ORIF, one/two plate(s) - endoscopically assisted
1. Principles
General considerations for endoscopically assisted fixation
When considering an endoscopically assisted transoral approach to a condylar process fracture, the two main advantages are:
- Avoidance of injury to the facial nerve
- Avoidance of external incison scar
The disadvantages are the need for special equipment and the specialized training and experience required for this surgical technique.
Medial vs lateral displacement
It is advantageous if the condylar fragment is already displaced laterally (lateral override). Most fractures will have a lateral override of the condylar fragment with displacement of the condylar head medially due to the pull of the lateral pyterygoid muscle.
Anesthesia
Muscle relaxation is essential during fracture reduction. If using a cheek trochar, it is best to place the trochar before starting relaxation to appreciate if there is any VII nerve stimulation during placement.
Special considerations
Additional considerations and reading material:
- Multiple fractures
- Complications
- Biomechanics of the mandible
- Locking plate principles
- Screw insertion into locking plates
- Transbuccal system
- Angulated screwdriver
- Emergency screws/system
Click on any subject for further detail.
2. Choice of implant
Plating considerations
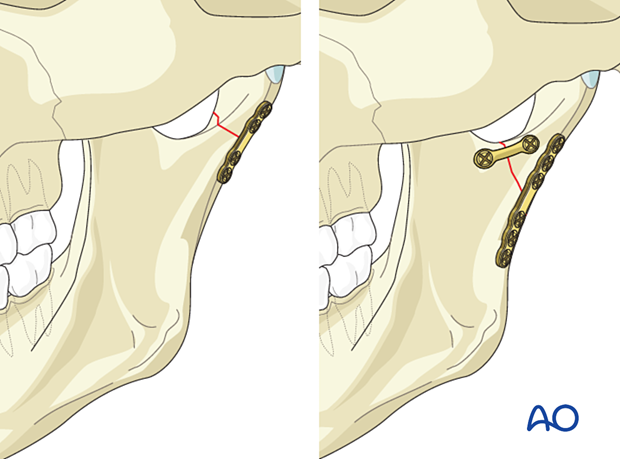
If possible, two plates should ideally be used in all condylar fractures. In some high condylar fractures only one plate can be placed due to bony limitations.
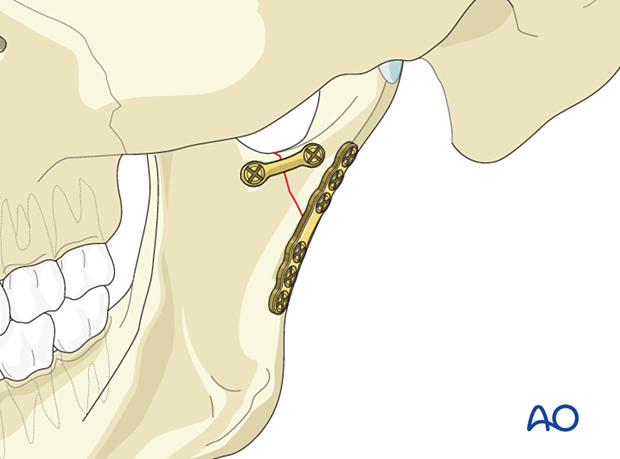
When two plates are used, the posterior plate is placed on the lateral surface parallel to the posterior rim. The anterior plate is placed below the sigmoid notch.
Either plate can be inserted first according to the surgeon's preference. In this procedure, the posterior plate will be inserted first.
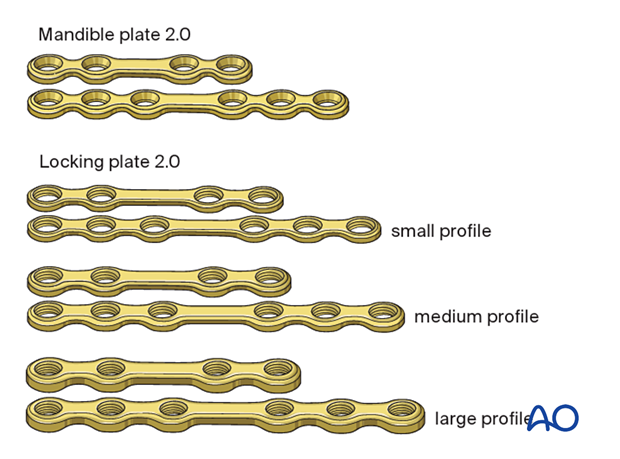
Choice of implants for one plate fixation/posterior plate
Several options of plates can be used. In general, any miniplate designed for the mandible is adequate.
Examples are shown to the left.
The posterior plate, whether it is used alone or in combination with an anterior plate, should be thicker and/or wider than a standard 1 mm thick miniplate. It should be used in combination with bicortical screws.
A minimum of two screws on either side of the fracture must be inserted. Plates with or without a center space can be used.
Low subcondylar fractures will usually accommodate a six-hole plate, allowing for the placement three screws on each side of the fracture line.
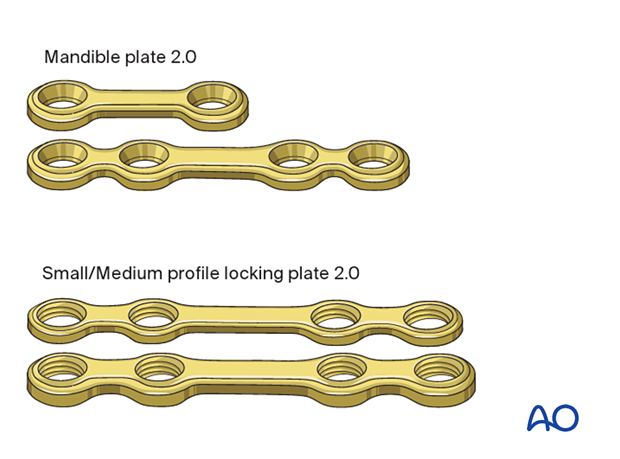
Choice of implants for the second plate
Several options of plates can be used. In general, any miniplate designed for the mandible is adequate.
Examples are shown to the left.
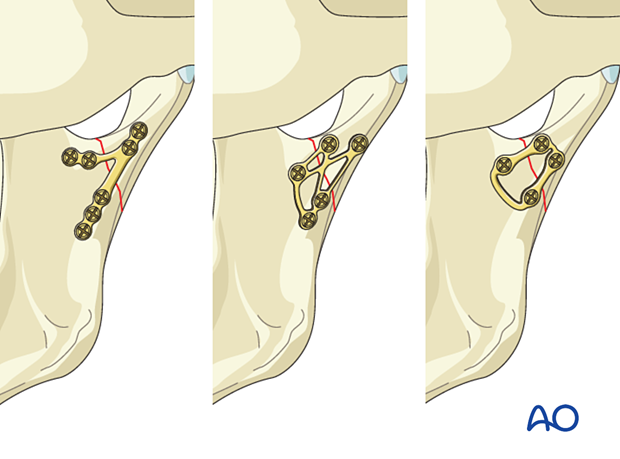
Specialized condylar plates
Specific plates have been designed to use for condylar fractures. Examples are shown to the left.
The order of screw insertion is similar to that of the first plate. The plate is first attached to the condylar fragment and then used to reduce the fracture before it is fixed to the ramus.
3. Patient preparation
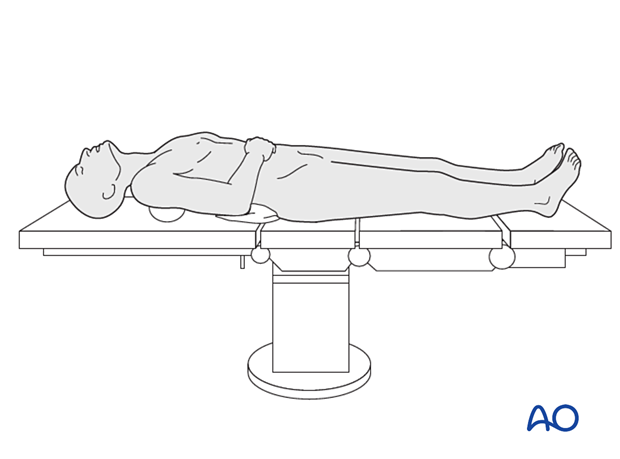
This procedure is typically performed with the patient placed in a supine position.
4. Approach
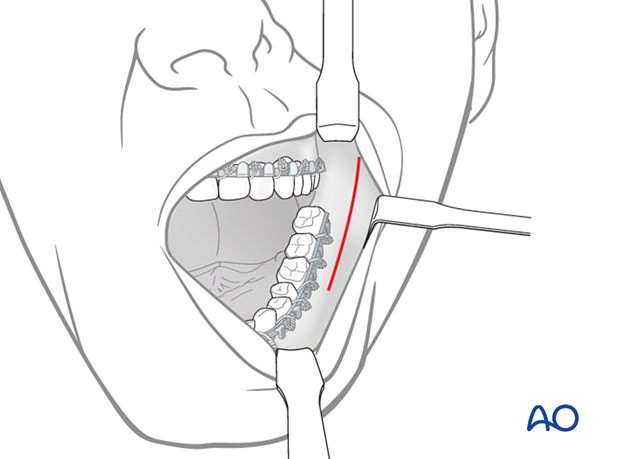
For this procedure, the transoral approach to the ramus is typically used.
Establishment of the optical cavity
A periosteal elevator is used to elevate the soft tissues in a subperiosteal plane. Expose the ascending ramus, sigmoid notch, posterior border, and enough condylar segment to accommodate the plate.
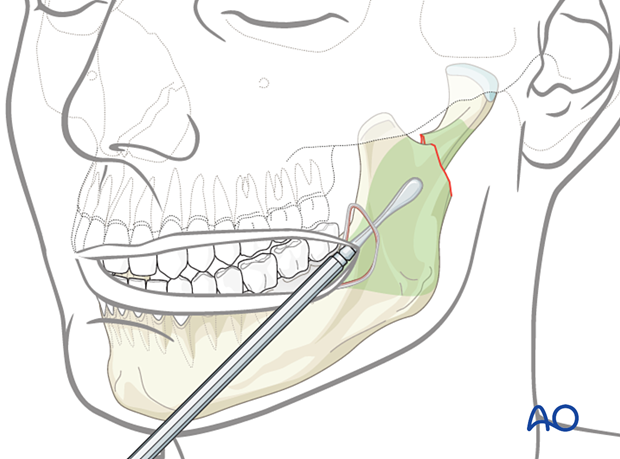
Pearl: As you elevate towards the condylar fragment, if the condyle has a lateral override, you may find that your elevator is going under the fragment as you dissect posteriorly. You may need to explore laterally to reestablish a dissection plane on the condylar segment's lateral surface to finish the elevation.
Maintenance of optical cavity
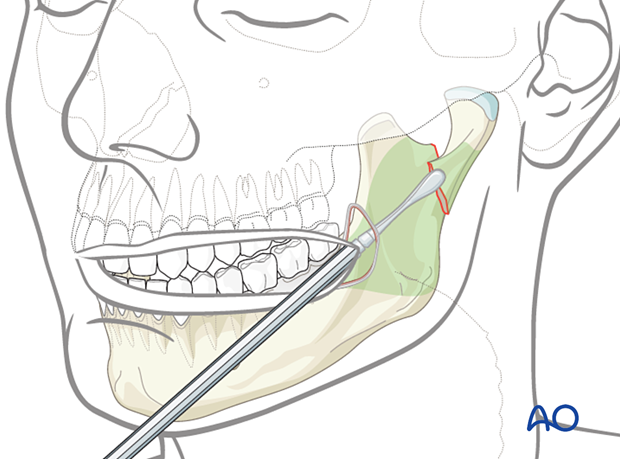
Combination retractor endoscopeThe optical cavity may be maintained in several different ways. The combination retractor endoscope holder may be used by placing the hook of the retractor blade around the posterior border of the ascending ramus.

Some surgeons find the combination retractor too bulky in some settings and prefer to use a large Langenbeck type (right angle ) retractor with the handle facing superior to help expose the condylar segment.
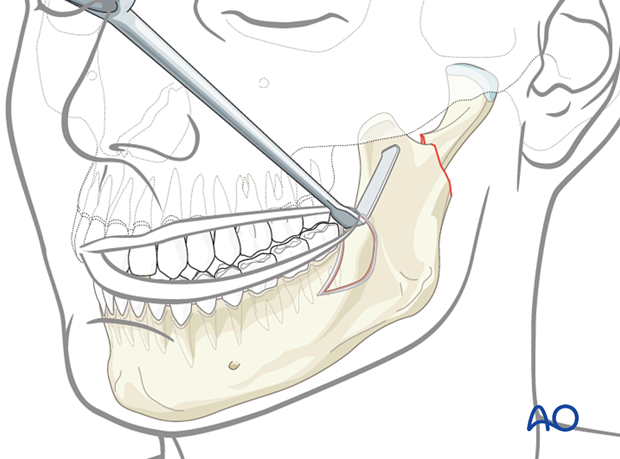
Some surgeons use a sturdy endoscope sheath with a spatula-shaped tip and a central opening to maintain the cavity.
The advantage of this type of sheath is that the cheek trochar and screwdriver can be passed through the opening in the retractor.
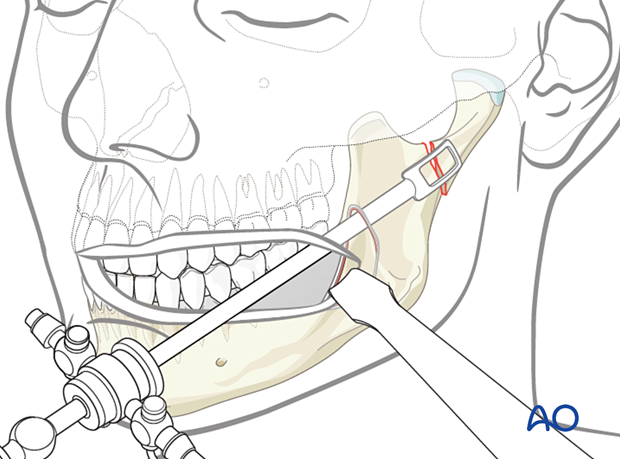
A trochar with a screw-on button may also be used to maintain the optical cavity.
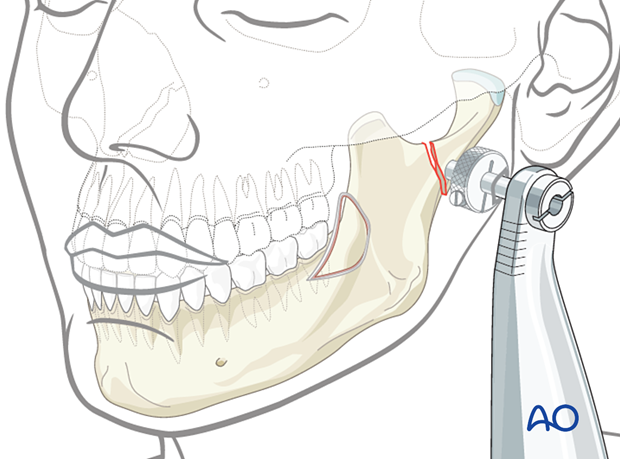
5. Preliminary reduction
Conversion of a medial override to a lateral override
If the condylar fragment has a medial override, convert it to a lateral override configuration.
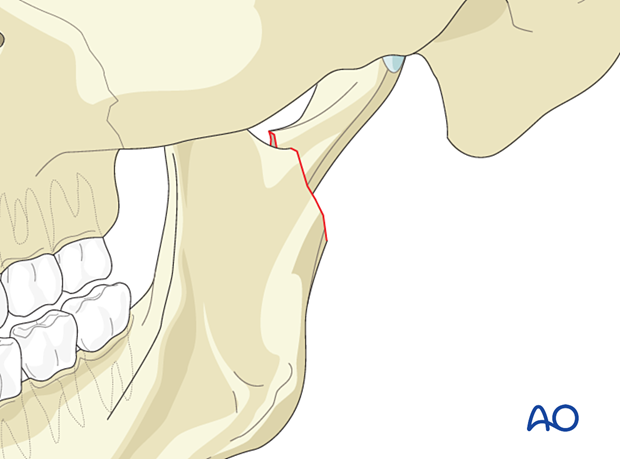
Place the corkscrew-shaped elevator through the sigmoid notch and medial to the condylar fragment.
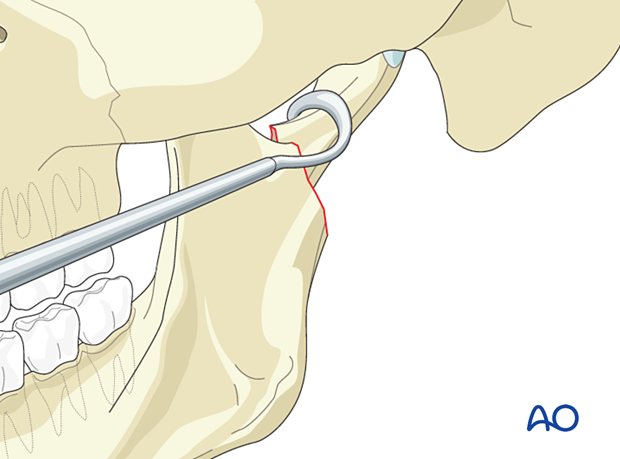
Forcefully and fully distract the fracture by manually applying downward pressure on the posterior mandibular dentition while simultaneously applying lateral pressure on the condylar fragment with the elevator.
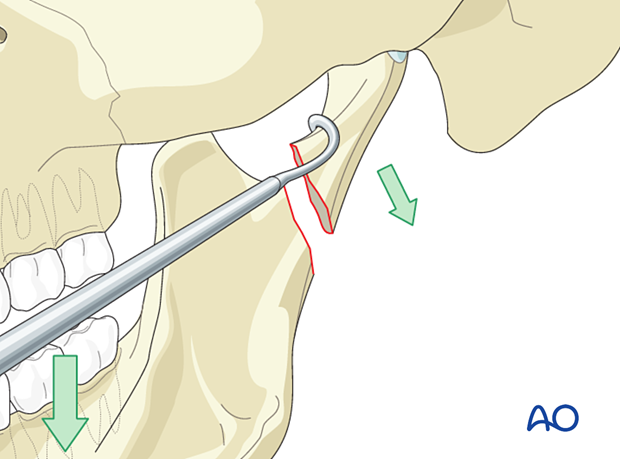
The medially displaced condylar fragment will now be resting on the ascending ramus's lateral surface, effectively converting it into a simpler lateral displaced fracture.
This maneuver is challenging when using a transoral approach and could be a reason for selecting elective external access or converting a transoral approach to a transcutaneous approach.
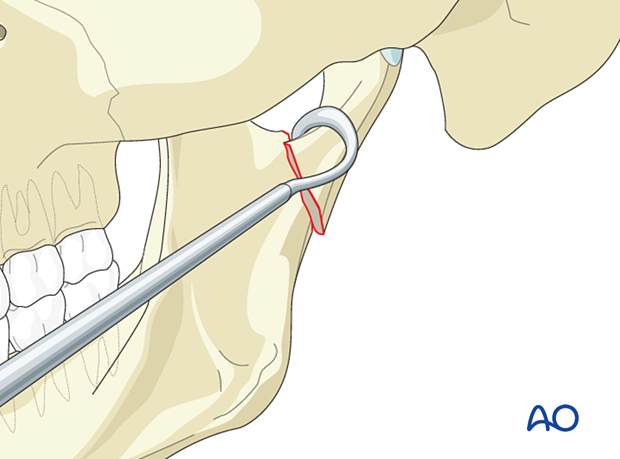
Initial reduction
It is advantageous if the condylar fragment is already displaced laterally (lateral override). Most fractures will have a lateral override of the condylar fragment with medial displacement of the condylar head due to the lateral pterygoid muscle pull.
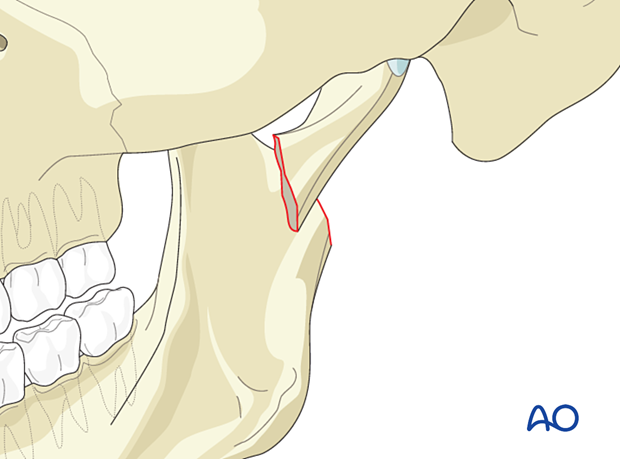
Insert the transbuccal system approximately over the palpated fracture line at the posterior border of the mandible. Use the drill guide with a cut-out at it's tip to allow for direct endoscopic control of drilling and screw insertion.
See here for a detailed description of the use of the transbuccal system.
Next, the ring retractor is screwed onto the cheek-trochar to facilitate maintenance of the optical cavity.
When using a standard cheek trochar without the screw-on ring retractor, do not place the cheek retractor on the trochar because the bulk of the retractor will be in the way of the operative field of view.
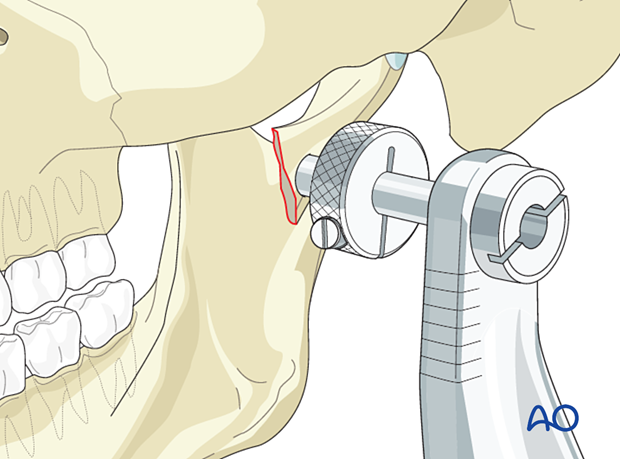
A left lateral override fracture is seen. The cheek trochar is being used to reduce the fracture as the posterior dentition is manually distracted downward.
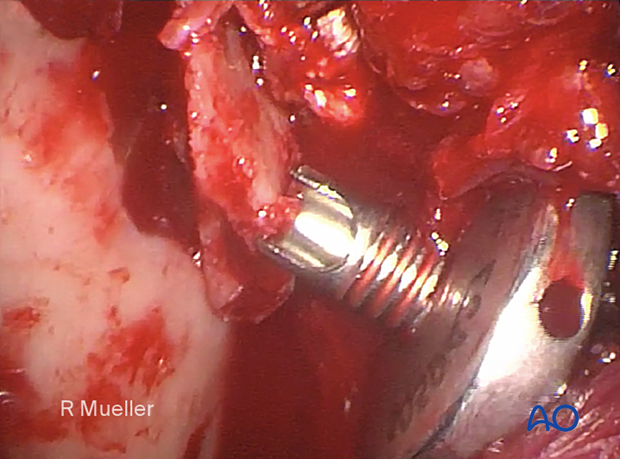
Reduction of the fracture can be achieved with the patient in loose elastics, MMF, or no MMF. Rigid MMF will prevent downward distraction of the ascending ramus and make reduction of the condylar fracture difficult.
Forcefully and fully distract the fracture by manually applying downward pressure on the posterior mandibular dentition while simultaneously manipulating the condylar fragment with the cheek trochar if necessary.
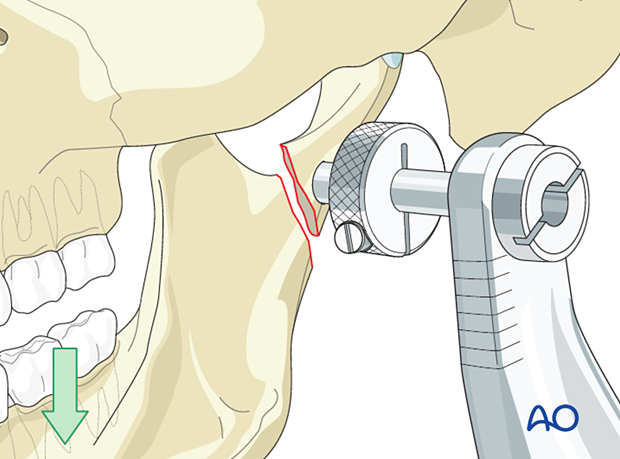
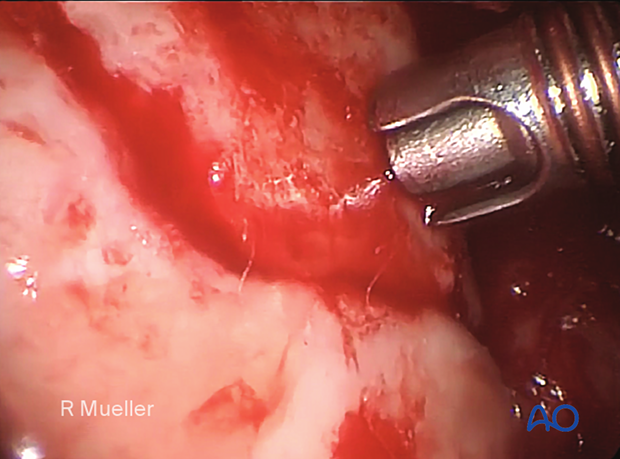
A left subcondylar fracture has been reduced.
Fine-tuning of the reduction will be performed using the plate after it is attached to the condylar fragment.
6. Final reduction and fixation
Insertion of first condylar screw
The first screw hole is located in the condylar fragment nearest the fracture line.
Place the retractor over the fracture zone.
Insert the drill guide of the transbuccal system and pass it through the hole in the retractor or endoscope sheath if needed.
Next, insert the 1.5 mm diameter drill without drill stop into the drill guide.
There is no need to drill the first hole with the plate in place.
Drill carefully to avoid damage to the internal maxillary artery.
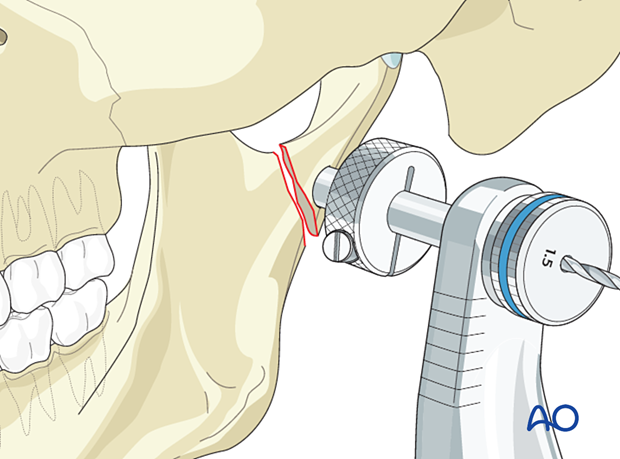
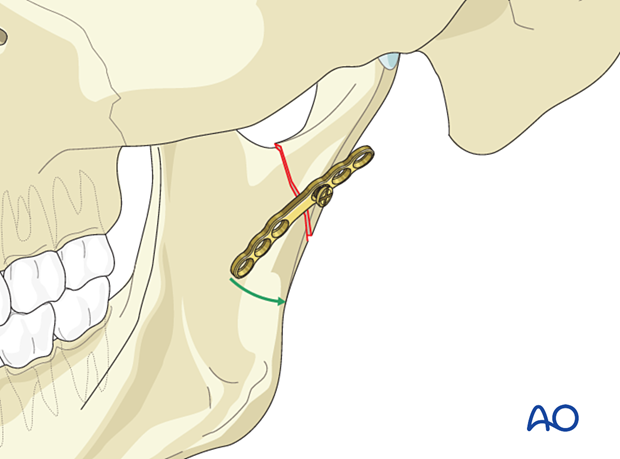
Insert the first screw to secure the plate to the condylar fragment without tightening it fully.
Rotate the plate to align it with the posterior border of the condylar fragment.
Then tighten the first screw.
Insertion of remaining condylar screws
Fill the remining screw holes in the condylar segment.
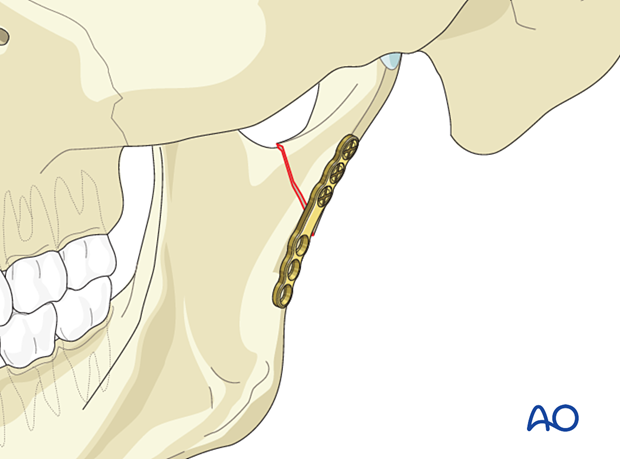
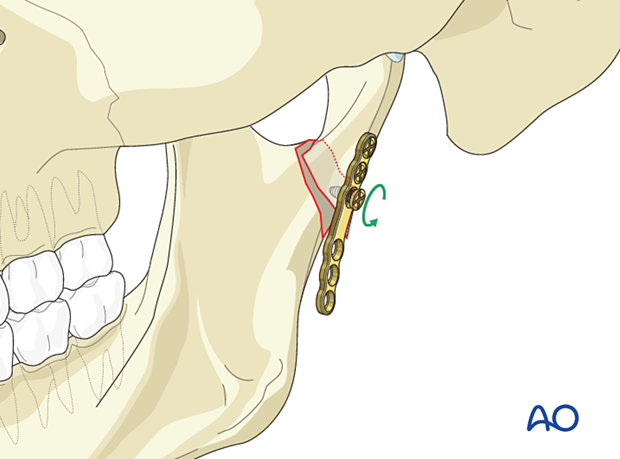
If the fracture is highly oblique the first screw may protrude into the fracture line and impede reduction. At this point, if needed, you may temporarily remove the screw closest to the fracture.
7. Final reduction
Apply downward pressure on the posterior dentition to distract the fracture while simultaneously using the end of the plate as a handle to manipulate the condylar fragment into reduction.
This can often be accomplished with the cheek trochar or nerve hook.
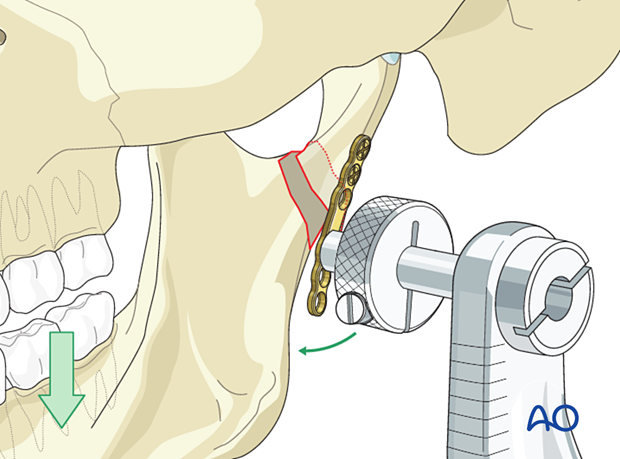
The other methods to distract the ramus inferiorly is by using a towel clip or bone clamp applied through the skin at the gonial angle, or applying a screw at the gonial angle and passing a wire into the optical cavity from inferiorly, attaching it to the screw.
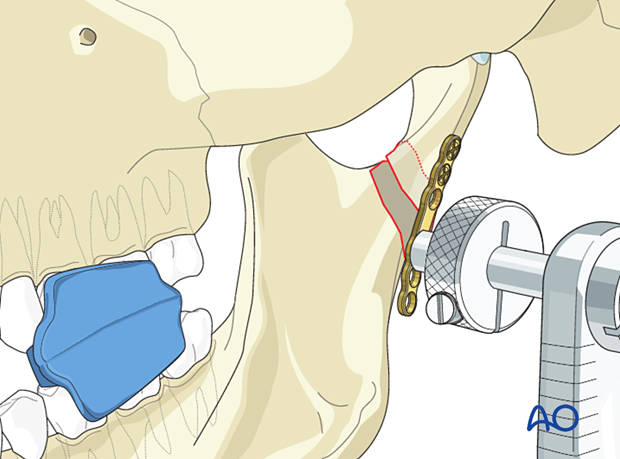
Hold the plate steady with the cheek trochar.
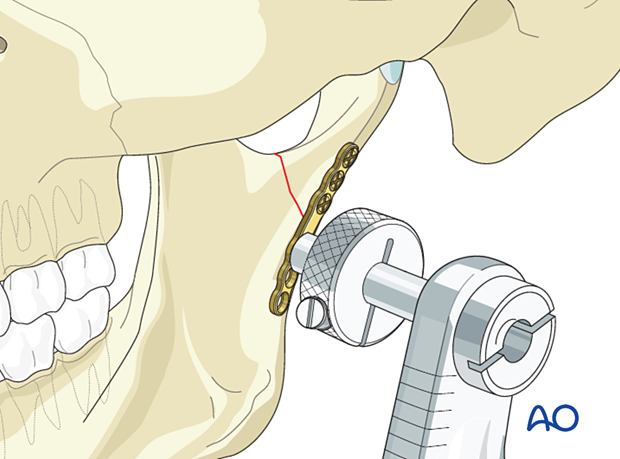
The plate has been affixed to the condylar fragment and is used as a handle to complete the reduction.
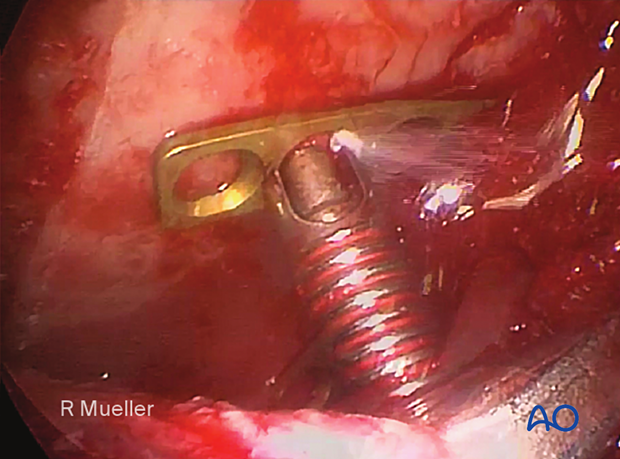
Insertion of the first screw in the mandibular segment
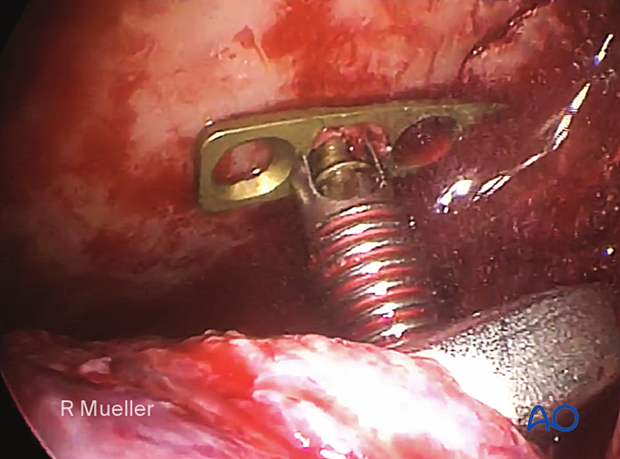
Secure the mandibular portion of the plate to the mandibular fragment with one screw.
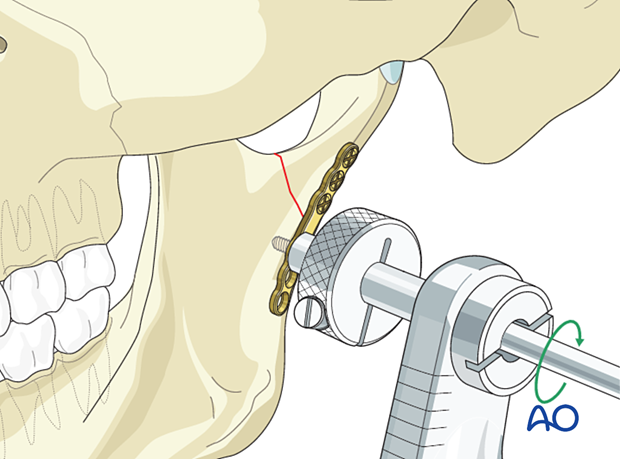
This clinical image shows the insertion of the first screw in the mandibular segment.
Verification of reduction
The reduction of subcondylar fractures is not ensured by MMF but by visual inspection and palpation using the trochar.
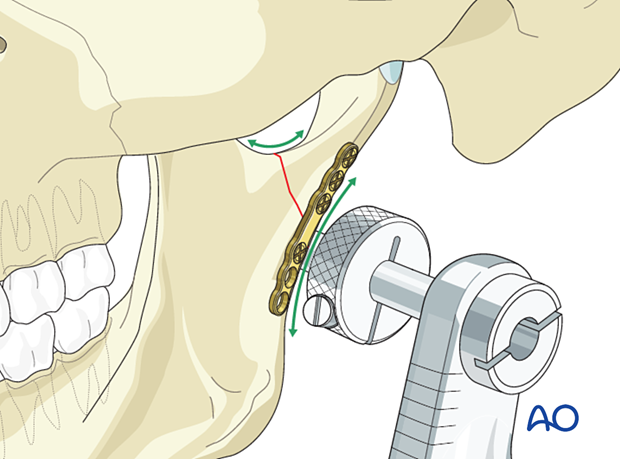
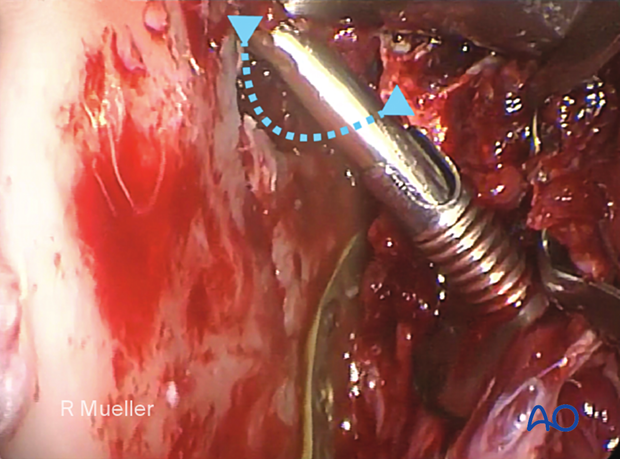
Visually inspect the reduction and sweep the trochar along the posterior border of the ascending ramus as indicated by the blue line. It should be a smooth sweep without any steps.
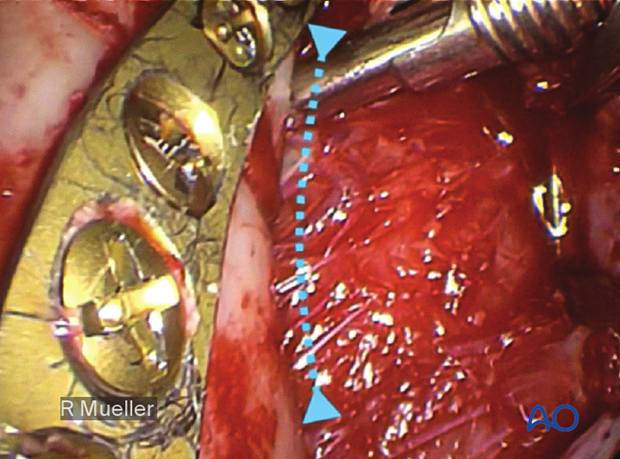
The same verification of reduction is performed along the sigmoid notch.
If significant steps are observed, remove the first screw and redo the reduction.
Complete fixation
Complete the plate fixation by inserting the remaining screws in the mandibular segment.
8. Application of a second plate (if possible)
After the first plate has been secured and the reduction confirmed, a second plate should be placed if possible for additional mechanical strength.
Placement of the second plate is generally much faster because the reduction has already been secured.
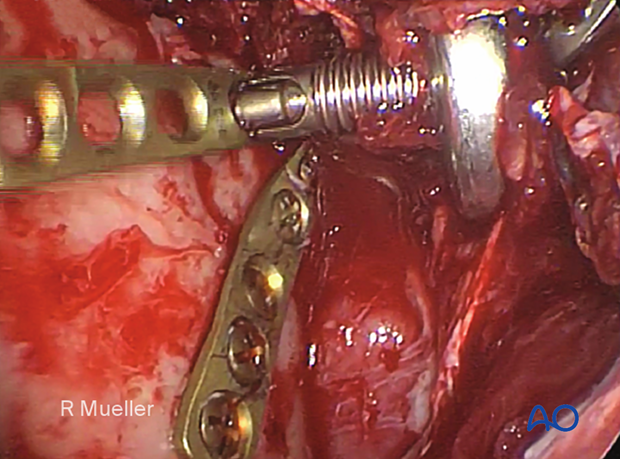
This image shows an endoscopic view of a second anterior plate being positioned using the cheek trochar and drill guide.
9. Alternative
Sometimes it is advantageous to place the anterior plate first.
The steps are the same as when placing a plate at the posterior border.
10. Aftercare following ORIF of condylar process and head fractures
Arch bars and MMF screws
If MMF screws are used intraoperatively, they are usually removed at the conclusion of surgery. Arch bars may be maintained postoperatively for functional therapy. Removal of the arch bars, MMF screws etc should be delayed until the patient's occlusion has normalized without the use of elastics.
X-ray
Postoperative x-rays are taken within the first days after surgery.
Malocclusion
It is imperative that the occlusal relationship and mandibular function be assessed early and on a regular basis. The patient is evaluated at 1 week to verify the occlusion and to assure adequate performance of functional rehabilitation exercises.
If a malocclusion is detected, the surgeon must ascertain its etiology (using the appropriate imaging technique). If the malocclusion is secondary to surgical edema or muscle splinting, training elastics will be beneficial. The lightest elastics possible are used for guidance, because active motion of the mandible is desirable. Patients should be shown how to place and remove the elastics using a hand mirror.
If the malocclusion is secondary to a bony problem due to inadequate reduction or hardware failure or displacement, elastic training will be of no benefit. The patient must return to the operating room for revision surgery.
Follow up
The frequency of follow-up will largely be based on the findings of the 1 week appointment. Typically, if the patient is doing well at 1 week, they will not be seen for 2 more weeks. The necessity and frequency of future appointments will be based upon the findings from this appointment and at the discretion of the treating surgeon..
Basic postoperative instructions
DietThe patient can eat whatever is comfortable. If solid foods cause pain, the patient will self-limit their diet to softer foods. There is no contraindication to taking solid foods from the standpoint of their fracture. Nevertheless, most surgeons recommend soft diet for a variable period of time.
Patients with extraoral approaches are not compromised in their routine oral hygiene measures and should continue with their daily schedule.
Patients with intraoral wounds must be instructed in appropriate oral hygiene procedures. The presence of the arch-bars and any elastics makes this a more difficult procedure than normal. A soft toothbrush (dipping in warm water makes it softer) should be used to clean the surfaces of the teeth and arch-bars. Any elastics are removed for oral hygiene procedures. Chlorhexidine oral rinses should be prescribed and used at least three times each day to help sanitize the mouth. For larger debris, a 1:1 mixture of hydrogen peroxide (0.25%)/chlorhexidine (0.12%) can be used. The bubbling action of the hydrogen peroxide helps remove debris. A Waterpik® is a very useful tool to help remove debris from the wires. If a Waterpik® is used, care should be taken not to direct the jet stream directly over intraoral incisions as this may lead to wound dehiscence.
Patients are instructed in physical therapy maneuvers to restore mandibular excursions. This includes maximum jaw opening, right and left lateral excursions, and protrusive excursions of the mandible. They should perform these exercises several times a day.


