ORIF 3-point fixation (with orbital reconstruction)
1. Principles
Each fracture case should be individualized for treatment planning and execution because fixation requirements differ from one fracture to another. There are some general principles for fixation of zygomatic complex fractures when plate and screw fixation is used:
- Self-threading screws are utilized.
- Plate selection: titanium plates and screws have reduced scatter in postoperative CT scans. Selecting an L-, T-, or Y- shaped plate for zygomaticomaxillary buttress region fixation allows greater flexibility in positioning screws to avoid tooth roots in the alveolar process.
- Use a thin plate at, or preferably below, the infraorbital rim to minimize visibility and palpability. The skin and muscles overlying the infraorbital rim are thin and may atrophy with open reduction procedures.
- In cases that have concomitant fractures of other midfacial bones, it may be necessary to use additional points of fixation. Maxillomandibular fixation (MMF), should be completed before reduction and fixation are begun.
- Areas of bone loss: span the gap after initial reduction with a bone plate stabilized at either end of the defect. Alternatively, the comminuted fragments can be provisionally reassembled, stabilized with inter-fragment wires, their position improved, and the entire structure then stabilized with rigid fixation. In the case of extensive comminution with or without bone loss, judgment is required to fix the bone in the proper position without spanning the gap, or the pieces can be reassembled provisionally to confirm proper zygoma positioning. Generally, gaps over 5 mm can be bone grafted if native bone is unavailable. Grafts or comminuted fragments should be stabilized to the bone plate with individual fixation screws, the number of which is left to the operator’s judgment. This technique allows optimal osseous healing throughout the defect.
A correct anatomical reduction is required to reproduce the original structure of the zygomaticomaxillary complex and the proper alignment of the orbital walls. Fragments of the greater wing of the sphenoid and the orbital process of the zygoma should be appropriately aligned in a straight line to achieve an adequate contour in reduction of the lateral orbital wall.
The aim is to restore the orbital volume, the facial width, AP projection, and height of the midface. Proper reduction of the zygoma addresses the issues of AP projection and width of the midface.
Forced duction tests should be performed before and after reducing the zygoma to confirm that the extra-ocular muscle system has full and free excursion without entrapment.
Pre- and postoperative ophthalmologic examinations should be considered in all patients who have sustained periorbital trauma.
The aim is to restore the facial width, AP projection, height of the midface, and orbital volume. Proper reduction of the zygoma addresses the issues of AP projection, width, and height of the midface.
The periorbital contents may have been affected by the reduction of the zygomatic-complex fracture. A forced duction test should be performed before and after reducing the zygoma to ensure that the patient does not have entrapment of the soft tissues. Pre- and postoperative ophthalmologic exams should be considered in all patients who have sustained periorbital trauma.
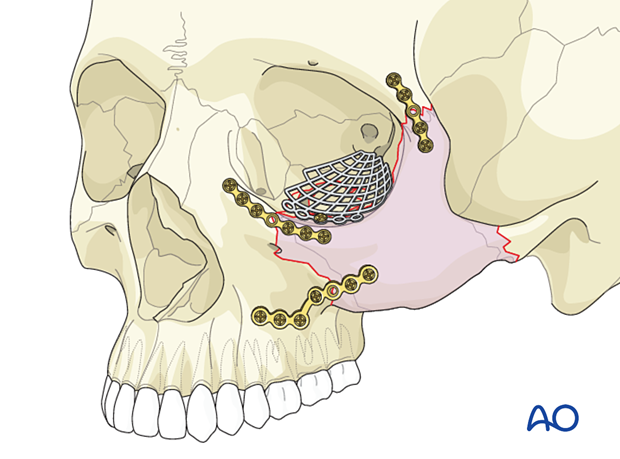
Plate fixation
As a general principle, at least two screws should be placed on either side of the fracture. This often requires a plate with at least one extra screw hole to span the fracture. Ideally, the first screw should be placed on the mobile fragment side, and the plate used as a handle to close the gap and reduce the fracture.
The first two screws should be placed in the plate holes closest to the fracture, one on each side. Make sure that the fracture is adequately spanned so that each screw is placed in solid bone.
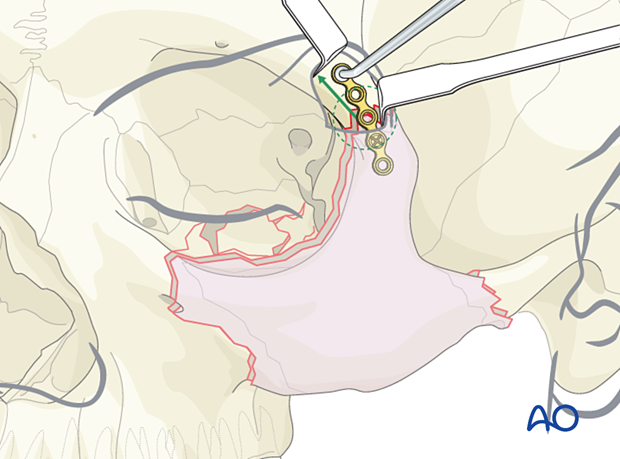
Order of reduction and fixation
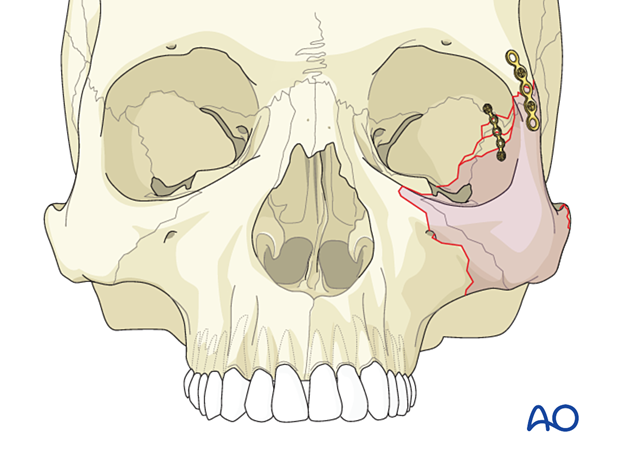
In a zygomatic fracture that does not require orbital floor reconstruction, after reducing the zygoma and inspecting the orbital floor, the first fixation plate is placed at the zygomaticofrontal suture as described above.
It is debated whether the second site for fixation should be the orbital rim or the zygomaticomaxillary buttress.
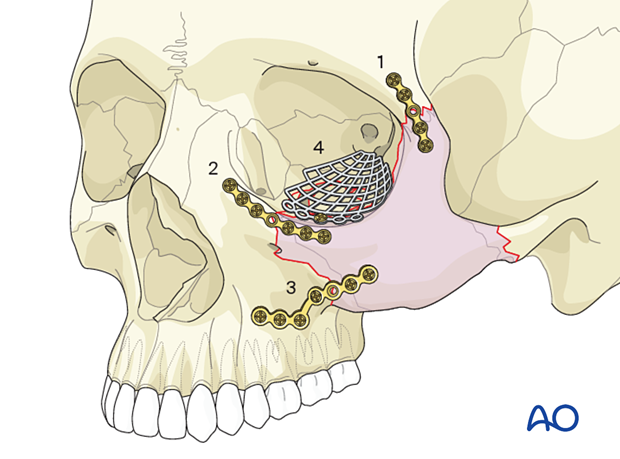
It is easier to visualize whether a proper reduction of the lateral orbital wall is achieved by placing the plate on the infraorbital rim as the second plate after the zygomaticofrontal suture. A thinner plate is recommended for the infraorbital rim. A thicker plate (commonly an L-shaped plate) is recommended for the zygomaticomaxillary buttress.
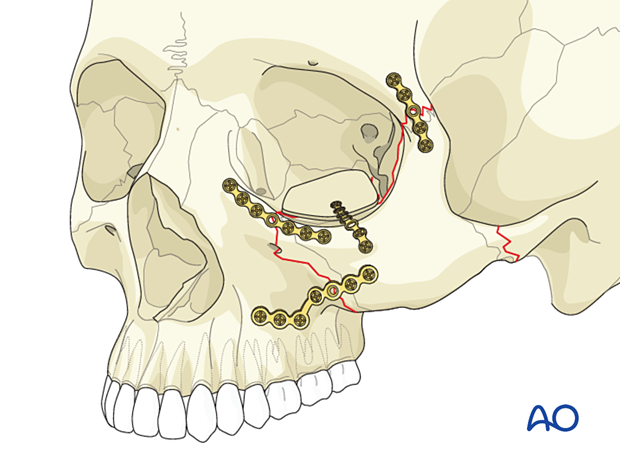
The 3-point fixation technique is commonly applied to comminuted fractures which are medially displaced and therefore do not require direct open reduction of the zygomatic arch through a coronal approach.
Perfect reduction of the zygoma in medially and inferiorly displaced fractures is usually possible through the three anterior approaches, resulting in satisfactory alignment of the zygomatic arch. Occasionally, placement of an elevator underneath the zygomatic arch from the intra-oral zygomaticomaxillary exposure is helpful in further reducing the arch, which often snaps into position. Click here for a description of the 4-point fixation.
Surgeons argue that potential cosmetic sequelae caused by a coronal approach to the zygomatic arch are worse than the deformity of a minimally displaced arch. The sequelae of a coronal incision include alopecia from the coronal scar, injury to the temporal branch of the facial nerve, and temporal hollowing from muscle and fat atrophy.
Involvement of lateral orbital wall
Isolated lateral orbital wall fractures are rare and only occur after isolated trauma to the lateral orbital rim. A lateral orbital wall fracture is a portion of every complete zygoma fracture (as shown).
Displacement of the lateral orbital wall (with or without combined zygomatic complex fracture) directly affects the intraorbital volume (ie, inwards displacement results in exophthalmos, whereas outward displacement results in enophthalmos). The increase in orbital volume may be camouflaged by posttraumatic swelling so that the sequelae mentioned above often become apparent only after swelling has decreased, which usually takes about two weeks.
For a detailed description of clinical and radiographic examination click here.
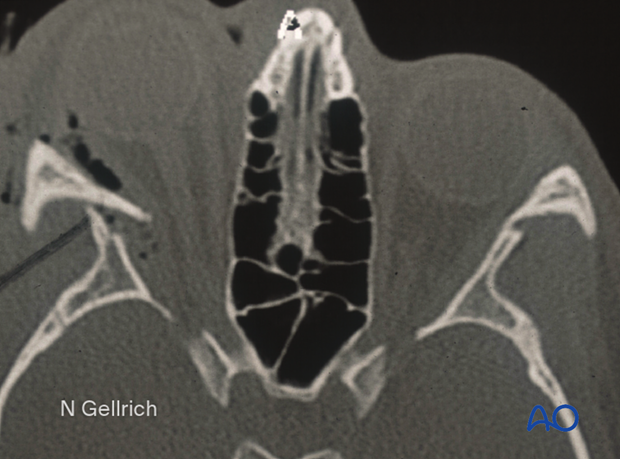
Clinical evaluation of fractures in the lateral orbital wall area may be more difficult due to the swollen overlying soft tissues. However, a CT scan can demonstrate fracture displacement at the lateral orbital wall area.
Severely inward displaced lateral orbital wall fractures might require emergency treatment if the intraorbital pressure is increased (due to displacement or intraorbital hematoma) or there are signs of compromised optic nerve function (see axial CT scan).
Some surgeons recommend placing a plate to reduce and fixate the lateral wall of the orbit between the greater wing of the sphenoid and the zygoma. This helps to achieve a proper reduction of this fracture. If there is comminution of the lateral wall of the orbit, the internal segments of the fracture should be reduced after alignment of the greater wing of the sphenoid beyond the comminuted fracture segments is confirmed. Placement of this plate is challenging because of the need for globe retraction.
This plate is best placed through the generous exposure provided by a coronal incision. It is difficult or impossible to place this plate through a short upper eyelid incision alone.
Teaching video
AO Teaching video on fixation of a zygomaticomaxillary fracture and an orbital floor fracture
2. Computer assisted surgery and patient specific implants
Computer assisted surgery and intra-operative imaging have greatly improved the management of craniomaxillofacial trauma. Whenever an intraoperative CT scanner is available, an intraoperative scan should be obtained for intraoperative evaluation of the reduction.
When using computer assisted surgery, reduction and fixation, if necessary, is performed according to standard procedures as described in the AO Surgery Reference. CAS should be considered an adjunct to surgical treatment.
Further details about virtual planning, intraoperative imaging, and intraoperative navigation are available here.
3. Approaches
Various approaches may be used for this procedure. They commonly include an intraoral maxillary vestibular approach, a lower-eyelid incision (transcutaneous or transconjunctival), an upper eyelid incision (upper blepharoplasty or brow incision), or a coronal incision with direct exposure of the zygomatic arch and lateral orbital region. Where possible, existing lacerations may also be used. Extension of existing lacerations is generally not preferred.
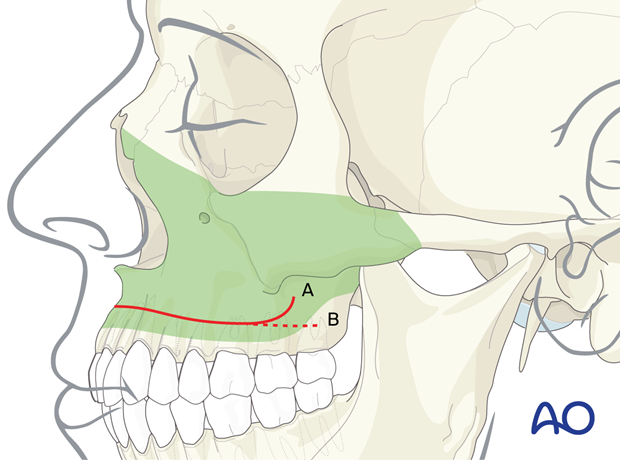
Intraoral maxillary vestibular approach
The intraoral maxillary vestibular approach facilitates the exposure of the medial and lateral inferior buttresses of the midface. It can also be used to expose the anterior and inferior portion of the inferior orbital rim. The maxillary vestibular approach is routinely used to reposition the depressed or comminuted zygoma.
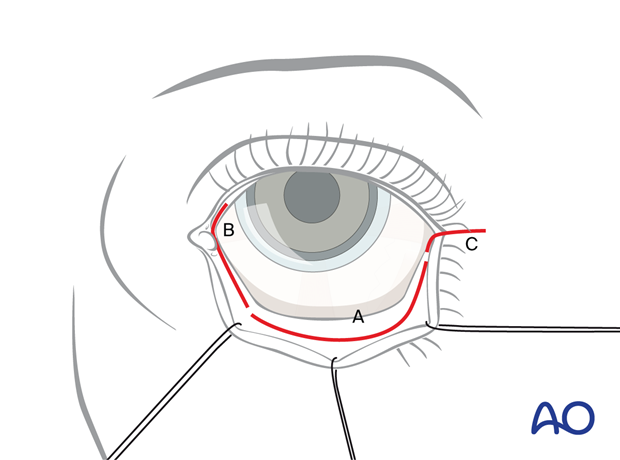
Lower-eyelid incision
Lower-eyelid incisions are ideal for exposing the orbital floor, the orbital rim, and the lateral orbital wall.
Coronal approach
A coronal incision is ideal for exposure of the zygomatic arch, lateral orbital rim (zygomaticofrontal suture), and lateral wall of the orbit (sphenozygomatic suture). It can also be used to harvest split calvarial bone graft.
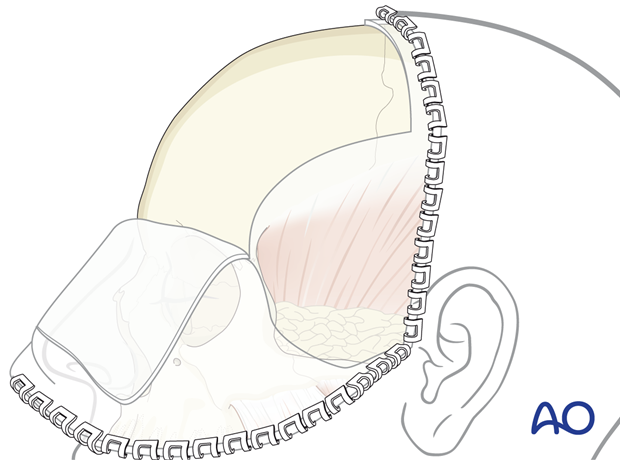
The lateral orbital wall can be approached via the lower eyelid incision (transconjunctival or transcutaneous) or the upper eyelid incision (blepharoplasty incision). It can also be approached via a coronal incision (if a coronal incision is otherwise required).
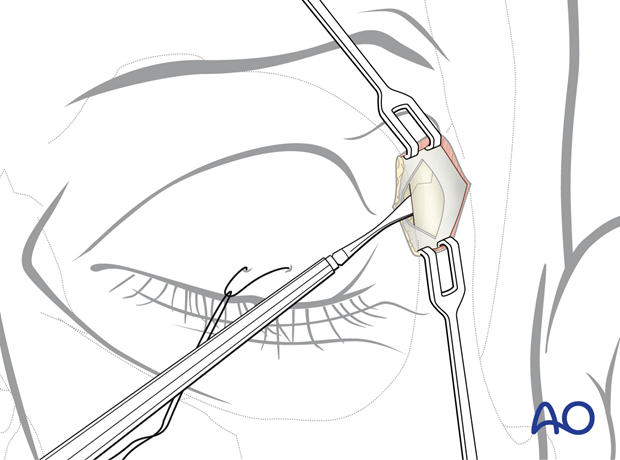
4. Zygoma reduction methods
Reduction maneuvers
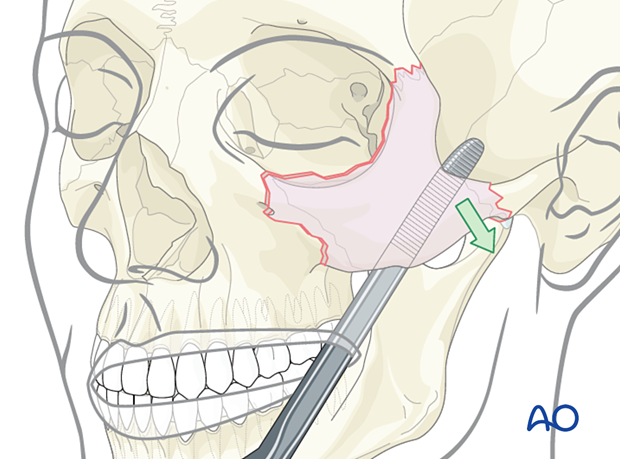
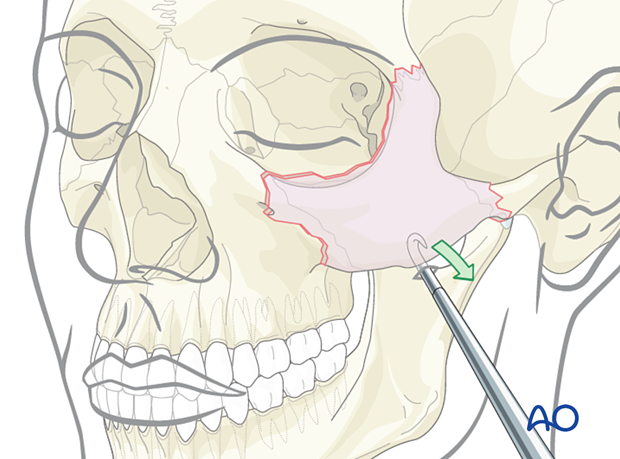
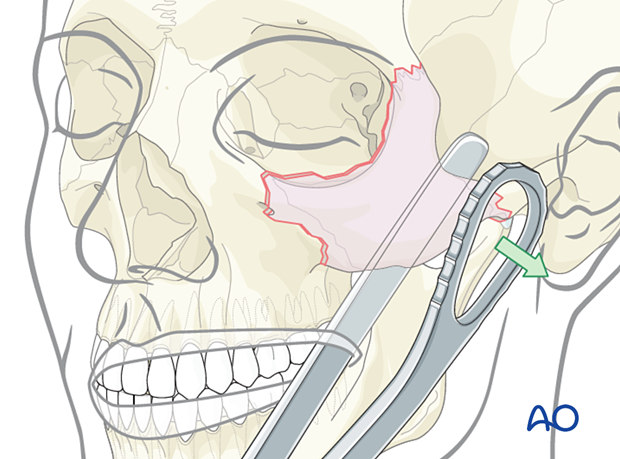
Mobilization and reduction of the zygomatic complex is achieved using a variety of instruments including elevators, hooks, screws, or Carroll-Girard type devices.
The reduction can be performed via a maxillary vestibular incision (Keen approach) using a Dingman elevator.
The reduction can also be performed using a hook.
A Rowe zygoma elevator can also be used.
Alternative: screw and traction
A screw can be inserted into the zygomatic bone through the skin. This allows fracture reduction using the screw and a holding instrument.
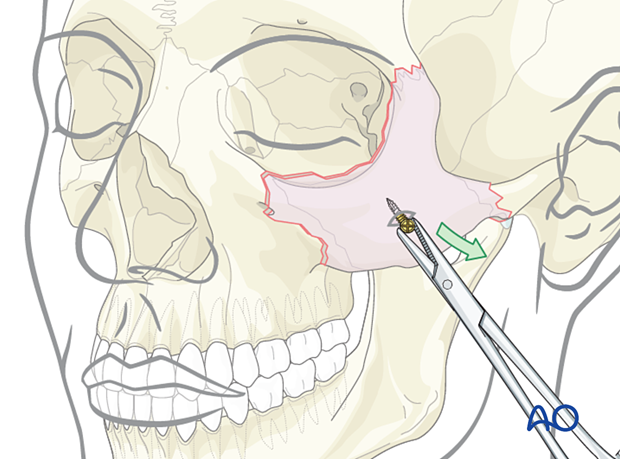
Threaded reduction tool
A threaded reduction tool (Carroll-Girard screw) can be inserted into the zygoma through the lower eyelid incision or directly through the skin and used for reduction.
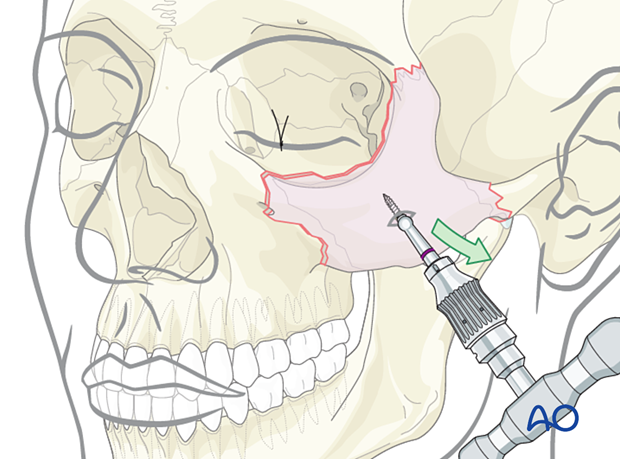
5. Placement and fixation of first plate
Placement of first plate
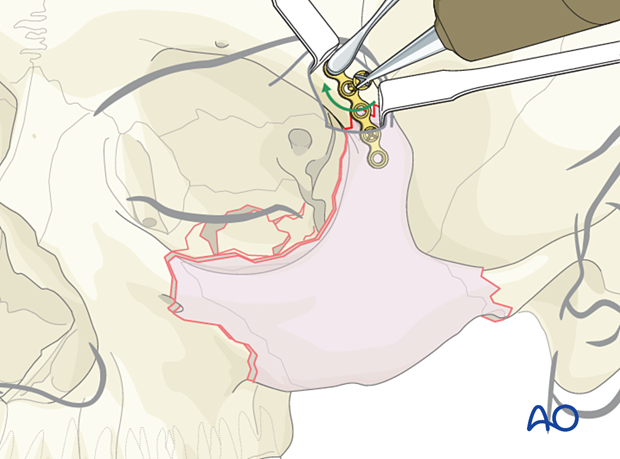
The first plate is placed across the zygomaticofrontal fracture area.
We recommend a minimum of a 5-hole plate with one hole spanning the fracture line. The plate should be properly adapted.
In this illustration, the first screw is placed in the unstable zygomatic fracture. An instrument is then used to pull the plate and zygomatic fragment in the cephalad direction to reduce the fracture further.

Fixation of first plate
Only one screw should be placed on each side of the fracture in the holes nearest to the fracture until the surgeon has verified the proper 3D reduction of the zygoma at the other two points. It is challenging to determine the 3D rotation of the zygoma by looking through the upper eyelid incision.
While drilling holes in the periorbital area, it may be desirable to use a drill bit with a stop (commonly a 6 mm stop).
The final two screws in the zygomaticofrontal plate should be placed at the end of the intervention.
6. Placement of additional plates
Placement of second plate
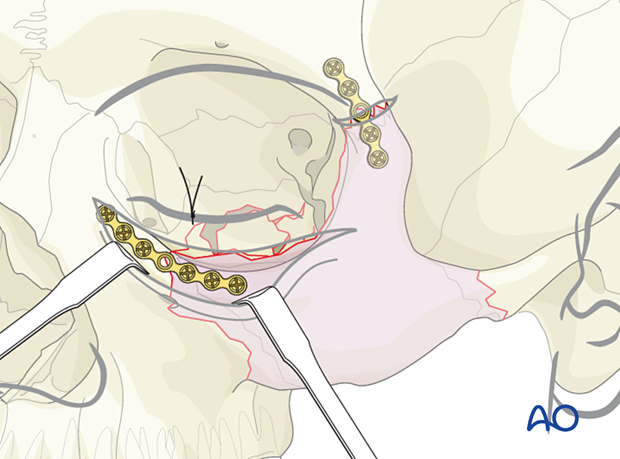
When looking through the lower eyelid incision, the orbital rim plate should be properly adapted. Use a minimum of a 5-hole plate with one hole spanning the fracture line. Reconfirm that the lateral orbital wall (greater wing of the sphenoid and zygoma) has been appropriately reduced before placing this plate. A minimum of two screws should be placed on each side of the fracture.
Placement of third plate
The fracture of the zygomaticomaxillary buttress is aligned, looking through the maxillary vestibular approach. A larger L-shaped plate is ideal for the fixation of this fracture. The L-plate is the most difficult to be adapted to a zygoma fracture.
The leg of the L-plate must be placed on the most lateral portion of the lateral maxillary buttress, where the bone is fairly thick.
The foot of the L-plate must be placed along the alveolar bone, avoiding the dental roots with the screws.
A common problem with this plate is the failure to properly adapt the L-plate, resulting in screw placement into the thin wall of the anterior maxillary sinus. It is not uncommon for the lateral maxillary buttress to be comminuted. In this instance, using a longer L-plate with multiple screw holes may be ideal.
We recommend that lower profile plates are used at the zygomaticofrontal area since the skin is very thin in this region and will get thinner over time.
A stronger plate is recommended for the zygomaticomaxillary buttress.
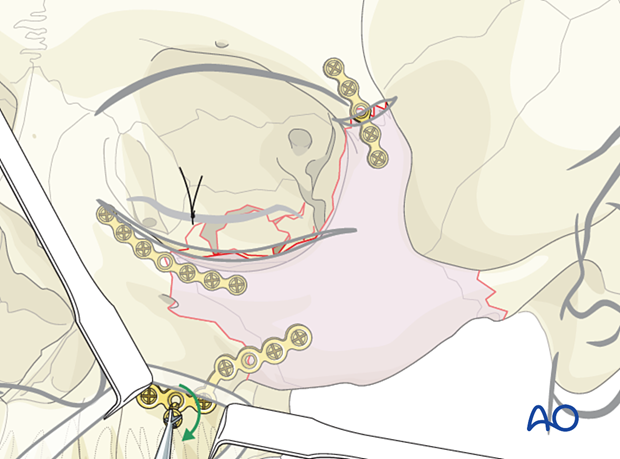
7. Reconstruction of the orbital floor defect
General considerations
If it was determined pre- or intraoperatively that orbital floor reconstruction is required, it is now performed.
The orbital floor defect is exposed by using orbital retractors and retractors on the lower eyelid.
More information about isolated orbital floor fractures is provided in the orbital reconstruction technique in the orbital floor fracture section of this module.
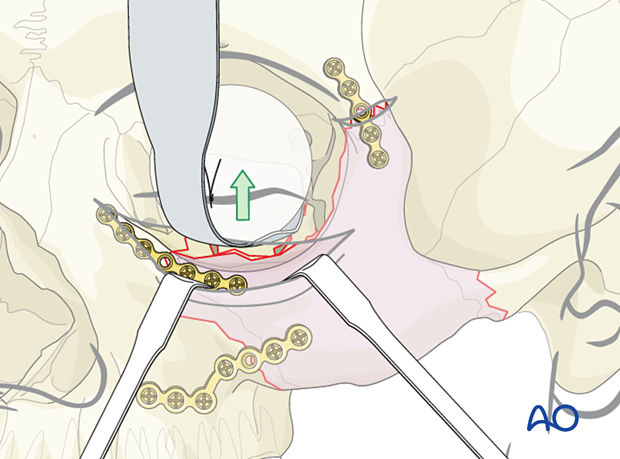
Helpful devices
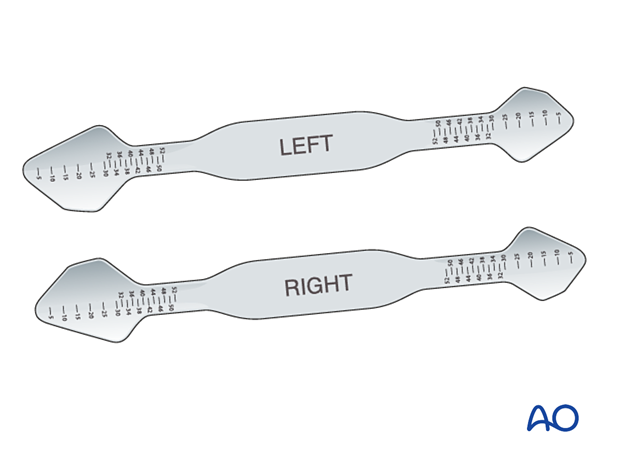
Many different devices have been used to facilitate retraction of the orbital contents, including malleable retractors, spoons, and special orbital retractors designed for the globe (as illustrated). The fundamental principle of retraction and visualization within the orbit is to gently position orbital soft tissue away from the desired field of vision. It is very important that retraction of the orbital contents be done gently without excessive pressure.
The second important principle is not to damage vital soft tissue structures such as the extra-ocular muscle (EOM) system. The use of cautery and dissection instruments must always favor atraumatic handling of the orbital soft tissue and extra-ocular muscle system. It is wise to perform a forced duction test of the globe (up/down and medial to lateral) before the dissection begins. Similarly, another forced duction test should be performed after placement of implant material to ensure that there is no soft tissue or muscular entrapment.
Cutting and bending
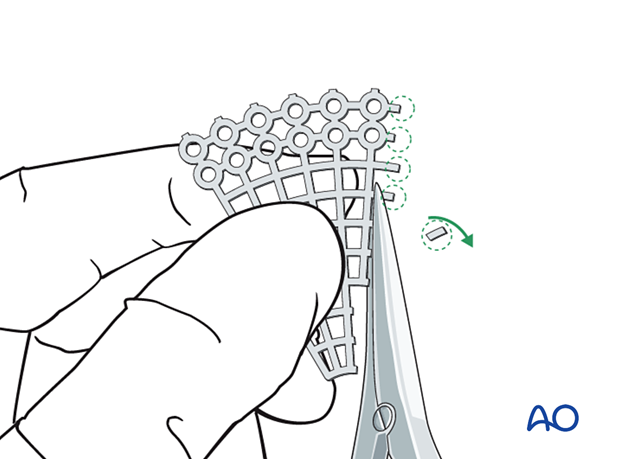
The mesh is cut.
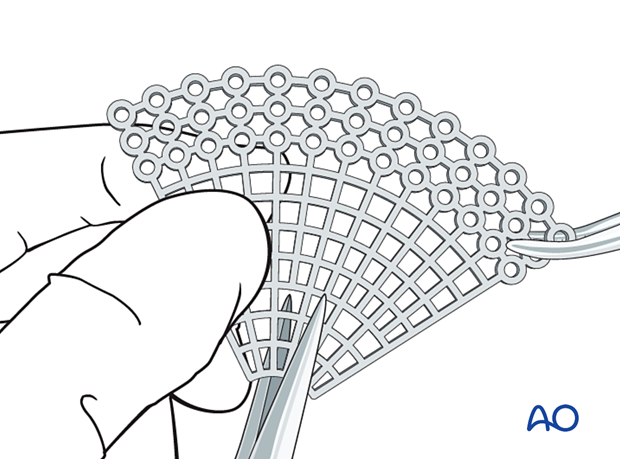
Then all sharp edges of the plate are trimmed off to protect the soft tissues (note the shape of the fan has only a minimum number of screw holes).
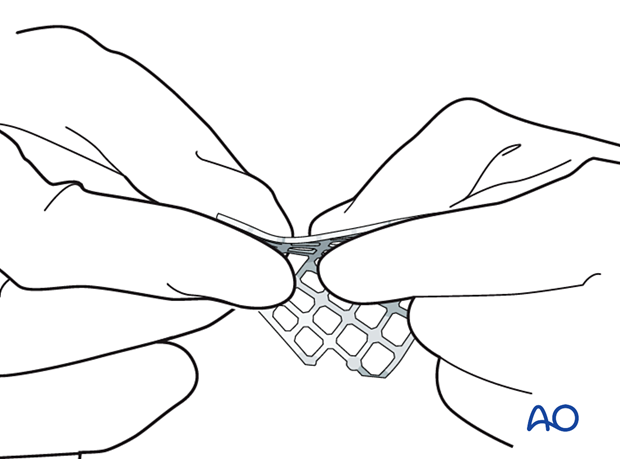
The mesh is then contoured to achieve the shape required to accommodate key anatomical structures (lacrimal fossa, infraorbital nerve, and optic nerve).
The posterior extent of the implant should reach the posterior ledge of the fracture but remain at least 8 mm anterior to the optic canal entrance.
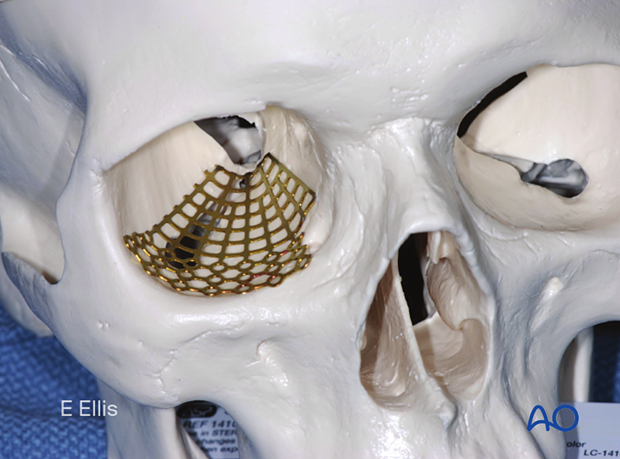
A sterile artificial skull facilitates proper anatomical contouring of the implant.
While contouring is minimized by prebending or using prebent mesh, subtle differences in orbital shape may require further adjustment of the implant.
Note the following:
- When using the fan-shaped plate, the outer circumference of the mesh is widest in the area of the infraorbital rim. The mesh should be trimmed so that the outer circumference is as small as possible but still provides enough width to cover the defect. It is easy to impale the extra-ocular muscle system with sharp edges of the implant. Placing a flexible piece of rubber or plastic between the retractor and the orbital soft tissue during implantation protects the orbital content from inadvertent injuries. This must be removed after fixation of the plate.
- The necessity for screw fixation varies with the type of material used and the nature of the fracture. Generally, fixation of an implant is preferred as migration is frequent. The fixation is usually performed in the thicker bone behind the orbital rim. Generally, a single screw will suffice.
Implants used
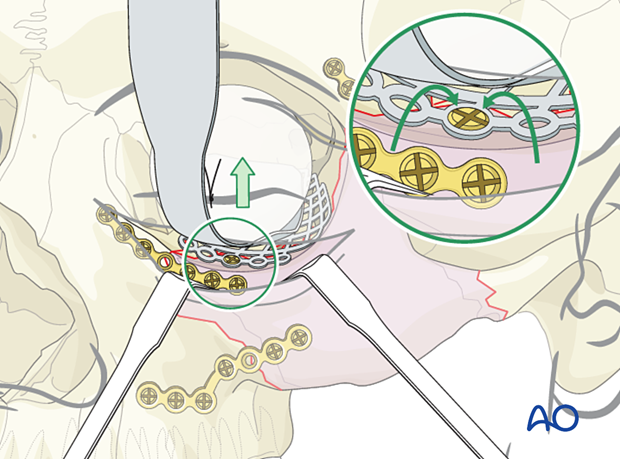
We recommend the use of a separate plate for fixation of the orbital rim. This plate is ideally placed just below the rim to minimize fibrosis in the lower lid, as plates placed in the superior aspect of the orbital rim induce fibrosis. (See the description of the second plate application).
The fan-shaped plate must span the entire orbital defect up to the posterior ledge. Plates placed over the edge of the posterior orbital defect may directly impinge the inferior rectus muscle posteriorly as it rests on the edge of the defect. A forced duction test should be performed before and after placing orbital floor reconstruction material.
Alternative implants
The most common material utilized is polyethylene. Generally, metallic plates are felt to induce more reaction and fibrosis than plastic materials. Autogenous bone grafts induce the least amount of fibrosis. They can be harvested from the calvarium, rib, or iliac crest.
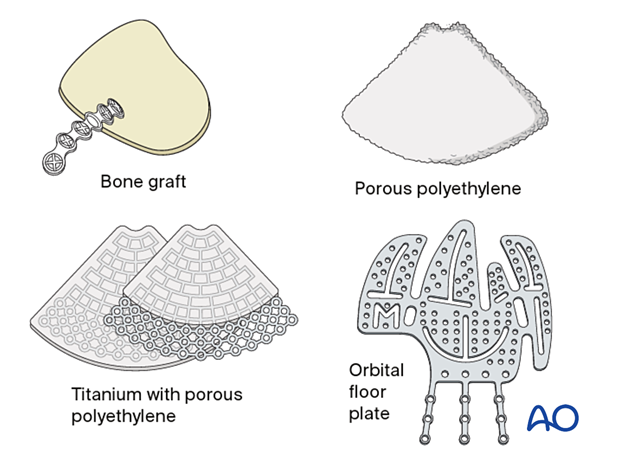
Alternatives to using a fan-shaped plate include bone graft, porous polyethylene, titanium with porous polyethylene, and orbital floor plates.
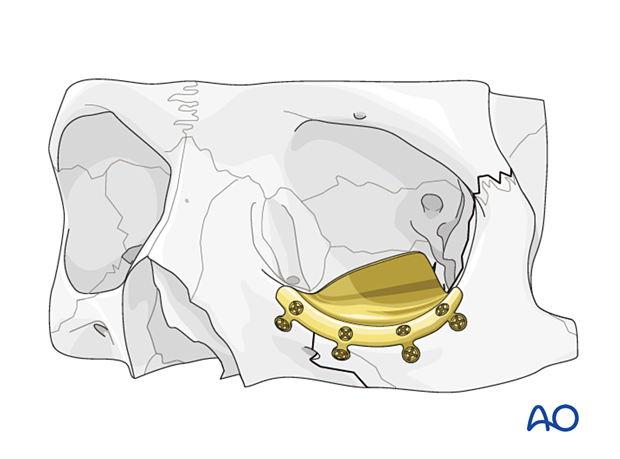
Another alternative to a fan-shaped plate is a patient-specific implant.
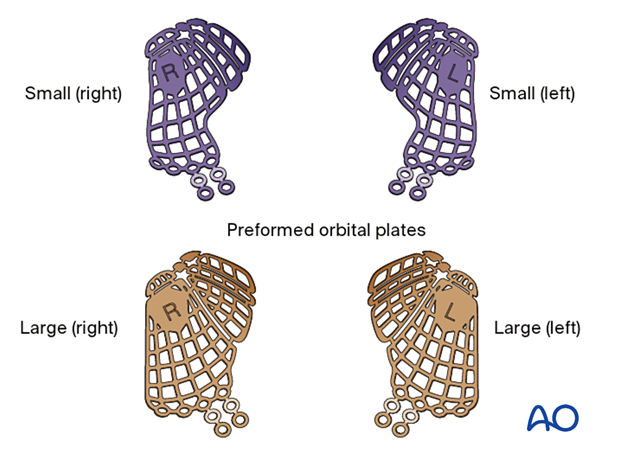
Preformed orbital plates provide another alternative to fan-shaped plates.
The advantage of bone graft is that the material is inexpensive. A disadvantage is that it takes additional time to harvest the bone graft, and there is an additional donor site and associated morbidity. Screw fixation is preferred.
Porous polyethylene has the advantage of being easy to work with and not having sharp barbs on the edges after being trimmed.
It has the disadvantage of being invisible on postoperative imaging.
Another disadvantage is that it can prevent the post-surgical drainage of orbital exudate into the maxillary sinus, leading to the possible development of a hematoma.
Screw fixation is preferred.
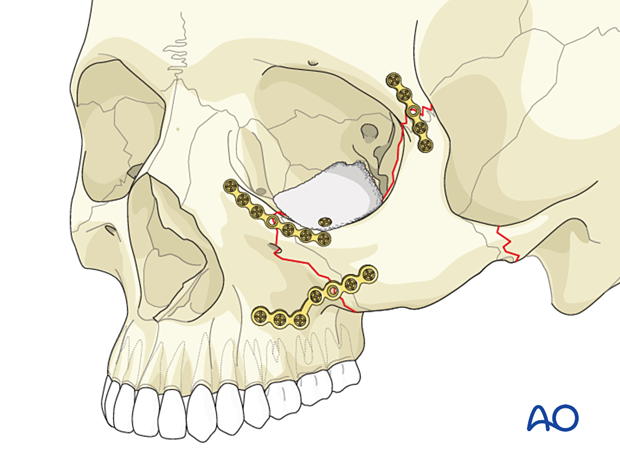
Titanium with porous polyethylene has the combined advantages of being more rigid than porous polyethylene alone and less likely to have sharp barbs on the edges. It is visible on postoperative radiographic imaging.
A possible disadvantage is that it can prevent the post-surgical drainage of orbital exudate into the maxillary sinus, leading to the possible development of a hematoma.
Screw fixation is recommended.
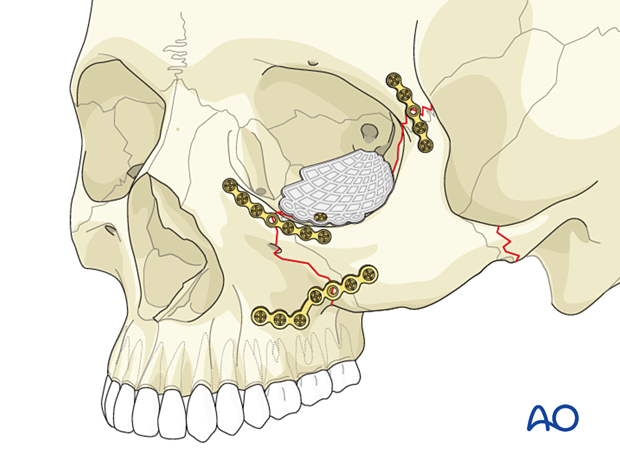
Preformed implants for orbital floor fractures have the advantage of a reduced bending requirement. They are meant to replicate the contour of the medial orbital wall and floor and especially the junction of the medial orbital wall with the floor which has a unique inward bulge toward the periorbita.
With nonanatomical implants, careful bending is required to replicate the 3D structure of the inferior medial orbital wall. Some materials such as the "fan plate" are more difficult to contour.
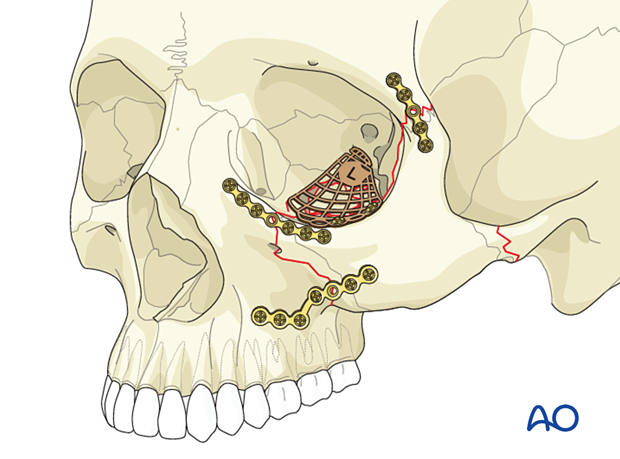
8. Postoperative examination
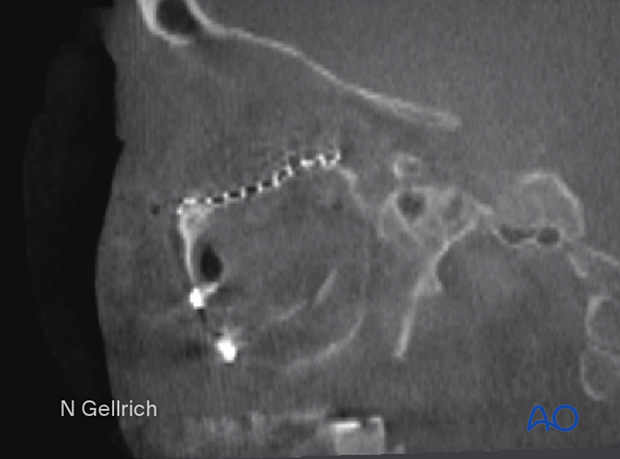
A postoperative CT scan will show the position of the implant relative to the bone and extraocular muscle/periorbita. It is particularly helpful in cases where diplopia is present after the reconstruction when it was not present preoperatively. Forced duction exams also indicate restriction caused by impingement or damage of the EOM system.
This image shows a fan plate reconstructing the orbital floor and medial orbital wall in a coronal view.
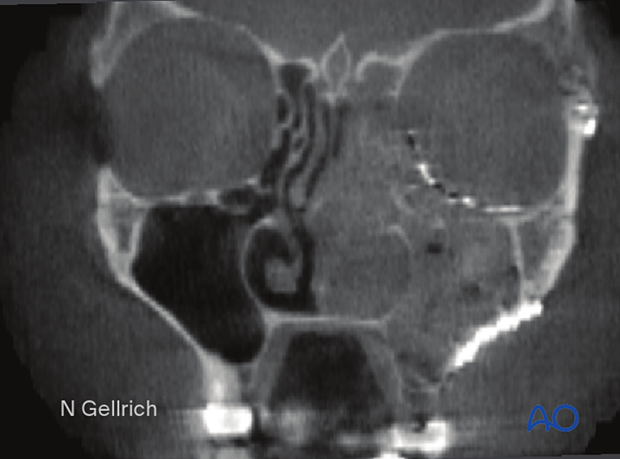
An oblique parasagittal view of the implant reconstructing the orbital floor is seen in a patient with an associated zygomatic-complex fracture. The implant just rests on the posterior ledge and has been appropriately bent to reconstruct the subtle contours of the orbit.
9. Aftercare
Patient vision is evaluated after awakening from anesthesia and then at appropriate intervals.
A swinging flashlight test may serve the same function in the unconscious or noncooperative patient. In some centers, an electrophysiological examination can be utilized if the appropriate equipment is available (VEP).
Postoperative positioning
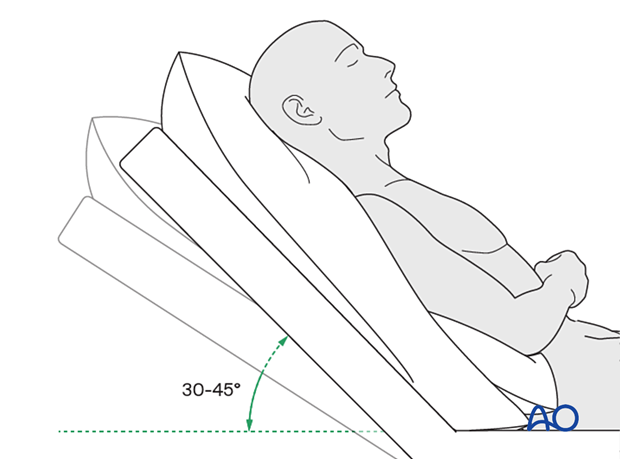
Keeping the patient’s head in a raised position both preoperatively and postoperatively may significantly reduce edema and pain.
Nose blowing
Nose blowing should not involve pressing on the sides of the nose to increase intranasal pressure. Finger pressure on the nose should not accompany nose blowing for at least two weeks following orbital fracture repair to minimize the chance of orbital emphysema.
Medication
The use of the following perioperative medication is controversial. There is little evidence to make strong recommendations for postoperative care.
- No aspirin or nonsteroidal anti-inflammatory drugs (NSAIDs) for seven days
- Analgesia as necessary
- Antibiotics (Many surgeons use perioperative antibiotics. There is no clear advantage beyond perioperative antibiotics, unless fracture repair has been delayed and there is maxillary sinus obstruction. Here the duration of treatment is dependent upon the circumstances.)
- Regular perioral and oral wound care must include disinfectant mouth rinse, lip care, etc.
Ophthalmological examination
Postoperative examination by an ophthalmologist may be requested if indicated. The following signs and symptoms are usually evaluated:
- Vision
- Extraocular motion (motility)
- Diplopia
- Globe position
- Perimetric examination
- Lid position
- If the patient complains of epiphora (tear overflow), the lacrimal duct must be checked
Postoperative imaging
Postoperative imaging should be performed within the first days after surgery. 3D imaging (CT, cone beam) is recommended to assess complex fracture reductions. An exception may be made for centers capable of intraoperative imaging.
Wound care
Ice packs may be effective in the short term to minimize edema.
Remove sutures from the skin after approximately five days.
Avoid sun exposure and tanning to skin incisions for several months.
Diet
Diet depends on the fracture pattern.
A soft diet can be taken as tolerated until there has been adequate healing of the maxillary vestibular incision.
Nasogastric feeding may be considered in cases with oral bone exposure and soft-tissue defects.
Patients in MMF will remain on a liquid diet until the MMF is released.
Clinical follow-up
Clinical follow-up depends on the complexity of the surgery and whether the patient has any postoperative problems.
With patients having fracture patterns including periorbital trauma, issues to consider are the following:
- Globe position
- Double vision
- Other vision problems
Other issues to consider are:
- Facial deformity (including asymmetry)
- Sensory nerve compromise
- Problems of scar formation
Issues to consider with Le Fort fractures, palatal fractures and alveolar ridge fractures include:
- Problems of dentition and dental sensation
- Problems of occlusion
- Problems of the temporomandibular joint (TMJ), (lack of range of motion, pain)
Eye movement exercises
Following orbital fractures, eye movement exercises should be considered.
Implant removal
Generally, orbital implant removal is not necessary except in the event of infection or exposure. Readmission may be indicated if the long-term stability of the orbital volume has not been maintained.
MMF
The duration and use of MMF are controversial and highly dependent on the patient and complexity of the trauma. In some cases where long-term MMF may be recommended, the surgeon may choose to leave the patient out of MMF immediately postoperatively because of concerns of edema, postoperative sedation, and airway. In these cases, the surgeon may decide to place the patient in MMF after resolving these considerations.
The need for and duration of MMF are very much dependent on the following:
- Fracture morphology
- Type and stability of fixation (including palatal splints)
- Dentition
- Coexistence of mandibular fractures
- Premorbid occlusion
Oral hygiene
Tooth brushing and mouth washes should be prescribed and used at least twice a day to help sanitize the mouth. Gently brushing the teeth occurs with a soft toothbrush (dipped in warm water to make the bristles softer).
Special considerations for orbital fractures
Travel in commercial airlines is permitted following orbital fractures. Commercial airlines pressurize their cabins. Mild pain on descent may be noticed. However, flying in military aircraft should be avoided for a minimum of six weeks.
No scuba diving should be permitted for at least six weeks.


