Open reduction internal fixation
1. Principles
General considerations
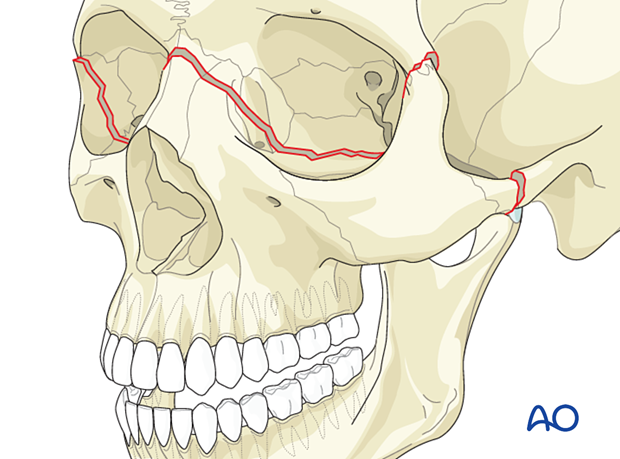
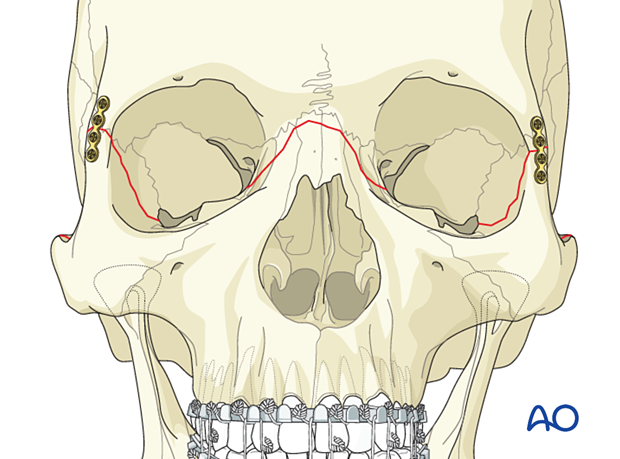
A Le Fort III fracture includes fracture of the nasofrontal junction, bilateral fractures through the area of the frontozygomatic suture, and probable fractures of the zygomatic arch. These fractures are also referred to as craniofacial disjunction.
Surgical airway
Considerations related to establishing proper dental occlusion require a nasotracheal intubation. Alternatively, a submental/submandibular intubation could be considered. Other possibilities include placement of the endotracheal tube through a gap in the dentition or behind the posterior molars.
Depending on the patient’s general condition, a tracheostomy might also be considered and is the first choice where brain or pulmonary injuries are likely to require prolonged intubation.
Successful reconstruction of midface fractures aims to reestablish the continuity and position of midfacial vertical buttresses. These pillars even serve a critical role in patients who lack dentition (partial or completely edentulous).
A fundamental principle in Le Fort fracture treatment is to reestablish the premorbid dental occlusion. Portions of the pterygoid plates and associated musculature are still attached to the posterior portion of the maxilla, so passive mobilization of the fracture can be difficult in incomplete or impacted fractures.
To properly achieve a passive maxillary position, the fracture must be completed and the maxilla able to be passively repositioned. An osteotomy is required or strong mobilization forces used to complete the fracture. Rowe’s disimpaction forceps, a “Stromeyer” hook, Tessier retromaxillary mobilizers, etc., can be utilized for this purpose.
The goal is to achieve correct anatomical repositioning, which may be confirmed by dental occlusion when MMF is released. It is possible to displace the mandibular condyles from the glenoid fossae during the application of MMF. When the MMF is released, the condyles re-seat into their normal position in the glenoid fossae, resulting in a malocclusion.
Other methods to confirm proper reduction include intraoperative imaging and 2D or 3D CT evaluation. If available, dental cast, stereolithographic models, dental records, or premorbid photographs may also be helpful guides for treatment planning.
As a general principle, all facial fractures should be exposed and reduced before plating.
Choice of implant
It is difficult to give absolute guidelines for the strength of the plates to be used at the three key points of fixation for a Le Fort III fracture.
Factors affecting the size and strength of the plate are:
- Grade of instability and comminution of the fracture
- Association with other midface fractures
- The decision of temporarily keeping the patient in MMF postoperatively
Older texts often recommended using a larger compression plate at the zygomaticofrontal suture. The soft-tissue coverage over this area is very thin, and patients are likely to complain if the plate is palpable. Furthermore, compression plating at this location is not necessary.
Generally, a smaller straight plate is adequate in the zygomaticofrontal area.
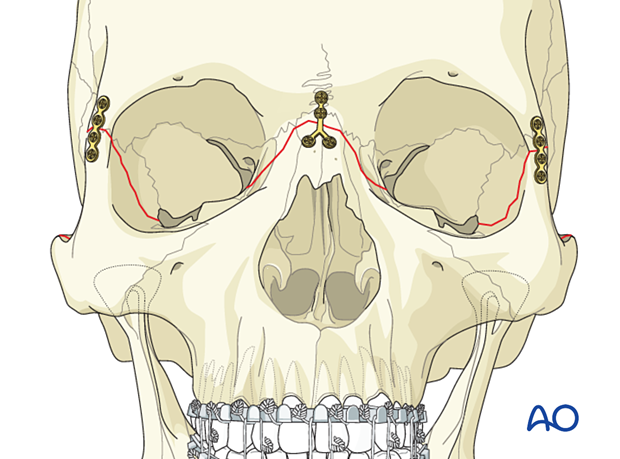
A variety of different plates may be used at the nasofrontal area. Options include one or two straight plates, or various configurations of Y- or X-plates. Sometimes inter-fragment wires provide sufficient alignment and are not palpable. In many cases the zygomaticofrontal suture can be aligned with an inter-fragment wire and provides adequate fixation where one or both of the other two sites of the zygoma are stabilized with plate placement.
Click here for a description of implant options.
Orbital involvement
A Le Fort III fracture involves fractures of the internal orbit. If significant, these orbital fractures may be treated in the same way as other orbital fractures in this location. An orbital wall reconstruction with bone graft or alloplastic material may be required.
More information about the reconstruction of combined medial wall and orbital floor fractures is given in the section of this module on combined fractures of the orbit.
Teaching video
AO Teaching video on fixation of a complex midface fracture
2. Choice of approach
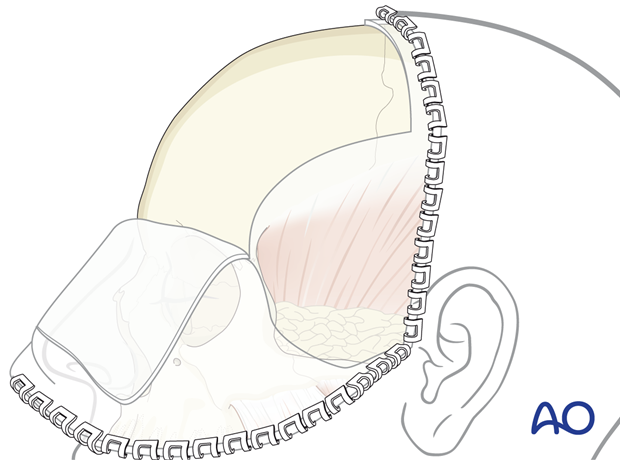
All of these fractures can be approached by a coronal incision.
A second option includes a combination of bilateral upper-eyelid incisions to treat the fracture at the frontozygomatic suture and a glabellar incision to approach the nasofrontal area if the surgeon is confident regarding the reduction and chooses not to plate the zygomatic arch fractures.
A third option includes a combination of upper-eyelid incisions a glabellar incision, and a preauricular approach to plate the zygomatic arch. This combination also avoids performing a coronal incision.
A glabellar incision may be particularly desirable in an elderly patient who commonly has frown lines in the glabella area or in a patient who wears glasses, where the frame of the glasses may help cover up the glabellar incision.
If present, existing lacerations may also be used. The ethmoidal approach (Lynch) is not recommended.
3. Reduction
Arch bars and mobilization
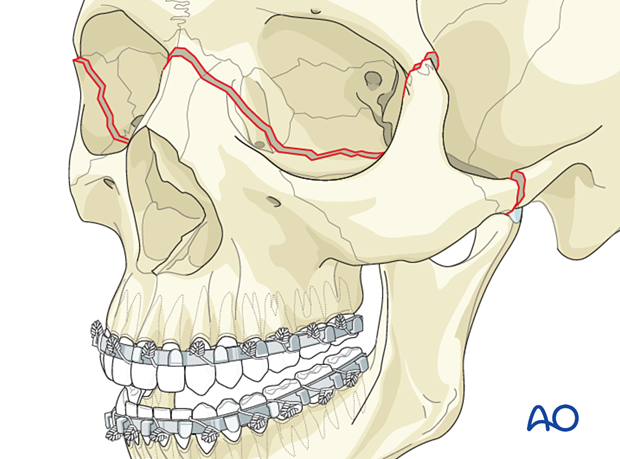
First, arch bars are secured to the dentition. Click here for a detailed description of maxillomandibular fixation (MMF).
After exposure of the fracture segments by adequate approaches, the fractures are mobilized to enable reduction and fixation.
Option: hybrid arch bars
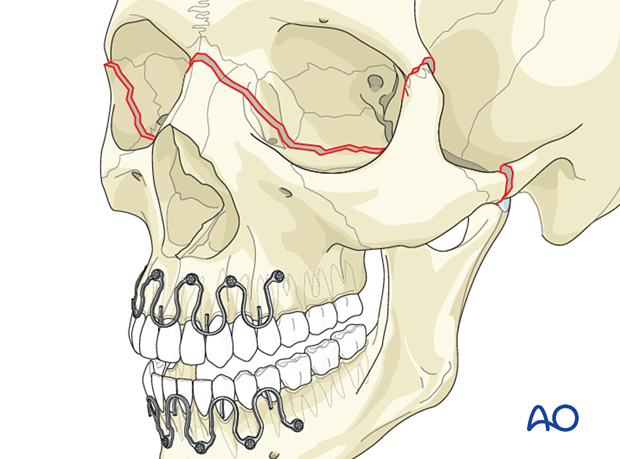
You can choose between traditional arch bars or hybrid arch bars.
Hybrid arch bars use screws to fix the arch bar to the bone, making the procedure faster.
Mobilization
After exposure of the fracture segments through a maxillary vestibular approach, the fracture is mobilized to enable reduction and fixation. In cases where the maxilla mobilization cannot be accomplished using conventional methods, additional osteotomies may be required. Many surgeons prefer completing a Le Fort I level osteotomy resulting in free positioning of the Le Fort I segment rather than creating additional fractures at the Le Fort II or III levels using a device such as Rowe forceps for forced manipulation.
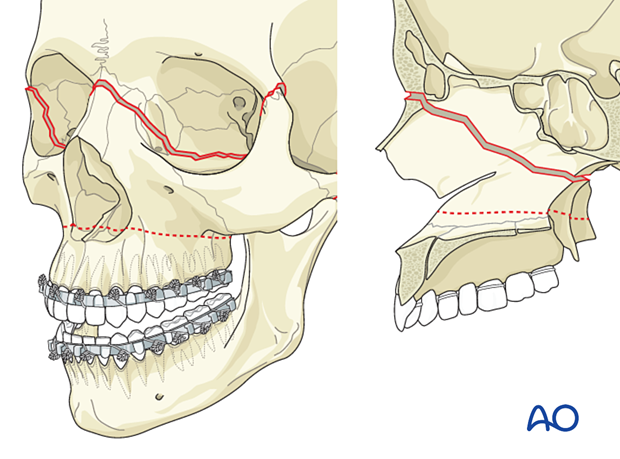
Reduction instruments
Rowe disimpaction forcepsThe Rowe disimpaction forceps are side-specific. They allow the application of significant amounts of force to disimpact and reposition the maxilla and midface.
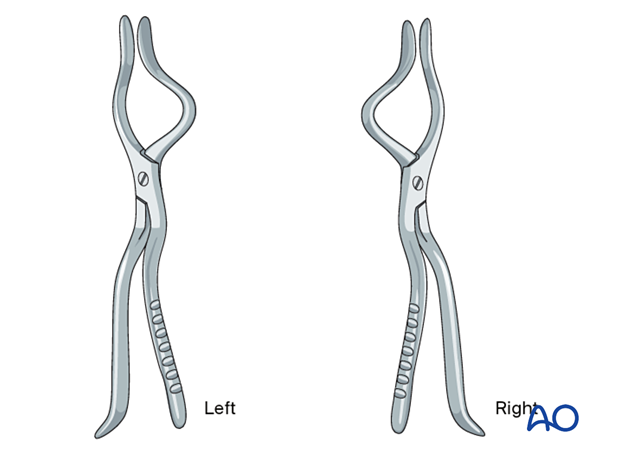
It should be noted that in cases of incomplete fracture many surgeons prefer to complete the fracture at the Le Fort I osteotomy level as a safer maneuver than using Rowe forceps for forced disimpaction.
If Rowe forceps are utilized, special attention must be paid to the correct placement of the forceps so that the upper anterior dentition is not harmed.
The maxillary fracture must be completely mobilized to allow for free repositioning.
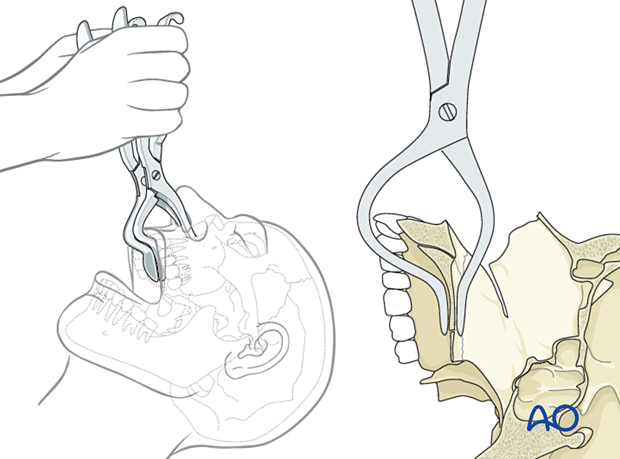
According to regional preferences and various schools of teaching, different bone hooks may be used for fracture mobilization and reduction. In general, they are all inferior to completion of the fracture with a Le Fort I osteotomy.
The Stromeyer hook is very versatile for the transoral reduction of Le Fort fractures.
In selected cases, the Stromeyer hook can also be used to manipulate the Le Fort complex by hooking the tip of the instrument inside the piriform aperture and pulling it downwards and forwards. This technique is sometimes referred to as the “downfracture procedure” in Le Fort osteotomies.
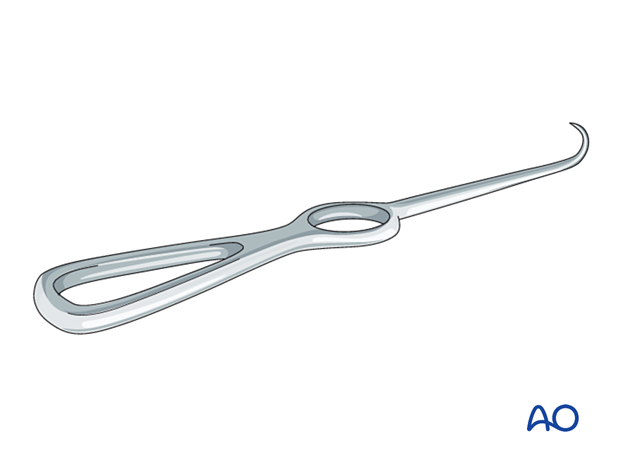
For zygoma reduction, the tip of the Stromeyer hook is inserted transcutaneously. The curvature of the Stromeyer is held between the index finger and the thumb. The hook’s tip is inserted about 4 cm below the lateral canthus directly through the skin or following a limited stab incision.
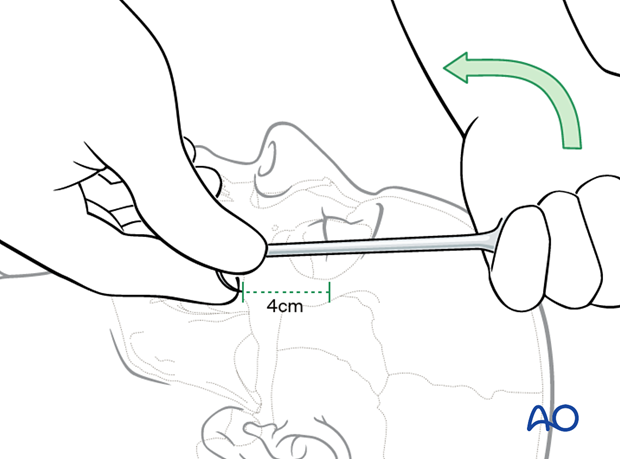
After controlled positioning of the instrument, the hook is placed below the fracture segment, and reduction can be obtained by pulling in the necessary vector. Care must be taken so that the direction of pull on the hook is not changed, causing dislocation of the hook, resulting in injury to the orbit or soft tissues.
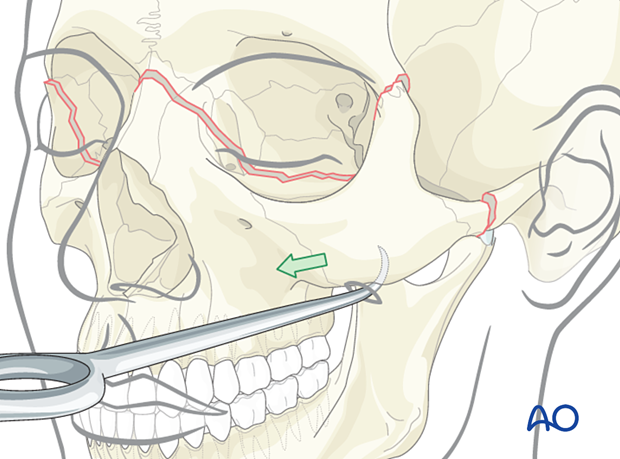
The Tessier retromaxillary mobilizers are placed behind the maxillary tuberosities to help mobilize a posteriorly displaced and impacted maxilla, facilitating passive repositioning and a normal occlusion. The repositioned maxilla must be passive to ensure that it remains in the correct position.
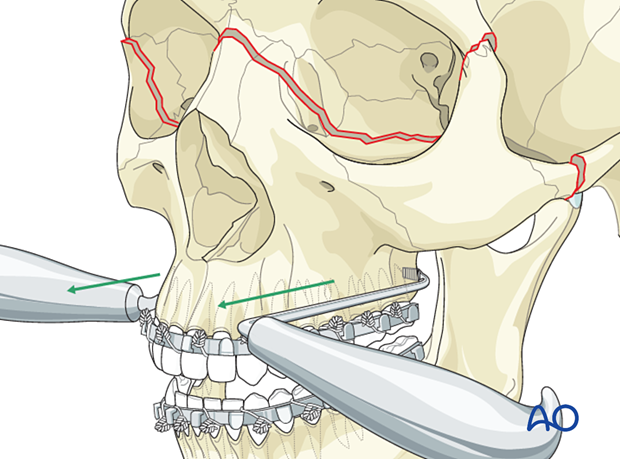
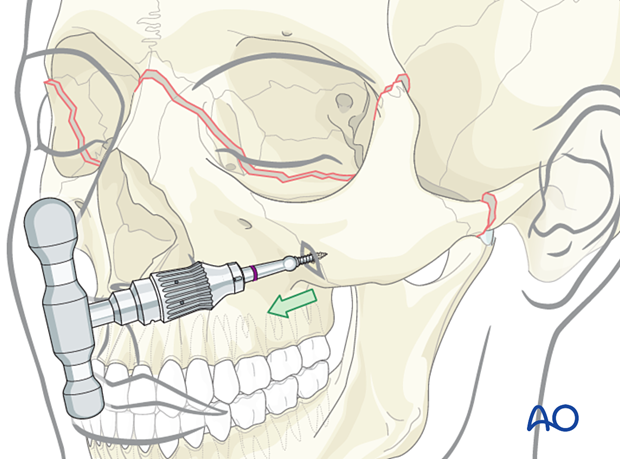
A threaded reduction tool (Carroll-Girard technique) might be helpful for 3D positioning of the midface.
The tip of the tool is self-drilling, and generally requires no predrilling, but support of the mobile fragment is required to withstand the force resulting from the insertion of the instrument.
The T-handle allows excellent manipulation of a solid bony structure like the zygoma in a Le Fort III fracture. Insertion of the threaded reduction tool is usually done after a limited stab incision.
4. Fixation
General considerations
Depending on the quality and stability of the reduction, the final decision is made regarding the number of plates and screws and the plates’ design.
Generally, for Le Fort III fractures, plate fixation is applied to the fractures at the zygomatic arch, the frontozygomatic area, and the nasofrontal junction.
Fixation usually starts at the most reliably reduced buttress, always considering any fracture line in all three dimensions. If the reduction is satisfactory, the first plate can be fixed by using an adequate number of screws. Due to specific patient injury patterns, provisional fixation with a limited number of screws may be indicated (in special cases, even temporary wire fixation might be considered). Final fixation must include two screws per fracture side.
The remaining buttresses are similarly addressed.
Complete reduction and fixation of the Le Fort fractures should take place before addressing the internal orbital wall fractures.
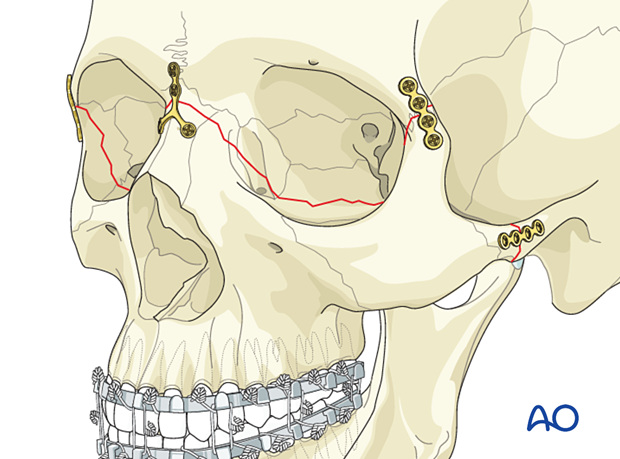
If any significant orbital fractures require fixation or reconstruction, this is performed after completely reducing and stabilizing the Le Fort III fracture.
First plate
All the plates need to fit passively. In the case shown, the first plate is applied to the frontozygomatic buttress. A plate of appropriate profile, shape, and length is selected and contoured using bending pliers according to the fracture morphology.
The plate is positioned with appropriate instruments (eg, forceps, plate holders, gauze packer). The first hole is drilled (a drill bit with a stop may be used) next to the fracture line in the frontal process of the zygoma, and a screw is inserted.
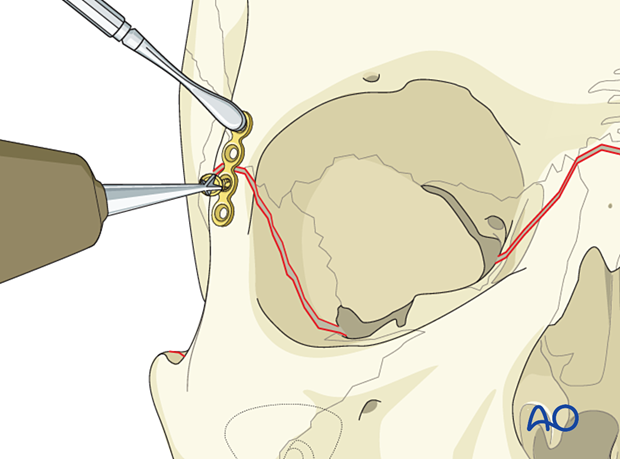
After drilling, the second screw is inserted next to the fracture line on the opposite side of the fracture.
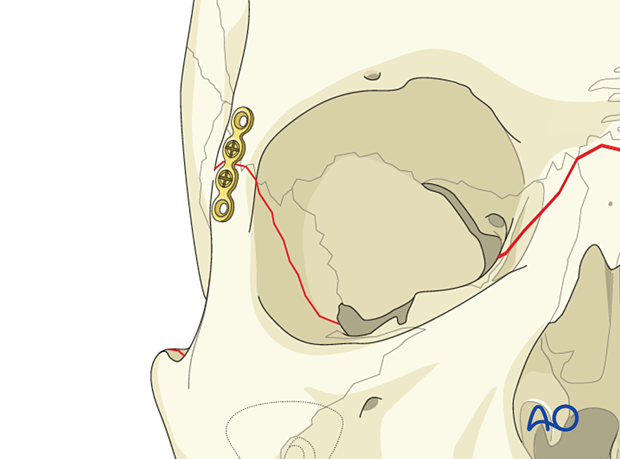
If the reduction is satisfactory at the other fracture lines, the remaining screws are inserted (at least two screws per fracture fragment).
Alternatively, these two screws can be inserted after all other plates have been applied.
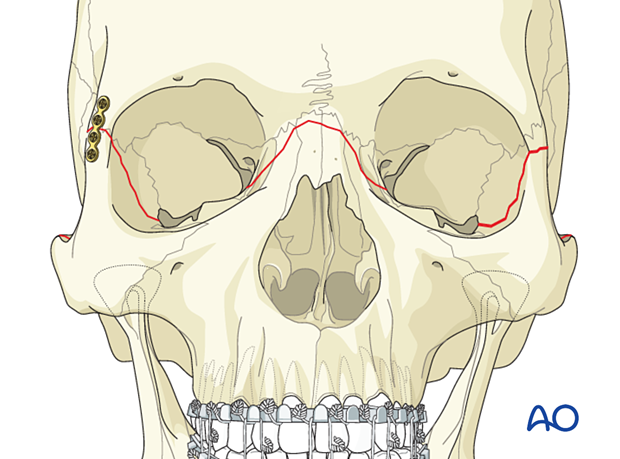
Contralateral frontozygomatic buttress
In the illustrated case, the contralateral frontozygomatic buttress is fixed in the same manner.
Additional plates (if required)
Bilateral frontozygomatic fixation may be sufficient for isolated Le Fort III fractures; more commonly, additional fixation points are needed.
Depending on the fracture pattern, one or two plates are applied. In this illustrated case, a Y-plate is used to reduce and stabilize the nasofrontal fracture.
If the patient’s fracture morphology requires additional fixation, plates can be applied to the zygomatic arches to reestablish these sagittal buttresses.
Plate fixation typically uses straight plates. As with other fractures, at least two screws should be placed on each side of the fracture line when possible. The number, length, and size of screws vary according to patient anatomy.
In the case of a zygomatic arch fracture near the temporal bone, screw fixation (position screw or lag screw) may be considered. Care must be taken to choose the correct screw dimension and length to avoid damage to neighboring structures. The use of drill bits with stops should be considered in this area.
Further information can be found in the "ORIF 4-point fixation (with orbital reconstruction)" treatment in the Zygoma, zygomatic complex fracture section of this module.

Check occlusion
After internal fixation has been completed, MMF is released, and the occlusion is checked.
The occlusion is checked with a patient out of MMF with the fingers on the mandible seating the condyles in a posterior superior position within the glenoid fossa.
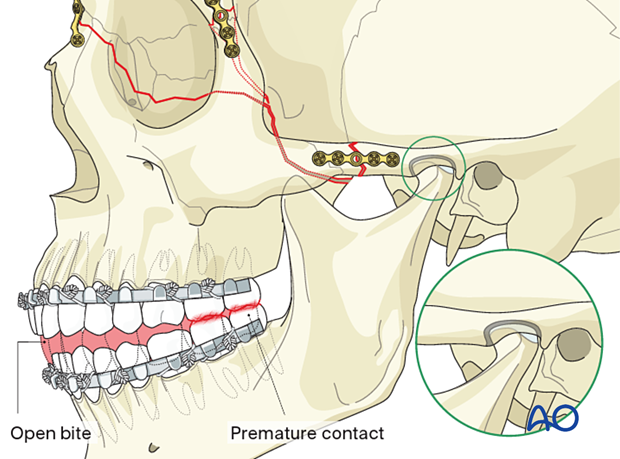
If a malocclusion such as an anterior open bite is noted at this time, a revision of the reduction must be performed to reestablish the proper occlusion.
Pitfall: malocclusion
If an open bite or Class III tendency occurs when checking the occlusion, one or both mandibular condyles are malpositioned in the posterior or inferior direction. In such cases, it is necessary to remove the bone plates, reapply MMF, and passively reposition the maxillomandibular complex, ensuring the condyles are properly seated. Bone plates are then reapplied, and the occlusion is verified.
The reason for the malocclusion may be that the condylar heads were not properly positioned in their respective glenoid fossae when the MMF was initially applied (as illustrated).
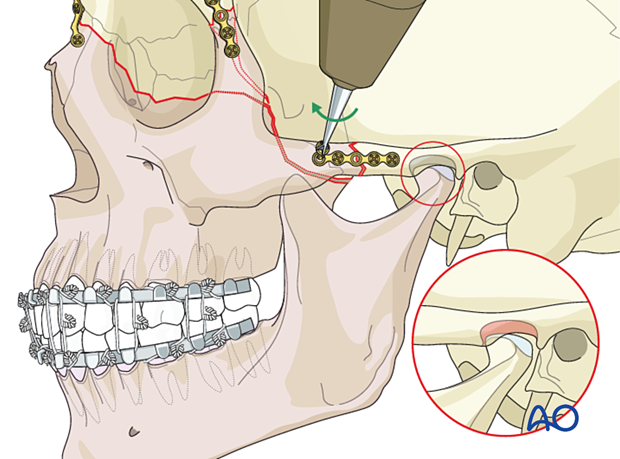
The illustration shows the subsequent malocclusion after release of the MMF.

5. Aftercare
Patient vision is evaluated as soon as awakening from anesthesia and then at regular intervals until hospital discharge.
A swinging flashlight test may serve in the unconscious or noncooperative patient; alternatively, an electrophysiological examination must be performed but this is dependent on the appropriate equipment (VEP).
Postoperative positioning
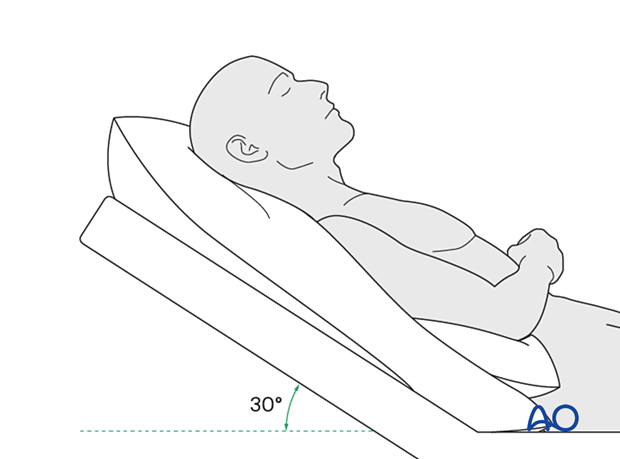
Keeping the patient’s head in an upright position both preoperatively and postoperatively may significantly reduce periorbital edema and pain.
Nose-blowing
Nose-blowing should be avoided for at least ten days following orbital fracture repair to prevent orbital emphysema.
Medication
The following medications may be used:
- Analgesia as necessary (no aspirin or nonsteroidal anti-inflammatory drugs (NSAIDs) for seven days).
- Antibiotics: many surgeons use perioperative antibiotics. There is no clear advantage of any antibiotic, and the recommended duration of treatment is debatable.
- A nasal decongestant may be helpful for symptomatic improvement in some patients.
- Steroids, in cases of severe orbital trauma, may help with postoperative edema. Some surgeons have noted increased complications with perioperative steroids.
- Regular perioral and oral wound care must include disinfectant mouth rinse, lip care, etc.
Ophthalmological examination
Postoperative examination by an ophthalmologist may be requested. The following signs and symptoms are usually evaluated:
- Vision
- Extraocular motion (motility)
- Diplopia
- Globe position
- Perimetric examination
- Lid position
- If the patient complains of epiphora (tear overflow), the lacrimal duct must be checked
Postoperative imaging
Postoperative imaging may be considered. 2D and 3D imaging (CT, cone beam) are recommended to assess complex fracture reductions. An exception may be made for centers capable of intraoperative imaging.
In fractures involving the alveolar area, orthopantomograms (OPG) are helpful.
Wound care
Remove sutures from the skin after approximately five days if non-resorbable sutures have been used.
Apply ice packs (may be effective in the short term to minimize edema).
Avoid sun exposure and tanning to skin incisions for several months.
Diet
Diet depends on the fracture pattern.
Patients in MMF will remain on a liquid diet until the MMF is released.
Clinical follow-up
Clinical follow-up depends on the complexity of the surgery and whether the patient has any postoperative problems.
With patients that have fracture patterns that include periorbital trauma, consider the following issues:
- Globe position
- Double vision
- Other vision problems
Other issues to consider are:
- Facial deformity (including asymmetry)
- Sensory nerve compromise
- Problems of scar formation
Issues to consider with Le Fort fractures, palatal fractures, and alveolar ridge fractures include:
- Problems of the dentition and dental sensation
- Problems of occlusion
- Problems of the temporomandibular joint (TMJ), such as lack of range of motion, pain
MMF
The duration and use of MMF are controversial and highly dependent on the particular patient and the complexity of the trauma. In some cases, MMF may be recommended for 4–6 weeks.
The need and duration of MMF are very much dependent on:
- Fracture morphology
- Type and stability of fixation (including palatal splints)
- Dentition
- Coexistence of mandibular fractures
- Premorbid occlusion
Oral hygiene
Patients with arch bars, intraoral incisions, or wounds must be instructed about appropriate oral hygiene procedures. The presence of arch bars or elastics makes oral hygiene more complicated. A soft toothbrush (dipped in warm water to make it softer) should be used to clean the teeth and arch bars. Elastics are removed during oral hygiene procedures. Disinfectant mouth rinses (Chlorhexidine) should be prescribed and used at least three times a day to help sanitize the mouth.
For larger debris, a 1:1 mixture of hydrogen peroxide/Chlorhexidine can be used. The effervescent action of the hydrogen peroxide helps remove debris. A jet irrigator, (eg, Waterpik) is a handy tool to help remove debris from the wires. If used, care should be taken not to directly point the jet stream over intraoral incisions, which may lead to wound dehiscence.
Follow-up
The patient needs to be examined and reassessed regularly and often. Additionally, ophthalmological, ENT, and neurological/neurosurgical examinations may be necessary.
Special considerations for orbital fractures
Travel in pressurized aircraft is permitted following orbital fractures. Mild pain on descent may be noticed. However, flying in a non-pressurized plane should be avoided for a minimum of six weeks.
No scuba diving should be permitted for at least six weeks.


