ORIF - Plate and screws
1. General considerations
Principles
The severity of soft-tissue injury will dictate the choice of timing: early single-stage, or initial provisional fixation and delayed definitive repair. The decision is based on the individual situation and not necessarily on general principles.
Displaced fractures with minimal closed soft-tissue injury
(Tscherne classification, closed fracture grade 0, rarely grade 1)
Reconstruction may be done with a single-stage procedure, similar to the proposals of Rüedi and Allgöwer. This involves complete restoration of the ankle mortise including fibula and tibia. This may require bone grafting and usually a buttress plate. The goal is absolute stability of the joint surface, to permit early motion and achieve healing with anatomical alignment.
Grossly displaced fractures and / or fractures with moderate to severe closed soft-tissue injury
(Tscherne classification, closed fracture grade 2 or 3)
It is generally advisable to proceed in two or more stages:
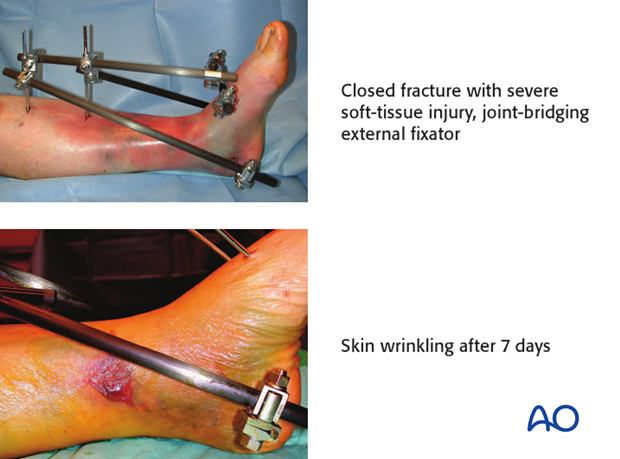
- Closed reduction and joint bridging external fixation
- Definitive open reconstruction after 5-10 days (wait for the appearance of skin wrinkles)
Open pilon fractures
These are very severe injuries often requiring plastic surgery for soft-tissue reconstruction. The management includes the following stages:
Emergency management:
- Wound debridement and lavage
- Joint-bridging external fixation
- Fibular fixation may also be considered, but rarely adds benefit and may require another incision through badly injured tissue
- Open wound management with occlusive dressing (possible antibiotic bead pouch or vacuum dressing)
At 48 hours:
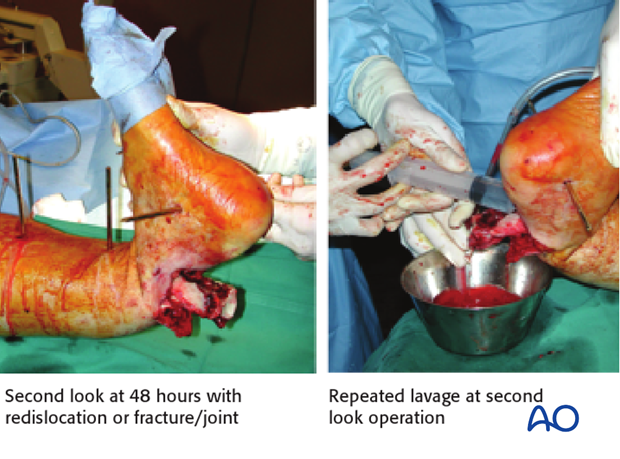
- Second look with repeated lavage (re-dislocation of fracture/joint!) and re-debridement if necessary
- Reconstruction of the tibial articular block
- Soft-tissue coverage (local or free flap), if possible. Significant delay of coverage increases infection risk
Definitive stabilization:
- Bridging of the metaphyseal comminution, with or without bone graft
- Definitive stabilization with internal or external fixation may be performed at 48 hours, or preferably later
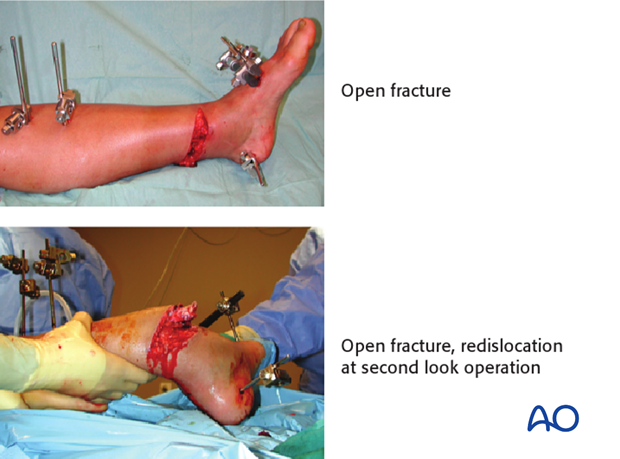
Image shows second look at 48 hours with redislocation of the fracture/joint and repeated lavage at second look operation.
Teaching video
AO teaching video: Tibia, Distal — Pilon Fracture — Fixation with LCP-Distal Tibia Plate and LCP One-third Tubular Plate 3.5
2. Fibula or tibia first? Sequence of bone stabilization
Introduction
The ankle joint involves the tibial-fibular mortise and talus. If the fibula is not properly attached to the tibia, the joint will not be congruent. If there is a fibular fracture, it usually must be repaired. The surgeon must choose whether to do it first or later.
Simple fracture of the fibula
If the fibular fracture is simple, this fracture is fixed as a first step by open reduction and stable plate fixation. This indirectly reduces attached lateral fragments of the tibial articular surface through the usually intact syndesmotic ligaments. ORIF of the articular surface of the tibia and stable meta-diaphyseal fixation then follow.
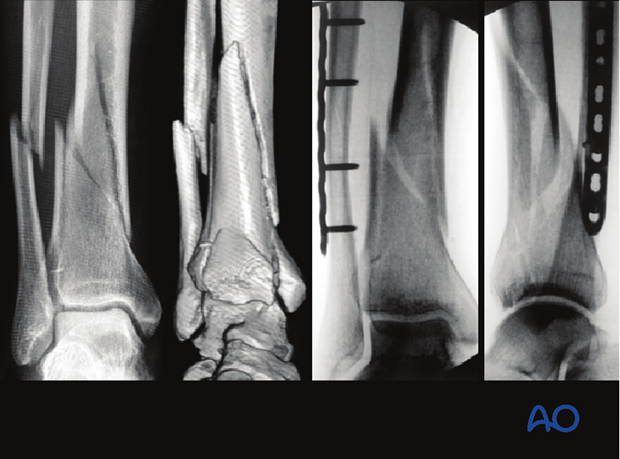
Multifragmentary fibular fracture
Comminuted fibular fractures (a) are difficult to reduce accurately. In such cases it is usually better to reconstruct the tibia first and use the tibia and talus as guides for positioning the lateral malleolus, if necessary. This usually reduces the fibular fracture indirectly. Since the syndesmotic ligaments are usually intact, gross realignment of the fibula often occurs as the tibia is reduced (b).
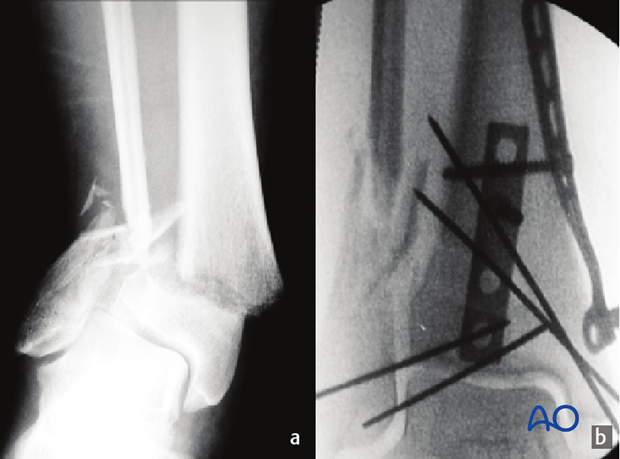
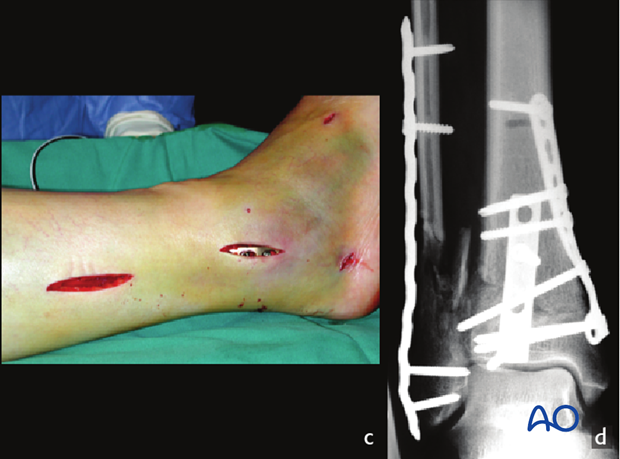
The comminuted fibular fracture can often be stabilized with a subcutaneous plate, without exposing the fragments (c) using a long bridging plate (d). It is essential to achieve correct length, rotation, and axial alignment of the fibula.
3. Planning for reduction and fixation
Preoperative planning
Preoperative planning is an essential part of the treatment of all distal tibial fractures:
- Obtain good AP and lateral x-rays of both injured and uninjured side; CT if needed
- Careful study of the x-rays and CT scan
- Trace AP and lateral x-rays of normal side
- Identify the individual fracture fragments
- Draw the fracture fragments, reduced, onto the normal tracing
- Consider reduction techniques
- Choose and draw in fixation implants
- Choice of surgical approach
- Prepare list of operative steps
Choice of the surgical approach
Most tibial pilon fractures are best treated through an anteromedial or anterolateral approach. The optimal approach side can be determined according to:
- Fracture location at the articular surface: the approach should be performed on the side where the fragment enters the joint
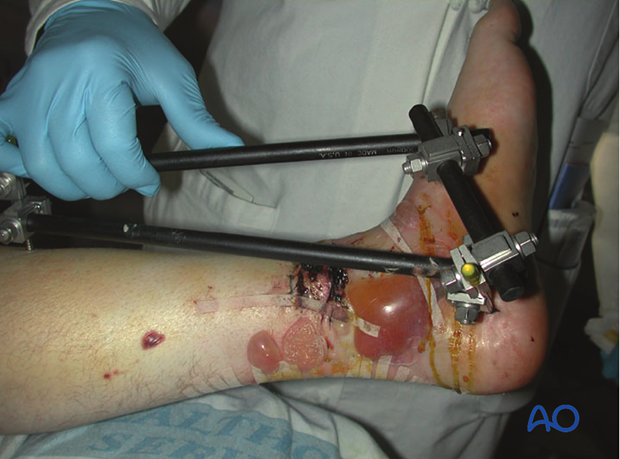
- Associated transverse traumatic wound at the distal tibia (see fig.): the surgical approach should be performed on the opposite side to minimize additional dissection beneath the traumatized skin
- Plate positioning: with significant metaphyseal comminution, the medial soft tissues are potentially more injured so that medial plating may cause wound breakdown. An anterolateral plate may be a less risky alternative, and requires an anterolateral approach
The anticipated incision(s) for ORIF should be considered during initial debridement and external fixation, even though definitive fixation is delayed until soft tissues recover.
The approach may be limited, but sufficient exposure is necessary for direct articular fracture reduction. Plate insertion proximally can be minimally invasive.
Implant choice
Interfragmentary compression with lag screws is the basic technique for reconstruction of articular surface fractures. Since a plate will connect the articular block to the shaft proximally, the preoperative plan should include strategically placed lag screws that do not interfere with the planned plate.
Additional interfragmentary lag screws can be placed through the distal holes in the plate. To make this possible, the exact position of the plate must be determined during preoperative planning. See also the additional material on lag screw principles.
The shape and location of the plate are important for metaphyseal reduction and must be planned preoperatively.
A variety of precontoured distal tibial plates are available. They usually need slight adjustment of contouring. It is important that the plate be contoured properly before insertion. Longer implants improve load distribution and stability. Only a small number of screws will be needed in the tibial shaft.
A locking or conventional plate can be used. The bone quality, fracture pattern and length of the distal segment will be the primary determinants. The cost and availability of angular stable fixation and anatomically precontoured plates must also be considered. Well-planned use of conventional fixation remains a reasonable alternative to locking plates in most if not all situations.
Plate contouring
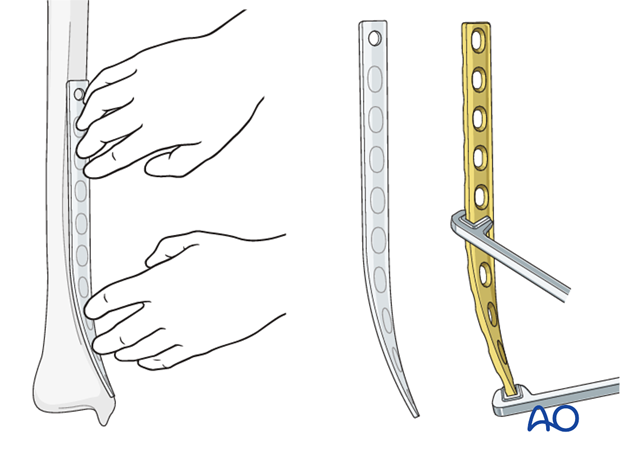
If precontoured implants are not available a non-contoured plate can be shaped prior to sterilization, using a sawbones model as a template.
Determine the length of the plate from preoperative x-rays. It should be placed as distally as possible and long enough to place at least four holes proximal to the fracture (with screws in at least three of them).
The most distal 8-12 cm of the plate must be bent to form a concave arc with a radius of curvature of about 20 cm and twisted to fit the distal tibia. As illustrated, the medial tibia is internally rotated distally (20 degrees) and lies closer to the sagittal plane.
4. Patient preparation
This procedure is normally performed with the patient in a supine position.

5. Preliminary reduction
Application of a distractor
Application of a distractor intraoperatively greatly assists with articular visualization and alignment of the articular fragments. A temporary joint bridging external fixator is typically replaced with a distractor during definitive articular surface reduction and fixation.
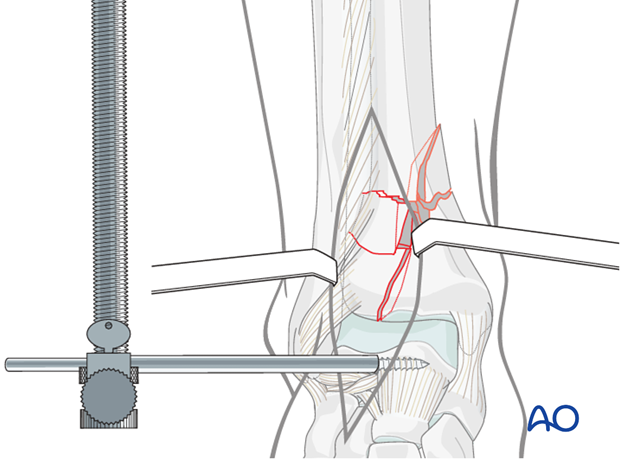
To apply the distractor laterally, a 4 mm Schanz pin is placed transversely from lateral to medial into the talar neck, through the surgical incision. A second 4 mm Schanz pin is placed from lateral to medial into the tibial shaft, proximal to the intended plate. The distal pin, anterior to the axis of rotation of the talus, produces ankle joint distraction and plantarflexion, maximizing articular visualization. The threaded rod of the distractor is placed posterolaterally, away from the incision.
Note: The course of the anterior compartment neurovascular bundle, and also the superficial peroneal nerve, should be considered during pin placement. The proximal pin should be placed in the anterior half of the tibia. It is important to use blunt dissection and the appropriate soft-tissue protection sleeves during pin placement.
Reduction and stabilization of the articular segment
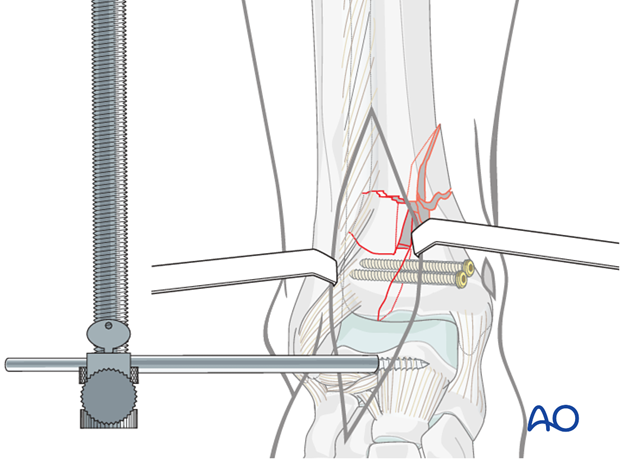
The articular segment must be reduced anatomically and either provisionally or definitively stabilized. This can be accomplished with a pointed reduction clamp, K-wires, independent lag screws, or combinations thereof.
In the illustration, the articular segment is reduced through a limited anterolateral incision. It is fixed with two 3.5 mm cortex screws as lag screws placed through a separate small medial incision. It is important that these are planned to avoid the subsequent plate screws.
Metaphyseal reduction
The reconstructed articular block it must be reduced to the diaphysis. This is done indirectly with fluoroscopic control through manipulation, distraction and plate application. The first step is to adjust the distractor tension for the best alignment. Rotation and axis alignment (AP and lateral) should be confirmed.
See also the content on assessment of reduction.
6. Plate insertion
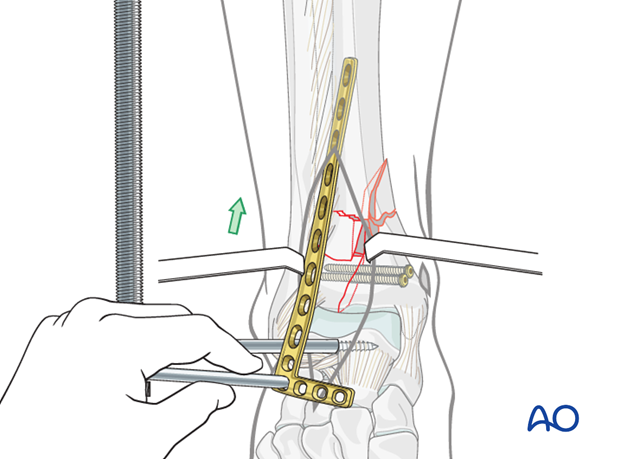
A tunnel is made with a blunt instrument close to the bone. Attention should be paid not to displace the metaphyseal fragments or disturb their soft-tissue attachments.
The contoured plate is inserted through the tunnel. The plate is slid submuscularly along the lateral cortex of the tibia, deep to the anterior compartment musculature and neurovascular bundle, and anterior to the interosseous membrane.
The distractor maintains length and alignment during plate placement.
Note: Care must be taken during plate placement to ensure that the plate is slid directly against the tibia to avoid damage to the neurovascular bundle.
7. Confirm plate position
A small incision is made at the proximal end of the plate, if possible well outside the fracture zone. The incision is a helpful guide for correct plate positioning. The plate can be repositioned using a threaded drill sleeve in the most proximal hole.
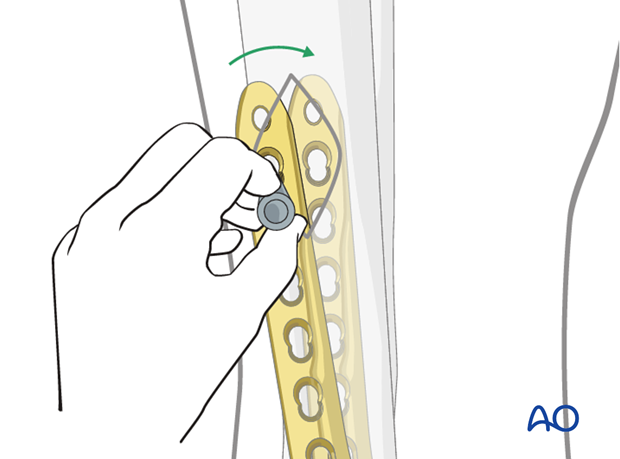
The plate can be temporarily hold in position placing K-wires through screw holes. It can be secured against the bone with the pull reduction device, or a single cortex screw as shown in the illustration.
The goal is to position the plate so that bringing it against the bone completes the fracture reduction.
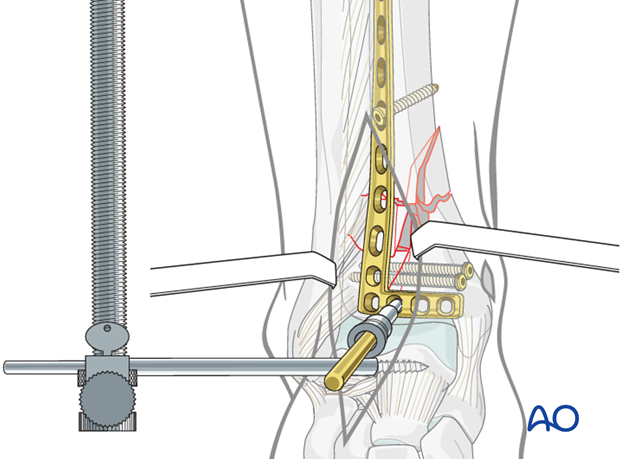
Note: The distal end of the plate must be positioned precisely for optimal screw purchase without the screws entering the ankle joint. This must be coordinated with the proximal plate fixation.
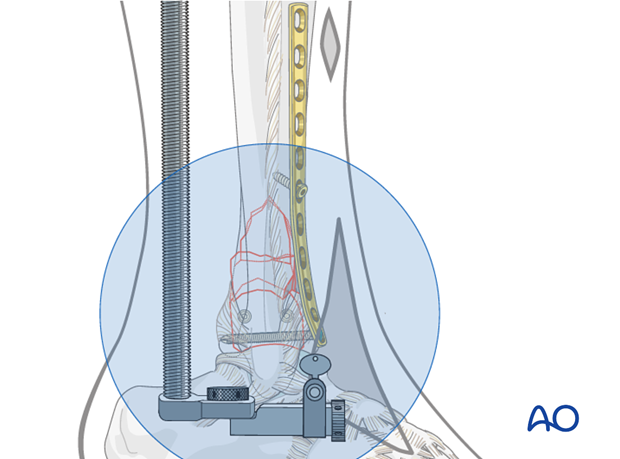
8. Distal fixation of the plate
Prevent penetration of the ankle joint
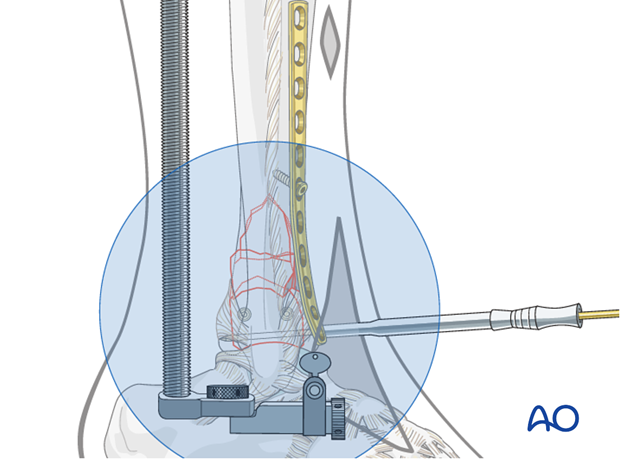
Distal screws must avoid the ankle joint. This may be checked with x-rays after placing K-wires through drill sleeves.
Distal screw insertion
The distal screws can be lag screws for appropriately oriented fracture lines. Particularly for low fractures, it may be advisable to use as many as the plate allows, as long as they are anchored in good bone and avoid other screws. Many plates allow either locking head or standard screws, to be used at the surgeon’s discretion.
Plate rotation should be checked, and adjusted if needed, after the first distal screw is inserted.
The plate illustrated has screw holes in both its transverse and vertical limbs. Screws can be placed in the vertical limb from the ankle joint level up to the fracture zone.
9. Metaphyseal reduction
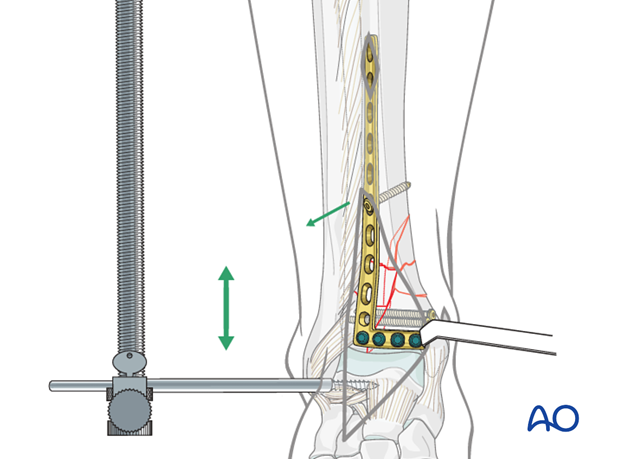
Reduction of the articular segment relative to the tibia shaft should be checked. This involves indirect reduction of the metaphyseal comminuted fragments.
Adjustment of the distractor may again be necessary. Length, rotation and angulation should be identical to the opposite limb. During reduction, the initial plate holding screw may need to be removed or loosened. When alignment is satisfactory, proximal plate fixation can proceed. See also the content on assessment of reduction.
10. Proximal plate fixation
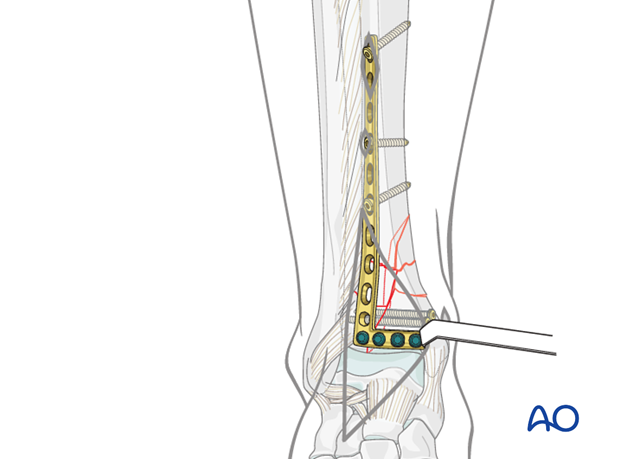
Final metaphyseal reduction is achieved by attaching the proximal end of the plate in correct alignment to the tibial shaft. This can be done with minimal exposure, particularly if less invasive clamp or screw placement techniques are used. For example, the plate can be held to the tibial shaft with the pull-reduction device. Adjustment of the plate is confirmed with x-rays.
Definitive fixation is applied with at least three or four proximal screws spread widely in the available holes. The proximal screw hole will be accessible through the incision previously made for plate positioning. The other screws can be placed percutaneously.
Locking head screws or cortex screws can be selected based upon bone quality and surgeon’s preference. Remember that the plate must be properly positioned against the bone before locking head screws are inserted.
11. Alternative fixation: medial MIO
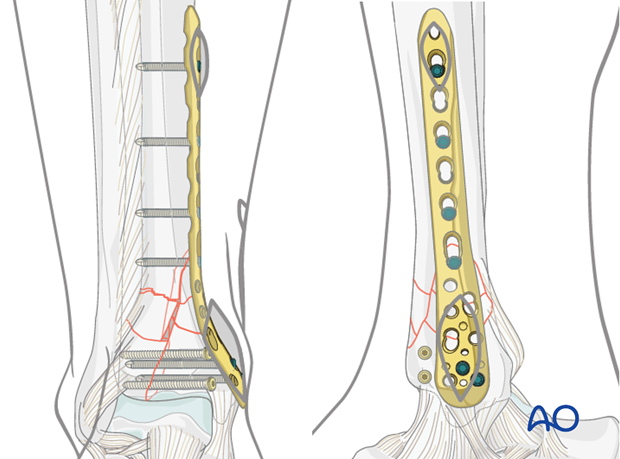
Alternative: MIO fixation of multifragmentary metaphyseal fractures with minimal soft-tissue injury
Fixation across the comminuted metaphysis is preferentially done with minimally invasive fixation, and an indirect reduction. Anterolateral plate fixation was illustrated, because it takes advantage of a thicker and perhaps less traumatized soft-tissue coverage.
If the medial skin is uninjured, a minimally invasive plate can be applied to the subcutaneous medial surface, as in this illustration. To reduce the articular component, a separate limited anterolateral incision is used, with lag screws placed through the same medial incision through which the plate will be inserted.
12. Aftercare following plating
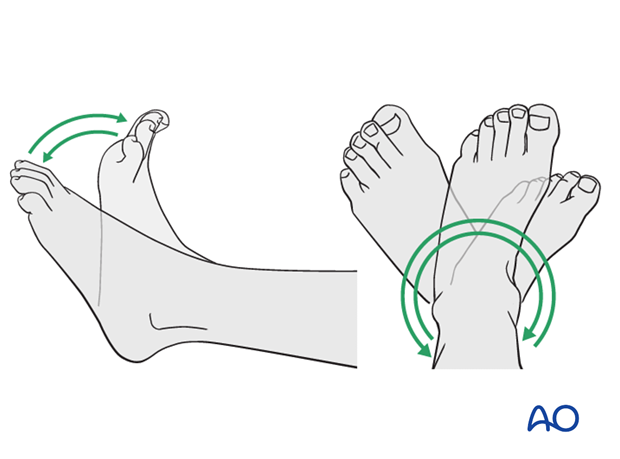
Leg elevation is recommended for the first 2-5 postoperative days. Physiotherapy with active assisted exercises is started immediately after operation. Immobilization is not necessary.
Mobilization
Starts depending on the wound healing with flat footed, weight of the leg weight bearing (10-20kg).
Follow up
Clinical and radiological follow-up is recommended after 2, 6 and 12 weeks. Depending on the consolidation, weight bearing can be increased after 6-8 weeks with full weight bearing usually after 3 months. Supervised rehabilitation with intermittent clinical and radiographic follow-up is advisable every 6-12 weeks until recovery reaches a plateau, typically 6-12 months after injury. Weight-bearing radiographs are preferable to assess articular cartilage thickness. Angular stable fixation may obscure signs of non-union for many months.
Implant removal
Implant removal may be necessary in cases of soft-tissue irritation by the implant (plate and/or isolated screws). The best time for implant removal is after complete remodeling, usually at least 12 months after surgery.
