ORIF - Plate and screws through anteromedial approach
1. Single stage or multiple-stage procedure?
Principle
The soft-tissue conditions usually dictate the choice of procedure: early single-stage, or multiple-stage surgery. The decision is based primarily on the individual situation than on general principles.
Read more about decision making and strategies for complete articular pilon fractures.
Displaced fractures with minimal closed soft-tissue injury
(Tscherne classification, closed fracture grade 0, rarely grade 1)
Reconstruction may be achieved by a single-stage open procedure, embracing the classical four steps of Rüedi and Allgöwer:
- Reconstruction of a fractured fibula
- Reconstruction of the tibial joint surface
- Use of autogenous cancellous or corticocancellous bone graft (if necessary)
- Support by a buttress plate
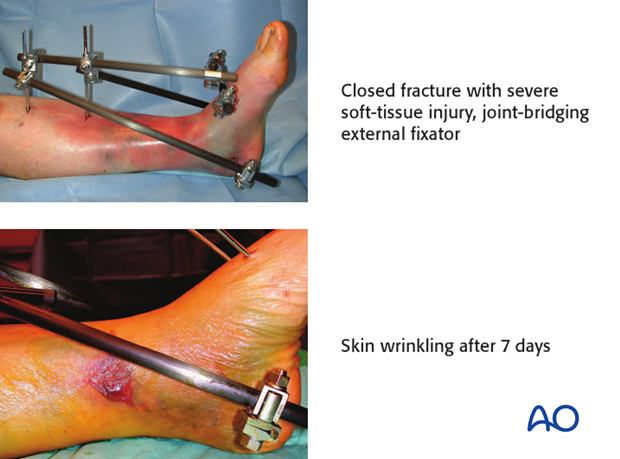
Grossly displaced fractures and / or fractures with moderate to severe closed soft-tissue injury
(Tscherne classification, closed fracture grade 2 or 3)
It is generally advisable to proceed in two or more stages:
- Closed reduction and joint bridging external fixation
- Definitive open reconstruction after 5-10 days (wait for the appearance of skin wrinkles)
Open pilon fractures
Open pilon fractures are often very severe injuries that may require plastic surgery for soft-tissue reconstruction. The management includes several stages:
Emergency management:
- Wound debridement and lavage
- Fibular stabilization and fixation (if needed and the soft tissues allow)
- Joint-bridging external fixation.
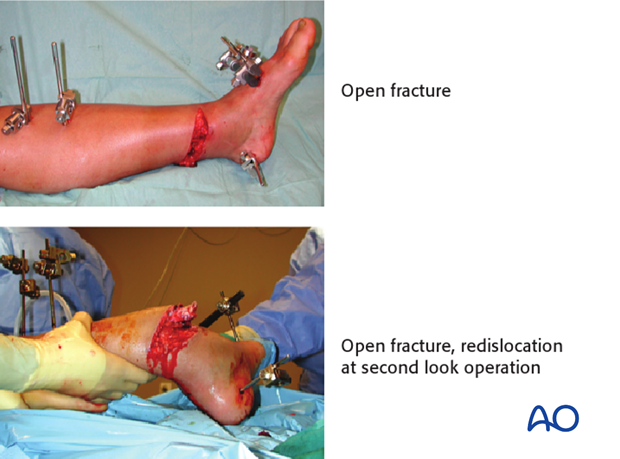
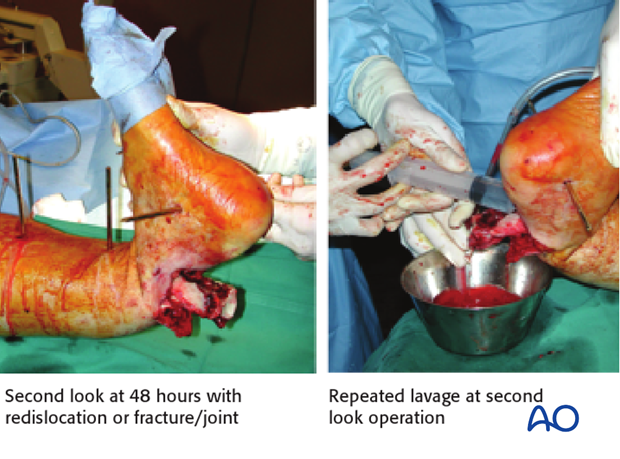
At 48 hours:
- Second look with repeated lavage (redislocation of fracture/joint!) and redebridement if necessary
- Soft-tissue coverage (local or free flap)
- Reconstruction of the tibial articular surface may be possible at the same time and should be considered if the exposure for flap coverage allows
Third stage:
Definitive stabilization between the articular segment (joint block) and tibial shaft by internal fixation (or external fixator) is typically delayed until soft-tissue recovery has occurred. However, this may be performed at the time of flap coverage in certain circumstances.
2. Fibula or tibia first? - Sequence of bone stabilization
Sequence of bone stabilization - fibula or tibia first?
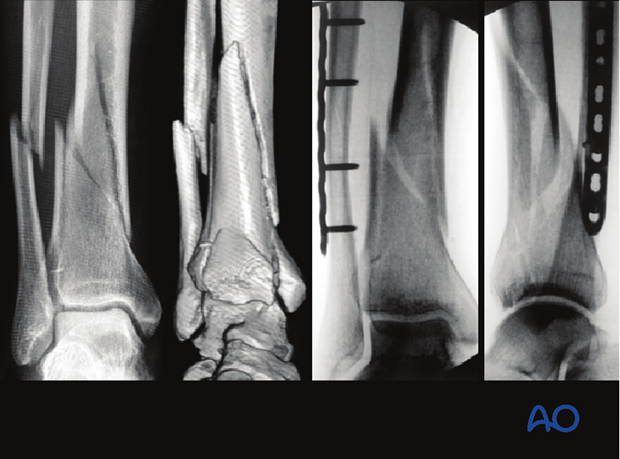
If the fibula is fractured, it needs to be stabilized.
Simple fracture of the fibula
This fracture is addressed as first step by open reduction and stable plate fixation. This indirectly reduces the antero- and posterolateral fragments of the articular surface of the tibia by the usually intact syndesmotic ligaments. Reconstruction of the articular surface of the tibia and stable plate fixation follow the fixation of the fibula.
Multifragmentary fibular fracture
This type of fracture (a) is preferably addressed after reconstruction of the tibia. The syndesmotic ligaments are usually intact, so gross realignment of the fibula occurs with reduction and fixation of the tibia (especially of the anterolateral and posterolateral fragments) as shown in figure (b).
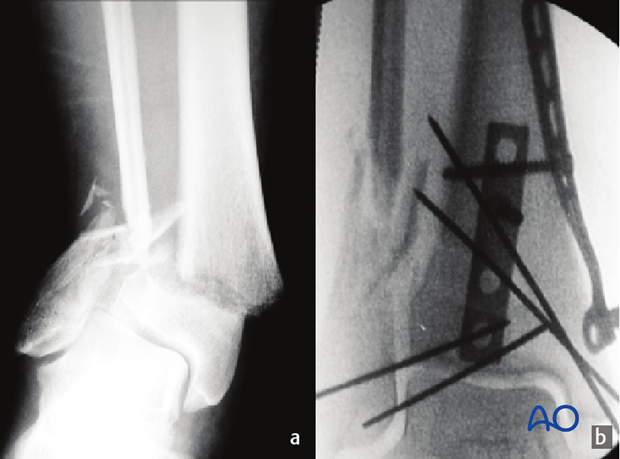
It is essential to achieve correct length, rotation, and axial alignment of the fibula. This may be achieved with a MIPO technique (c) using a long bridging plate (d).
3. Planning of reduction and fixation
Preoperative planning
Preoperative planning is an essential part of treatment of all pilon fractures. It consists of:
- Obtaining good AP and lateral x-rays of both injured and uninjured side; CT if needed
- Careful study of the x-rays and CT scan
- Tracing AP and lateral x-rays of normal side
- Identifying the individual fracture fragments
- Drawing the fracture fragments, reduced, onto the normal tracing
- Considering reduction techniques
- Choosing and drawing in fixation implants
- Choice of surgical approach
- Preparing a list of operative steps
Planning of reduction techniques
For the reduction of pilon fractures with displaced central fragments and/or impaction, the exact approach is planned from the CT. The approach is selected based on fracture location and type. Usually, it is either anteromedial or anterolateral, but occasionally posteromedial or posterolateral approaches are necessary.
These fractures cannot be reduced by ligamentotaxis alone and always need some direct manipulation and inspection of the joint. Therefore, a limited open approach is required at least for the reduction of the articular surface.
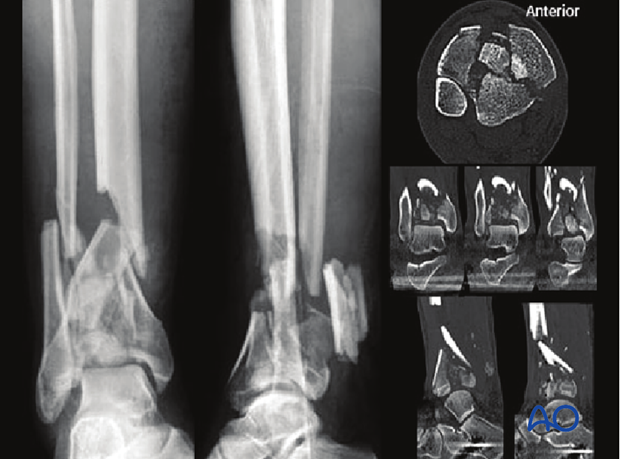
The illustrated case is a type 3A open fracture. The wound is posterior, with partial rupture of the Achilles tendon. One large posterior metaphyseal fragment had to be removed at the first operation (debridement, wash-out and joint bridging external fixation). 48 hours after injury, the traumatic wound was re-debrided and closed. A subsequent CT scan clarifies the comminution of the articular block.
4. Patient preparation and approach
Patient preparation
This procedure is normally performed with the patient in a supine position.

Approach
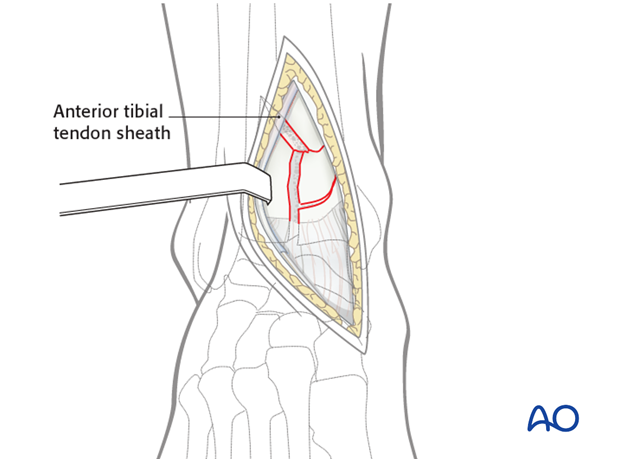
For this procedure an anteromedial approach is used.
5. Application of a distractor
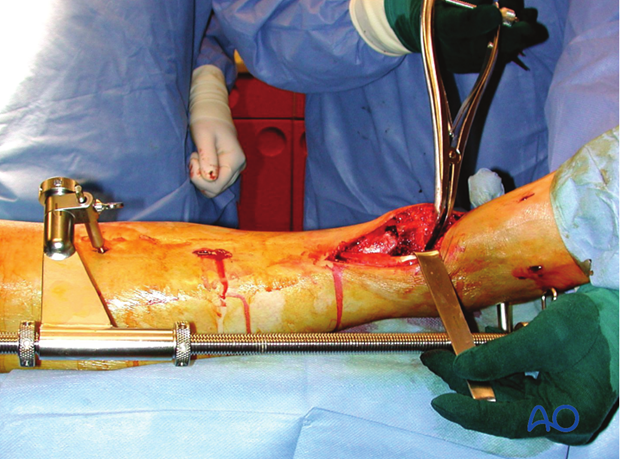
A distractor (or external fixator) is a very helpful tool for reduction. Distraction is used for the open reduction and plate fixation of the fibula as first step (if not yet already fixed) and for the reduction of the articular surface of the tibia as a second step.
Schanz screws are positioned in safe zones of the tibial shaft and talar neck (or the calcaneal tuberosity). In case of previously applied joint-bridging fixator, the already existing Schanz screws can be used. The talus (or calcaneus) is pulled in a caudal direction under distraction to allow a good view into the ankle joint. A new distal pin in the talar neck, parallel to the ankle joint distracts and can plantarflex the talus, perhaps providing the best fracture control and visualization.
6. Plating of the fibula
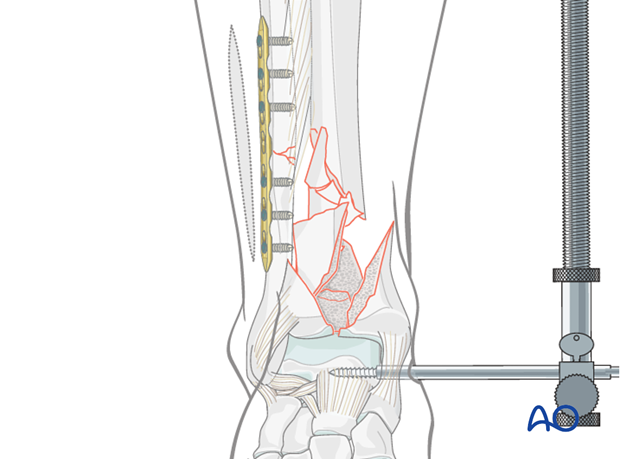
Through a posterolateral straight approach, the fibula is stabilized with a plate. In the illustrated case a LCP 3.5, with locking head screws, is used as a bridge plate because of the somewhat comminuted fracture. It is essential to achieve correct alignment for length, axis and rotation.
7. Reduction of articular segments
Exposure and cleaning of the fracture area
An anteromedial approach to the distal tibia is performed. Limit proximal extent of the incision to that necessary for articular exposure. The fracture zone is opened by separating the anterior fragments through the sagittal fracture line. The fracture and joint are irrigated and cleansed of clotted blood and small osteochondral fragments.
In the illustrated case with type III A open soft-tissue injury (posterior), all avascular metaphyseal fragments must be removed, leaving a large proximal metaphyseal defect. Inspect and document any cartilage damage on the talar dome. Now the central part of the fracture with several articular fragments is visible.
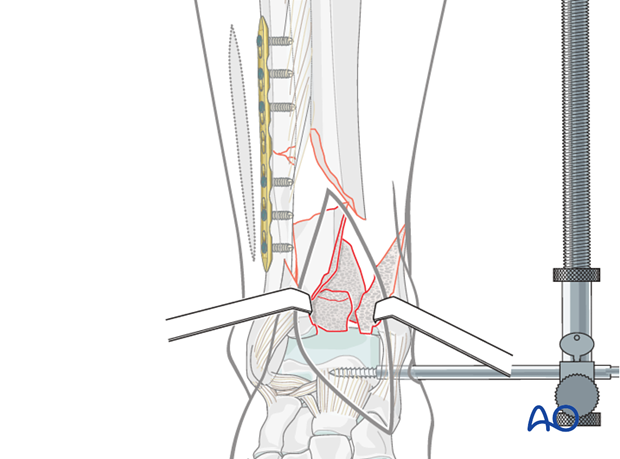
Reduction of the central fragment
First, realign the central fragment with the posterolateral part of the articular block.
This preliminary reduction is stabilized with a small K-wire inserted from anteriorly. This wire will become part of the fragment’s definitive fixation when it is cut and buried inside the completely reduced fracture (“lost” K-wire).
Cutting the buried K-wire requires sufficient access. This may be easier before the other fracture fragments are reduced.
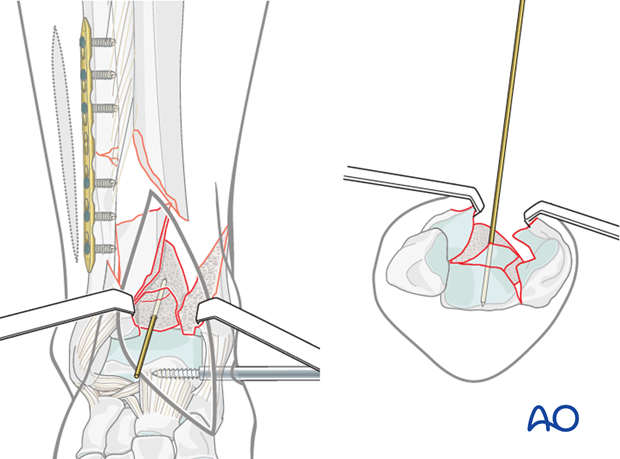
Reduction of the anterolateral fragment
The anterolateral fragment is reduced anatomically to the posterocentral block under visual control. Reduction is maintained by a small K-wire, inserted percutaneously through a separate small anterolateral incision.
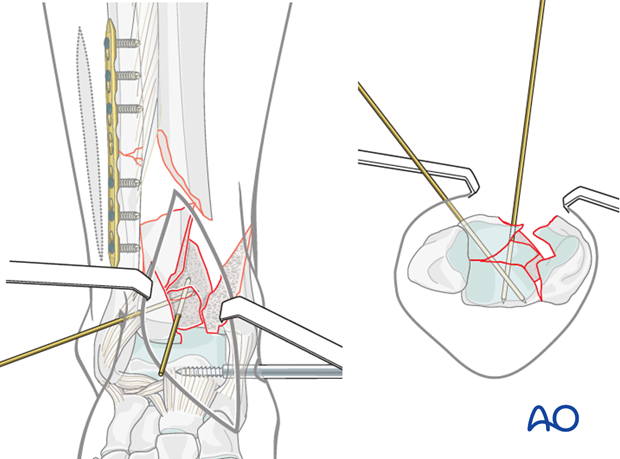
Reduction of the medial fragment
The medial fragment is reduced, with attached malleolus, to the lateral articular block. It is stabilized with a Weber clamp, which is then replaced with two K-wires.
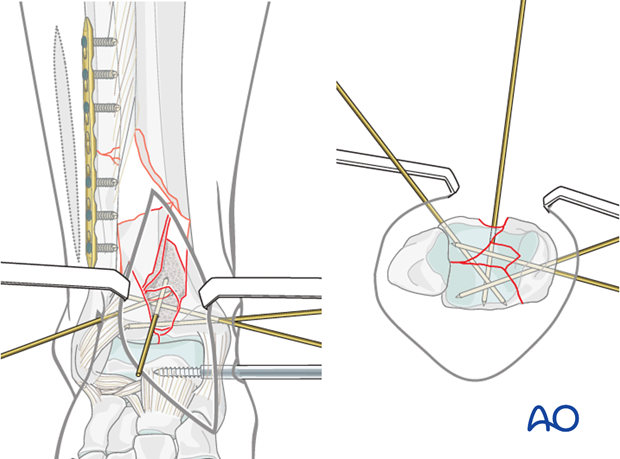
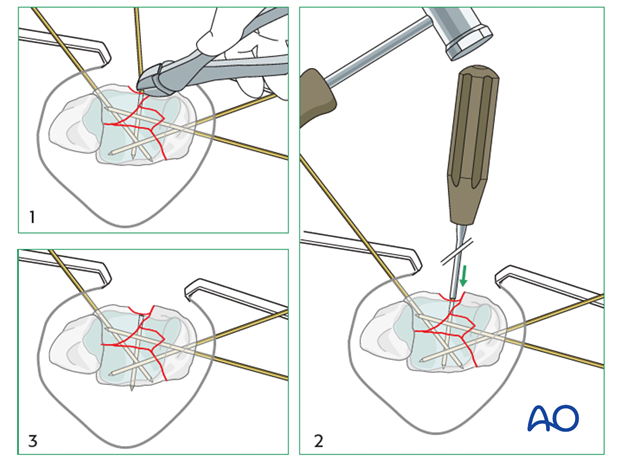
Burying the K-wire
- The K-wire is cut in the central piece as close to the bone as possible.
- The wire is impacted to bone level.
- This will allow the anterior metaphyseal fragment to be reduced anatomically into the remaining defect.
Alternatively, the K-wire may be replaced by a resorbable pin.
Reduction of the metaphyseal fragment
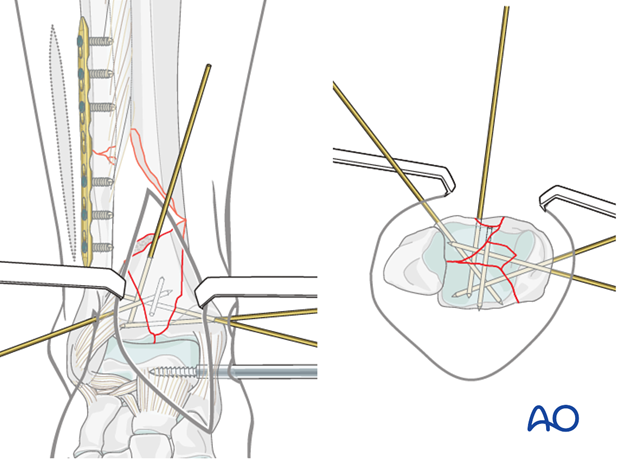
The anterior cortical defect is closed just above the subchondral bone.
The illustration shows the defect filled with the large anterior metaphyseal fragment which has remained attached to the lateral periosteum. This fragment is fixed preliminarily with a K-wire.
Correct reduction is confirmed and documented by fluoroscopy (see also the content on assessment of reduction).
8. Screw fixation of the articular block
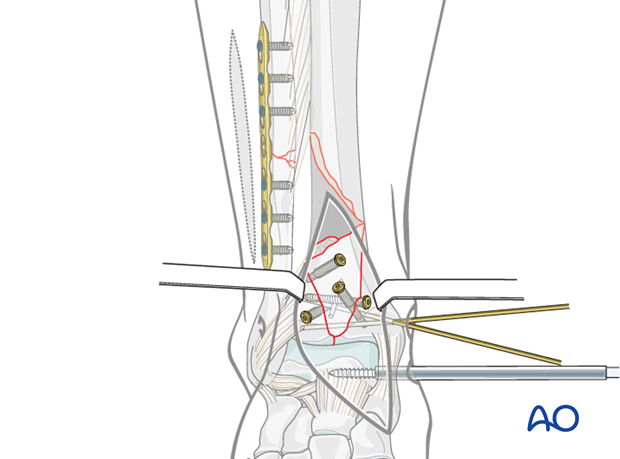
The reduced articular block is stabilized with several lag screws, one inserted from anterolateral to posteromedial, another one inserted from anteromedial to posterolateral. In the illustrated case 3.5 mm lag screws were used, but it is not uncommon to use smaller and variable screws in other cases, such as 2.7 mm, 2.4 mm, and even 2.0 mm.
The large, anterior metaphyseal fragment is also fixed with two lag screws, one directed to the posterolateral, the other one to the posteromedial metaphysis. If the screws provide adequate stability, the anterior K-wires can be removed.
See also the additional material on lag screw principles.
9. Implant choice
A variety of anatomical plates are available from different manufacturers.
In case of a large meta-diaphyseal defect, a stronger plate should be used. The LCP distal medial tibia plate is thicker than the distal part of the LCP distal tibial metaphyseal plate. Therefore, it was used for the illustrated case.
The selected plate is anatomically preformed and usually does not require contouring. Alternatively, a cloverleaf plate or two small (e.g., one-third tubular) plates may be used.
10. Plate fixation
Plate insertion
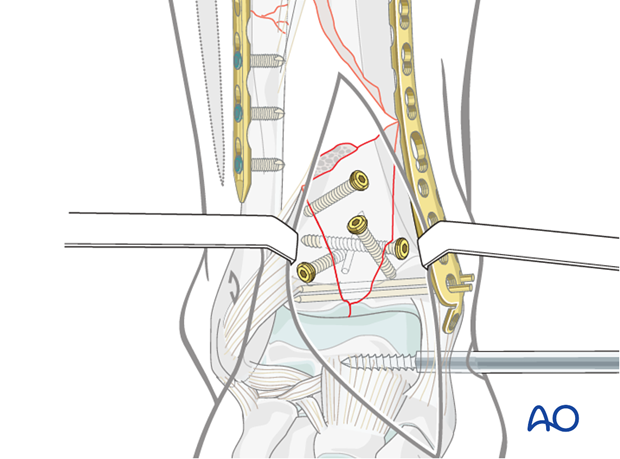
The plate is inserted epiperiosteally on the anteromedial aspect of the distal tibia, after developing a subcutaneous tunnel.
The K-wires are shortened (to 5-10 mm above the bone surface) so that they can pass through screw holes. If this is not possible, the K-wires are repositioned to allow placement of the plate.
Definitive stabilization of the articular block
The plate is positioned at the correct level to allow the application of two locking screws, replacing the K-wires, from medial to lateral through the plate, close to the articular surface. The screws pass below the previously placed AP screws. One is directed into the anterolateral, and the other one into the posterolateral fragment.
With this step, the articular block is definitively stabilized.
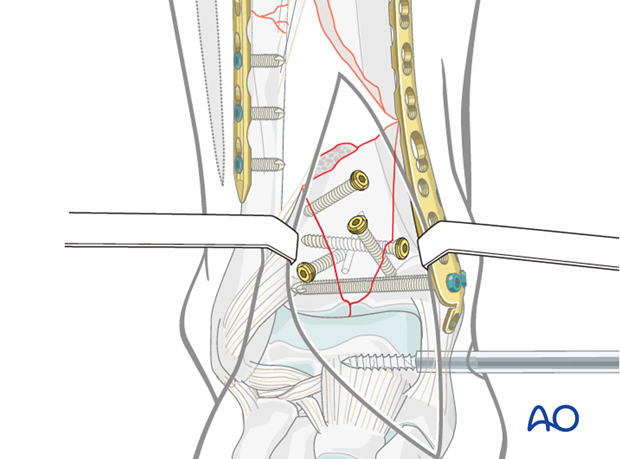
Metaphyseal fixation
Secure fixation of the plate to the articular block is important for bridging the large metaphyseal defect. Locking head screws may be optimal for this purpose. This justifies selection of a locking plate if it is available.
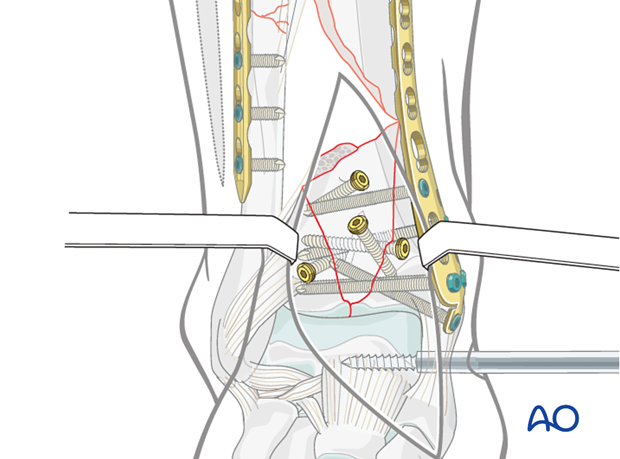
Proximal plate fixation
In the illustrated case, proximal fixation of the plate to the diaphysis is achieved with locking head screws inserted close to the defect and at the proximal end of the plate. Additional plate length improves proximal fixation and confirms sagittal plane reduction. With good bone quality, non-locking cortical screws can be used.
It is essential to obtain correct length, axis and rotation before the first screw is applied in the diaphysis. Careful use of fluoroscopy and physical exam are essential for assessing alignment.
The whole fracture zone is now stabilized. When the soft tissues are healed (4-6 weeks), the large lateral bone defect will be filled with an extensive cancellous bone graft from the posterior iliac crest.
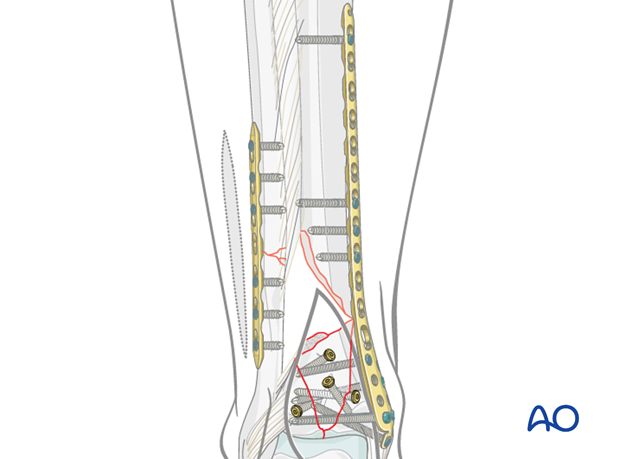
11. Assessment of reduction
The anatomical reduction of the joint block and correct alignment of the distal fibula and tibia is radiographically checked at the end of the operation.
Note the “lost K-wire” which is slightly overlapping the posterior bone border. Before wound closure, radiographic confirmation of joint congruity, length, and axial alignment is mandatory (see also the content on assessment of reduction).
In the illustrated case, the dead space (bone defect) was not initially filled. Alternatively, antibiotic bone cement, as a block or beads, can be used to fill the defect temporarily.
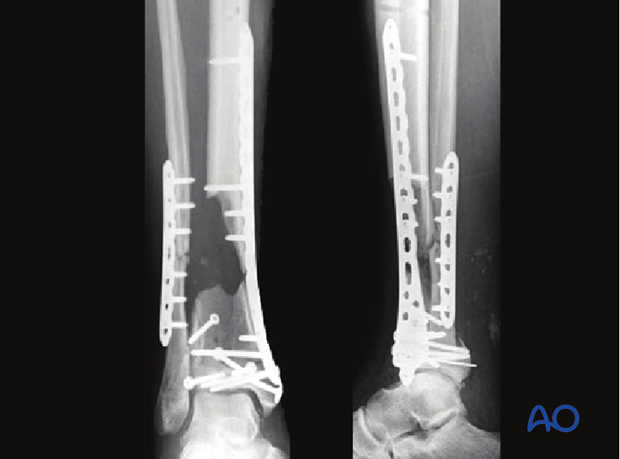
12. Bone grafting
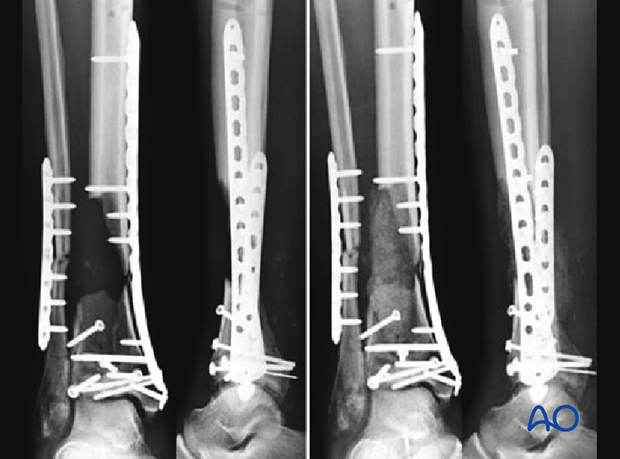
After six weeks, the soft tissues have healed uneventfully, allowing the planned bone grafting of this large defect. The consolidation of the fibula and articular block has already started with a still stable fixation.
13. X-ray follow-up
X-ray follow-up at 3 months after bone grafting
The entire bone graft has healed in nicely. The fibula and the distal tibia seem to be united. Therefore, full weight bearing was started at that time.

14. Alternative - Fixation with traditional plates
Cloverleaf plates
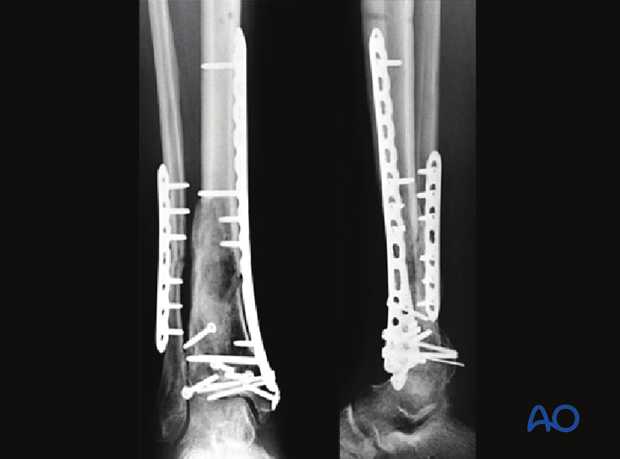
If locking plates are not available, traditional plates can be used for ORIF of multifragmentary articular fractures of the distal tibia. The standard traditional plate is the cloverleaf plate 3.5, which can be placed medially, anteromedially or anteriorly, depending on the fracture pattern.
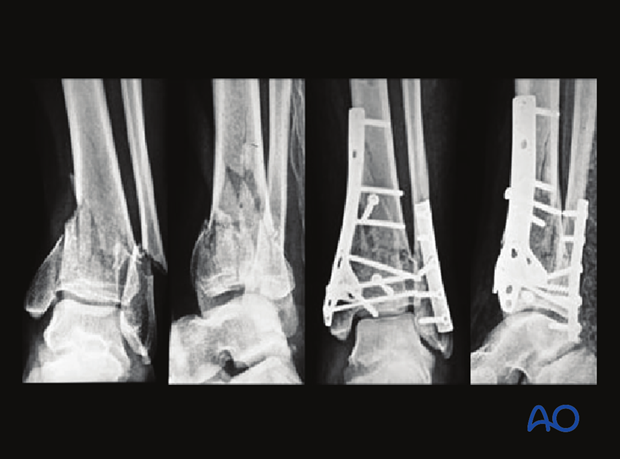
Double-plate technique
The case example is showing injury, preoperative plan, and end result with double plating fixation technique.
Double plating, with two one-third tubular plates (or others) to buttress the incompetent cortices, can be used instead of a singular locking plate as an alternative. However, the latter may offer greater stability, particularly in osteoporotic bone.
15. Aftercare following plating
Leg elevation is recommended for the first 2-5 postoperative days. Physiotherapy with active assisted exercises is started immediately after operation. Immobilization is not necessary.
Mobilization
Starts depending on the wound healing with flat footed, weight of the leg weight bearing (10-20kg).
Follow up
Clinical and radiological follow-up is recommended after 2, 6 and 12 weeks. Depending on the consolidation, weight bearing can be increased after 6-8 weeks with full weight bearing usually after 3 months. Supervised rehabilitation with intermittent clinical and radiographic follow-up is advisable every 6-12 weeks until recovery reaches a plateau, typically 6-12 months after injury. Weight-bearing radiographs are preferable to assess articular cartilage thickness. Angular stable fixation may obscure signs of non-union for many months.
Implant removal
Implant removal may be necessary in cases of soft-tissue irritation by the implant (plate and/or isolated screws). The best time for implant removal is after complete remodeling, usually at least 12 months after surgery.
