ORIF - Lag screws with or without buttress plate
1. Principles
General considerations
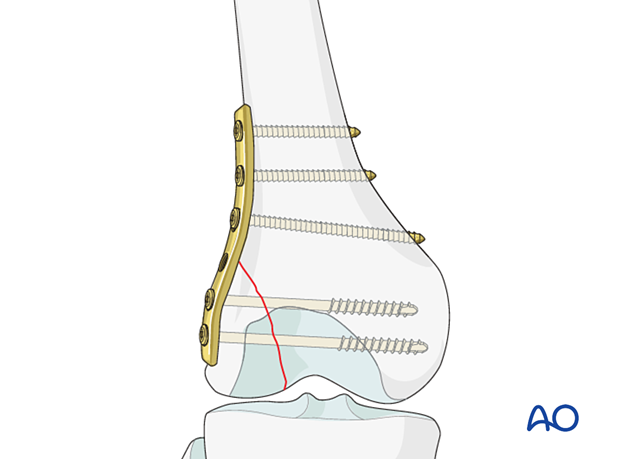
As with any articular injury, anatomical restoration of the joint surface must be obtained. This is generally done under direct vision, with clamp application, provisional fixation and then lag screw fixation.
Strong axial loading forces, as well as varus/valgus stress in the knee joint can tend to displace fragments and a buttress plate must be added.
Lag screws can also be inserted through the plate or be used independently.
Screw location
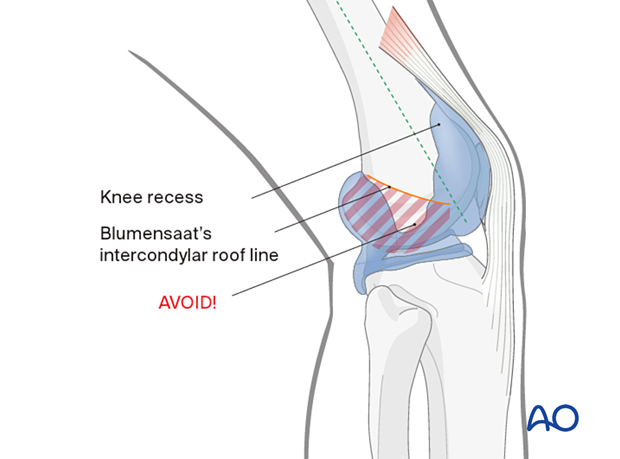
In general, the screws are inserted at points along the midshaft axis of the femur (dashed line). The area distal to the Blumensaat’s intercondylar roof line must be avoided so as not to violate the notch. In addition, the area of the knee recess should be avoided.
If you need to insert a screw in the area distal to the Blumensaat’s intercondylar roof line, make sure to direct the screw anteriorly, in order to avoid the intercondylar notch. Alternatively, if the screw is through the plate, the screw should not have enough length to go through to the midline.
Anatomy of the distal femur
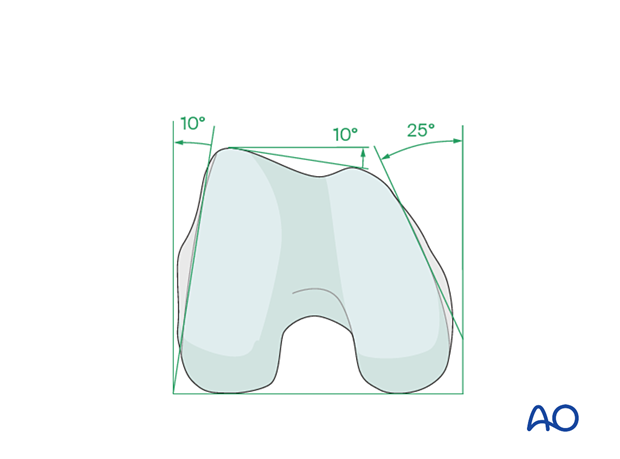
The distal femur has a unique anatomical shape. Seen from an end-on view, the lateral surface has a 10° inclination from the vertical, while the medial surface has a 20–25° slope. A line drawn from the anterior aspect of the lateral femoral condyle to the anterior aspect of the medial femoral condyle (patellofemoral inclination) slopes approximately 10°. These anatomical details are important when inserting screws. In order to avoid joint penetration, screws should be inserted parallel to the patellofemoral and femorotibial joint planes.
2. Patient preparation and approach
Positioning
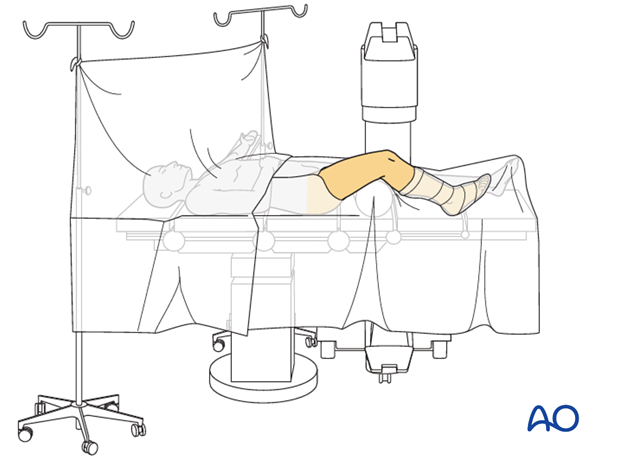
This procedure may be performed with the patient in one of the following positions:
- Supine position knee flexed 30°
- Supine position knee flexed 90°
- Lateral decubitus (particularly in obese patients)
Approach
For this procedure the following approaches may be used:
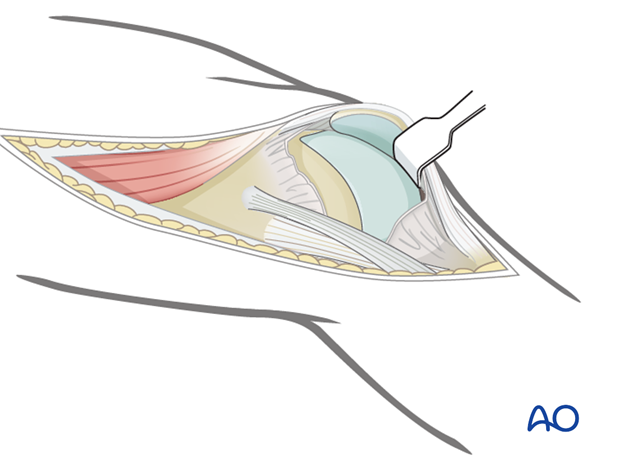
The standard lateral/anterolateral approach gives satisfactory joint exposure to check the quality of the joint reduction.
3. Joint debridement
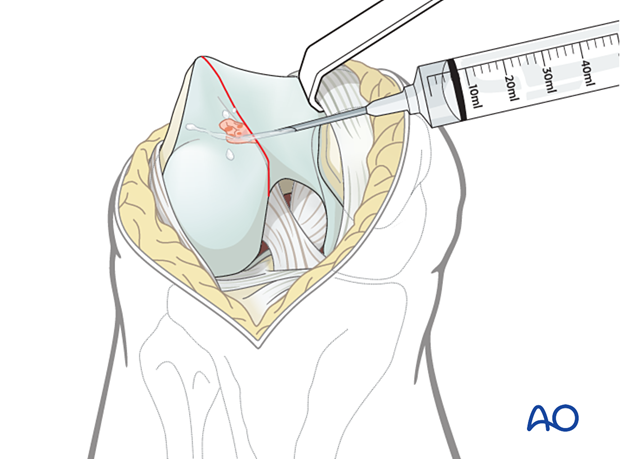
Remove enough of the intraarticular hematoma to obtain an accurate reduction and rinse the joint thoroughly with saline solution.
4. Reduction
Temporary reduction
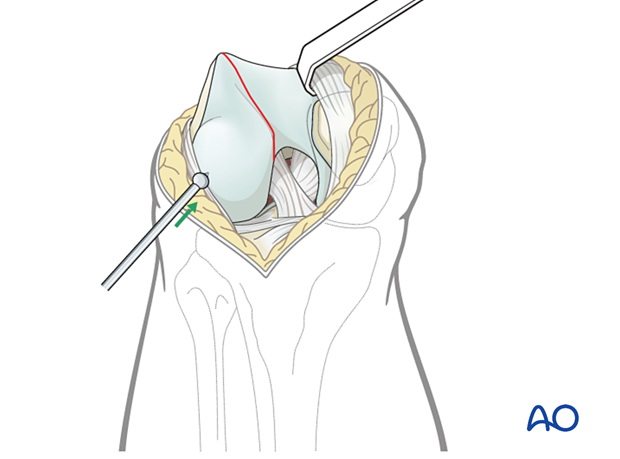
Reduce the fragment using a periosteal elevator and a ball-spiked pusher (illustrated), or a dental pick.
Reduction and temporary fixation
Make a stab incision for the placement of the pointed reduction forceps.
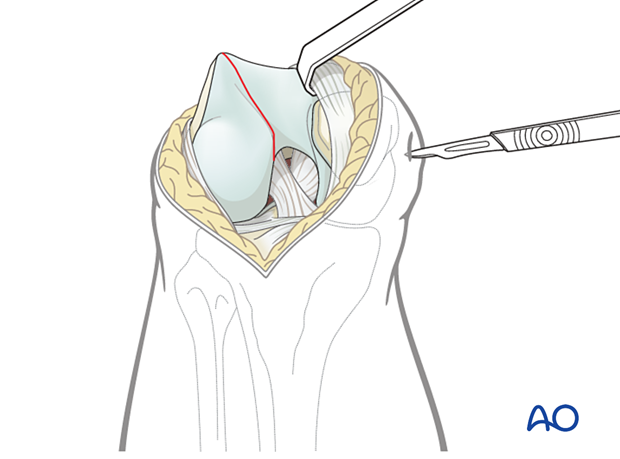
Hold the final reduction using a large pointed reduction forceps. Make sure to place the pointed reduction forceps not too posterior as compression across the intercondylar notch would tend to tilt the fragment.
Secure the reduction with one, or more, temporary K-wires. Make sure that the K-wire does not conflict with the planned screw track and plate.
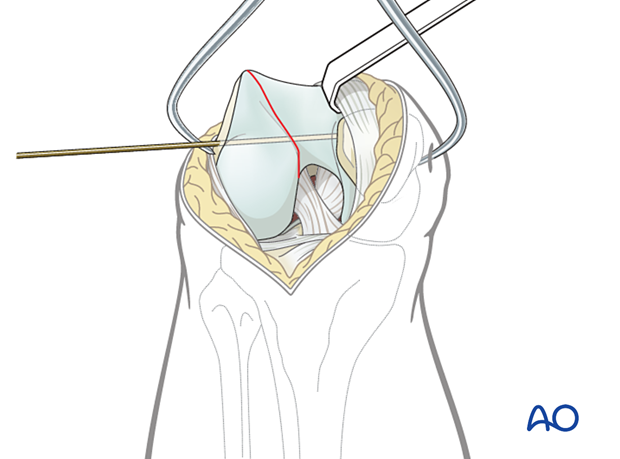
Insertion of temporary K-wire following reduction.
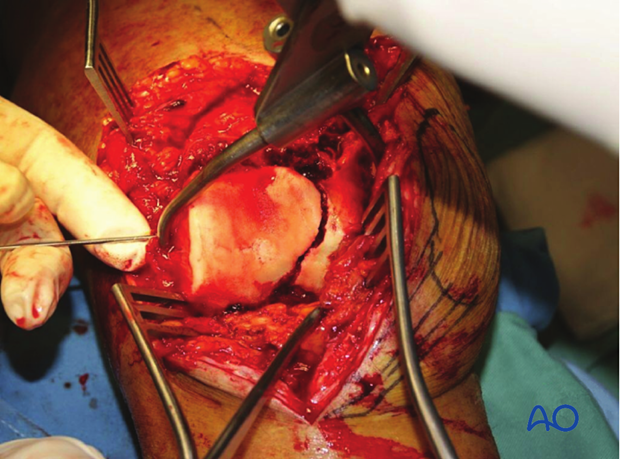
Check of reduction
The quality of the reduction is confirmed radiographically.
5. Insertion of buttress plate
Principle
To enhance the stability and to avoid axial load on the fracture (especially in osteoporotic bone) a buttress plate is needed to prevent cranial displacement of the fragment.
That plate need be placed according to the position of the unstable fracture fragment. Occasionally this fracture fragment is posterior rather than in the midline.
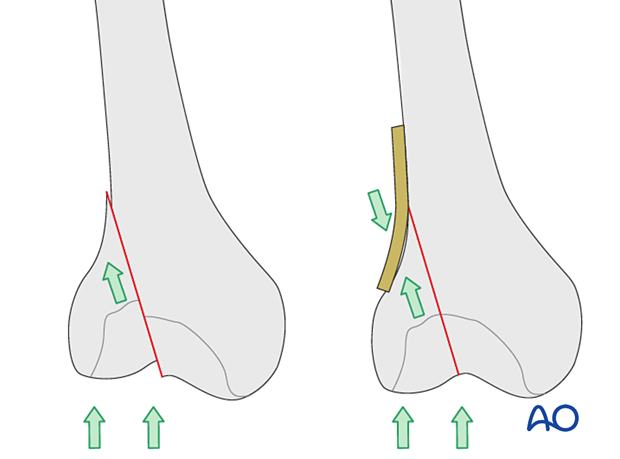
A wide range of plates can be utilized and as an example we will here use a simple 4.5 mm narrow plate. The plate must be contoured with a light pre-bend, that is, there should be a 1 mm gap between the central part of the plate and the bone when placed on the bone.
Alternative buttress plate insertion
- Application of LCP plate as buttress plate (minimally invasive)
- Application of LCP plate as buttress plate (open)
Depending on which plate, and the length of the plate that is used, lag screws can be inserted either through or outside the plate.
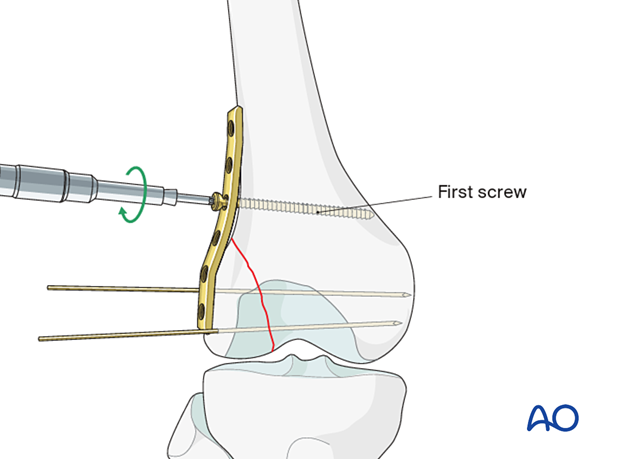
Insertion of first screw
Apply the plate to the lateral aspect of the distal femur. To press the under-contoured plate firmly to the femur, insert a standard cortical screw just proximal to the fracture line in neutral mode.
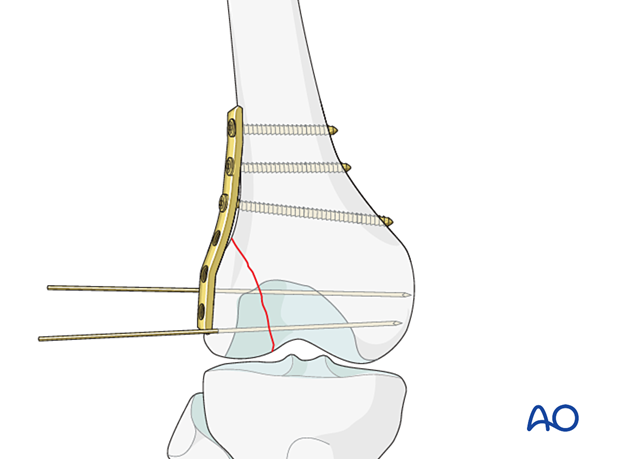
Insertion of further screws
Secure the plate with two more bicortical screws proximal to the first screw in neutral mode.
6. Insertion of lag screws
Partially threaded cancellous lag screws are inserted either as cannulated or non-cannulated lag screws, either outside or inside the plate. Both techniques are described in the following link.
Depending on the size of the fragment, 2 to 4 screws are necessary.
Screw size will depend on the size of the patient and the fragment.

When cannulated screws are planned, use the image intensifier to make sure that the tips of the guide wires just penetrate the far cortex.
In good bone stock, you may now remove the pointed reduction forceps. Otherwise, leave the pointed reduction forceps in place until all screws have been inserted.
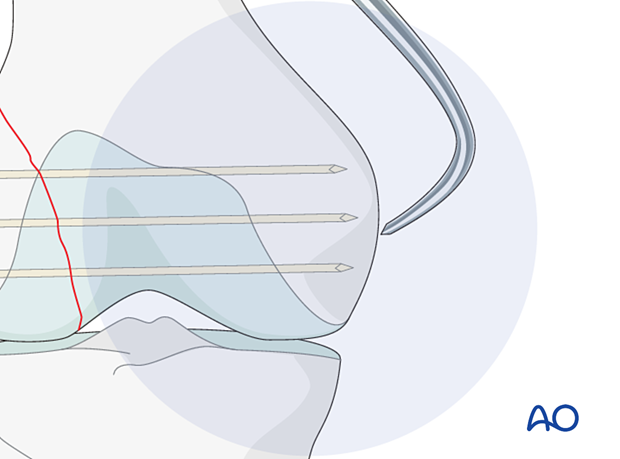
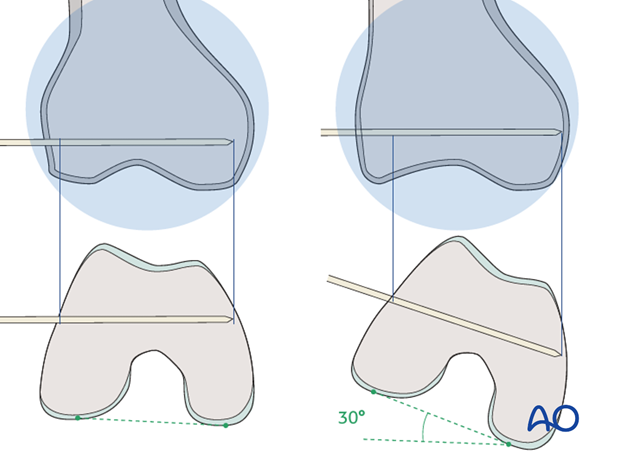
It is important to remember that the distal femur tapers from the posterior to the anterior. Therefore, if a straight AP view is obtained, the guide wire can appear to be inside the bone. If it appears to be outside the bone, it is most likely too long. In order to assess the exact length of the guide wire obtain an AP view with 30° internal rotation of the lower extremity.
Check of implant position
Check the osteosynthesis, using the image intensifier in at least two planes.
7. Wound closure
Irrigate all wounds copiously. Insert an intraarticular suction drain. Close the joint and the iliotibial tract using absorbable sutures. Close the skin and subcutaneous tissue in the routine manner.
With the femur now stable, it is possible to perform a gentle examination of the knee joint to exclude associated ligamentous laxity, but be extremely careful testing with valgus stress.
8. Aftercare
Impediments to the restoration of full knee function after distal femoral fracture are fibrosis and adhesion of injured soft tissues around the metaphyseal fracture zone, joint capsular scarring, intra-articular adhesions, and muscle weakness.
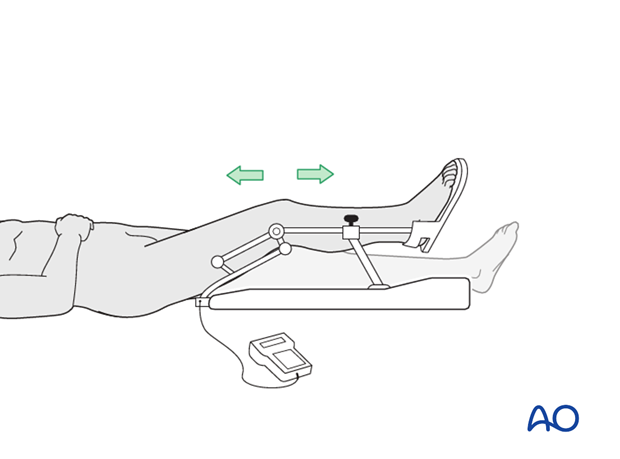
Early range of motion helps restore movement in the early postoperative phase. With stable fracture fixation, the surgeon and the physical therapy staff will design an individual program of progressive rehabilitation for each patient.
The regimens suggested here are for guidance only and not to be regarded as prescriptive.
Functional treatment
Unless there are other injuries or complications, knee mobilization may be started immediately postoperatively. Both active and passive motion of the knee and hip can be initiated immediately postoperatively. Emphasis should be placed on progressive quadriceps strengthening and straight leg raises. Static cycling without load, as well as firm passive range of motion exercises of the knee, allow the patient to regain optimal range of motion.
Weight bearing
Touch-down weight-bearing (10-15 kg) may be performed immediately with crutches, or a walker. This will be continued for 6-10 weeks postoperatively. This is mostly to protect the articular component of the injury, rather than the shaft injury. Touch-down weight-bearing progresses to full weight-bearing gradually, over a period of 2 to 3 weeks (beginning at 6–10 weeks postoperatively). Ideally, patients are fully weight-bearing, without devices (e.g., cane) by 12 weeks.
Follow-up
Wound healing should be assessed at two to three weeks postoperatively. Subsequently 6-week, 12-week, 6-month, and 12-month follow-ups are usually made. Serial x-rays allow the surgeon to assess the healing of the fracture.
Implant removal
Implant removal is not essential but should be discussed with the patient if there are implant-related symptoms after consolidated fracture healing.
Thrombo-embolic prophylaxis
Thrombo-prophylaxis should be given according to local treatment guidelines.
