Open reduction internal fixation
1. Principles
General considerations
Considerations related to dental occlusion render nasotracheal intubation necessary. If that is not feasible, primary submental/submandibular intubation should be considered. Depending on the patient’s general condition, a tracheostomy might also be considered.
The aim of successful reconstruction of midface fractures is reestablishing the midfacial vertical buttresses. These pillars can serve an even more important role in patients who lack dentition (partial or completely edentulous patients).
A principle in all Le Fort fractures is to reestablish the premorbid dental occlusion. Portions of the pterygoid plates and associated musculature are still attached to the posterior portion of the maxilla, so passive mobilization of the fracture can be difficult. Without passive mobilization, Class III tendency often occurs in the postoperative period. The reason for this is that when patients are placed into MMF during surgery, soft-tissue tension from the attached musculature distalizes the mandibular condyles in the glenoid fossae. When the MMF is removed, the condyles re-seat themselves into their normal position, bringing the mandibular dentition forward, creating a Class III malocclusion. In order to properly achieve a passive position of the maxilla, the maxilla requires strong mobilization forces using varied instrumentation: Rowe’s disimpaction forceps, “Stromeyer” hook, Tessier retromaxillary mobilizers, etc.
The goal is to achieve an anatomical correct repositioning by means of 3-D reconstruction. If available, dental cast, stereolithographic models, and/or premorbid photographs may be useful guides for treatment.
As a general principle, all facial fractures should be exposed and reduced before plating.
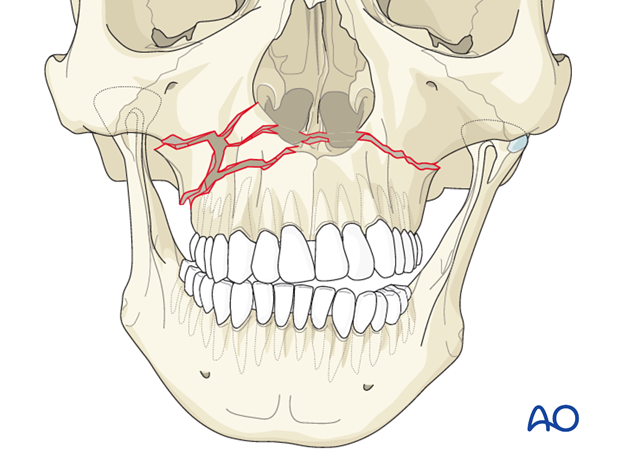
Choice of implant
It is difficult to give absolute guidelines as to the strength of the plates that would be used at the bony interfaces for a Le Fort I fracture. The following however should be considered:
- A plate that is placed for the fixation of the fracture at the zygomaticomaxillary buttress is generally a larger plate because it is the point that will provide most stability to the Le Fort I fracture. The highest forces of mastication would be in this area. Depending on the fracture pattern an L-, T-, Y-plate or a straight plate may be used.
- Another plate can also be applied at the piriform rim.
There is considerable variation in different cases as to how unstable or comminuted the fractures may be. Furthermore, the majority of Le Fort I fractures are also associated with a multitude of other midface fractures. This has further impact on deciding the size and strength of the plate that must be used. Finally, in many cases of Le Fort I fracture with other panfacial trauma, many surgeons may choose to leave the patient in MMF for a period of time postoperatively. This has a further impact in deciding whether a larger or smaller plate is adequate.
Click here for a description of implant options.
Teaching video
AO Teaching video on fixation of a complex midface fracture
2. Approach
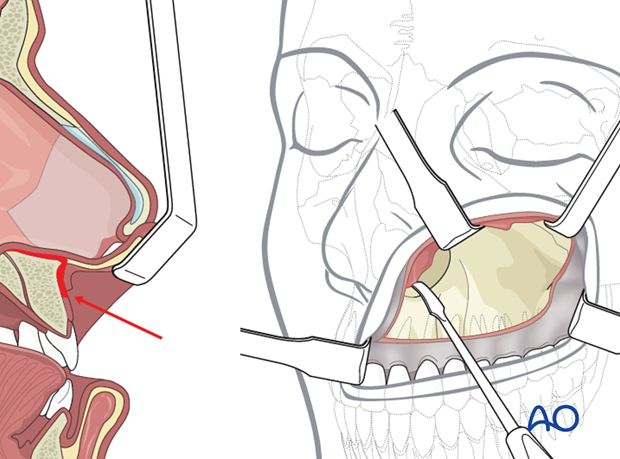
For this procedure, standard approaches to the maxilla are used. However, if present, lacerations can be used to directly access fracture site for fracture managment.
3. Reduction
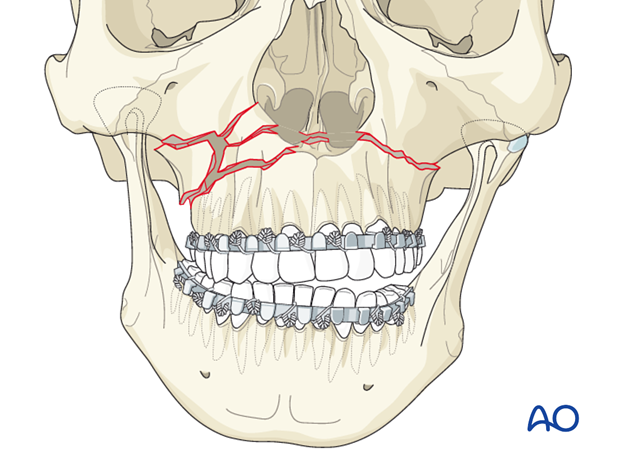
Arch bars
First, arch bars are secured to the dentition. Click here for a detailed description of mandibulomaxillary fixation.
Mobilization
After exposure of the fracture segments through a maxillary vestibular approach, the fracture has to be mobilized to enable reduction and fixation.
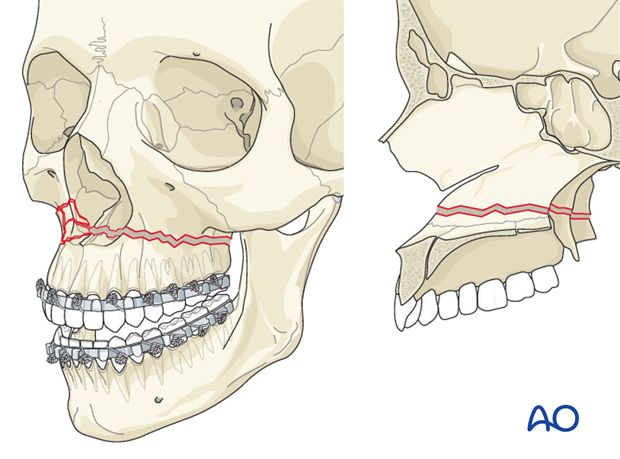
Reduction instruments
Rowe disimpaction forceps
The Rowe disimpaction forces are side specific. They allow the application of great amounts of force to disimpact and reposition the maxilla and midface.
Note: Special attention has to be given to the patient individual fracture pattern so that the use of these instruments does not result in significant shearing at the skull base or orbit. Otherwise, severe complications such as blindness can occur.
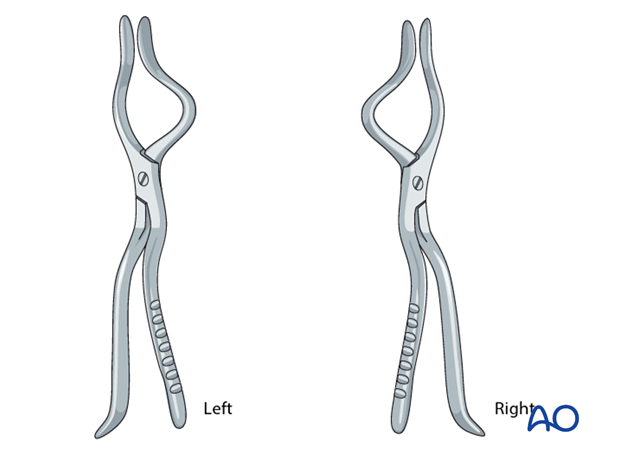
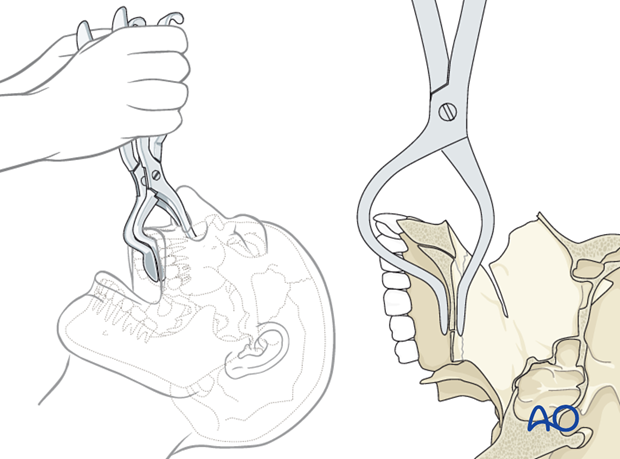
Special attention has to be paid regarding the correct placement of the Rowe disimpaction forceps so that the upper anterior dentition is not harmed.
The maxillary fracture is completely mobilized and an attempt should be made to make the fragment as passive as possible. This may require an up-down and side-to-side movement of the forceps.
Bone hooks
According to regional preferences and various schools of teaching, different bone hooks are used for fracture reduction.
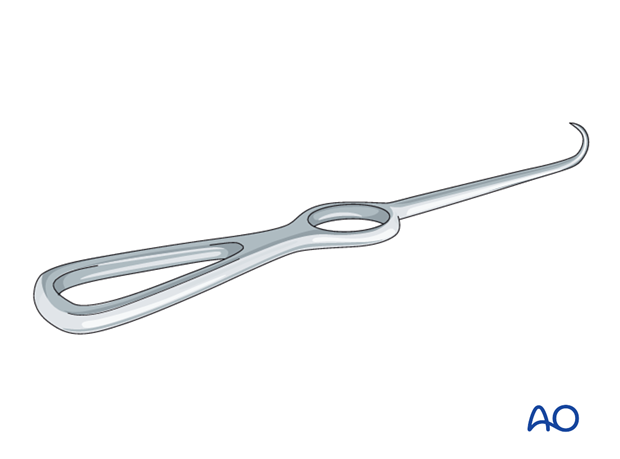
- Reduction hook (Stromeyer hook)
The Stromeyer hook (Georg Friederich Louis Stromeyer, Hannover, Germany, 1804-1876) is very versatile for transoral reduction of Le Fort fractures.
In selected cases the Stromeyer hook can also be used for manipulating the Le Fort complex by hooking the tip of the instrument inside the piriform aperture and pulling downwards and anteriorly. This technique is called downfracture procedure in Le Fort osteotomies.
Placing the patient into MMF
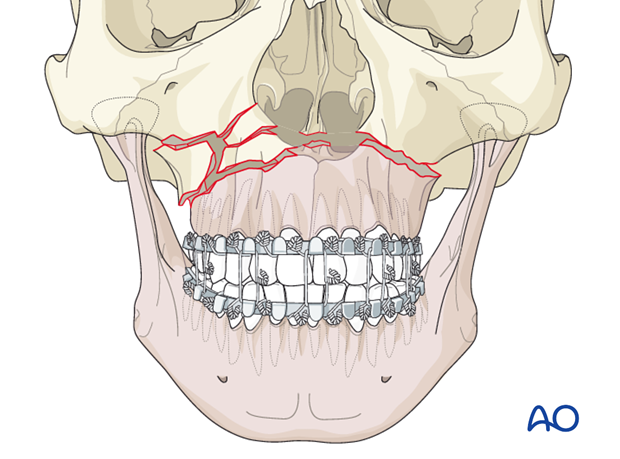
After the fracture has been adequately mobilized, the patient is placed into MMF. Click here for a detailed description of various MMF techniques.
Note: In case of concomitant mandibular fractures, the integrity of the mandible should be restored as a first measure.
Reducing the maxilla
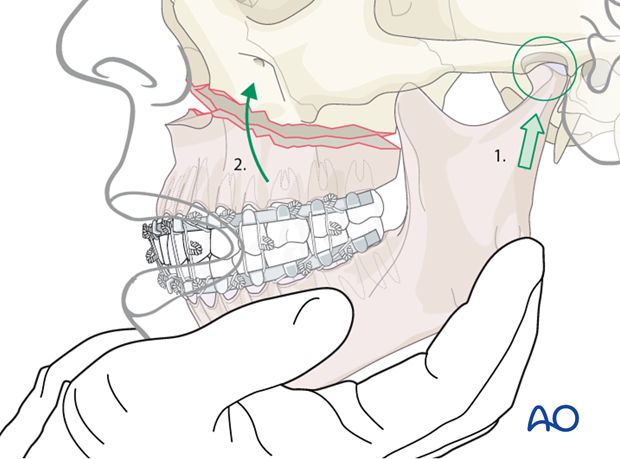
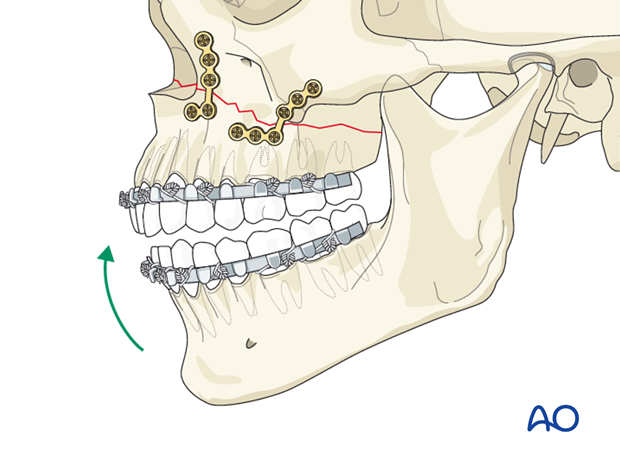
Ensuring that the condyles are properly seated within the glenoid fossae (1), the maxillomandibular complex is rotated superiorly until the point where maximum bone contact occurs at the fracture site (2).
4. Fixation (comminution without defect)
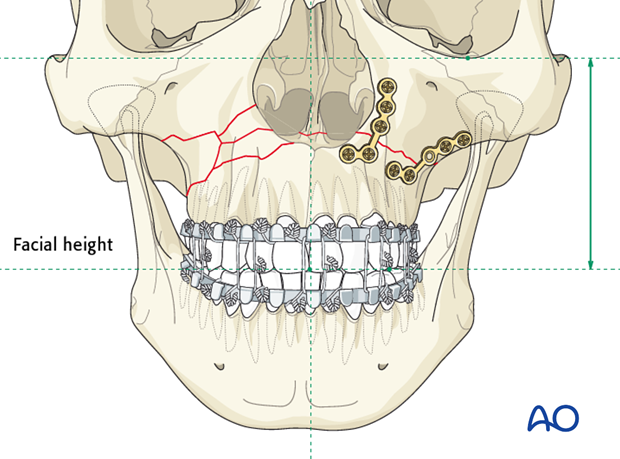
Apply plates to the linear fracture side
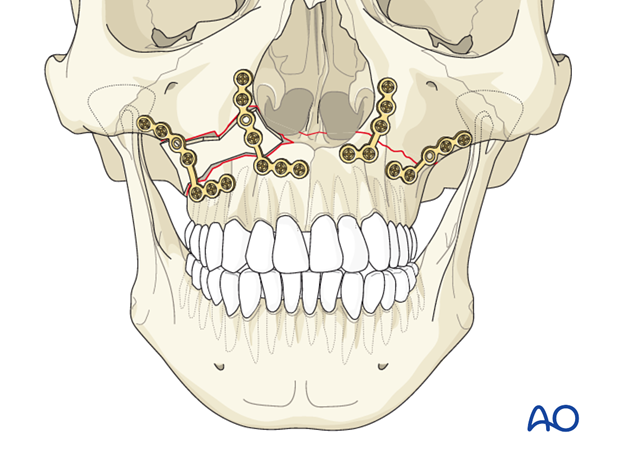
Fix the noncomminuted side by applying two plates along the vertical buttresses. Choose and contour the plates. Make sure that the screws placed below the fracture line avoid the tooth roots.
Insert at least two screws on each side of the fracture line in each plate.
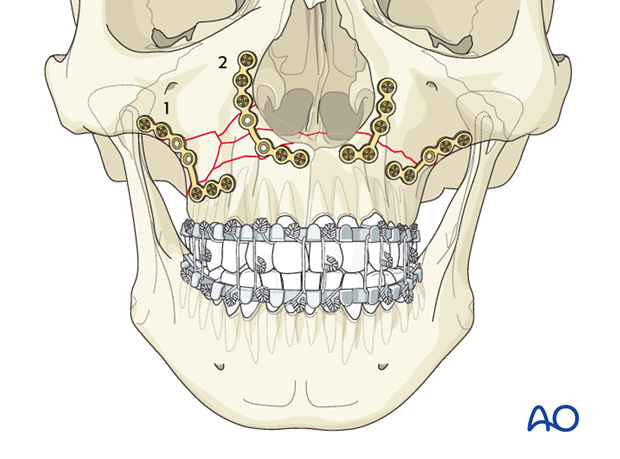
Apply plates to the comminuted fracture side
Fix two plates to the comminuted side. It is advisable to start with the lateral plate (1).
Insert at least two screws on each side of the fracture in each plate.
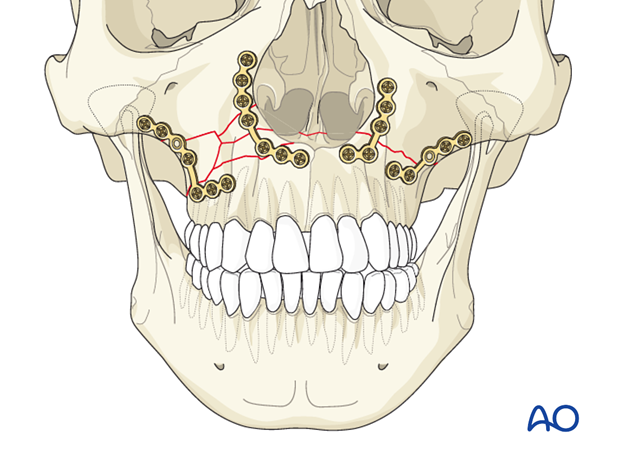
Secure fracture fragments to the plate
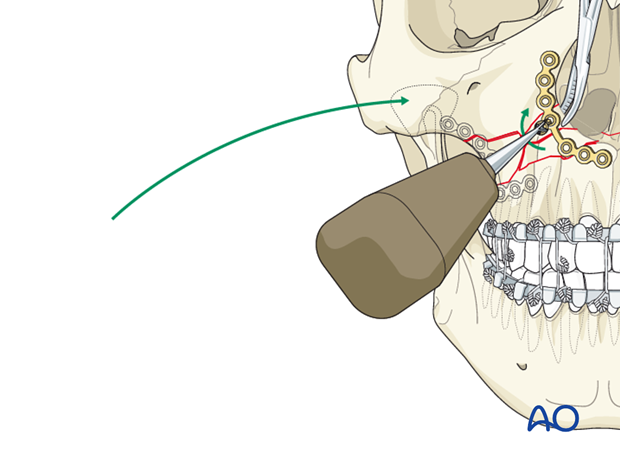
After the two plates are properly fixed, further screws can be inserted in order to fix fracture fragments to the plates.
Pearl: predrilling of comminuted fragments
Fixation of comminuted fragments to the plate is a demanding procedure which can be facilitated by predrilling the bony fragment outside the operational field. Therefore:
- Mark (or remember) the plate hole position on the surface of the fragment
- Remove the bony fragment
- Drill a pilot hole into the bony fragment
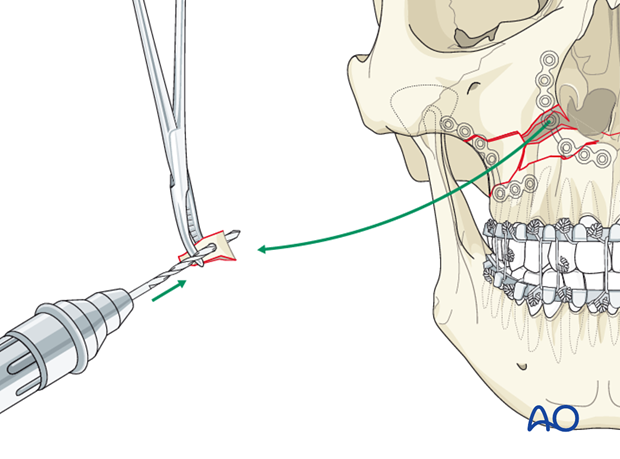
- Reposition the bony fragment using a forceps
- Fix the fragment with a screw.
Note: self-retaining screw drivers can be a disadvantage when dealing with thin bony fragments. It is advised to use non-self-retaining screw drivers.
Note: Using a screw with small diameter and low pitch allows for better retention.
5. Fixation (comminution with defect)
Apply plates to the linear fracture side
Fix the noncomminuted side by applying two plates along the vertical buttresses. Choose and contour the plates. Make sure that the screws placed below the fracture line avoid the tooth roots.
Insert at least two screws on each side of the fracture line in each plate.
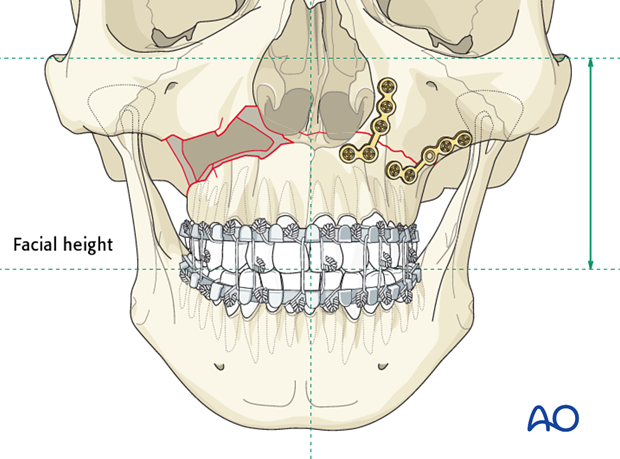
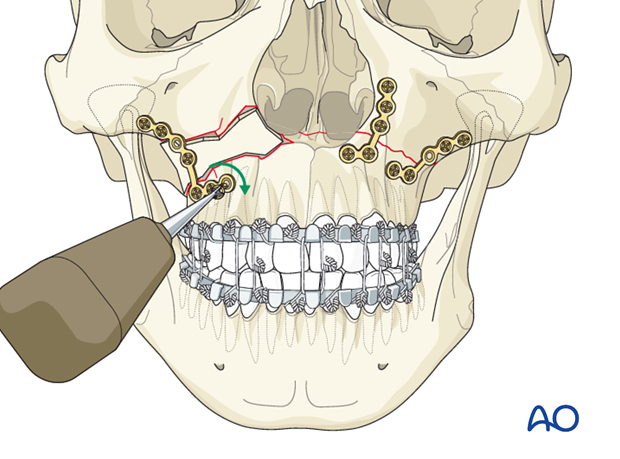
Buttressing of the defect side
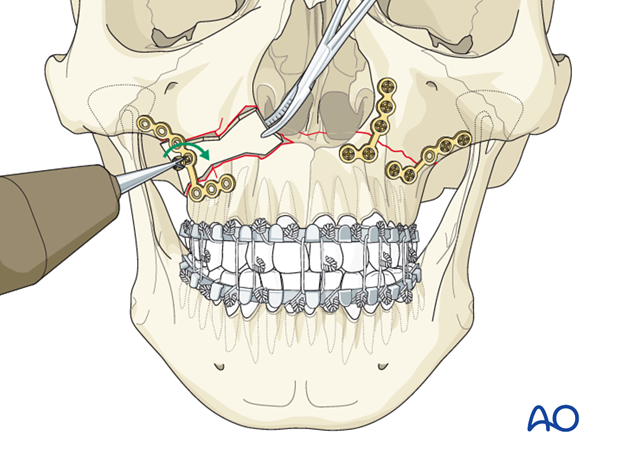
Bone graft is used to fill the defect and the buttresses are restored by plates.
The lateral buttress is plated first, followed by the medial buttresses. The lateral segment is repaired in the following order:
- Contour the plate to the buttress area.
- Insert the bone graft.
- Position the plate.
- Fix the bone graft to the plate while the surgeon or an assistant keeps the graft in place.
Indications for bone grafting
Indication (bone grafting)
- Loss of bone volume and loss of buttressing
Contraindications (bone grafting)
- Inability to stabilize bone graft and maxilla
- Inability to obtain soft-tissue closure over graft
Advantages (bone grafting)
- Support for facial soft tissues
- Restoration of bony buttresses
- Prevention of loss of facial height
Disadvantage (bone grafting)
- Donor site required for bone graft harvesting
- Fix the plate to the main fracture fragments (at least two screws in each fragment).
The medial plate is applied second. The bone graft is fixed to the plate while an assistant holds the bone graft with a forceps.
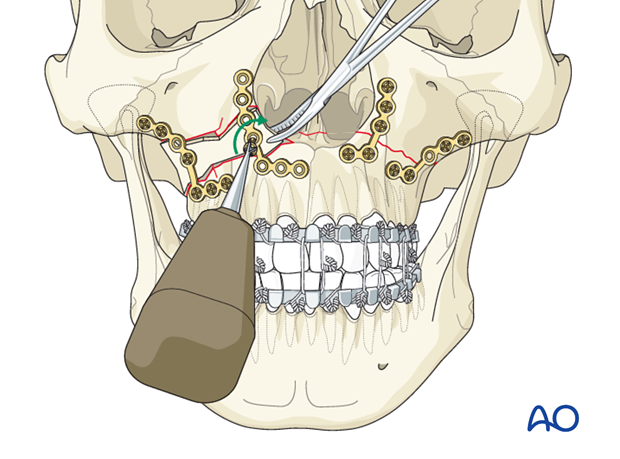
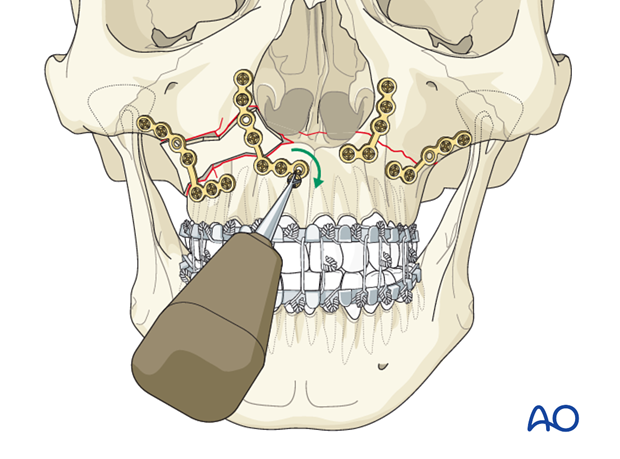
After the plate has been fixed to the bone graft, the plate is fixed to each main fracture fragment with at least two screws.
Shaping the bone graft
If the bone graft is prominent, trimming with a diamond burr may be necessary. This is particularly important along the piriform aperture in order not to impinge on the nasal soft tissues.
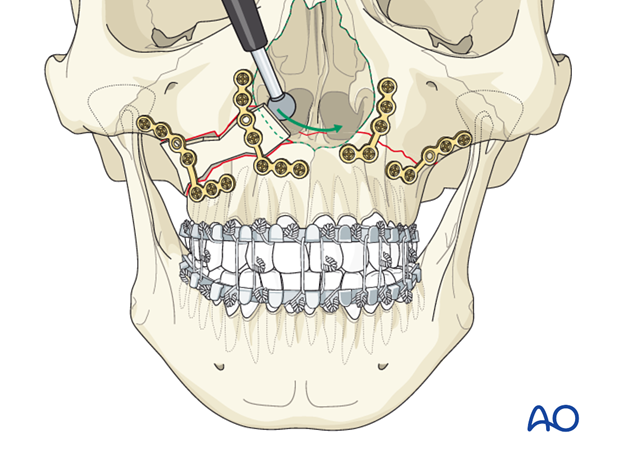
Illustration shows the completed osteosynthesis.
6. Check of occlusion
After internal fixation has been completed, MMF is released and the occlusion checked.
Pitfall: malocclusion
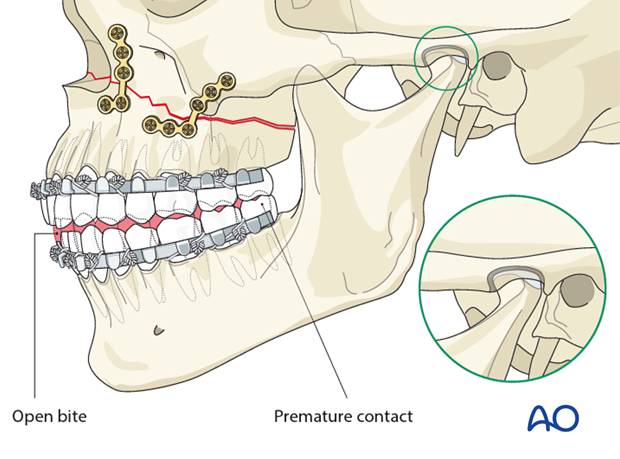
If an open bite and/or Class III tendency occurs when checking the occlusion, one or both mandibular condyles were malposed in posterior and/or inferior direction. In such cases, it is necessary to remove the bone plates, reapply MMF, and passively reposition the maxillomandibular complex again, assuring the condyles are properly seated. Bone plates are again applied and the occlusion verified.
The reason for a malocclusion may be the fact that the condylar heads were not positioned correctly in their respective glenoid fossae when securing MMF (as illustrated).
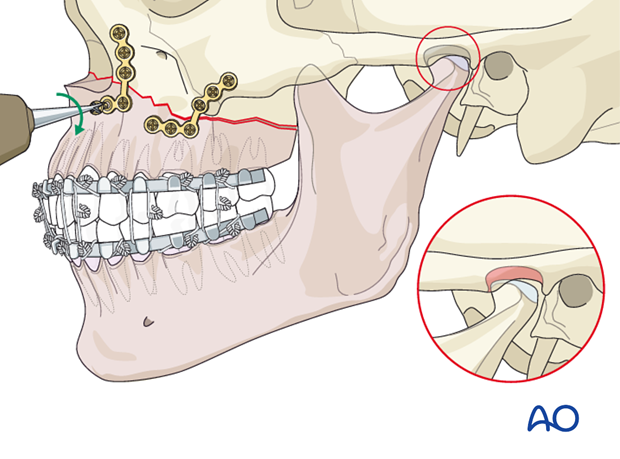
Illustration shows the subsequent malocclusion.
7. Aftercare following open reduction and internal fixation of Le Fort I and palatoalveolar fractures
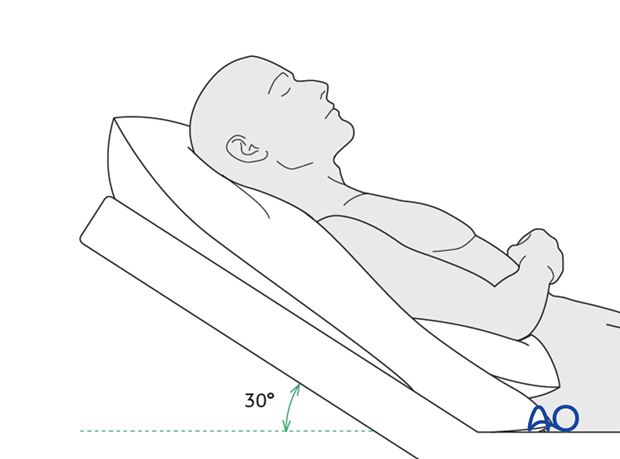
Postoperative positioning
Keeping the patient’s head in an upright position both preoperatively and postoperatively may significantly improve periorbital edema and pain.
Medication
The use of the following perioperative medication is controversial. There is little evidence to make strong recommendations for postoperative care.
- No aspirin or nonsteroidal antiinflammatory drugs (NSAIDs) for 7 days
- Analgesia as necessary
- Antibiotics (many surgeons use perioperative antibiotics. There is no clear advantage of any one antibiotic, and the recommended duration of treatment is debatable.)
- Nasal decongestant may be helpful for symptomatic improvement in some patients.
- Steroids, in cases of severe orbital trauma, may help with postoperative edema. Some surgeons have noted increased complications with perioperative steroids.
- Ophthalmic ointment should follow local and approved protocol. This is not generally required in case of periorbital edema. Some surgeons prefer it. Some ointments have been found to cause significant conjunctival irritation.
- Regular perioral and oral wound care has to include disinfectant mouth rinse, lip care, etc.
Ophthalmological examination
Postoperative examination by an ophthalmologist may be requested. The following signs and symptoms are usually evaluated:
- Vision (except for alveolar ridge fracture, palatal fracture)
- Extraocular motion (motility) (except alveolar ridge fracture, palatal fracture)
- Diplopia (except Le Fort I, alveolar ridge fracture, palatal fracture)
- Globe position (except Le Fort I, alveolar ridge fracture, palatal fracture)
- Perimetric examination (except Le Fort I, alveolar ridge fracture, palatal fracture)
- Lid position
- If the patient complains of epiphora (tear overflow), the lacrimal duct must be checked.
Note: In case of postoperative double vision, ophthalmological assessment has to clarify the cause. Use of prism foils on existing glasses may be helpful as an early aid.
Postoperative imaging
Postoperative imaging has to be performed within the first days after surgery. 3-D imaging (CT, cone beam) is recommended to assess complex fracture reductions. An exception may be made for centers capable of intraoperative imaging.
Especially in fractures involving the alveolar area, orthopantomograms (OPG) are helpful.
Wound care
Remove sutures from skin after approximately 5 days if nonresorbable sutures have been used.
Apply ice packs (may be effective in a short term to minimize edema).
Avoid sun exposure and tanning to skin incisions for several months.
Diet
Diet depends on the fracture pattern.
Soft diet can be taken as tolerated until there has been adequate healing of the maxillary vestibular incision.
Intranasal feeding may be considered in cases with oral bone exposure and soft-tissue defects.
Patients in MMF will remain on a liquid diet until such time the MMF is released.
Clinical follow-up
Clinical follow-up depends on the complexity of the surgery, and whether the patient has any postoperative problems.
With patients having fracture patterns including periorbital trauma, issues to consider are the following:
- Globe position
- Double vision
- Other vision problems
Other issues to consider are:
- Facial deformity (incl. asymmetry)
- Sensory nerve compromise
- Problems of scar formation
Issues to consider with Le Fort fractures, palatal fractures and alveolar ridge fractures include:
- Problems of dentition and dental sensation
- Problems of occlusion
- Problems of the temporomandibular joint (TMJ), (lack of range of motion, pain)
Implant removal
Implant removal is rarely required. It is possible that this may be requested by patients if the implant becomes palpable or visible. In some countries it will be more commonly requested. There have been cases where patients have complained of cold sensitivity in areas of plate placement. It is controversial whether this cold sensitivity is a result of the plate, a result of nerve injury from the original trauma, or from nerve injury due to trauma of the surgery. Issues of cold sensitivity generally improve or resolve with time without removal of the hardware.
Generally, orbital implant removal is not necessary except in the event of infection or exposure. Readmission might be indicated if long term stability of the orbital volume has not been maintained.
MMF
The duration and/or use of MMF is controversial and highly dependent on the particular patient and complexity of the trauma. In some cases where long-term MMF may be recommended, the surgeon may choose to leave the patient out of MMF immediately postoperatively because of concerns of edema, postoperative sedation, and airway. In these cases the surgeon may choose to place the patient in MMF after these concerns have been resolved.
The need and duration of MMF is very much dependent on:
- Fracture morphology
- Type and stability of fixation (including palatal splints)
- Dentition
- Coexistence of mandibular fractures
- Premorbid occlusion
Oral hygiene
Patients with arch bars and/or intraoral incisions and/or wounds must be instructed in appropriate oral hygiene procedures. The presence of the arch bars or elastics makes this a more difficult procedure. A soft toothbrush (dipped in warm water to make it softer) should be used to clean the surfaces of the teeth and arch bars. Elastics are removed for oral hygiene procedures. Chlorhexidine oral rinses should be prescribed and used at least 3 times a day to help sanitize the mouth.
For larger debris, a 1:1 mixture of hydrogen peroxide/chlorhexidine can be used. The bubbling action of the hydrogen peroxide helps remove debris. A Waterpik® is a very useful tool to help remove debris from the wires. If a Waterpik is used, care should be taken not to direct the jet stream directly over intraoral incisions as this may lead to wound dehiscence.


