Open reduction internal fixation
1. Principles
General considerations
Surgical airwayConsiderations related to establishing proper dental occlusion require a nasotracheal intubation. Alternatively, a submental/submandibular intubation could be considered. Other possibilities include placement of the endotracheal tube through a gap in the dentition or behind the posterior molars.
Depending on the patient’s general condition, a tracheostomy might also be considered and is the first choice where brain or pulmonary injuries are likely to require prolonged intubation.
Successful reconstruction of midface fractures aims to reestablish the continuity and position of midfacial vertical buttresses. These pillars even serve a critical role in patients who lack dentition (partial or completely edentulous).
A fundamental principle in Le Fort fracture treatment is to reestablish the premorbid dental occlusion. Portions of the pterygoid plates and associated musculature are still attached to the posterior portion of the maxilla, so passive mobilization of the fracture can be difficult in incomplete or impacted fractures.
To properly achieve a passive maxillary position, the fracture must be completed and the maxilla able to be passively repositioned. An osteotomy is required or strong mobilization forces used to complete the fracture. Rowe’s disimpaction forceps, a “Stromeyer” hook, Tessier retromaxillary mobilizers, etc, can be utilized for this purpose.
The goal is to achieve correct anatomical repositioning, which may be confirmed by dental occlusion when MMF is released. It is possible to displace the mandibular condyles from the glenoid fossae during the application of MMF. When the MMF is released, the condyles re-seat into their normal position in the glenoid fossae, resulting in a malocclusion.
Other methods to confirm proper reduction include intraoperative imaging and 2D or 3D CT evaluation. If available, dental casts, stereolithographic models, dental records, or premorbid photographs may also be helpful guides for treatment planning.
As a general principle, all facial fractures should be exposed and reduced before plating.
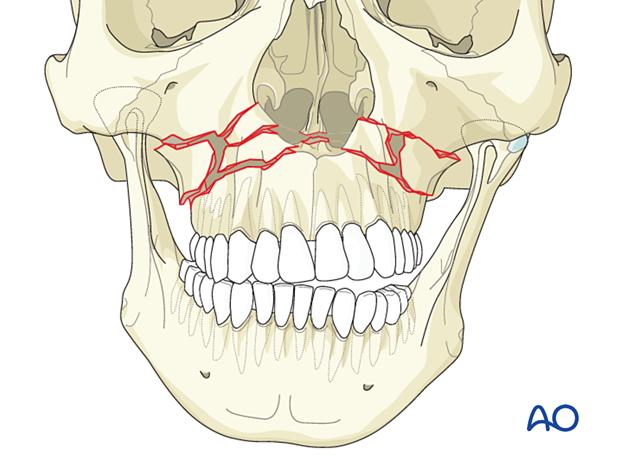
Facial height
Establishing the correct facial height is crucial in this procedure. Usually, at least one point of bone contact across the Le Fort I level can be found to establish the appropriate vertical dimension. Occasionally a free bone fragment from within the Le Fort I gap can be used to provide the proper vertical dimension. A bone plate should be placed in the area where the correct vertical dimension can be determined. Other bone plates are then applied across the bone gaps, which are then grafted.
If a single buttress cannot be reconstructed anatomically, lip-tooth position is a guide to vertical height. Pre-injury photographs can be used to determine this and they can be a guide for establishing the correct vertical height of the maxilla.
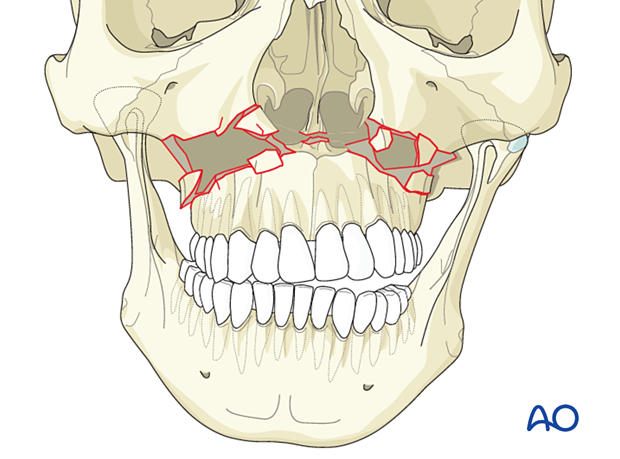
Choice of implant
A minimum of two plates (four are preferred) are used to provide stability along the vertical buttresses. Additional plates may support comminuted alveolar fragments. If internal fixation devices are not available, interfragment wire fixation and MMF can be used.
It is difficult to give absolute guidelines for the size of the plates used at the bony interfaces. The following parameters should be considered:
- A plate placed for the fixation of the fracture at the zygomaticomaxillary buttress is generally a sturdy plate because it is the point that will provide strong stability to the Le Fort I fracture reduction. The highest forces of mastication would be in this area. An L-, T-, or Y-plate, or a straight plate may be used depending on the fracture pattern.
- An additional plate should be used at the piriform aperture on each side resulting in four-point stabilization of the lower midface segment.
Other factors affecting the size and strength of the plate are:
- Grade of instability and comminution of the fractures.
- Association with other midface fractures.
- The decision about whether to temporarily keep the patient in MMF postoperatively should be individualized. Uncooperative patients, and patients with comminuted fractures, multiple Le Fort fracture levels, and combined maxillary and mandibular fractures, especially condylar fractures, would benefit from postoperative MMF.
Click here for a description of implant options.
Teaching video
AO Teaching video on fixation of a complex midface fracture
2. Approach
For this procedure, standard approaches to the maxilla are used. However, if present, lacerations can be used to access the fracture site for direct fracture management. The presence of significant intraoral lacerations may require rethinking and redesigning the incision in order to avoid devascularization of the bone or compromise of the soft tissue.
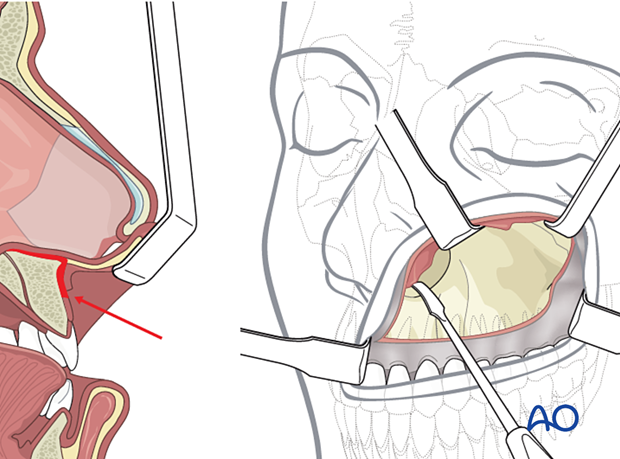
3. Reduction
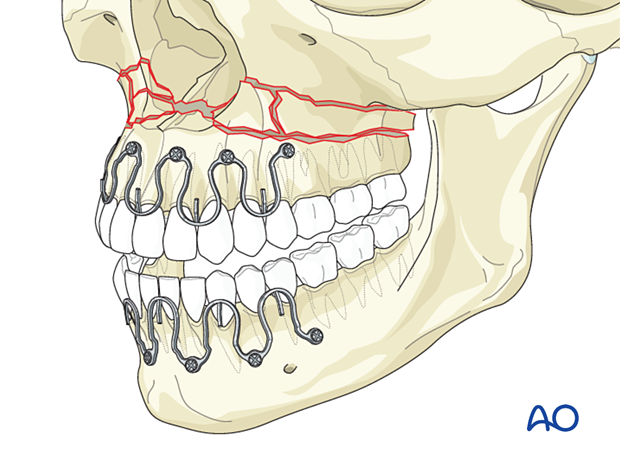
Arch bars
First, arch bars are secured to the dentition. Click here for a detailed description of maxillomandibular fixation.
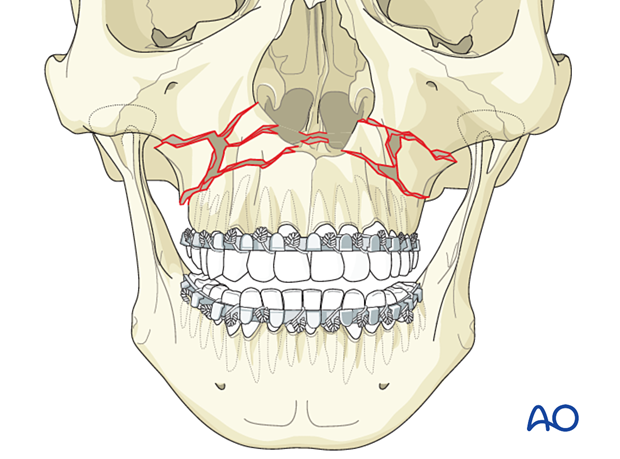
Option: hybrid arch bars
You can choose between traditional arch bars or hybrid arch bars.
Hybrid arch bars use screws to fix the arch bar to the bone, making the procedure faster.
Mobilization
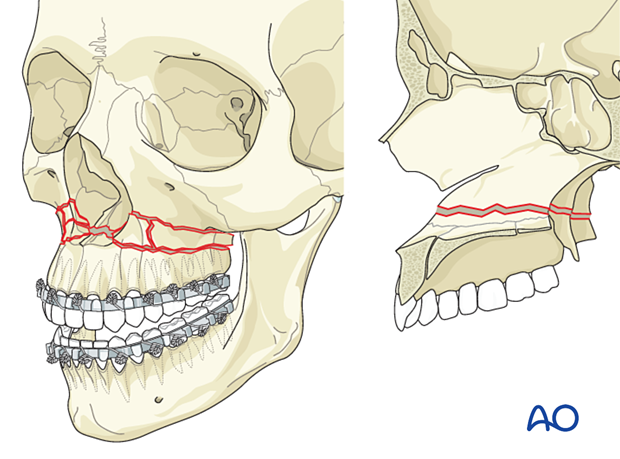
After exposure of the fracture segments through a maxillary vestibular approach, the fracture is mobilized to enable reduction and fixation. In cases where the maxilla mobilization cannot be accomplished using conventional methods, additional osteotomies may be required. Many surgeons prefer completing a Le Fort I level osteotomy resulting in free positioning of the Le Fort I segment rather than creating additional fractures at the Le Fort II or III levels using a device such as Rowe forceps for forced manipulation.
Reduction instruments
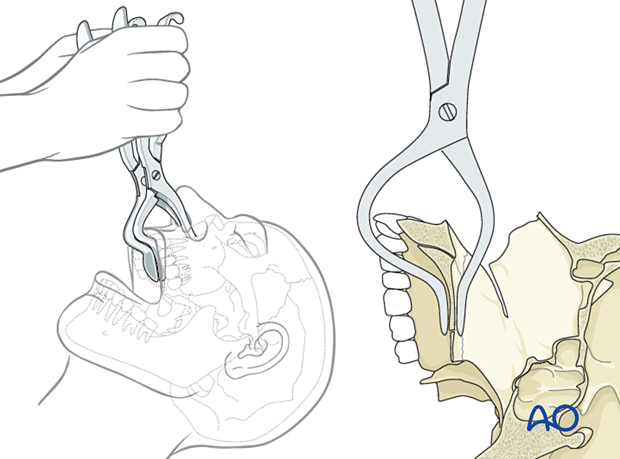
Rowe disimpaction forcepsThe Rowe disimpaction forceps are side-specific. They allow the application of significant amounts of force to disimpact and reposition the maxilla and midface.
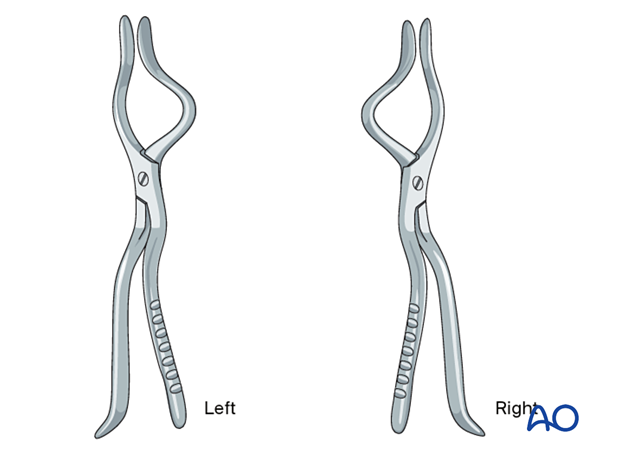
It should be noted that in cases of incomplete fracture many surgeons prefer to complete the fracture at the Le Fort I osteotomy level as a safer maneuver than using Rowe forceps for forced disimpaction.
If Rowe forceps are utilized, special attention must be paid to the correct placement of the forceps so that the upper anterior dentition is not harmed.
The maxillary fracture must be completely mobilized to allow for free repositioning.
According to regional preferences and various schools of teaching, different bone hooks may be used for fracture mobilization and reduction. In general, they are all inferior to completion of the fracture with a Le Fort I osteotomy.
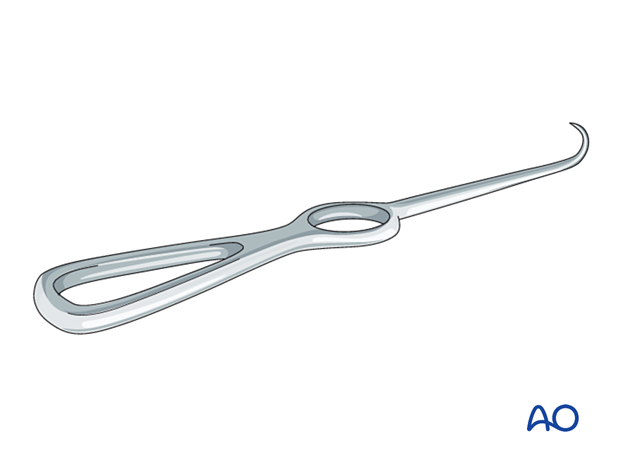
The Stromeyer hook is very versatile for the transoral reduction of Le Fort fractures.
In selected cases, the Stromeyer hook can also be used to manipulate the Le Fort complex by hooking the tip of the instrument inside the piriform aperture and pulling it downwards and forwards. This technique is sometimes referred to as the “downfracture procedure” in Le Fort osteotomies.
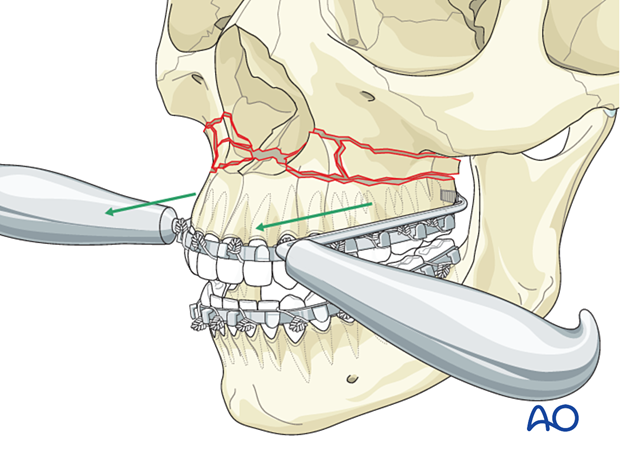
The Tessier retromaxillary mobilizers are placed behind the maxillary tuberosities to help mobilize a posteriorly displaced and impacted maxilla, facilitating passive repositioning and a normal occlusion. The repositioned maxilla must be passive to ensure that it remains in the correct position.
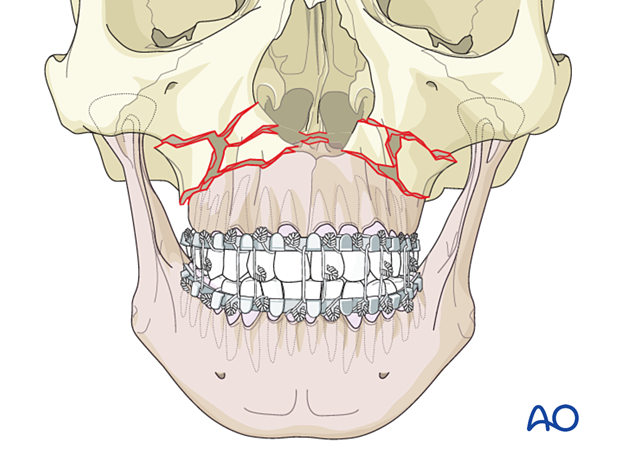
Placing the patient into MMF
After the fracture has been adequately mobilized, the patient is placed in MMF. Click here for a detailed description of various MMF techniques.
Following reduction and fixation of the mandibular fractures, the MMF is released, allowing the condyles to sit passively in the glenoid fossa, and occlusion confirmed.
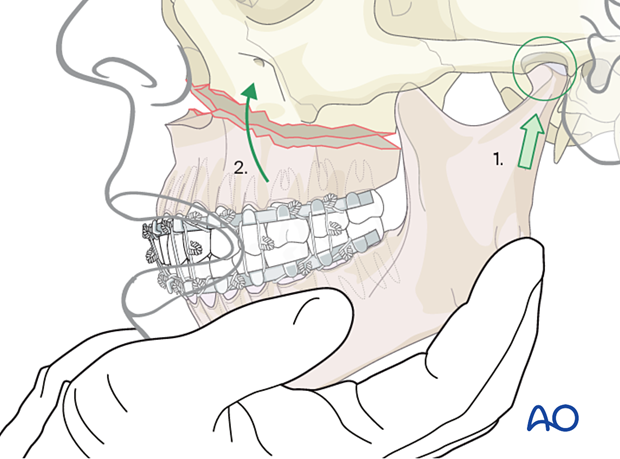
Reducing the maxilla
Ensuring that the condyles are properly seated within the glenoid fossae (1), the maxillomandibular complex is rotated superiorly until the point of first contact at the maxillary fracture site (2).
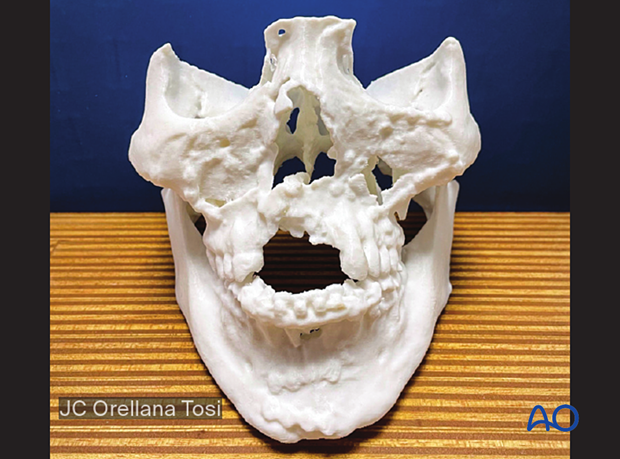
Be sure to establish at least one point of bone contact to get a proper facial height. In these cases, a 3D stereolithographic model is beneficial for establishing proper facial height.
The picture shows a case with an unsuccessful outcome, with a poorly reduced comminuted Le Fort I fracture. This stereolithographic model was printed to ensure that the best bone contact was established, and to plan the graft required to restore the vertical facial height.
Pre-injury photographs can be useful for confirming previous lip-tooth position.
4. Decision on whether to use bone graft
After reduction, it must be decided whether the comminuted fragments can restore vertical buttresses. If not, bone grafting should be considered.
5. Fixation (without bone graft)
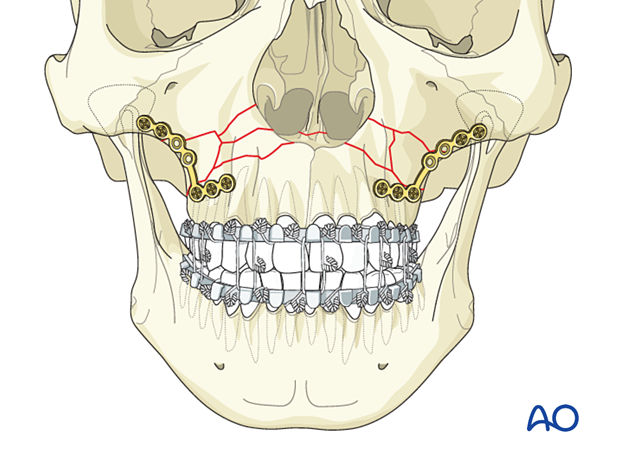
Apply two L plates to the lateral buttresses
Fix two plates that have been bent to conform to the shape of the lateral buttresses. The plates should fit passively.
Contour the plates before applying them to the bone. The plate location must consider the tooth roots and the location of the comminuted fracture fragments that are to be attached to the plate.
Insert at least two screws in the major fragment at the top and bottom of the fracture and at least one screw in the central comminuted fragments.
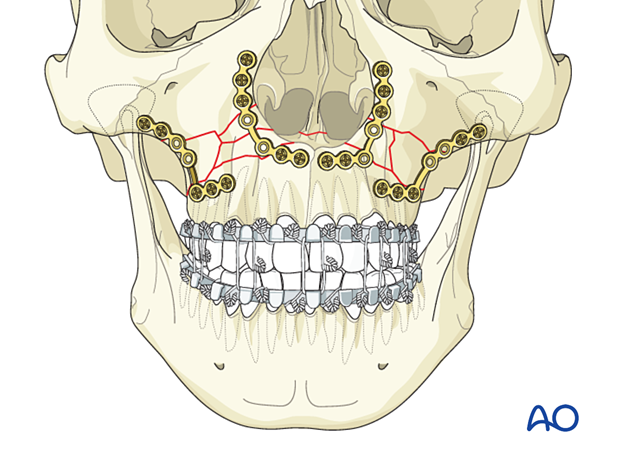
Apply two plates to the medial buttresses
Fix two plates to the medial buttresses.
Insert at least two screws at the top and bottom of the fracture and a single screw in each of the minor fragments.
Secure fracture fragments to the plate
After the plates are properly fixed, additional screws can be inserted to fix comminuted fragments to the plates. One or more screws in minor fragments can be placed according to the size and strength of the fracture fragment.
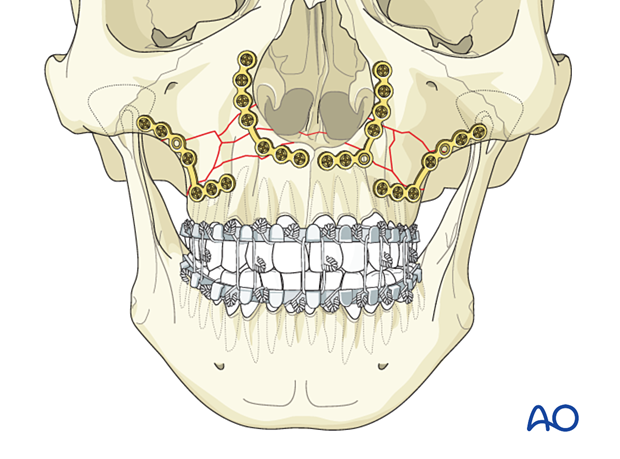
Two methods can be used for fixing unstable comminuted fragments to a plate.
The first method is to position the fragment with a right angle clamp or bone hook within the maxillary sinus or with a clamp applied to an edge of the fracture fragment as the hole is drilled. This is a common method of fixing a fracture fragment to a plate that has initially been stabilized with the plate ends fixed to solid bone. The comminuted fragments are then stabilized additionally as described.
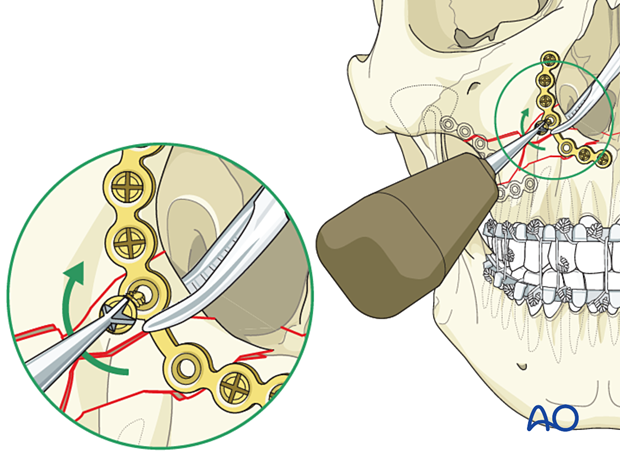
Pearl: predrilling of comminuted fragments
A second, more demanding, procedure involves predrilling the bony fragment outside the operative field as described below:
- Mark (or remember) the plate hole position on the surface of the loose fragment
- Remove the bony fragment
- Drill a pilot hole in the desired position
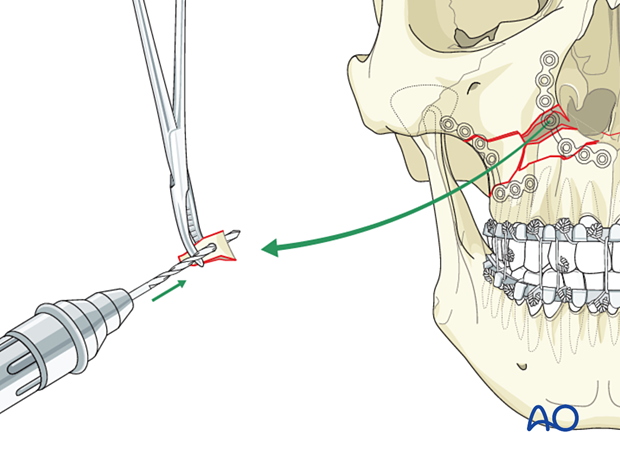
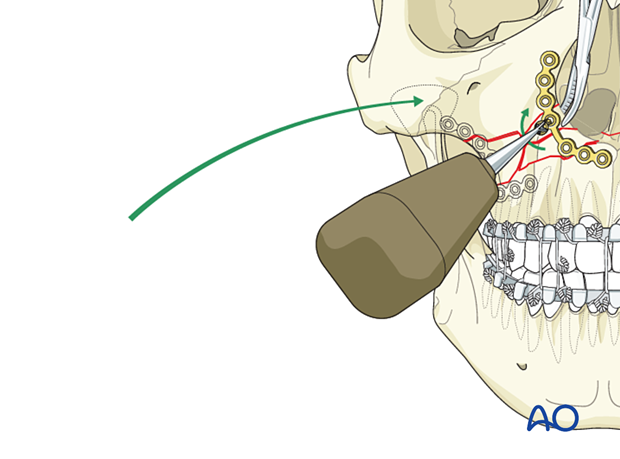
Then:
- Reposition the bony fragment in the surgical site using forceps
- Fix the fragment to the overlying plate with a screw of the appropriate length
- It is preferable not to use self-drilling screws, as additional pressure is required when inserting them, causing displacement of small fragments
- Using a screw with a small diameter and low thread pitch allows for better retention
6. Fixation (with bone graft)
Harvest of bone graft
It is essential to measure the size of the defect with a template or a caliper to get a proper bone graft to support the forces of a normal maxillary bone.
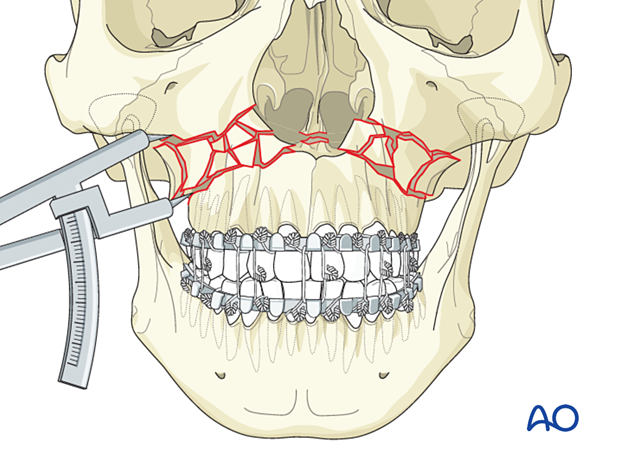
A 1 cm wide split-thickness calvarial bone graft with sufficient length and height to reconstruct the maxillary buttresses is harvested.
The harvest of calvarial bone graft is performed as described in the coronal approach.
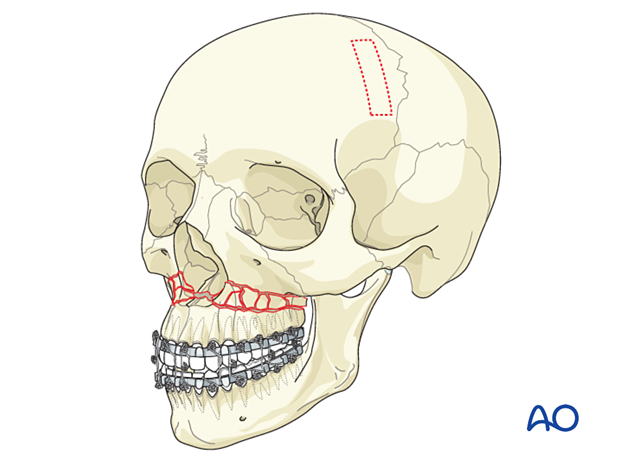
The illustration shows an example of the use of a calvarial bone graft.
Advantages:
- Low material costs
- Smooth surface
- Variability in thickness
- Radiopacity
- Maximal biocompatibility
Disadvantages:
- Additional donor site needed (necessitating additional surgery time for harvest, pain, scar, and possible surgical complications)
- Possible contour and dimensional changes due to remodeling
- Difficult to shape according to patient’s anatomy
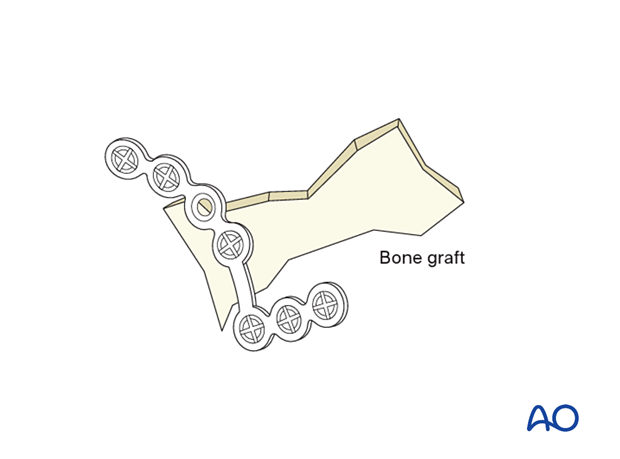
General considerations
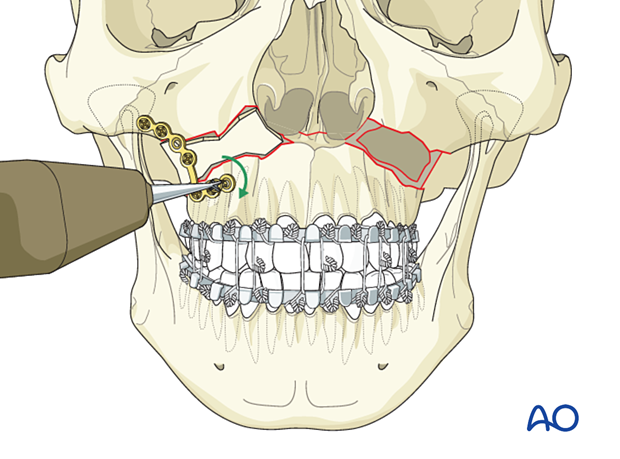
A bone graft is used to fill the defect, and L-plates restore the buttresses.
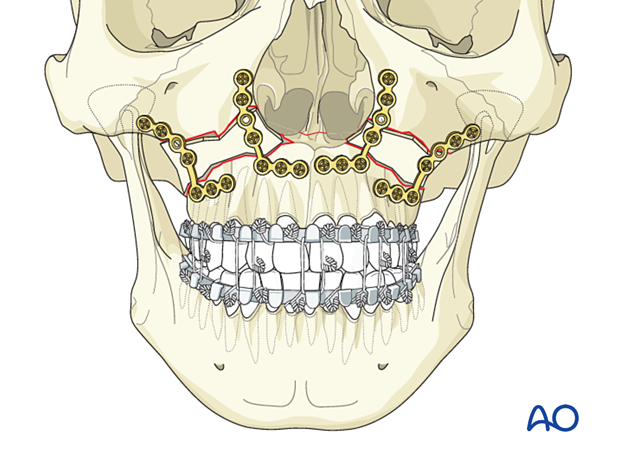
Lateral buttress
The lateral buttresses are plated first, followed by the medial buttresses. The lateral segment is repaired in the following order:
- Contour the plate to the buttress area
- Insert the bone graft
- Position the plate
- Fix the bone graft to the plate while the surgeon or an assistant holds the graft in place
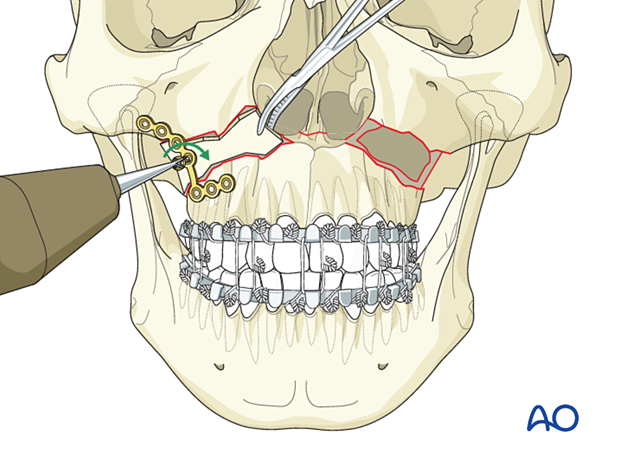
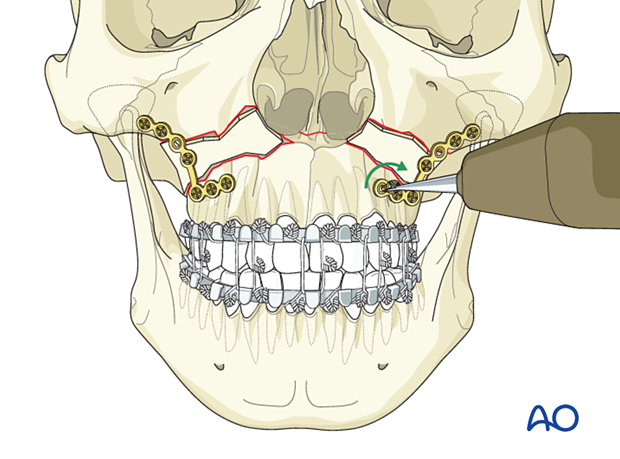
Fix the plate to the main fracture fragments (at least two screws in each fragment).
Apply the second lateral buttress plate in the same manner.
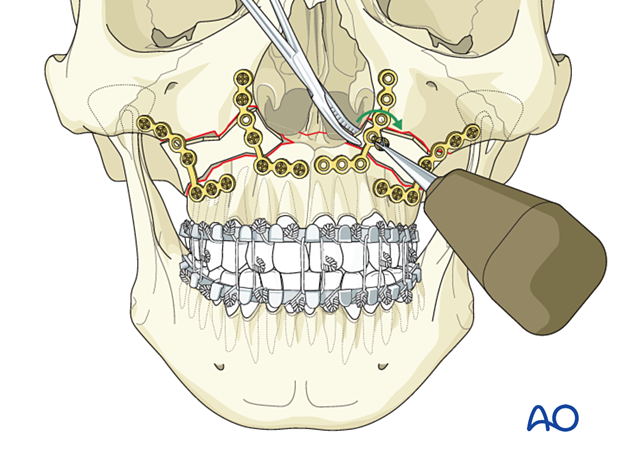
Medial buttresses
The medial plates are applied. An assistant holds the bone graft with forceps while it is fixed to the overlying plate. The plate is then fixed to the stable inferior and superior maxillary bone with at least two screws.
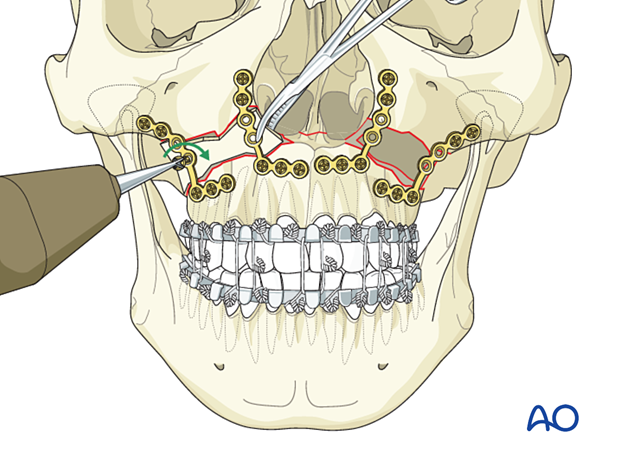
Alternative:
The upper and lower ends of the plate can first be fixed to the stable bone with two screws in the major end fragments, and then the bone graft can be fixed to the plate which has already been stabilized.
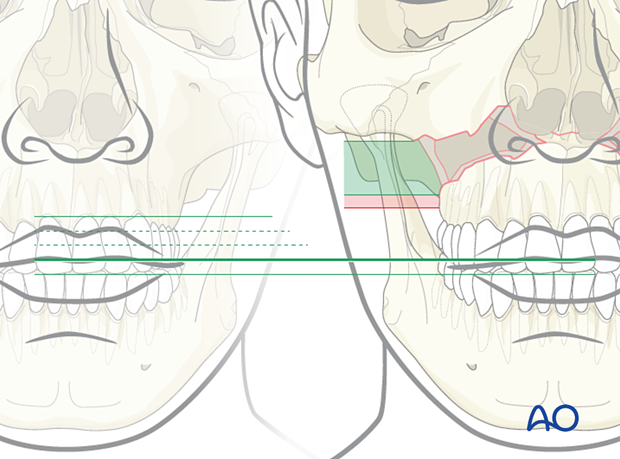
Pre-injury photographs are useful for confirming previous lip-tooth position.
The illustration demonstrates the use of a pre-injury photograph to determine the correct vertical positioning of a comminuted le Fort I fracture.
Shaping the bone graft
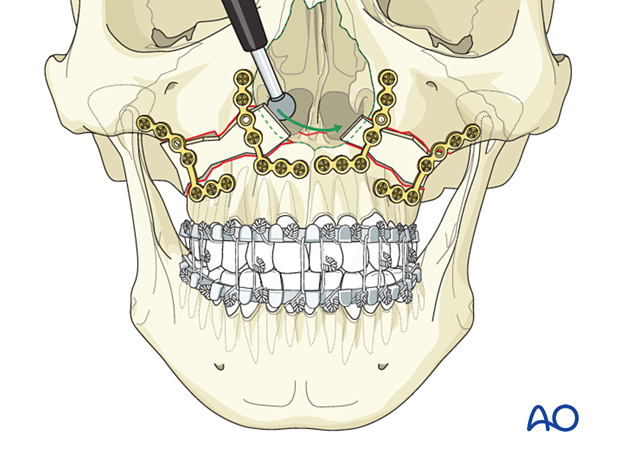
If the bone graft is prominent, trimming with a diamond burr may be necessary. This is particularly important along the piriform aperture to avoid compromising the nasal airway.
7. Check of occlusion
After internal fixation has been completed, MMF is released, and the occlusion is checked.
The occlusion is checked with a patient out of MMF with the operator’s fingers on the mandible seating the condyles in its posterior superior position within the glenoid fossa.
Any malocclusion observed such as an anterior open bite, requires revision of the reduction.
Pitfall: malocclusion
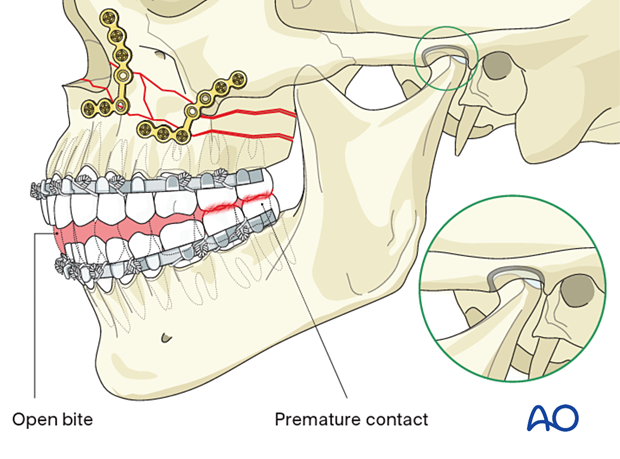
If an open bite or Class III tendency occurs when checking the final occlusion, one or both mandibular condyles were likely malpositioned in the posterior or inferior direction during the reduction and fixation of the fractures. In such cases, it is necessary to remove the bone plates, reapply MMF, and passively reposition the maxillomandibular complex, ensuring the condyles are properly seated. Bone plates are reapplied, and the occlusion is verified.
The reason for the malocclusion may be that the condylar heads were not properly positioned in their respective glenoid fossae when the MMF was initially applied (as illustrated).
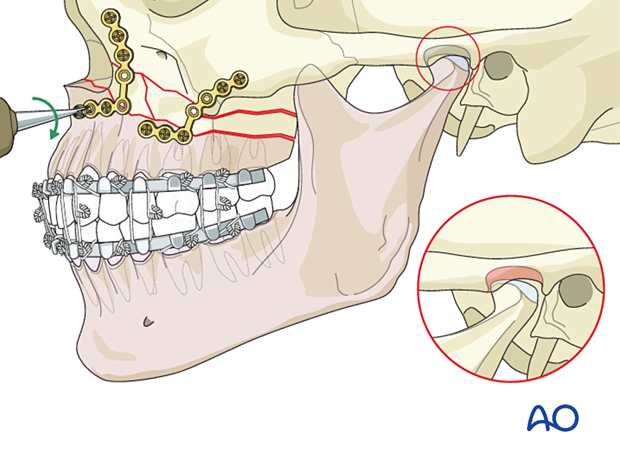
The illustration shows the subsequent malocclusion after release of the MMF.

8. Aftercare
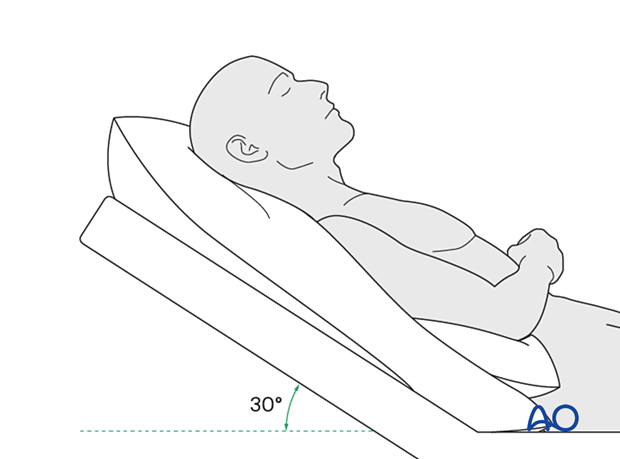
Postoperative positioning
Keeping the patient’s head in an upright position both preoperatively and postoperatively may significantly reduce periorbital edema and pain.
Medication
The following medications may be used:
- Analgesia as necessary (no aspirin or nonsteroidal anti-inflammatory drugs (NSAIDs) for seven days)
- In case of an open wound or exposed bone antibiotic coverage is indicated
- Regular perioral and oral wound care should include disinfectant mouth rinse, lip care, etc.
Postoperative imaging
Postoperative imaging should be performed within the first days after surgery. 3D imaging (CT, cone beam) is recommended to assess complex fracture reductions.
In fractures involving the alveolar area, orthopantomograms (OPG) are helpful.
Diet
Diet depends on the fracture pattern.
A soft (non-chew) diet can be taken as tolerated until there has been adequate healing (usually 4–6 weeks).
Patients in MMF will remain on a liquid diet until the MMF is released.
Clinical follow-up
Clinical follow-up depends on the complexity of the surgery and whether the patient has any postoperative problems.
Issues to consider with palatal fractures and alveolar ridge fractures include:
- Problems with dentition and dental sensation
- Problems with occlusion
- Problems with the temporomandibular joint (TMJ), such as reduced range of motion and pain
MMF
The need for and duration of MMF are very much dependent on:
- Fracture morphology
- Type and stability of fixation (including palatal splints)
- Dentition
- Coexistence of mandibular fractures
- Premorbid occlusion
Oral hygiene
Patients with arch bars, intraoral incisions, or wounds must be instructed about appropriate oral hygiene procedures. The presence of arch bars or elastics makes oral hygiene more complicated. A soft toothbrush (dipped in warm water to make it softer) should be used to clean the teeth and arch bars. Elastics are removed during oral hygiene procedures. Disinfectant mouth rinses (Chlorhexidine) should be prescribed and used at least three times a day to help sanitize the mouth.
For larger debris, a 1:1 mixture of hydrogen peroxide/Chlorhexidine can be used. The effervescent action of the hydrogen peroxide helps remove debris. A jet irrigator, (eg, Waterpik) is a handy tool to help remove debris from the wires. If used, care should be taken not to directly point the jet stream over intraoral incisions, which may lead to wound dehiscence.


