ORIF - Compression plating
1. Principles
Compression plate
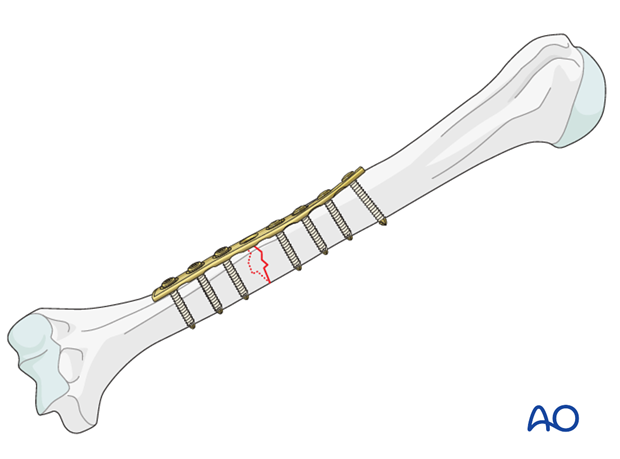
The objective of compression plating is to produce absolute fracture stability, abolishing all interfragmentary motion.
Compression plating is useful in two-part fracture patterns, where the bone fragments can be compressed.
Compression plating is typically used for simple fracture patterns with low obliquity, where there is insufficient room for a lag screw.
Dynamic compression principle
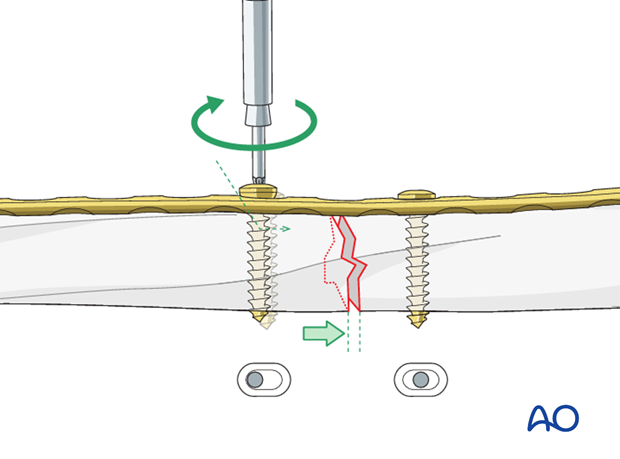
Compression of the fracture is usually produced by eccentric screw placement at one or more of the dynamic compression plate holes. These holes are shaped like an inclined and transverse cylinder. The screw head slides down the inclined cylinder as it is tightened, the head forcing the plate to move along the bone, thereby compressing the fracture.
Open fractures in the humeral shaft
Adequate surgical debridement is the crucial first step in the care of any open fracture.
Read more about the treatment of open fractures in the humeral shaft.
2. Choice of implant
Plate length
It is crucial to use a plate that is long enough on each side of the fracture. Plate length is more important than the number of screws for ensuring stability.

3. Plate position
Introduction
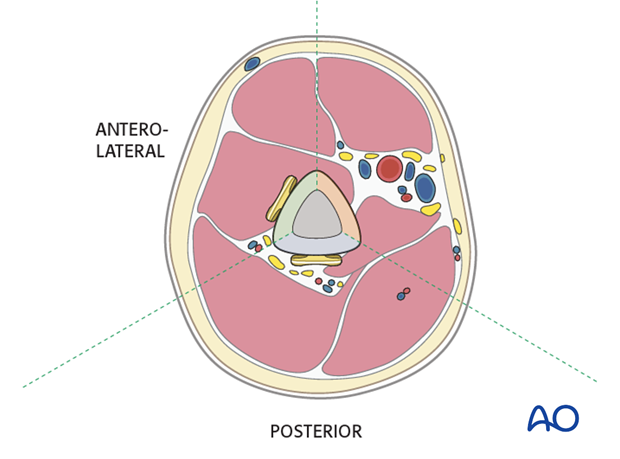
The choice of plate position depends on the fracture morphology and location, the radial nerve pathology and the surgeon’s preference. The anterolateral, anterior, and posterior surfaces of the humeral shaft are all possible choices.
The medial surface is generally only used for complex reconstructive procedures, ie vascular repair in complex fractures. Since the use of this plate position is rare it is not further shown.
The location should allow sufficient plate length on both proximal and distal segments, with a minimum of 3 holes for each.
Anterolateral plate
An anterolateral plate fits well from very proximally to the distal fifth of the humerus and is selected if proximal and middle third fractures are present.
A plate in this position should provide stable fixation of the fracture and minimal soft-tissue damage.
Proximally, the plate may interfere with the deltoid insertion if it is placed laterally, or with the long head of the biceps tendon if the plate is positioned anteriorly. To overcome these problems the proximal end of the plate can be tunneled through the deltoid insertion.
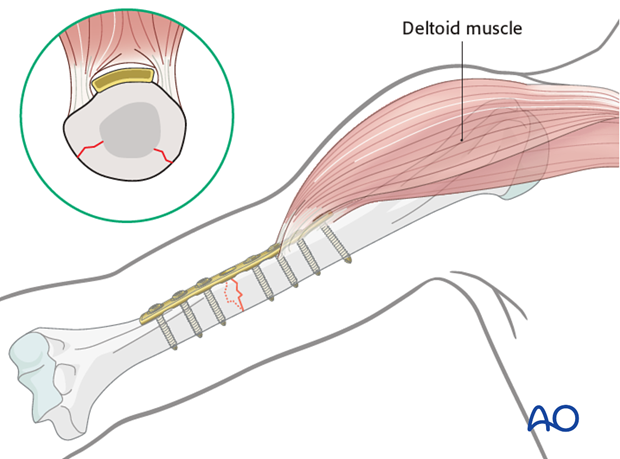
Distally the plate may be applied to the anterior or lateral surfaces.
Depending on the chosen positions for the proximal and distal plate ends, the plate may need to be contoured.
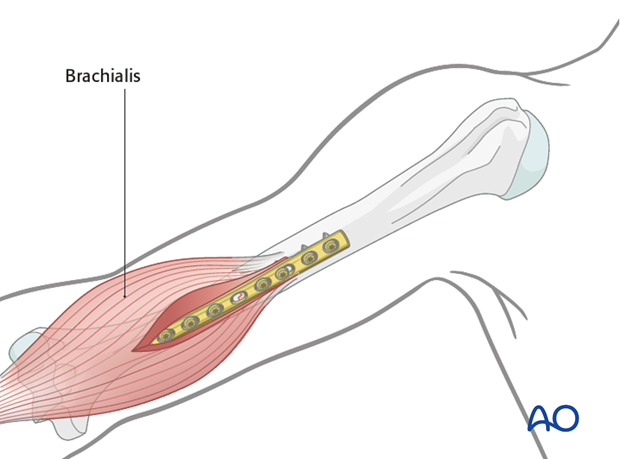
Neurological considerations should be taken into account. The radial nerve is at risk if the plate is applied to the lateral surface in the distal third.
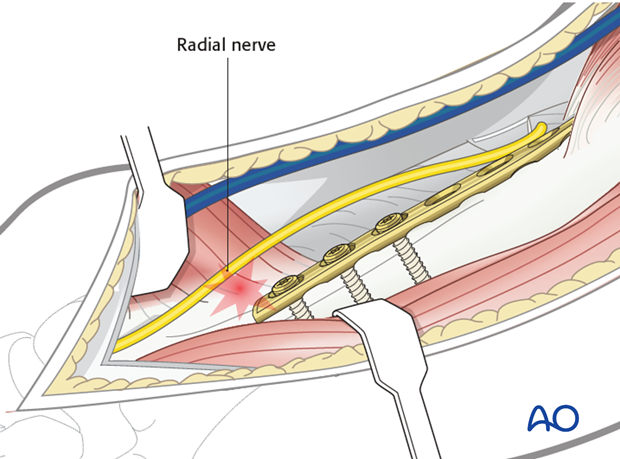
The innervation of the brachialis muscle is derived from both the radial and musculocutaneus nerves. These branches are at risk if the plate is applied to the anterior and anterolateral surfaces in the distal third while dissecting the brachialis muscle.
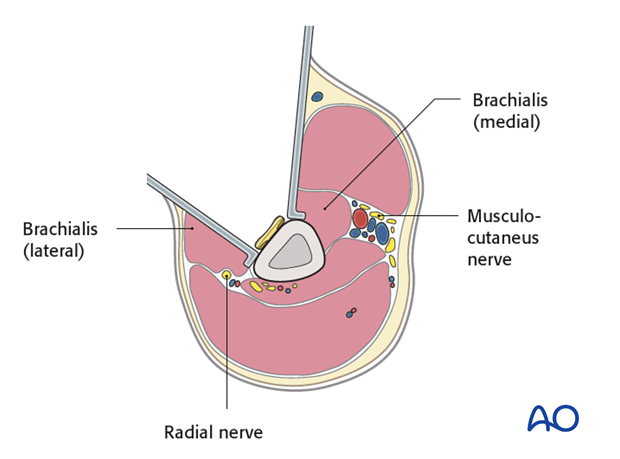
If a small open fracture wound is present, the approach is made separately. Only if there is a large wound, after debridement, consider using the wound itself, with its necessary extensions, for plate insertion.
Posterior plating
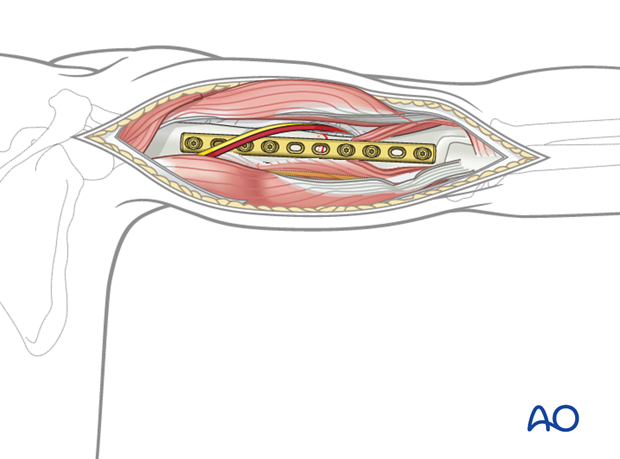
The posterior surface is difficult to access proximally and limited by the axillary nerve. Therefore, posterior plating is best suited for middle and distal third fractures.
It is important to protect the radial nerve and its accompanying vessels in the spiral groove. If the plate interferes with the radial nerve, the plate must be placed underneath it. The course of the radial nerve in relation to the plate holes should be mentioned in the operation note. This will reduce the risk of accidental nerve damage if the plate should ever need to be removed.
4. Patient preparation and approaches
Patient positioning
Place the patient in a supine position or, alternatively, a beach chair position for placement of an anterolateral or anterior plate.
For placement of a posterior plate, a prone or lateral decubitus position is normally used.Approaches
The approach is selected depending on the chosen plate position.
For an anterolateral plate the anterolateral or extended deltopectoral approach may be used. For a more distal anterior or lateral plate, an anterolateral or lateral approach may be used.
The posterior surface can be accessed with a posterior approach (triceps-split or triceps-on approach).5. Reduction
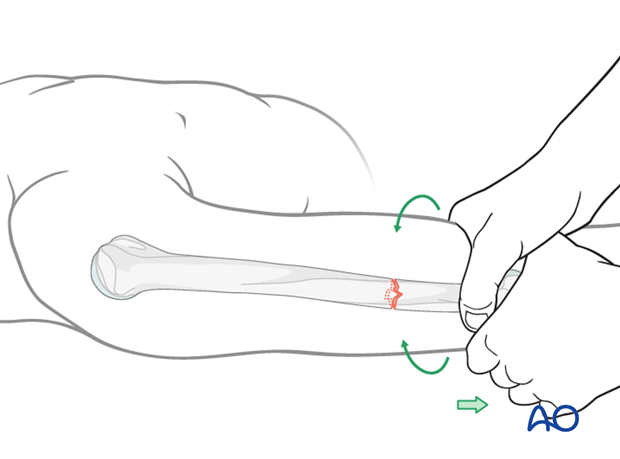
Manual reduction - limb realignment
Begin the reduction with traction on the distal humerus restoring bone length, tension in the soft tissues, realignment of the axis, and rotation.
Clear any interposed soft tissue by direct exposure. Preserve as much soft-tissue attachment as possible.
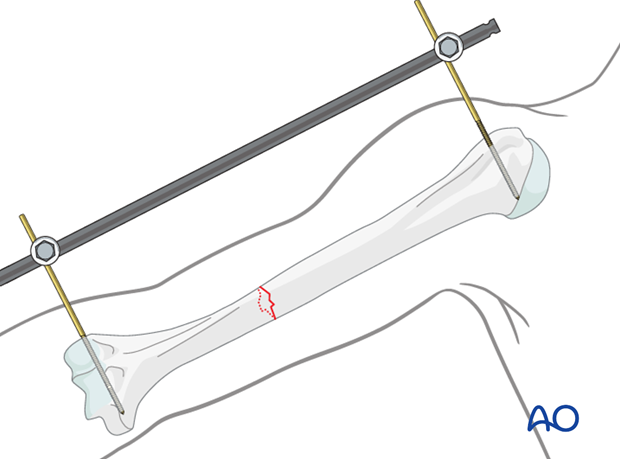
Reduction by external fixator or distractor
Sometimes traction can helpfully be provided by an external fixator, or distractor.
Insert proximal and distal pins outside the planned plate location. Take care not to injure the radial nerve. If in any doubt use incisions wide enough to allow palpation or direct visualization of the radial nerve.
Complete reduction may require additional correction of angulation or rotation. Folded linen bolsters under the fracture often help.
Final reduction
With suitable external supports, tissue tension usually maintains reduction of transverse fractures. The reduction may need final adjustment after the plate is applied provisionally to one bone fragment. It is important that the reduction be as close to anatomical as possible, to provide optimal fracture surface contact.
6. Plate contouring
Fitting the plate to the bone
Depending on the planned plate location, some contouring of the plate is likely to be necessary to fit the plate to the bone perfectly so that tightening its screws does not displace the fracture. This is true distally, posteriorly, and also on the anterolateral surface centrally. Sometimes twisting the plate around the shaft of the humerus provides a better fit and allows a longer plate.
Shape a malleable template to the bone surface. Use this template as a guide to shape the plate to fit the bone.
Use care to avoid fracture displacement while contouring the plate.
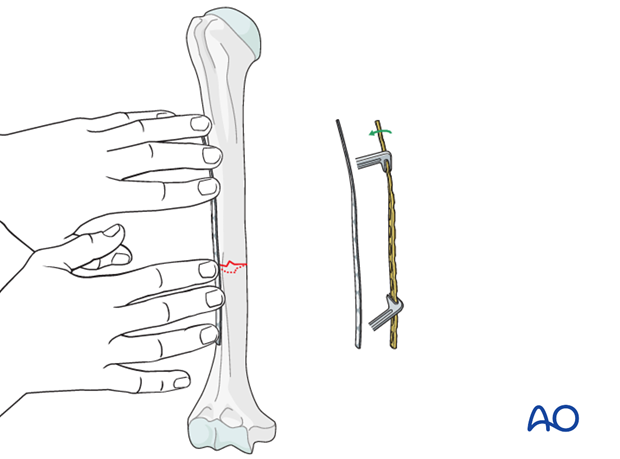
Overbending the plate
With short oblique and transverse fractures, overbending of the plate to avoid a fracture opening on the opposite side is typically not necessary.
7. Plate fixation
Application of the plate
Expose the bone sufficiently for plate application but do not strip the periosteum.
Center the plate over the fracture and hold it with a clamp in position.
Alternatively, and to confirm correct contouring, use a well-placed screw to hold the plate.
Drilling for the first screw
Hold the plate in the desired position and drill through a hole close to the fracture.
Measure the depth.
Tap the cortices if non-self-tapping screws will be used.
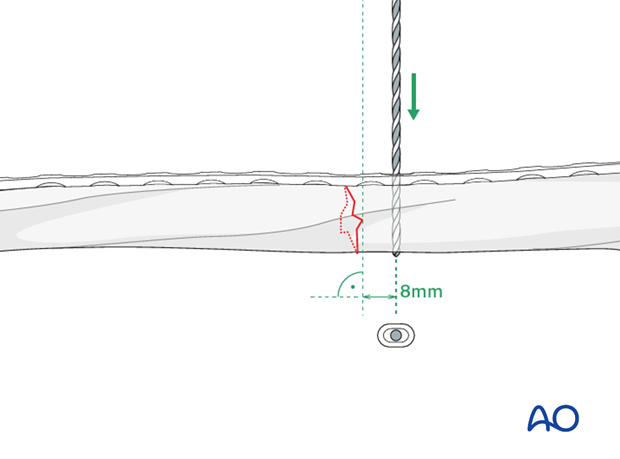
Fixation of the plate with a first screw
Attach the plate with one screw to the pre-drilled fragment. Do not tighten the screw completely at this stage. Check plate fit and alignment, and the fracture reduction. If satisfactory, proceed to drill the other fragment.
If there is concern of the strength of the screw hold in the bone add further screws to the same fragment.

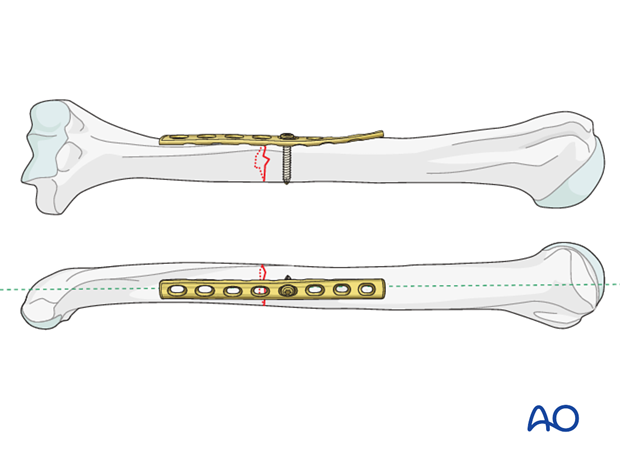
Eccentrical insertion of second screw
Insert a screw eccentrically into the other fragment, near the fracture. Tightening the eccentrically placed screw moves the plate, thereby compressing the fracture.
Confirm that the fracture surfaces are reduced, and that both ends of the plate fit satisfactorily.
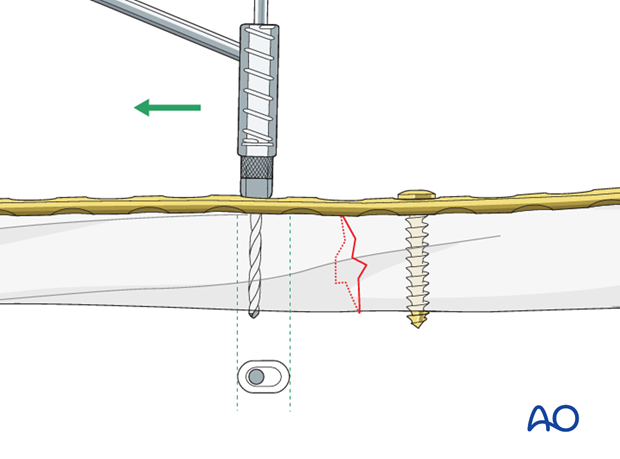
Tightening of screws for fracture compression
Tighten both screws alternately, watching carefully to see that the reduction is maintained and compressed satisfactorily.
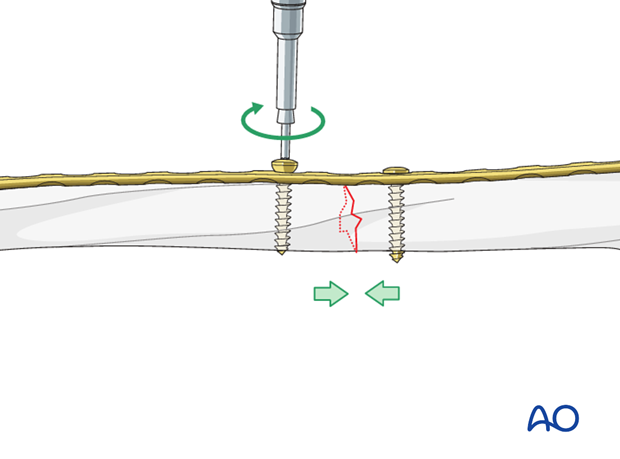
Insertion of remaining screws
Insert the remaining screws, first with the ones closest to the fracture site.
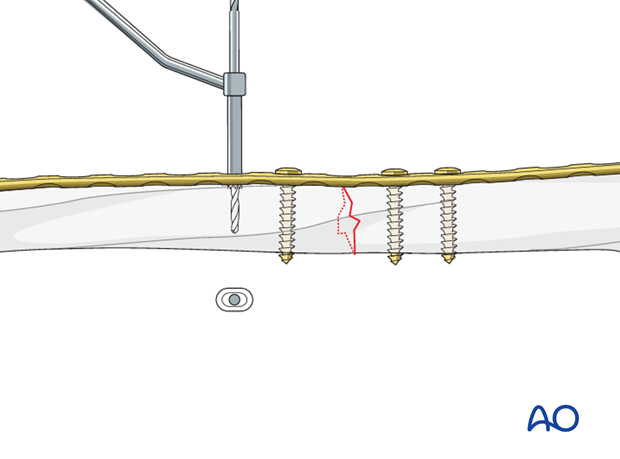
8. Final radiological assessment
Check for proper reduction and implant positions with image intensification in AP and lateral views.
Confirm also a proper torsional alignment of the humerus.
9. Aftercare
Principles
The aim of any surgical fixation of humeral shaft fractures is a stable osteosynthesis of the fracture allowing early passive and active motion. This is crucial to prevent elbow stiffness.
The rehabilitation regimen should take account of any damage to soft tissues, either as a result of the injury or due to the surgery. It also needs to take account of the security of the fixation.
Immediate postoperative care
Carefully examine the patient for neurological deficits and pulses.
Early treatment
In the beginning lymph drainage and elastocompressive bandages may be helpful.
Consider a sling for pain relief within the first days.
Treatment for refixation of deltoid detachment
If the deltoid was detached and reattached, active deltoid contraction should be delayed for the first six weeks.
Mobilization
In the early phase the rehabilitation consists of classic maneuvers eg overhead motion exercises.
Rehabilitation should address the entire upper limb.
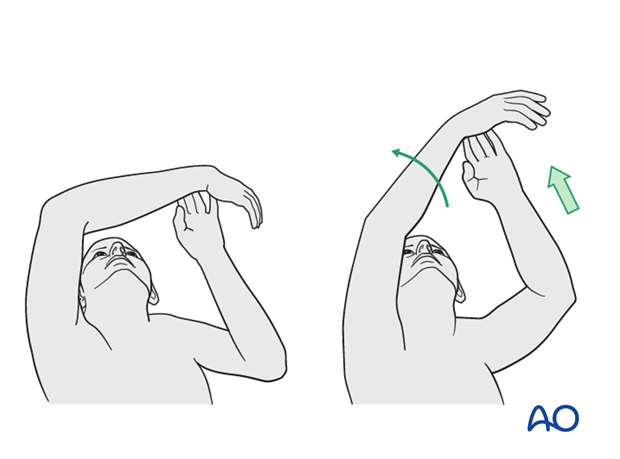
Exercise against resistance
Depending on the bone quality and compliance of the patient, exercise against resistance might be limited.
Follow-up
Clinical and radiological follow-up should be scheduled at least 6 weeks, 12 weeks and 6 months after surgery and continued until a bony healing is confirmed.
Hardware removal
Typically, humeral plates are left in situ indefinitely.
If removal is considered, bony healing should be confirmed. Plates are not normally removed for at least one year after surgery.
Be aware of the risk to the various nerves when dissecting the soft tissues to gain access to the distal humerus for removing anterior or anterolateral plates.
As the radial nerve runs over a posterior plate, removing this plate should only be considered with great caution, and the patient must be well informed about the risks. The original operation note should describe the relation of the nerve to the plate and should be reviewed before plate removal.


