ORIF - dynamic condylar screw (DCS)
1. Principles
Introduction
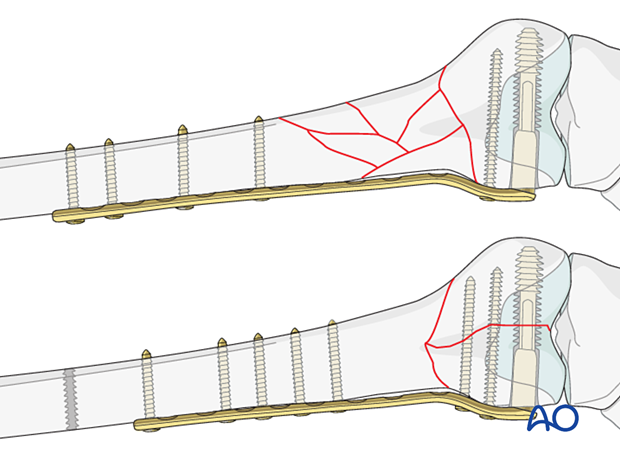
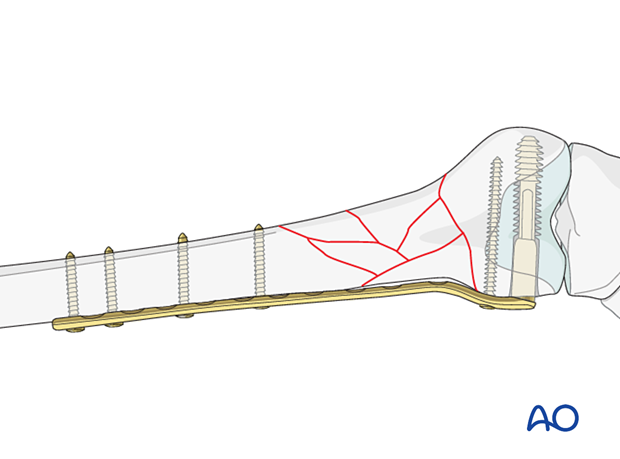
The DCS is a versatile plate which can be applied in a bridging mode (fragmentary supracondylar fracture component) and with compression (simple supracondylar fracture component).
Any fractures of the articular block are first addressed under direct vision using standard techniques of interfragmentary compression. Alignment of the main shaft fragments can then be achieved indirectly, using various aids before application of the plate.
Teaching video
Fixation of a C1 fracture with the dynamic condylar screw system.
Bridging mode
When used in bridging mode, the plate is an internal fixator used as an extramedullary splint, fixed to the two main fragments, leaving the intermediate fracture zone untouched. Anatomical reduction of intermediate fragments is neither sought nor necessary.
Direct manipulation of intermediate fragments would risk disturbing their blood supply. If the soft-tissue attachments to these fragments are preserved, and the fragments are generally aligned, healing is unimpaired.
Alignment of the main shaft fragments can be achieved indirectly with the use of:
- traction
- reduction tools
- the implant itself
Mechanical stability, provided by the bridging plate, is adequate for gentle functional rehabilitation and results in satisfactory indirect healing (callus formation). Occasionally, a larger wedge fragment might be approximated to the main fragments with a lag screw.
Compression mode
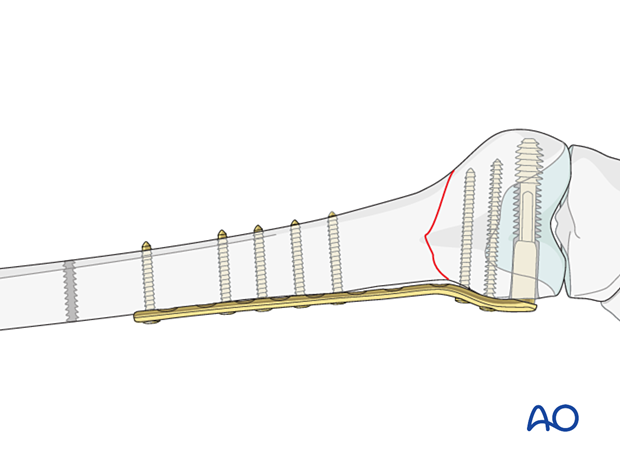
This implant is particularly useful for obtaining metaphyseal compression. If a fracture pattern can be reduced to a "simple" metaphyseal fracture pattern (such as an intact wedge fracture where the wedge is fixed to the main fragment), then compression can be used for the metaphyseal "simple" fracture.
Anatomy of the distal femur
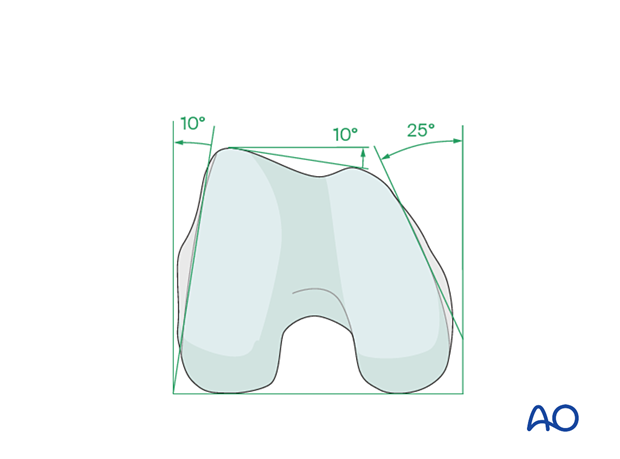
The distal femur has a unique anatomical shape. Seen from an end-on view, the lateral surface has a 10° inclination from the vertical, while the medial surface has a 20–25° slope.
A line is drawn from the anterior aspect of the lateral femoral condyle to the anterior aspect of the medial femoral condyle (patellofemoral inclination) that slopes approximately 10°. These anatomical details are important when inserting screws. In order to avoid joint penetration, these devices should be placed parallel to both the patellofemoral and femorotibial joints planes.
The muscle attachments to the distal femur are responsible for the typical displacement of the distal articular block following a supracondylar fracture, namely shortening with varus and extension deformity. Shortening is due to the pull of the quadriceps and hamstring muscles, while the varus and extension deformity is caused by the unopposed pull of the adductors and gastrocnemius, respectively.
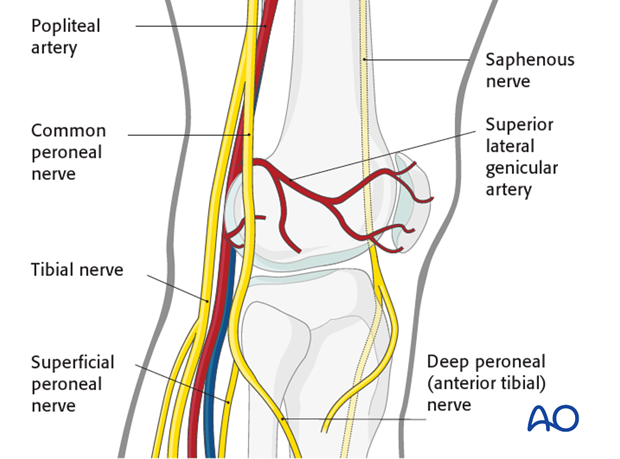
The popliteal vessels, the tibial nerve, and the common peroneal nerve lie near the posterior aspect of the distal femur. Because of this, vascular injuries occur in about 3% and nerve injuries in about 1% of fractures of the distal femur.
There are no significant arteries, veins, or nerves on the lateral side of the knee.
There may be bleeding from the lateral genicular arteries, which will need to be controlled using diathermy.
At the posterior aspect of the knee lie the popliteal artery, nerve, and vein. It must be borne in mind that these structures can be damaged by the injury or can be damaged by the surgeon during the reconstruction.
2. Patient preparation and approach
Positioning
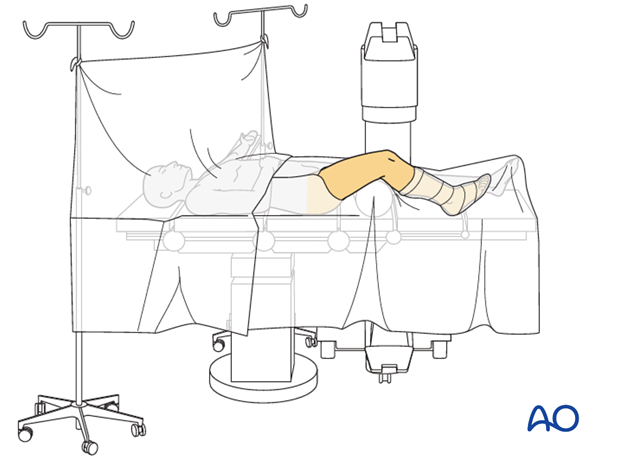
This procedure may be performed with the patient in one of the following positions:
- Supine position knee flexed 30°
- Supine position knee flexed 90°
- Lateral decubitus (particularly in obese patients)
Approach
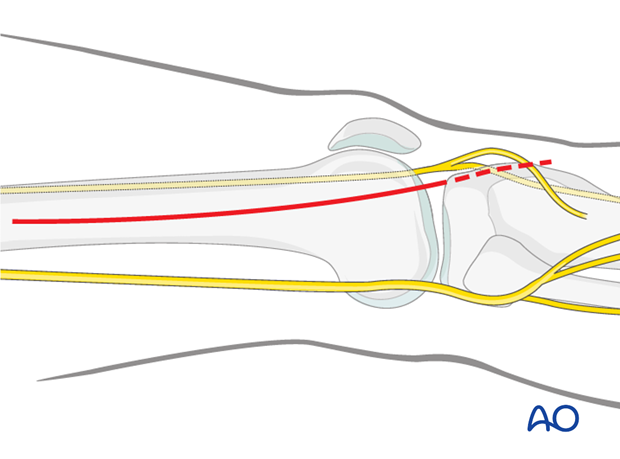
For this procedure, the lateral/anterolateral approach is used.
3. Reconstruction of the articular block
Reduction of the articular block
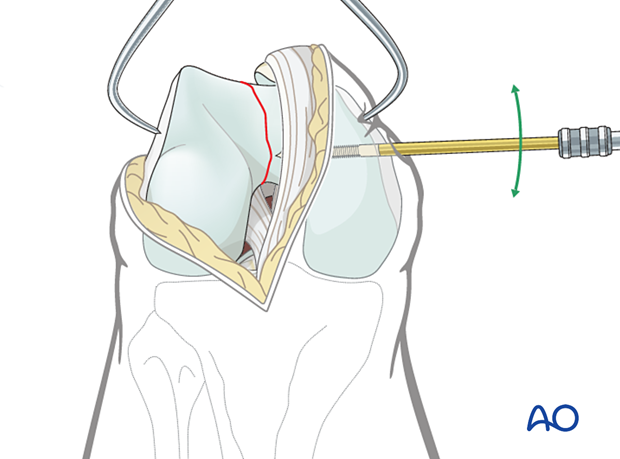
The approach must adequately expose the articular surface of the distal femoral condyle. Reduction aids that are helpful include:
- A 5.0 mm or 6.0 mm Schanz pin in the medial and/or lateral femoral condyle to act as a joystick.
- Pointed reduction forceps, or large pelvic reduction clamps, to clamp from medial to lateral across the intercondylar split.
Provisional fixation
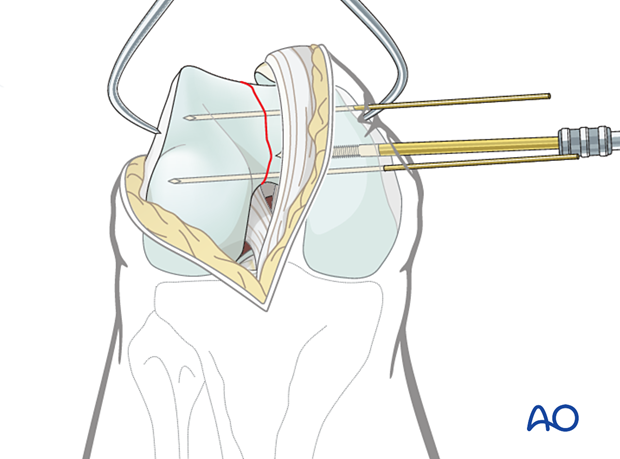
Before definitive fixation is undertaken, more than one foreceps is applied. Usually, one to two additional K-wires are inserted, either from medial to lateral, or lateral to medial.
If the K-wires are inserted from medial to lateral, they may either go through small stab incisions in the skin or through the parapatellar retinaculum.
Definitive articular surface fixation
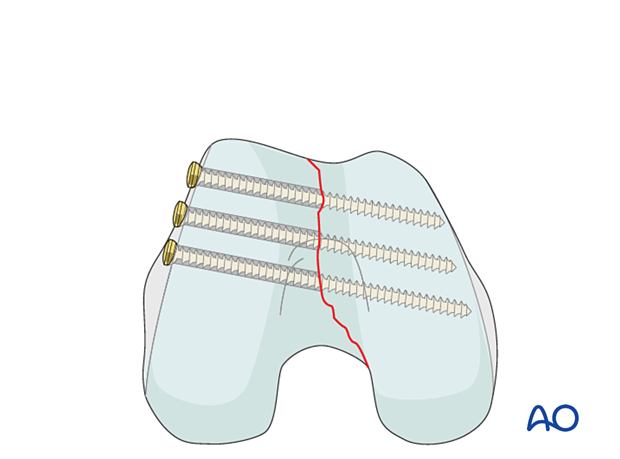
Screws are inserted along the periphery of the articular surface of the lateral femoral condyle going from lateral to medial or from medial to lateral to compress the intercondylar split.
These screws may be fully threaded 2.7 or 3.5 mm lag screws (shown with gliding hole), 6.5mm partially threaded lag screws, or 4.0/4.5 mm cannulated, partially threaded lag screws.
Insertion of screws in this manner leaves an area free of screw traffic or a "free-zone" of bone into which a laterally based plate system can be inserted (dotted circle).
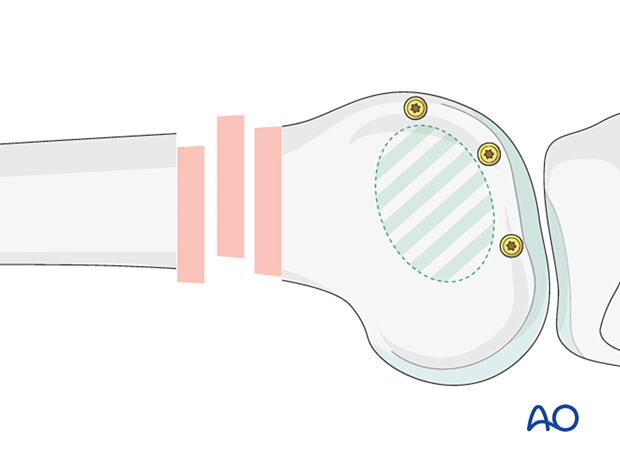
This end-on view demonstrates the screw trajectories from lateral to medial.
On occasions, it is acceptable to insert screws through the articular surface, when no other option is available. These screws must be countersunk and recessed beneath the articular surface.
4. Reduction
Consideration must be given to fracture reduction in:
- Varus/valgus
- Flexion/extension
- Internal/external rotation
- Translation
- Lengthening/shortening
Reduction can be performed with a single reduction tool (eg, large distractor), or by combining several steps (for example fracture table +/- external fixator, +/- reduction via the implant, etc) to achieve the final reduction.
The preferred method depends on the fracture and soft-tissue injury pattern, the chosen stabilization device, and the experience and skills of the surgeon.
If a large fragment has separated from the fracture zone and impaled the adjacent muscle, direct reduction may be required.
Reduction aids
Closed reduction is aided by:
- Complete anesthetic muscle relaxation
- A bolster in the supracondylar region to reduce the hyperextension deformity of the distal femoral articular block.
- Manual traction
- Femoral distractor

Reduction can also be aided by:
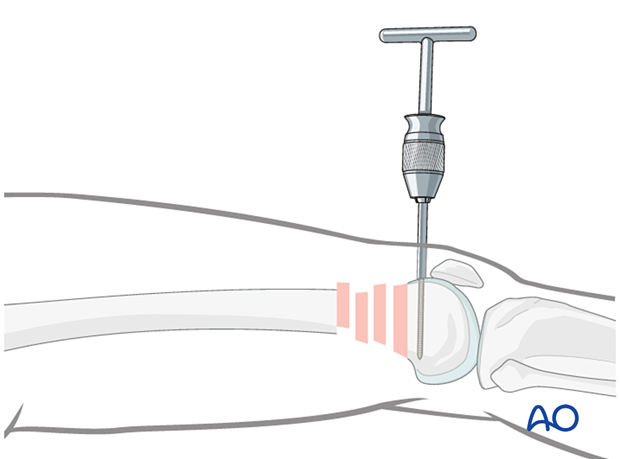
- Use of Schanz pins inserted into the medial, or lateral, femoral articular block to correct varus or valgus angulation of the femoral block.
- Insertion of a Schanz pin from anterior to posterior in the distal femoral articular block, which can be used to correct hyperextension.
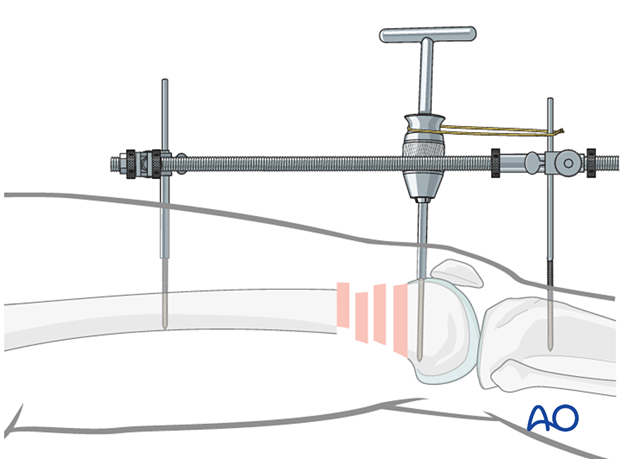
Use of external fixator/femoral distractor
Some surgeons find it useful to use an external fixator (or femoral distractor) from the proximal femur to the proximal tibia.
Due to the pull of the gastrocnemius muscle, the distal fragment tends to be displaced into extension at the metaphyseal fracture area, when distraction is applied.
To avoid this, the knee is brought into full extension, and the distal femoral fragment is stabilized in this position to the tibia. A Schanz screw is inserted in the distal femoral articular block and used to counter the pull of the gastrocnemius. When reduced, a temporary cerclage wire is used to lock the position of the Schanz screw relative to the distractor.
Insert the proximal and distal fixator (distractor) pins carefully in order not to conflict with the later plating procedure. Safe positions would be anterolateral or anterior on the femur.
Verification of successful reduction
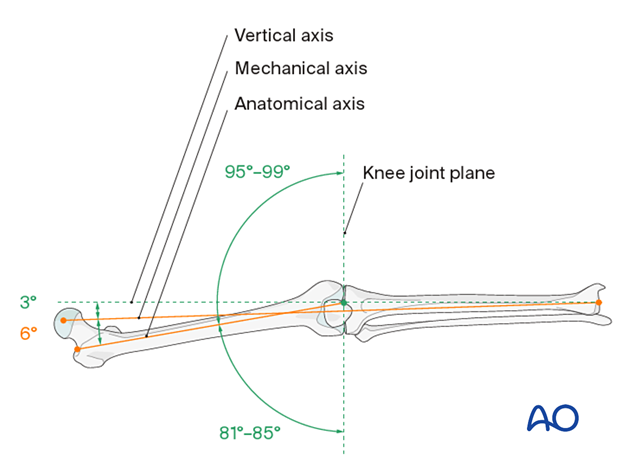
It is very important to restore the biomechanical axis of the lower limb. The normal biomechanical axis follows a line from the center of the femoral head, through the center of the proximal tibia and then through the center of the ankle joint. This axis can be checked intraoperatively by using a piece of cable, such as the diathermy cord. The cord is stretched from the iliac spine across the patella to the cleft between the first and second toes.
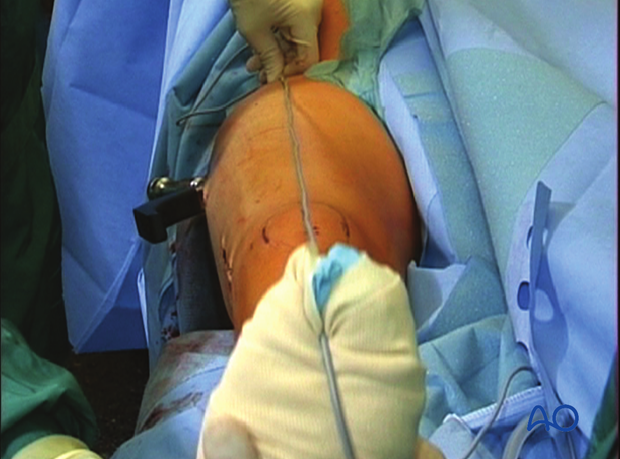
If rotation is correct, this cord will pass over the midline of the patella, and slightly medial to the tibial eminence. The radiological landmarks of the center of the femoral head, the center of the knee and the center of the ankle joint should all be in line if the mechanical axis of the femur is correct.
Another method of assessing rotational reduction is to compare the cortical thickness above and below the fracture. If a shaft fracture is multifragmentary, the image intensifier cannot be used to compare cortical diameters on each side of the fracture.
Not only must the biomechanical axis be restored, but care should be taken to ensure that there is no malrotation of the distal femur on the proximal femur.
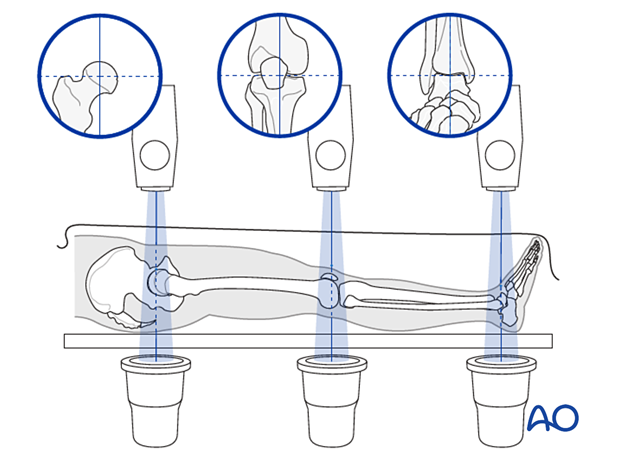
This illustration shows the longitudinal axes of the lower limb.
Confirmation of length
To ensure that femoral length has been restored, many options exist:
- One option involves reducing the fracture fragments anatomically, either directly or indirectly with fluoroscopic control.
- Even in multifragmentary fractures, there are usually a few main fracture segments that can assist the surgeon in ensuring that the appropriate length has been obtained.
- Another option involves taking radiographic images of the contralateral distal femur for comparison.
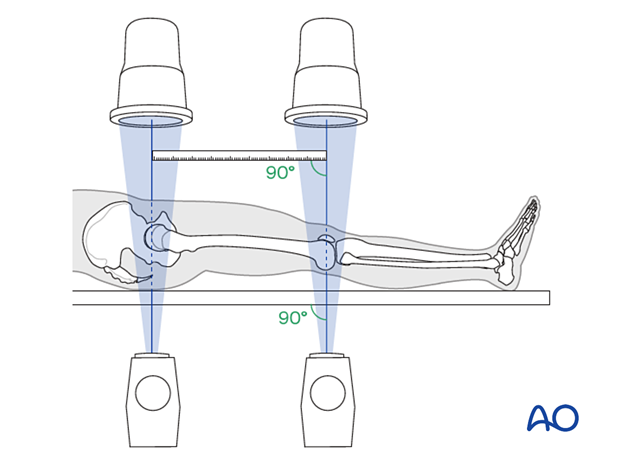
- A radiographic ruler can be used to measure the length of both femora. In this technique, it is important that the x-ray beams are perpendicular to the OR table and that the ruler is parallel to the OR table.
5. DCS fixation to the distal fragment
Preparation for correct positioning
Determine the correct position for the DCS with the help of guide wires around the joint. Under image intensifier control, pass one guide wire lateral to medial along the tibio-femoral joint line (red). Pass a second guide wire over the anterior surface of the knee to indicate the plane of the patello-femoral condyles (green).
The ideal position of the DCS is shown by the yellow wire. Note that it is inserted parallel to both the red wire in the frontal plane and is parallel to the green line on the end-on view on the femur. This latter orientation ensures that the plate comes to lie flush with the lateral cortex.
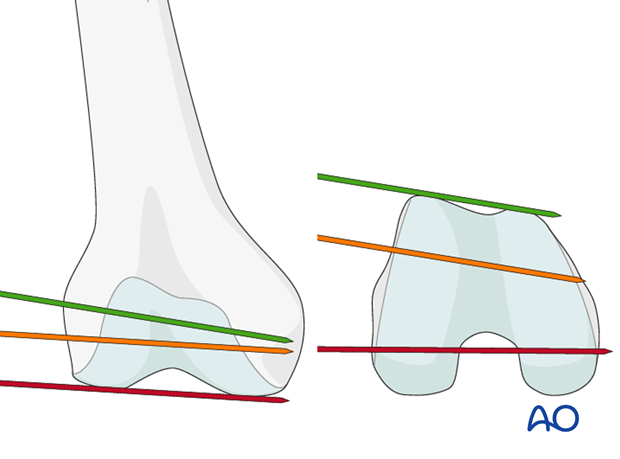
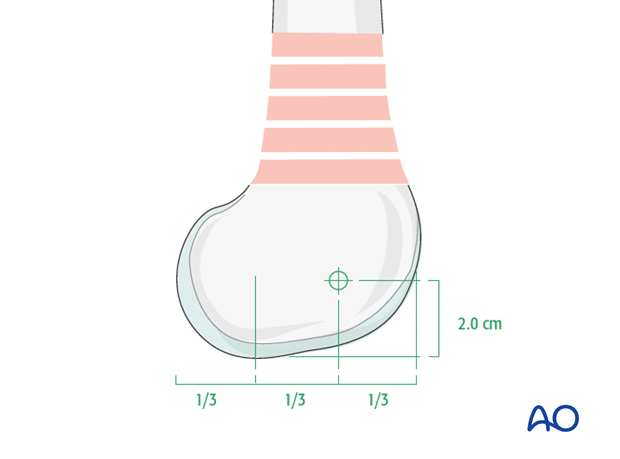
The ideal entry point for the DCS is shown on the diagram. The guide wire for the DCS is positioned at 2 cm proximal to the distal end of femur. On the lateral view, the distal femur is divided into thirds and the DCS entry site is located at the junction of the anterior and middle thirds.
Insert the guide wire at the chosen entry site of the DCS. Insert the guide wire under image intensifier control all the way across the femur. Check the position of the guide wire carefully to ensure it has been correctly positioned, with the parallelism already described.
Correct depth of guide-wire insertion
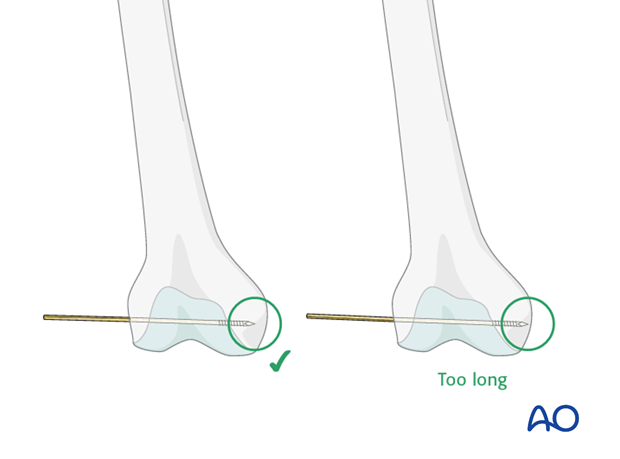
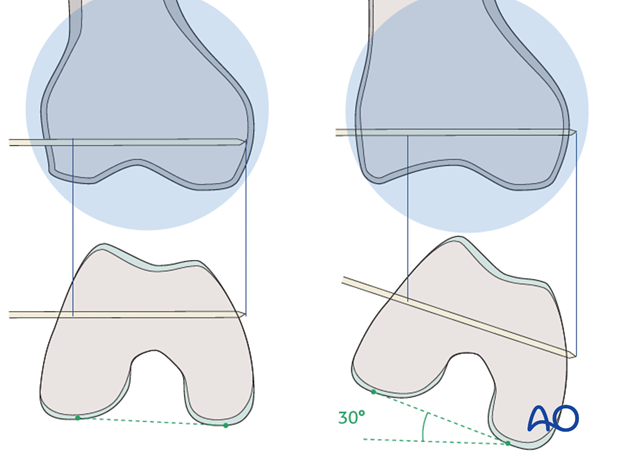
The depth of guide-wire insertion is crucial. Remember that the cross section of the distal femoral condylar mass is trapezoidal and slopes markedly on the medial side. The tip of the guide wire should just engage the medial cortex, and so will appear short of the medial condylar cortex on the AP intensifier image.
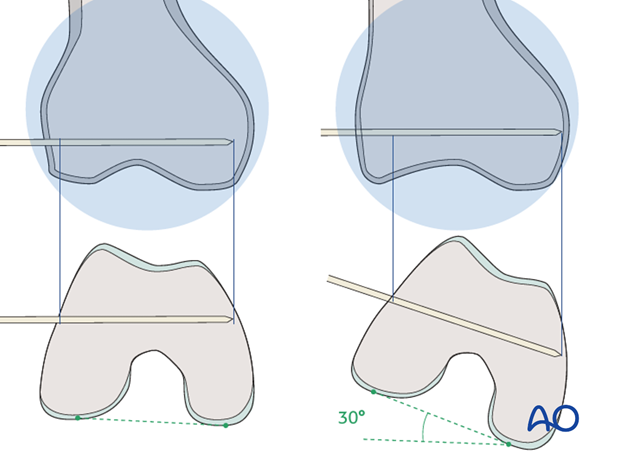
In this illustration, internal rotation by 30° reveals that the guide wire length was chosen inappropriately.
Screw length measurement
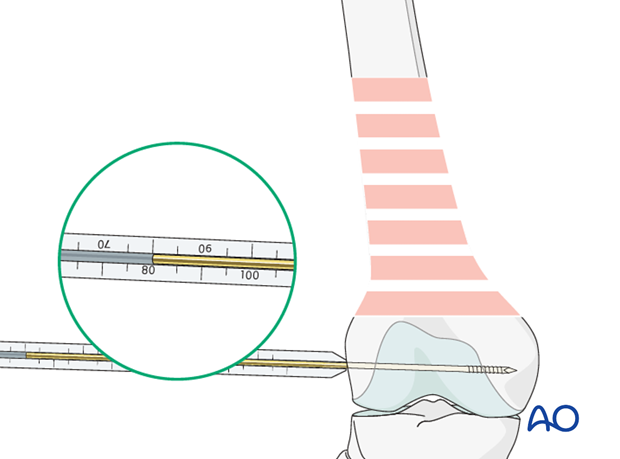
Next, slide the direct measuring device over the guide wire and determine guide-wire insertion depth and, thereby, the length of the DCS required.
Reaming
After assembling the DCS triple reamer and setting the reamer to the correct depth, ream the hole for the DCS over the guide wire.
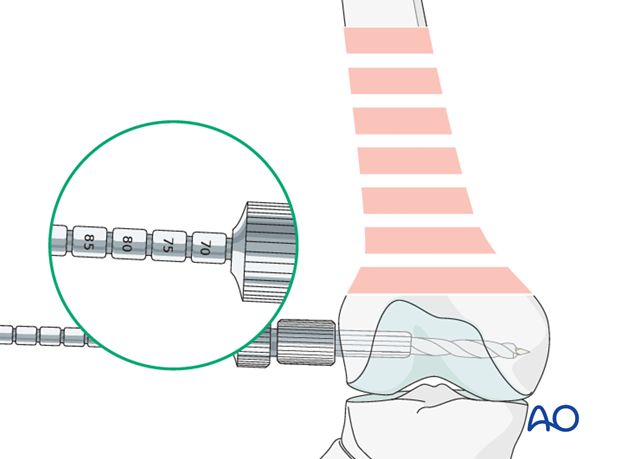
DCS insertion
After tapping, insert the DCS over the guide wire, so that its outer end is still visible 2-3 mm outside the lateral cortex of the distal femur.
For the plate barrel to slide over the screw, the T-handle should be parallel, on the lateral view, to the long axis of the distal fragment.
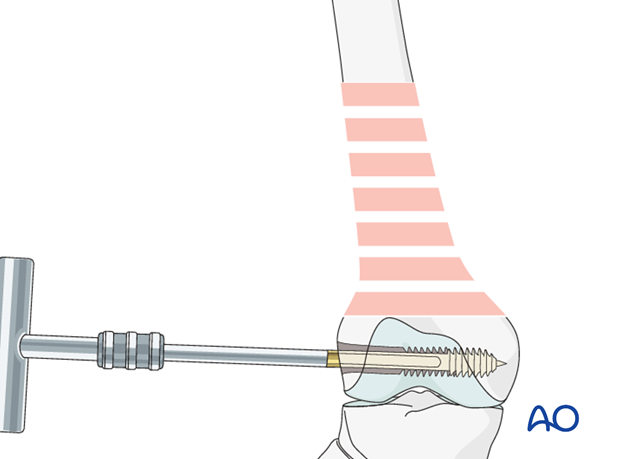
Plate placement
Detach the T-handle and pass the plate barrel over the screw shank.
Alternative: Some surgeons reconnect T-handle to the screw to help to adjust the position the plate. However, this maneuver is not absolutely necessary, and some surgeons do not perform it.
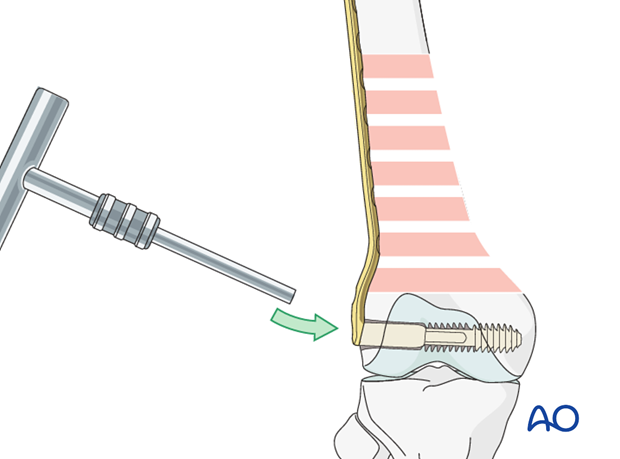
Plate impaction
Use the impactor to bring the plate down to the bone, with the barrel sliding over the screw shank. If the plate does not fit nicely against the side of the distal femur, then a chisel can be used to prepare a small channel for the DCS to recess into. This will allow the plate to sit against distal femur.
The compression screw may be utilized to couple the screw to the plate.
Additionally, the compression screw will provide additional compression across any intraarticular split.
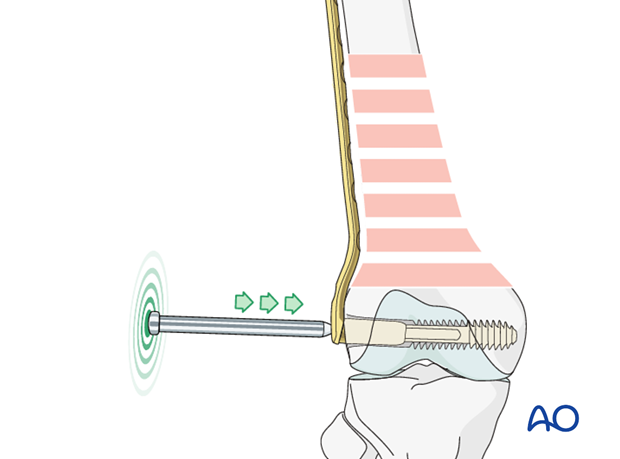
Final screw placement in distal fragment
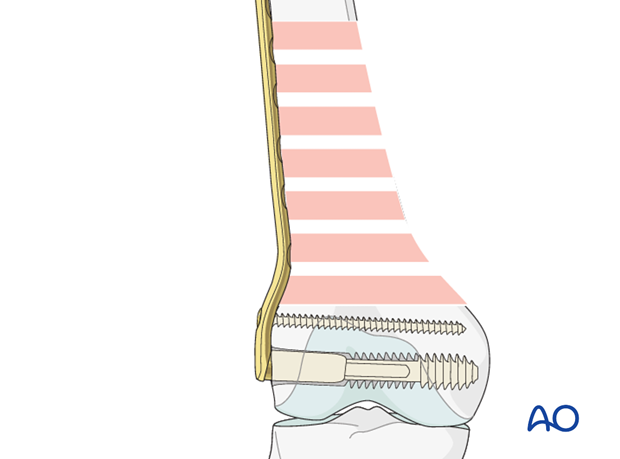
A cancellous screw can then be inserted into the most distal screw hole of the plate to prevent rotation of the distal femoral articular block around the axis of the DCS.
6. Plate fixation to the proximal fragment
Final reduction of metaphysis
Prior to plate fixation to the proximal fragment, final reduction of the metaphysis may be performed.
Anatomical reduction of all fracture segments may not be desired except in simple fracture patterns. If the mechanical axis is restored this should be adequate in most situations (fragmented patterns).
When the DCS is correctly inserted in the distal femur, the plate can be used to assist in the final reduction.
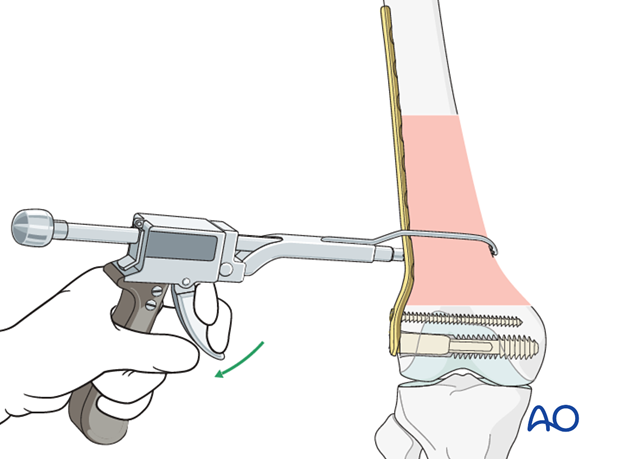
The surgeon must take care not to use excessive stripping at this point to ensure adequate fracture healing.
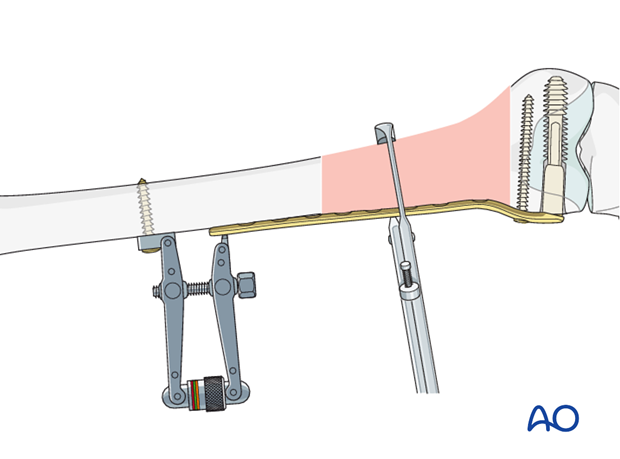
Loosely secure the plate to the proximal femur with a Verbrugge clamp.
Take care to restore the mechanical axis of the femur in all planes using the previously discussed techniques.
Indications for compression
Fixation with compression should be applied when possible in fracture patterns where there is contact between the proximal and distal main fragments.
It may not be used in situations of severe metaphyseal comminution and/or osteoporosis.
Fixation without compression
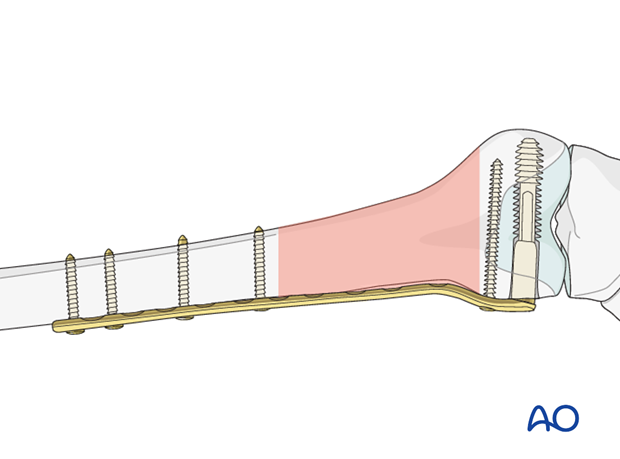
Once adequate alignment is achieved, insert a screw through the plate to secure the fixation.
Complete the fixation of the plate to the femur with sufficient screws, using neutral insertion of the screws in the plate holes.
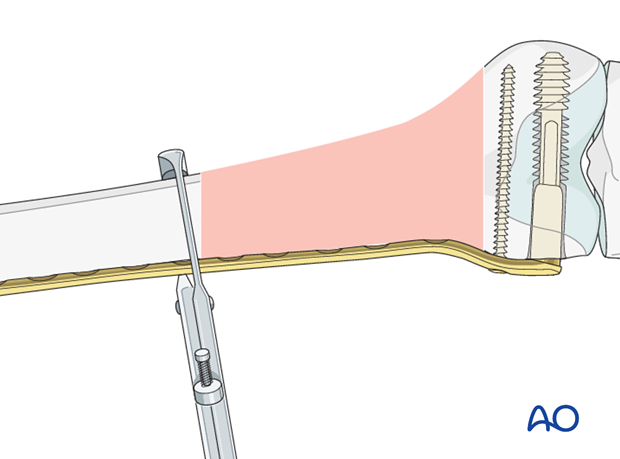
Lastly complete the fixation by inserting additional screws according to the preoperative plan.
Fixation with compression
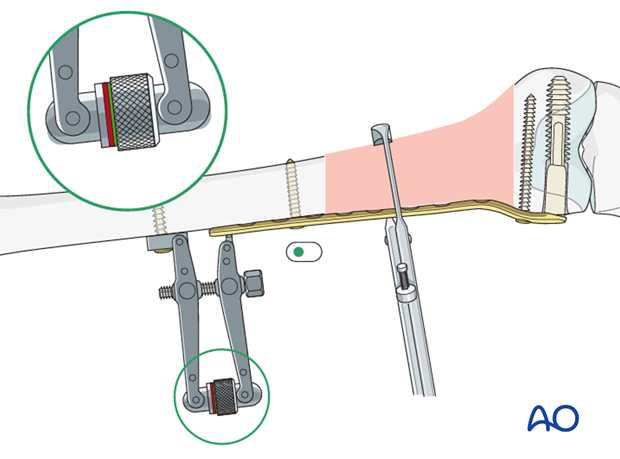
Secure the articulated tension device to the proximal femur with a bicortical screw. Tighten the articulated tension device with the spanner so that the indicator on the tension device is in the green zone, checking the fracture site carefully to ensure that no unwanted displacement occurs.
Insert a screw through the plate close to the compression device to secure the fixation. Insert the screw eccentrically in the plate hole to maintain the fracture compression.
Complete the fixation of the plate to the femur with sufficient screws, using neutral insertion of the screws in the plate holes.
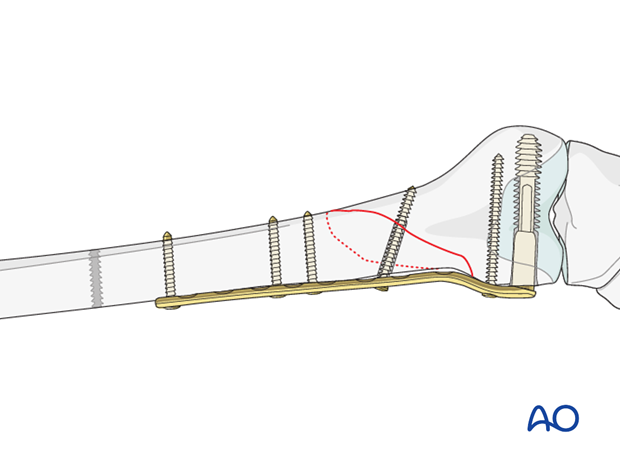
Lastly remove the articulated tension device and complete the fixation by inserting additional screws according to the preoperative plan.
In oblique, single-plane fractures, an interfragmentary lag screw should be inserted through the plate.
7. Aftercare
Impediments to the restoration of full knee function after distal femoral fracture are fibrosis and adhesion of injured soft tissues around the metaphyseal fracture zone, joint capsular scarring, intra-articular adhesions, and muscle weakness.
Early range of motion helps restore movement in the early postoperative phase. With stable fracture fixation, the surgeon and the physical therapy staff will design an individual program of progressive rehabilitation for each patient.
The regimens suggested here are for guidance only and not to be regarded as prescriptive.
Functional treatment
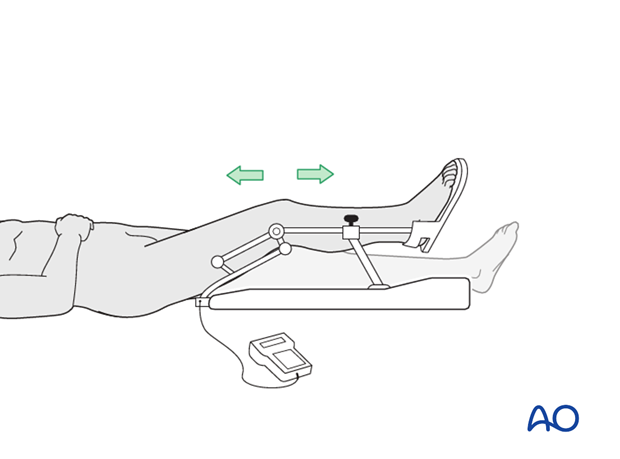
Unless there are other injuries or complications, knee mobilization may be started immediately postoperatively. Both active and passive motion of the knee and hip can be initiated immediately postoperatively. Emphasis should be placed on progressive quadriceps strengthening and straight leg raises. Static cycling without load, as well as firm passive range of motion exercises of the knee, allow the patient to regain optimal range of motion.
Weight bearing
Touch-down weight-bearing (10-15 kg) may be performed immediately with crutches, or a walker. This will be continued for 6-10 weeks postoperatively. This is mostly to protect the articular component of the injury, rather than the shaft injury. Touch-down weight-bearing progresses to full weight-bearing gradually, over a period of 2 to 3 weeks (beginning at 6–10 weeks postoperatively). Ideally, patients are fully weight-bearing, without devices (e.g., cane) by 12 weeks.
Follow-up
Wound healing should be assessed at two to three weeks postoperatively. Subsequently 6-week, 12-week, 6-month, and 12-month follow-ups are usually made. Serial x-rays allow the surgeon to assess the healing of the fracture.
Implant removal
Implant removal is not essential but should be discussed with the patient if there are implant-related symptoms after consolidated fracture healing.
Thrombo-embolic prophylaxis
Thrombo-prophylaxis should be given according to local treatment guidelines.
