ORIF through Kocher-Langenbeck
1. General considerations
Choice of approach
The morphology, size and location of fracture fragments are highly variable.
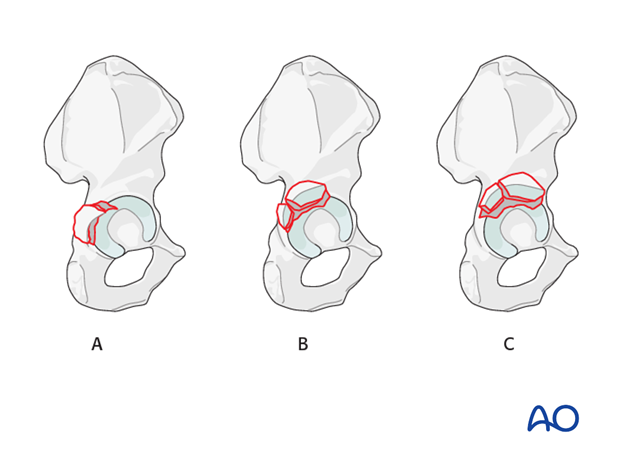
Most commonly, elementary fractures are confined to the retroacetabular surface involving only a small amount of the acetabular roof (A). This area of the innominate bone is appropriately accessed with the traditional Kocher-Langenbeck approach. This can be performed in either the prone or lateral position.
If the fragment is more superior in location and involves an extensive portion of the acetabular roof (B), additional cranial exposure may be required. This can be accomplished with the addition of the trochanteric osteotomy to the approach. This technique allows better visualization and better reduction of the fragments.
In cases where the fragment extends anterior to the gluteus medius pillar (C), the interval and prone positioning may limit the anterior exposure required for adequate reduction. In these cases, the more anterior interval of the modified Gibson approach with the trochanteric osteotomy significantly enhances cranial and anterior exposure.
Sequence of the treatment
With posterior wall fractures, the following surgical sequence is common:
- Joint distraction and removal of incarcerated fragments
- Reduction of femoral head dislocation if not achieved closed on admission
- Reduction and stabilization of marginal impaction
- Reduction and fixation of the posterior wall fragments
Planning/templating
Preoperative templating is essential for understanding the complexity of an acetabular fracture.
When using implants on the innominate bone, it is important to know the best starting points for obtaining optimal screw anchorage (see General stabilization principles and screw directions).
Patient positioning
The Kocher-Langenbeck for posterior wall fractures can be performed in either the prone or lateral position.
If a hip dislocation is expected, then the patient should be placed in the lateral position to allow sufficient freedom of movement of the leg. If the hip is only to be subluxed, then the prone position may also be utilized.
The following sections represent the approach in the prone position.
The maintenance of knee flexion (at 90°) and hip extension throughout the procedure reduces tension on the sciatic nerve.
Sciatic nerve injury
Posterior wall fractures, elemental and associated, usually result from posterior hip dislocation. The sciatic nerve may be injured. Post reduction CT will be used to evaluate the fracture characteristics.
Teaching video
AO teaching video: Posterior wall fracture through Kocher-Langenbeck approach
2. Principles of reduction
Indirect visualization
Unusually for a significant joint, articular reduction of acetabular fractures is indirect. The articular surface of the hip joint is not seen directly. Reduction must be assessed by the appearance of the extraarticular fracture lines and intraoperative fluoroscopic assessment. Some fracture lines are palpated manually but not seen directly such as transverse fracture lines on the quadrilateral plate.
Marginal impaction in the posterior wall fracture can be seen directly prior to final closure of the cortical fragment.
Quality of reduction
Posttraumatic arthrosis is directly related to the quality of reduction - the better the reduction, the greater the chance of a good or excellent result.
Reduction of femoral head
The posterior dislocation of the femoral head should have been reduced upon the patient’s arrival in hospital, to restore blood flow to the femoral head and minimize additional joint trauma. However, this reduction may be unstable, particularly with a large posterior wall fragment or fracture site impaction. The reduction may need to be repeated or adjusted intraoperatively. The femoral head must be completely reduced before the posterior wall can be reduced anatomically.
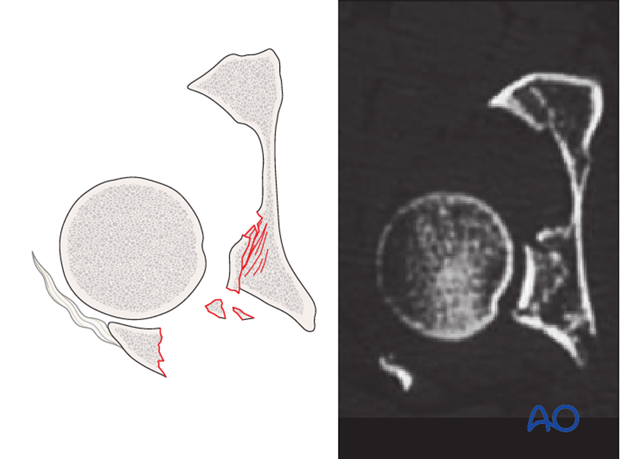
This CT scan image shows residual posterior dislocation, posterior wall impaction, and a free bone fragment in the cotyloid fossa.

3. Joint distraction
Application of traction
Traction on the femur, laterally or longitudinally, increases the joint space.
This will help:
- Expose the articular surface to assess reduction
- Remove loose fragments
- Reduce marginal impaction
Traction can be applied in several ways, including:
- Manually (the “assistant-distractor”)
- With a femoral distractor
- With a traction table
In some surgeon’s experience, the use of a traction table post or other traction frame is helpful during this operation.
Traction with a femoral distractor
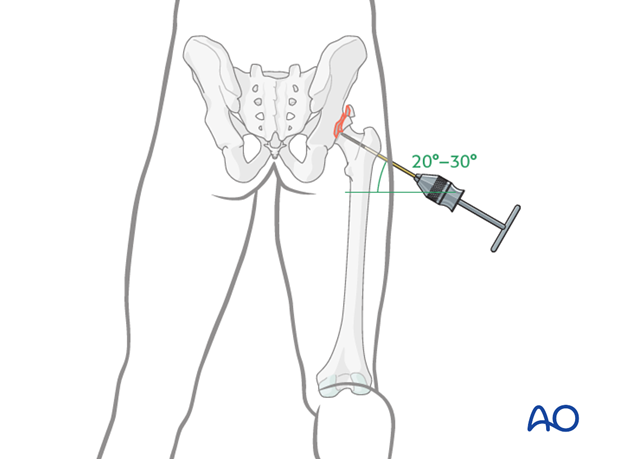
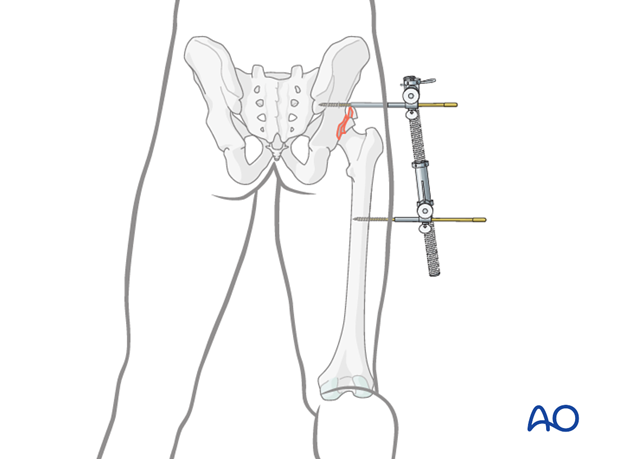
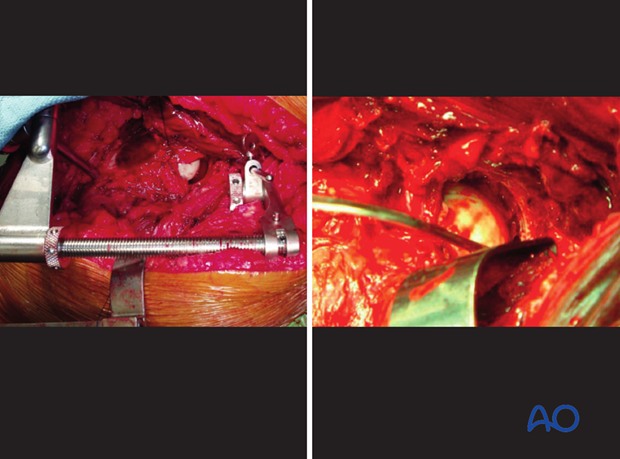
One way to apply traction is with a large distractor. This avoids both constant pulling and use of the fracture table, but does limit mobility of the hip. Properly placed, the distractor may properly realign the femoral head.
Insert a 5 mm Schanz screw into the sciatic buttress well above the level of the fracture. Place a second Schanz screw into the femur at the level of the lesser trochanter.
Tension on the distractor can be adjusted as needed for visualization or reduction.
Teaching video
AO teaching video: Use of the distractor on the pelvis
4. Cleaning of the fracture site
Cleaning and irrigation
Once the femoral head has been distracted, posterior wall fragments can be displaced to allow access to the hip joint.
The fracture bed is cleaned and the articular surface irrigated (as in right image with visualization).
It is critical to preserve any labral and capsular attachments to the posterior wall fragment(s).
Removal of incarcerated fragments
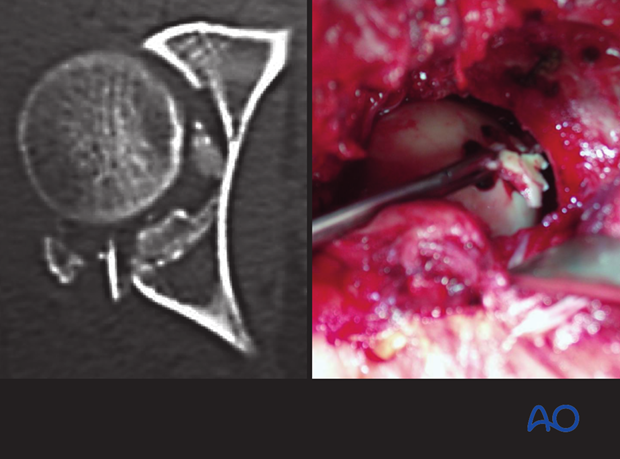
Commonly, there are incarcerated bone fragments that require removal. With the hip distracted, access to these pieces is possible with a pituitary rongeur or other small clamps.
The post-reduction X-ray or CT scan may reveal intraarticular loose bodies. If so, the femoral head must be distracted, or even re-dislocated, for the removal of entrapped loose bodies.
5. Reduction and stabilization of marginal impaction
At this stage in surgery, with all incarcerated fragments removed, and the joint still distracted, the surgeon inspects the articular surface for regions of marginal impaction. Impaction is often difficult to detect, but mandatory to treat.
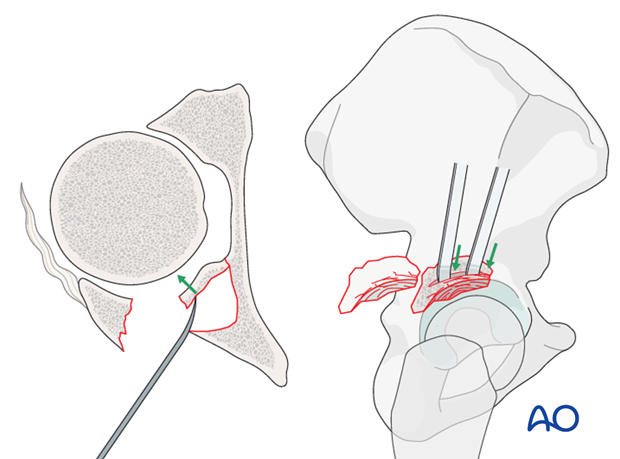
Marginal impaction is an area of articular surface, with its associated subchondral bone, that has been impacted into the metaphyseal bone at the leading edge of the fracture. The articular surface is displaced by the femoral head as it dislocates. Typically, the femoral head pushes the articular fragment into the intact, unfractured region of the stable segment.
- Marginal impaction that has been displaced by the femoral head dislocation
- Intact acetabular articular surface
Fracture impaction is often associated with posterior wall fractures. It causes joint incongruity, and deforms the fracture surfaces so that anatomical reduction is not possible until the impaction is corrected.
With the femoral head distracted to allow access to the impacted fragments, one can carefully elevate and mold the area, utilizing the femoral head as a template.
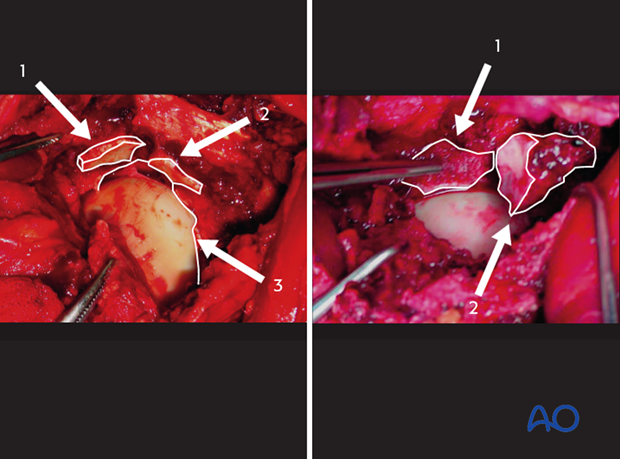
Clinical example 1
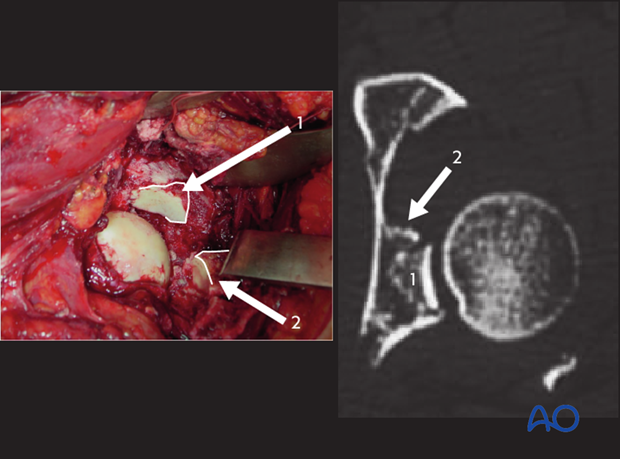
In the left clinical image, there are at least 3 specific fragments of the acetabular articular surface to identify.
- Displaced marginal impaction
- Displaced marginal impaction
- Intact region of acetabular articular cartilage
The femoral head will be used as a template, upon which to reduce the marginal impaction fragments. They will ultimately align with the intact region of acetabular articular cartilage as well.
Traction is adjusted until the femoral head is in a normal relationship with the unaffected region of the articular surface.
In the image on the right, the impacted fragment 1 has been mobilized and positioned to restore the normal relationship of this fragment with the femoral head. Of note, the surgeon has further displaced and mobilized fragment 2, which will be reduced next.
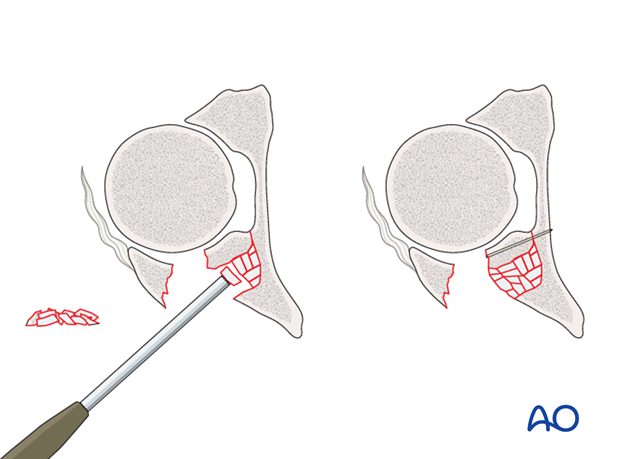
Filling the defect
Fill the metaphyseal defect left after reduction to the impaction with cancellous autograft or a structurally supportive bone substitute.
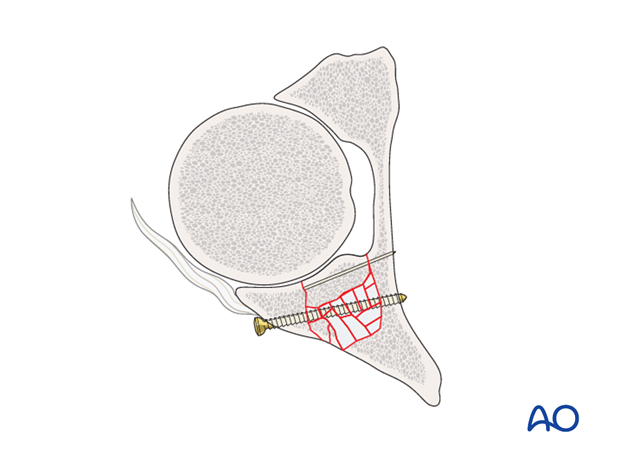
Fixation of marginal impaction
In osteochondral fragments large enough to support independent fixation, K-wire or mini fragment screws can be placed to maintain the reduced position.
Most commonly however, the impacted fragments have insufficient subchondral bone to support independent fixation. In these cases, supportive rafting occurs after the primary wall fragment has been reduced.
6. Reduction of posterior wall fragment(s)
After reduction of the marginal impaction, reduction and initial fixation of the posterior wall fragment are the next steps.
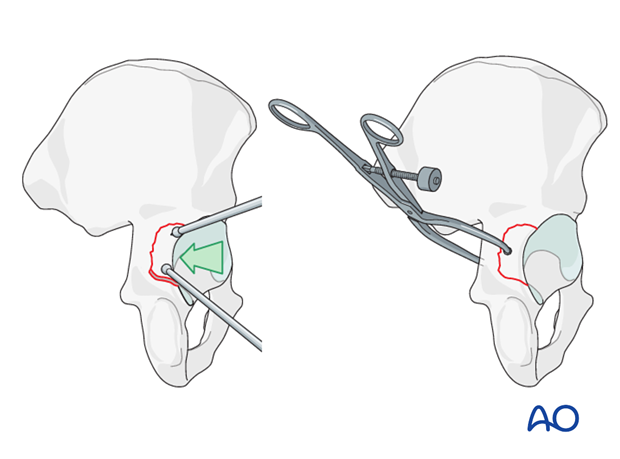
Reduction of posterior wall fragments generally requires multiple forces and adjuncts. The fragment typically displaces cranially and rotates anteriorly. The force vector is therefore distal and posterior, mating the fragment(s) into the intact fracture bed.
Ball spike pushers, dental picks, and modified hooks can be used to manipulate the fragment into its bed and compress the fractured edges. The reduction must be maintained manually until definitive fixation.
Alternatively, insert a pelvic reduction forceps with pointed ball tips into the greater sciatic notch and reduce the posterior wall fragment into position. Use the forceps to hold the fragment reduced until definitive fixation.
7. Fixation of posterior wall fragment(s)
Lag screw fixation
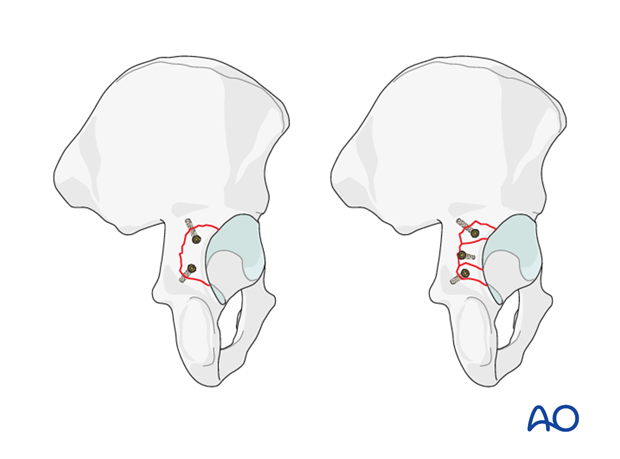
The optimal, final construct involves fragment specific fixation as well as plate stabilization of the posterior wall.
Fragment specific fixation will depend on the size and location of the fragments. Ideally, lag screw fixation of each fragment should occur as demonstrated in this illustration.
Commonly, however, fragments are too small or too peripheral to allow 3.5 mm screw fixation. In these cases, mini fragmentary fixation (1.5 mm, 2.0 mm screws) can be attempted, or spring hook plates utilized (see below).
It is unusual to encounter a fragment large enough to allow a 4.5 mm screw.
Of note, screws placed more peripherally, risk intraarticular penetration. The closer the screws are to the acetabular rim, the more dangerous due to the concavity of the acetabulum.
- Red zone: When placing screws within 10 mm of the acetabular rim, the screw trajectory must be parallel to the joint surface/cartilage.
- Green zone: Screws placed medial to the danger zone can be angled posteriorly but still avoiding intraarticular penetration.
Fragments that are small and peripheral can be challenging to stabilize due to the difficulty of interfragmentary screws penetrating the articular surface.
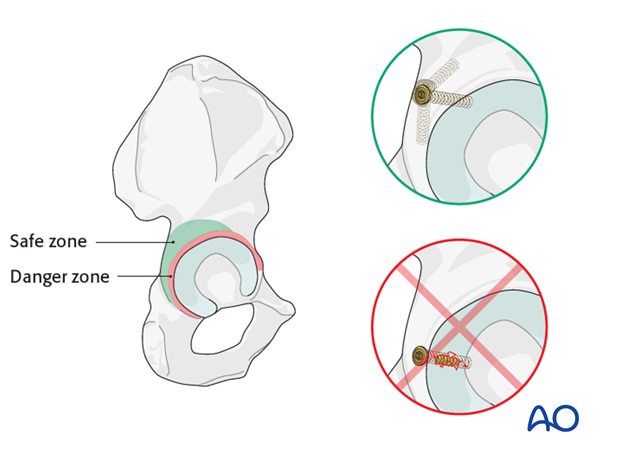
Plate fixation
Tightly applying a plate which is slightly less curved than the underlying bone will compress and stabilize the reduction.
Such an “undercontoured” plate is prepared with the aid of a flexible aluminum template.
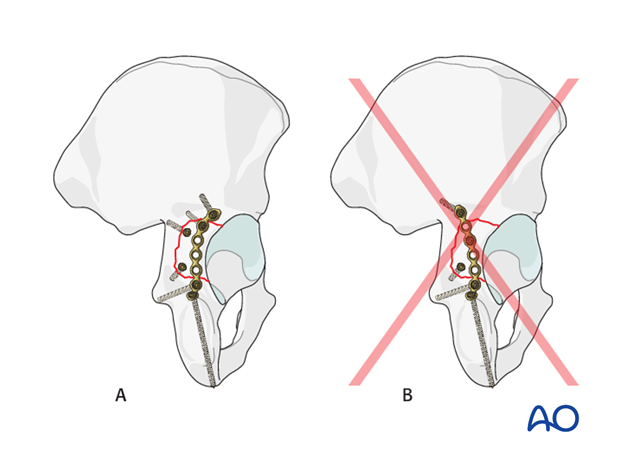
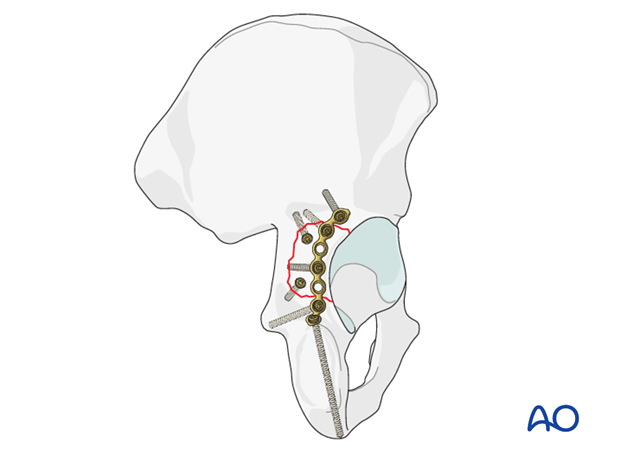
Apply a 3.5 mm reconstruction plate in buttress mode over the reduced posterior wall. Anchor it first to the ischium. The distal end of the plate is pre-contoured to fit the concavity at the base of the ischium. Next attach the proximal end to the ilium. Tightening the proximal screws completes plate contouring and compresses the fracture fragment(s) against the underlying bone.
The optimal plate positioning is very peripheral/lateral, along the acetabular rim (A). A common mistake is to apply the plate medially, parallel to the sciatic notch (B). This leaves the cranial fragment of the fracture unsupported.
Also, one should be careful not to violate the gluteus medius cranially and anterior when attempting to secure the plate proximally. Generally, safe plate application is limited by the superior gluteal pedicle and cannot extend cranially beyond the apex of the sciatic notch.
Interfragmentary screws applied through the plate are desirable but not always possible. Because the plate has been peripherally applied, these screws are commonly in the danger zone (red zone). They must be placed applied with a very superficial trajectory to avoid intraarticular penetration.
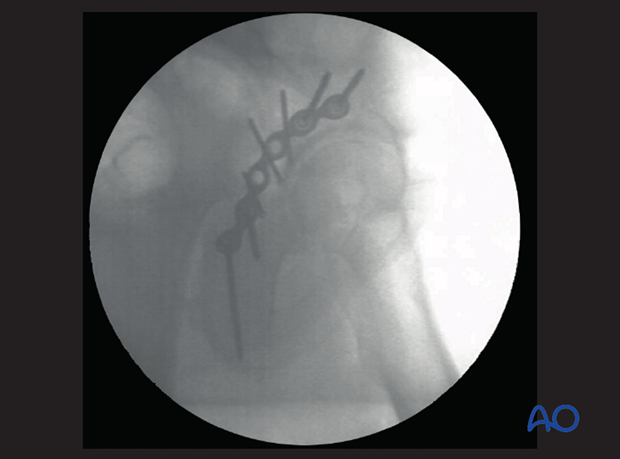
Each screw should be checked with the image intensifier to ensure that it is outside the joint.
Pearl: spring hook plates
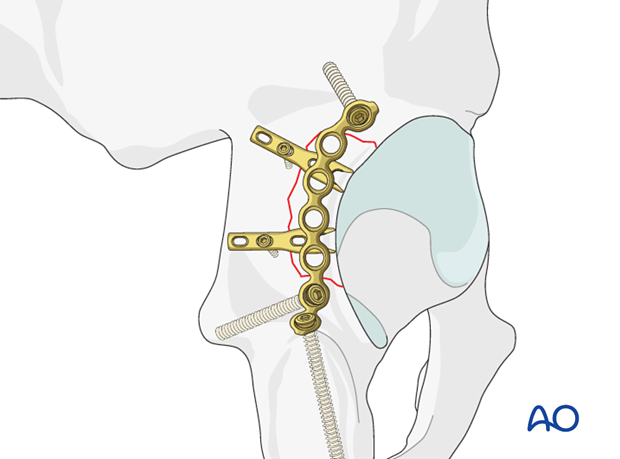
Stabilization of the posterior wall fragments sometimes requires spring hook plates to resist shearing forces on the fragment which are inserted either instead of lag screws, or before them to resist the shear created by the compression.
The spring hook plates should extend medially beyond the posterior wall buttress plate. These supplementary plates provide additional buttress support for the comminuted fragments.
The hooks must press on the bone fragments and not into the labrum.
Spring hook plates are available pre-contoured or made from small fragment one third tubular plates. For details see the corresponding basic technique.
Clinical example 2
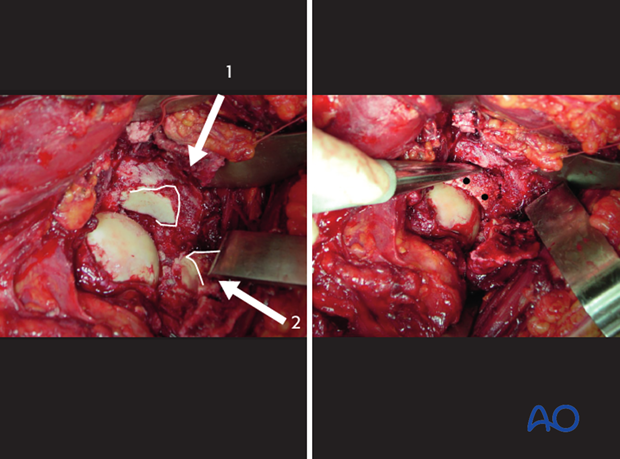
In this clinical example, a large fragment of marginal impaction (1) is seen to be impacted into the distal acetabular metaphysis.
On the right, this fragment has been reduced to its normal position, restoring the articular surface. The femoral head has been used as a template. This osteochondral fragment is large enough to support bio-absorbable pins as illustrated. These pins are drilled directly into the fragment itself to stabilize it.
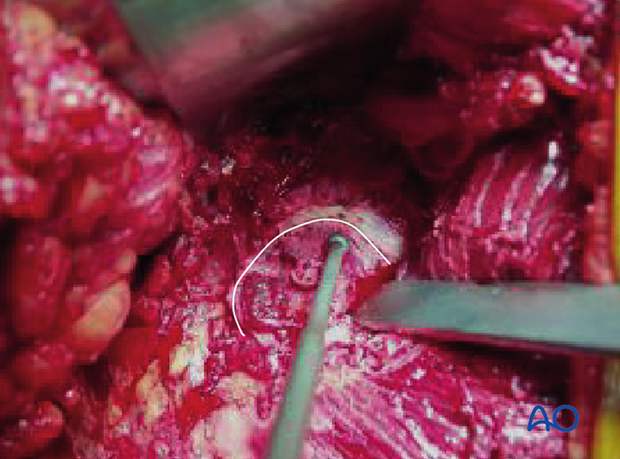
Once the articular surface has been reconstructed, the large posterior wall fragment is reduced into the fracture bed, utilizing a ball-spike pusher. Notably, the soft tissue attachments have been maintained on the displaced fragments. The ball-spike pusher maintains the reduction, while interfragmentary lag screws are applied. Alternatively, K-wires can be used to maintain provisional reduction, while screw fixation is obtained.
An intraoperative C-arm image demonstrates that the lag screws are all extraarticular. This image is obtained by rotating the C-arm into an excessive obturator oblique or a direct lateral of the acetabulum.
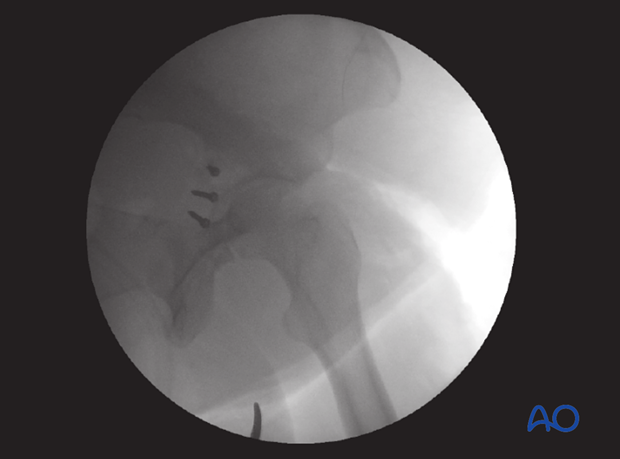
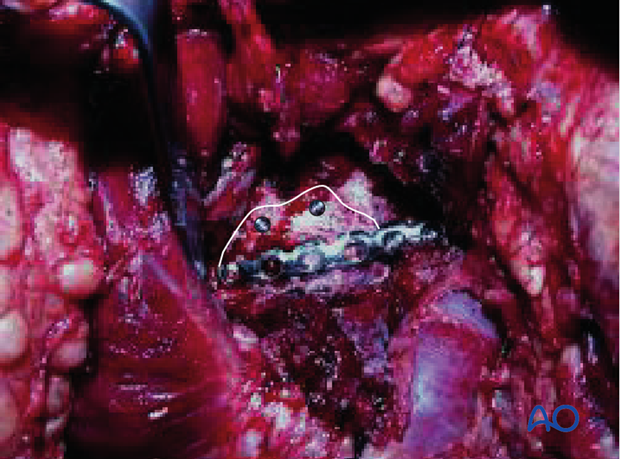
After interfragmentary screws have been placed, the undercontoured plate is applied. Notice, that it is applied laterally, just along the acetabular rim.
An intraoperative C-arm image verifies that no screws penetrate the articular surface.
8. Final radiographic assessment
Final radiographs are evaluated to ensure:
- Fracture reduction quality
- Concentric reduction without residual subluxation
- Articular congruence
- Extraarticular placement of hardware
- Screw length
The quality of the reduction of posterior wall fractures is difficult to assess (obscured by the femoral head).
Look for gaps and shadows of the posterior rim, particularly at the caudal extent of the fragment as indicators of an imperfect reduction.
Postoperatively, obtain formal high-quality radiographs of AP and both oblique views.
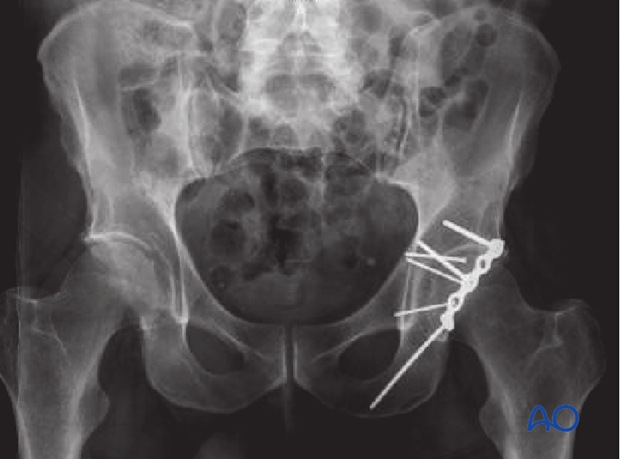
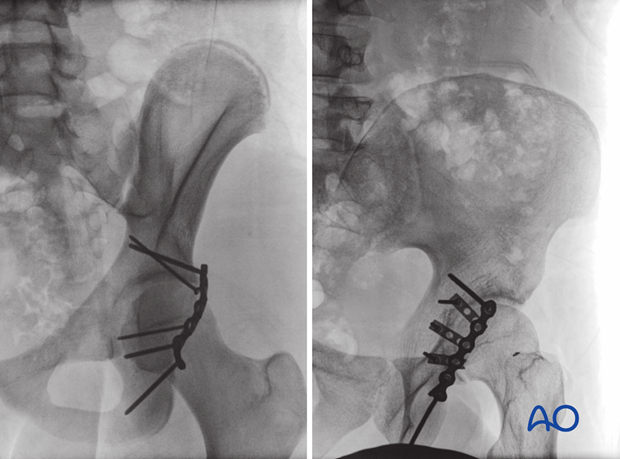
In these two cases, the X-rays demonstrate plate application in the ideal position, far lateral along the acetabular rim. Interfragmentary screws through the plate are not possible, given its position to the red zone.
The spring hook plates (right image) have been applied with points of individual fixation far medial to the acetabular surface, and are therefore safe. The posterior wall buttress plate overlies the distal spring plates, securing them peripherally.
The plates exert stabilization to the posterior wall fragments directly via their points. Additionally, an additional buttress support is provided by the surface area of each plate.
9. Postoperative care
During the first 24-48 hours, antibiotics are administered intravenously, according to hospital prophylaxis protocol. In order to avoid heterotopic ossification in high-risk patients, the use of indomethacin or single low dose radiation should be considered. Every patient needs DVT treatment. There is no universal protocol, but 6 weeks of anticoagulation is a common strategy.
Wound drains are rarely used. Local protocols should be followed if used, aiming to remove the drain as soon as possible and balancing output with infection risk.
Specialized therapy input is essential.
Follow up
X-rays are taken for immediate postoperative control, and at 8 weeks prior to full weight bearing.
Postoperative CT scans are used routinely in some units, and only obtained if there are concerns regarding the quality of reduction or intraarticular hardware in others.
With satisfactory healing, sutures are removed around 10-14 days after surgery.
Mobilization
Early mobilization should be stressed and patients encouraged to sit up within the first 24-48 hours following surgery.
Mobilization touch weight bearing for 8 weeks is advised.
Weight bearing
The patient should remain on crutches touch weight bearing (up to 20 kg) for 8 weeks. This is preferable to complete non-weight bearing because forces across the hip joint are higher when the leg is held off the floor. Weight bearing can be progressively increased to full weight after 8 weeks.
With osteoporotic bone or comminuted fractures, delay until 12 weeks may be considered.
Implant removal
Generally, implants are left in situ indefinitely. For acute infections with stable fixation, implants should usually be retained until the fracture is healed. Typically, by then a treated acute infection has become quiescent. Should it recur, hardware removal may help prevent further recurrences. Remember that a recurrent infection may involve the hip joint, which must be assessed in such patients with arthrocentesis. For patients with a history of wound infection who become candidates for total hip replacement, a two-stage reconstruction may be appropriate.
Sciatic nerve palsy
Posterior hip dislocation associated with posterior wall, posterior column, transverse, and T-shaped fractures can be associated with sciatic nerve palsy. At the time of surgical exploration, it is very rare to find a completely disrupted nerve and there are no treatment options beyond fracture reduction, hip stabilization and hemostasis. Neurologic recovery may take up to 2 years. Peroneal division involvement is more common than tibial. Sensory recovery precedes motor recovery and it is not unusual to see clinical improvement in the setting of grossly abnormal electrodiagnostic findings.
