Kocher-Langenbeck approach to the acetabulum
1. Introduction
The Kocher-Langenbeck approach is an approach to the posterior structures of the acetabulum. It allows direct visualization of the posterior column and the retroacetabular surface. The dorsocranial articular acetabulum is also accessible either through the fracture gap or after a capsulotomy.
The Kocher-Langenbeck approach can be performed either in the prone (as illustrated) or lateral position.
The maintenance of knee flexion (at 90°) and hip extension throughout the procedure reduces tension on the sciatic nerve.
AO teaching videos
Pelvic and acetabular surgical exposure – Kocher-Langenbeck approach – prone
Pelvic and acetabular surgical exposure – Kocher-Langenbeck approach – lateral
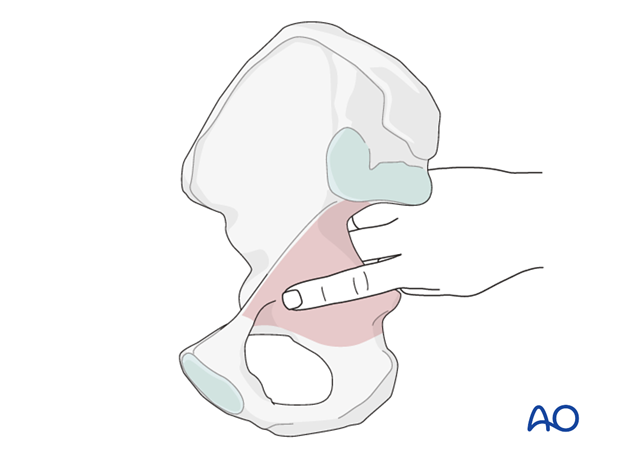
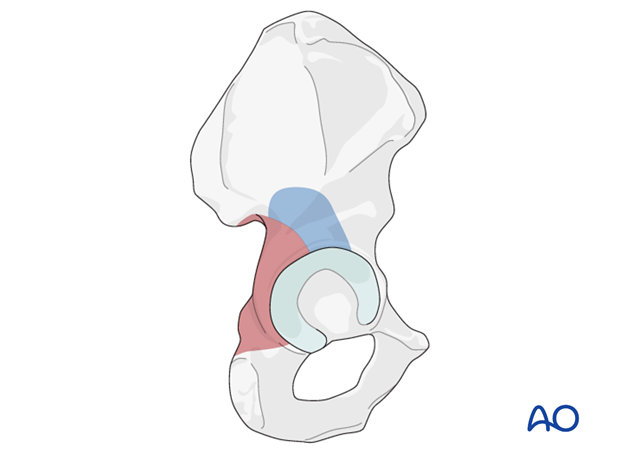
This approach allows direct access to the area indicated in dark brown, limited cranially by the neurovascular bundle.
Additional exposure to the cranial anterior portion of the acetabulum (blue) can be obtained with trochanteric osteotomy.
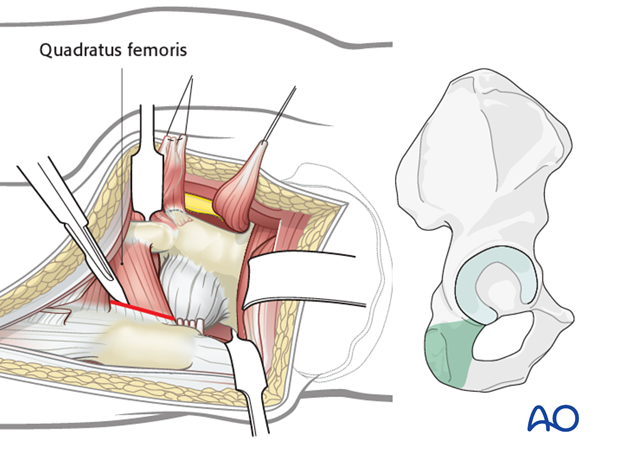
Caudal exposure (green) can be obtained with reflection of the quadratus femoris muscle. Care must be taken to avoid injury to the medial circumflex femoral artery and thus should be avoided when possible.
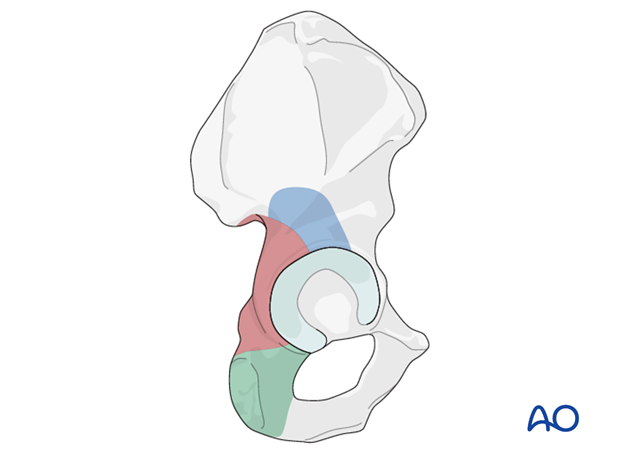
The area in light brown can be accessed by palpation and allows clamp placement.
2. Skin incision
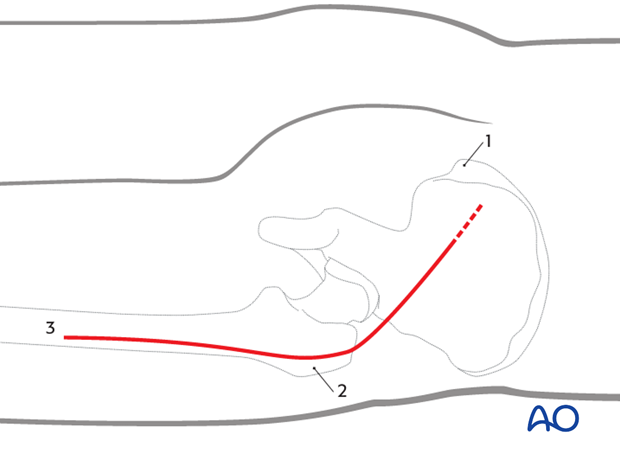
Outline the following bony landmarks with a sterile marking pen:
- Posterior superior iliac spine
- Greater trochanter
- Shaft of femur
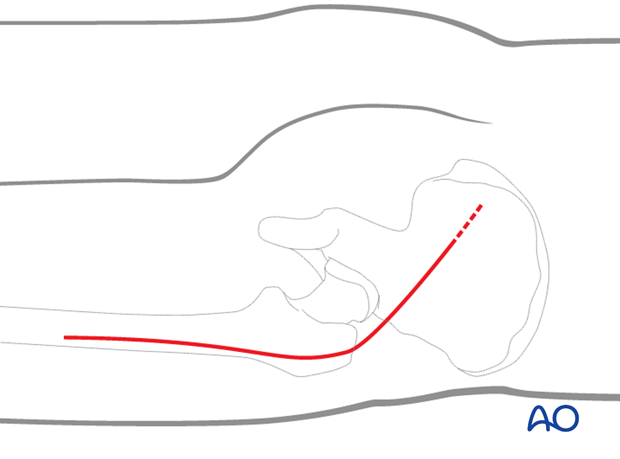
Start the skin incision a few centimeters distal and lateral to the posterior superior iliac spine. A more proximal extension (indicated by dashed line) may improve exposure in obese or muscular patients.
Continue the incision anteriorly over the greater trochanter. Curve it distally along the tip of the greater trochanter towards the lateral aspect of the femoral shaft.
End the incision at the mid third of the thigh (just distal to the insertion of the gluteus maximus tendon).
3. Superficial surgical dissection
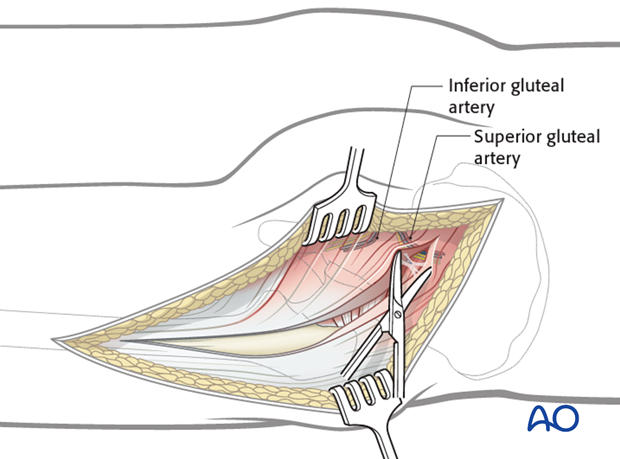
After dividing the subcutaneous tissues, sharply incise the subcutaneous tissues along:
- The gluteus maximus muscle (using scissors)
- The iliotibial tract (using a scalpel)

Split the gluteus maximus in line with its fibers, starting at the greater trochanter in a proximal direction up to the crossing of the first neurovascular bundle.
This creates a posterior muscle belly (inferior gluteal artery), and an anterior belly (superior gluteal artery) that includes one third of the gluteus maximus and the muscle of the tensor fascia latae.
In the distal half, incise the iliotibial tract in line with its fibers up to the mid third of the thigh.
4. Deep dissection
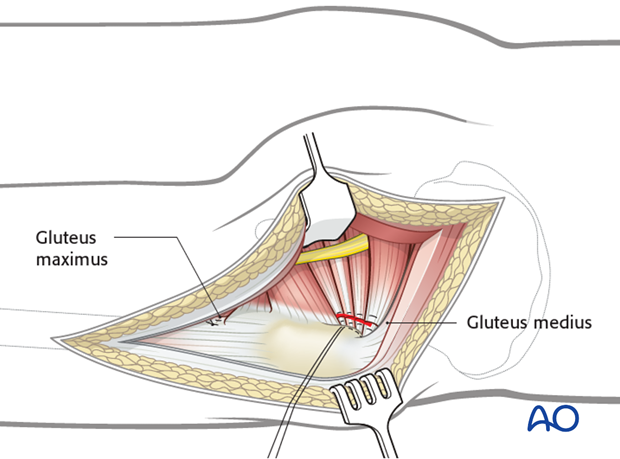
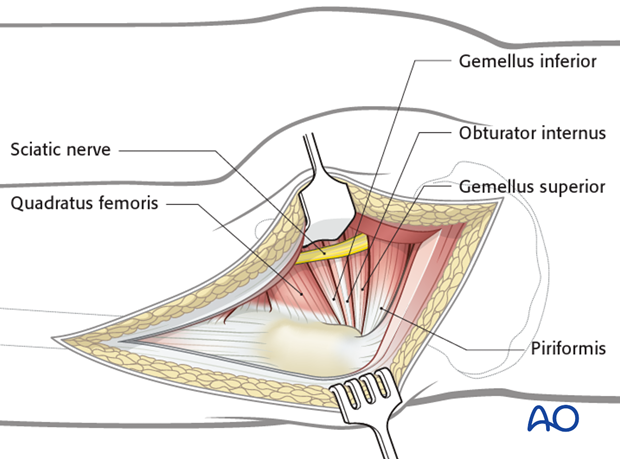
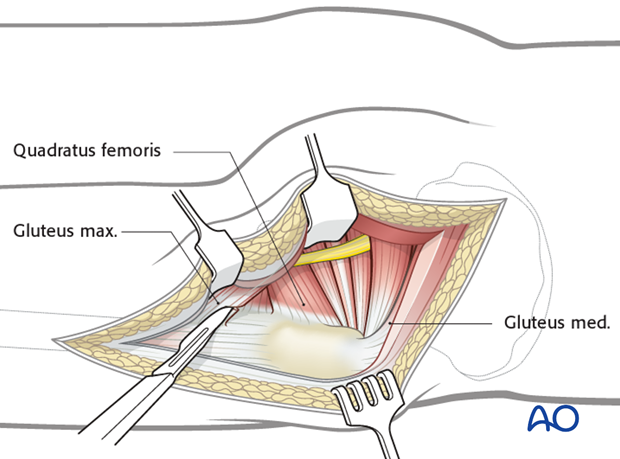
Free the layer of fat covering the short external rotators, exposing the insertion of the piriformis tendon, the gemelli, and the internal obturator muscle.
The sciatic nerve (see illustration) lies posterior to the gemelli and internal obturator muscles, and anterior to the piriformis muscle, between the greater trochanter and the ischial tuberosity.
Carefully visualize the sciatic nerve.
Ensure at all times that no direct pressure or stretching is exerted on the nerve.
Detach the gluteus maximus 1 cm from its insertion into the gluteal tuberosity of the femur.
Detachment can be done partially or completely.
This allows less tension and easier mobilization of the gluteus maximus muscle.
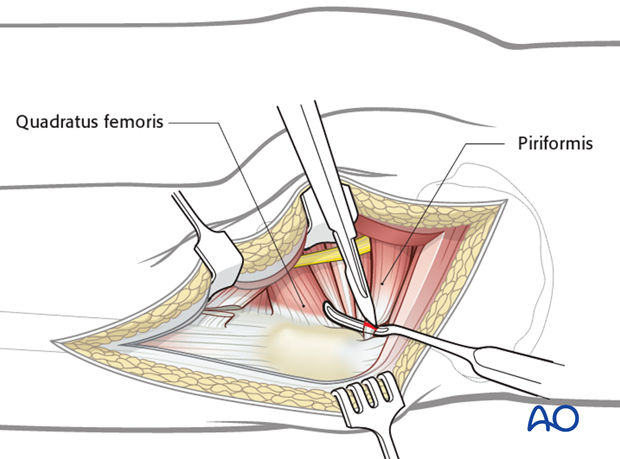
Isolate the piriformis tendon. Place a suture at least 1 cm lateral to its femoral insertion and dissect the tendon.
Avoid damage to the medial circumflex femoral artery which is running in proximity (at the upper border of the quadratus femoris muscle) by leaving 1 cm of tendon attached to the greater trochanter.
Reflect the piriformis belly laterally to expose the retroacetabular surface to the greater sciatic notch.
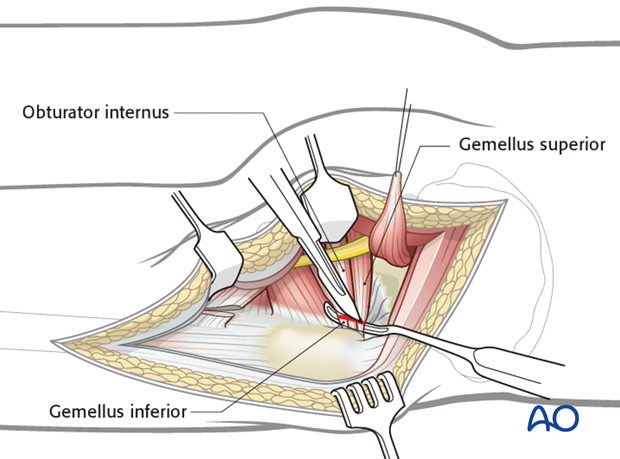
Isolate the conjoined tendon of the obturator internus and superior and inferior gemelli muscles. They are tagged and incised 1 cm lateral from their femoral insertions to protect the medial circumflex femoral artery. Reflect the muscle bellies of the three conjoined muscles laterally to access the lesser sciatic notch.
5. Exposure of the posterior wall and column
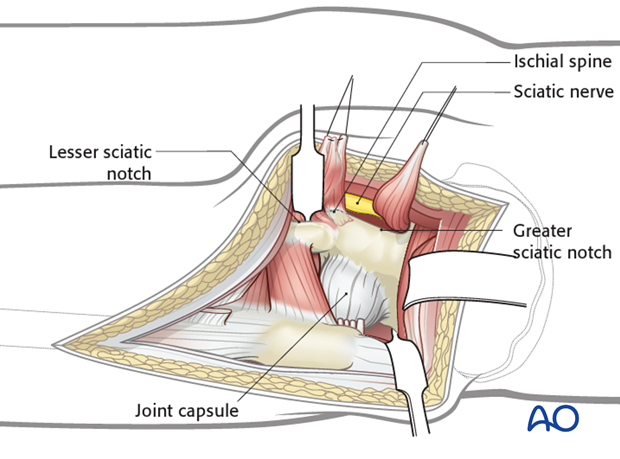
Expose the greater sciatic notch, the ischial spine, and the lesser sciatic notch.
Insert a retractor in the lesser sciatic notch and one anterosuperiorly in the direction of the anterior inferior spine. Now the posterior column is visible in its whole extent.
Protect the sciatic nerve, which lies behind the retractor, with abdominal sponges. Use the short external rotator muscles as a cushion.
6. Trochanteric osteotomy for additional cranial and anterior exposure
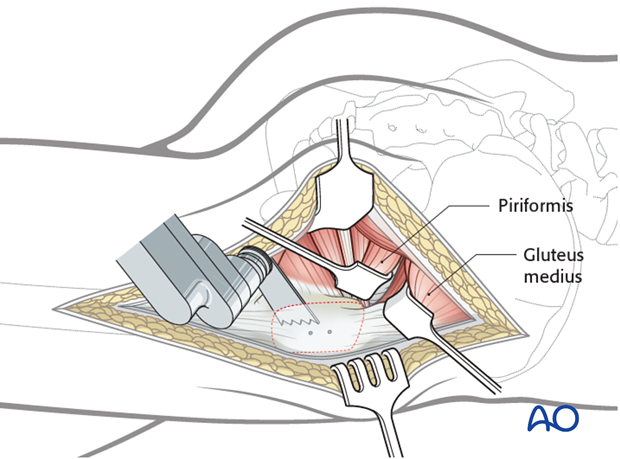
To enhance cranial and anterior exposure a trochanteric osteotomy can be performed.
The area in dark brown demonstrates the typical exposure or the standard Kocher-Langenbeck approach. The blue area indicates the additional exposure associated with trochanteric osteotomy.
This may be performed in either the prone or the lateral patient position.
It may be useful to predrill the trochanter for subsequent reattachment prior to the osteotomy.
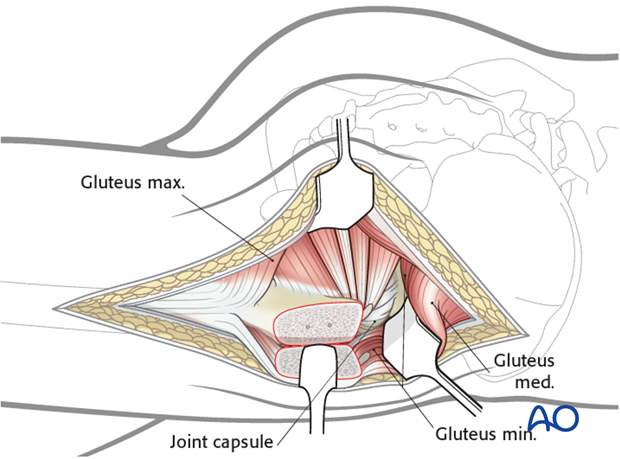
The osteotomy is then carried out from the posterior trochanter anteriorly to mobilize the fragment. This is facilitated by internal rotation of the femur. Ideally the exit point of the osteotomy will leave the piriformis origin partially attached to the trochanteric fragment. Trochanteric mobilization may also require detachment of remaining gluteus medius and elevation of the vastus lateralis fascia from the vastus tubercle.
Mobilizing the trochanteric fragment anteriorly now provides access to the cranial and anterior supraacetabular surface without excessive injury to the gluteus medius and minimus musculature.
7. Quadratus femoris elevation for additional caudal exposure
The quadratus femoris can be elevated from its origin to expose the distal extent of the posterior column as demonstrated in green.
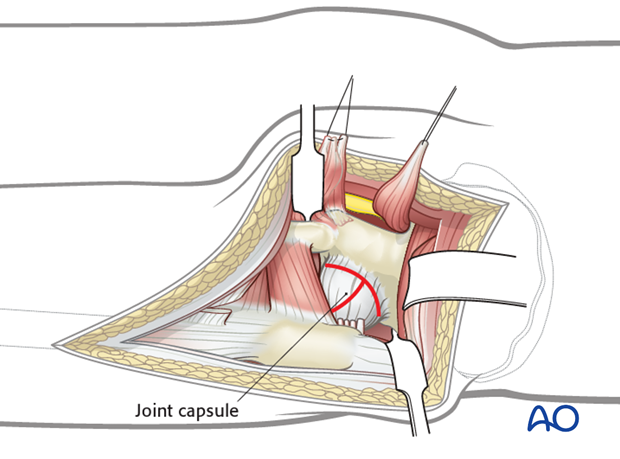
8. Option: perform a capsulotomy
If the posterior capsule is intact and direct inspection of the joint is required, a T-shaped capsulotomy is made.
Incise the joint capsule 0.5 cm lateral to the edge of the posterior wall, avoiding damage to the limbus.
Place the vertical leg of the incision parallel to the femoral neck.
With the help of a Schanz screw placed in the femoral neck, distraction of the hip joint can be achieved. In this way, the inner aspect of the acetabulum is directly visible.
Alternatively, distraction is achieved by enhancing skeletal traction on the femoral shaft with the extension table.
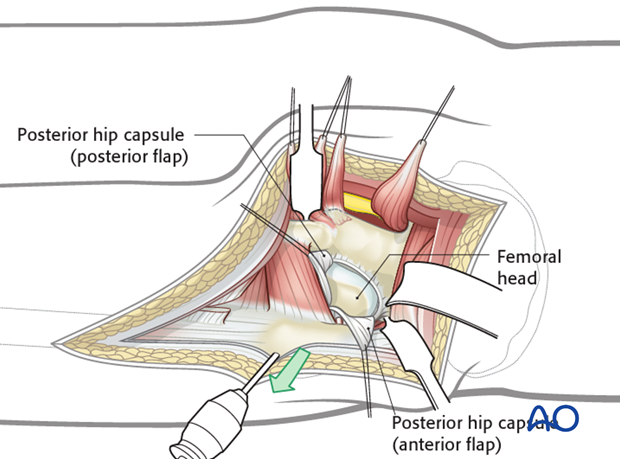
9. Joint inspection
Inspect the weight bearing dome and the femoral head.
Detect if there is any marginal impaction or damage to the cartilage of the acetabulum and femoral head. Localize, remove, and/or clean and reinsert any free intraarticular fracture fragment(s).
Note: If no capsulotomy has been performed, the hip joint cannot be inspected after reduction (fixation) of the fragments.
10. Wound closure
Perform a meticulous debridement of all soft tissues before starting wound closure.
Remove necrotic tissue and irrigate the entire wound to decrease the risk of periarticular ossification. Insert at least two suction drains. Reinsert all tendons and approximate the split parts of the gluteus maximus with adaptation sutures. Perform the closure of the iliotibial tract, the subcutis and the skin.
Note: The repair of these tendons at the time of closure represents additional risk to the femoral head circulation. This is particularly true for the conjoint tendon where passage of a needle into the tendon stump may injure the medial femoral circumflex artery.
