Open reduction internal fixation
1. Principles
NOE type III injuries represent severely comminuted fractures. The nasal dorsum is almost always extensively comminuted as is the frontal process of the maxilla. The medial canthal tendon is avulsed from its bony insertion, requiring canthopexy. These fractures usually require 3-point exposure and fixation.
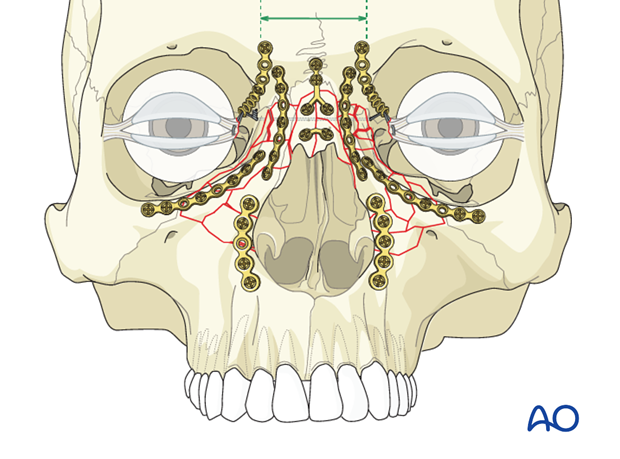
The intercanthal distance should be restored.
Rule out CSF leak particularly in bilaterally displaced fractures in order to minimize the risk of early or delayed meningitis. Always make sure to rule out injuries to the globes and the lacrimal apparatus.
Great care should be taken when considering placing plates anterior to the medial canthal ligament as these may be visible through the thin overlying skin.
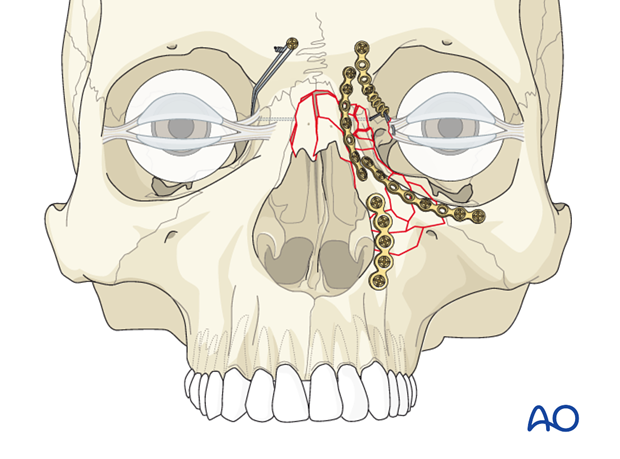
Nasal bone involvement
If nasal bones are also fractured, they should be addressed and reduced. Fixation with plates may be necessary.
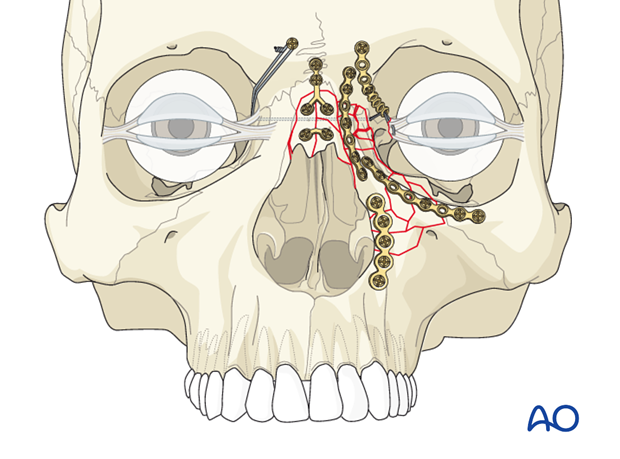
If the dorsum of the nose is comminuted or if can not be fully reduced, reconstruction with a cantilevered bone graft is performed.

Bilateral NOE fracture with nasal bone involvement
NOE type III fractures often occur bilaterally. A wire needs to be placed through both medial canthal ligaments and secured in the appropriate posterior and superior position. The wire can then be twisted on itself to bring the canthi together. A slight overcorrection of the intercanthal distance should be considered. The recommended intercanthal distance for white males is 33 to 34 mm and for white females 32 to 33 mm. Little data is available for other ethnic groups.
Numerous modalities may be used in order to hold the transnasal wire in the appropriate posterior position. These include the use of medial canthal plates, the use of mesh, which may be particularly desirable when the NOE fracture is combined with a medial orbital wall fracture, or the use of bone grafting.
2. Selection of approach
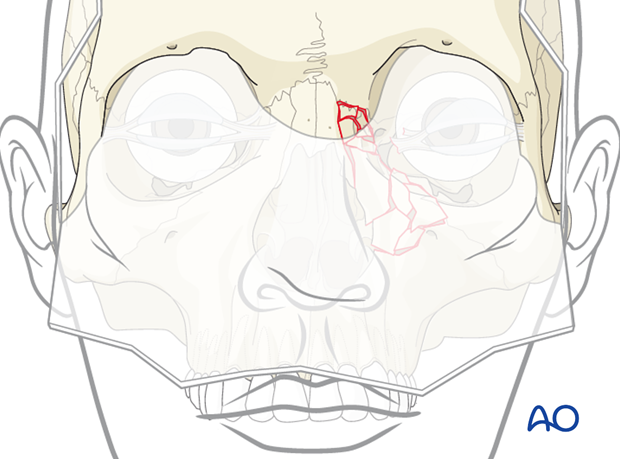
The most common access for reduction of NOE fractures includes a combination of surgical approaches, that include a coronal, lower eyelid transcutaneous, lower eyelid tranconjunctival, and a maxillary vestibular incision. This combination of surgical approaches is often required to adequately visualize, reduce and stabilize extensively comminuted fractures. Additionally, the coronal approach may be useful in treating concomitant fractures of the frontal bone, nasal bones, zygomas, cranium, etc. It also provides access for harvesting calvarial bone grafts.
The glabellar approach alone does not allow enough exposure of a NOE type III fracture. The extended glabellar approach can be used in combination with the lower eyelid transcutaneous, the lower eyelid tranconjunctival, and the maxillary vestibular approach in selected cases.
In cases where there is a significant laceration over the nasal/NOE region this can often greatly facilitate the reduction of the NOE fractures"
3. Reduction
NOE type III fractures are some of the most difficult facial fractures to reduce. The reasons for the difficulty include the small fracture fragments commonly seen, as well as the poor direct access, requiring multiple surgical approaches, and the difficulty controlling the position of the medial canthal ligament(s).
While visualizing the reduction of the fractured segments through one surgical approach, the surgeon must continually recheck the reduction through the other surgical incisions. Some surgeons have used temporary plates or wires to stabilize the comminuted segments, prior to placement of the final plates.
4. Fixation
General consideration
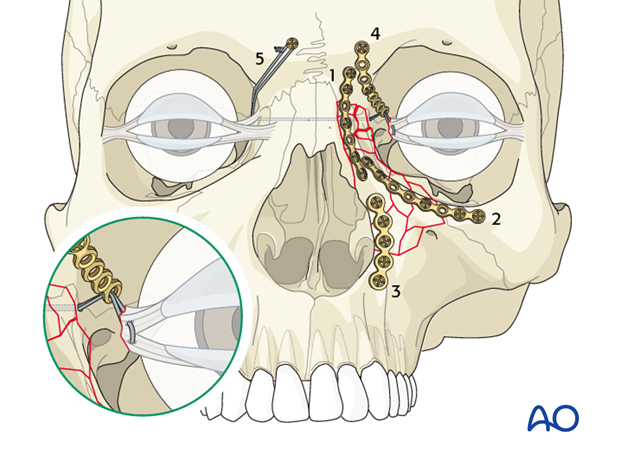
NOE type III fractures represent comminuted fractures where the medial canthus has become detached from the bone. A transnasal canthopexy must be performed. The most important aspect is the medial and posterior positioning of the medial canthal ligament. In order to accomplish this, a cantilever technique (plate 4 in the illustration) may be utilized. The cantilever technique is described in detail further below.
Commonly, a minimum of three points of fixation will be needed. This will include a plate at the NOE/frontal bone (1), a plate along the orbital rim (2), and a plate along the piriform aperture (3). In addition to these plates, additional plates may be needed to further stabilize the comminuted fracture segments. Following the reduction and fixation of the other bony fragments, the transnasal wire (5) needs to be placed.
Order of fixation
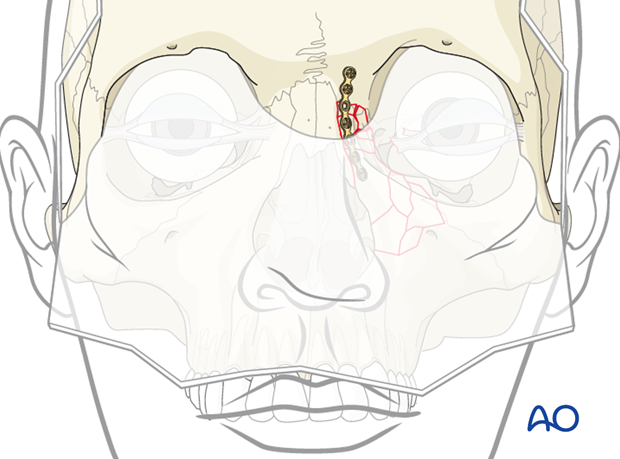
A suggestion is to place the first plate where the surgeon has the best visualization and access, with the most well defined landmarks. If a surgeon has good visualization at all three points, a consideration is to first stabilize the NOE fracture to the frontal bone (1), achieving stabilization to the calvarium, with the second plate placed along the orbital rim (2), and the third plate placed along the piriform aperture (3). This prioritizes plate placement according to the order of aesthetic importance.
Placement of first plate
In the illustrated case, the first plate is applied to the fracture between the NOE and the frontal bone through the coronal approach. (This can also be achieved through an extended glabellar approach.)
Placement of second plate
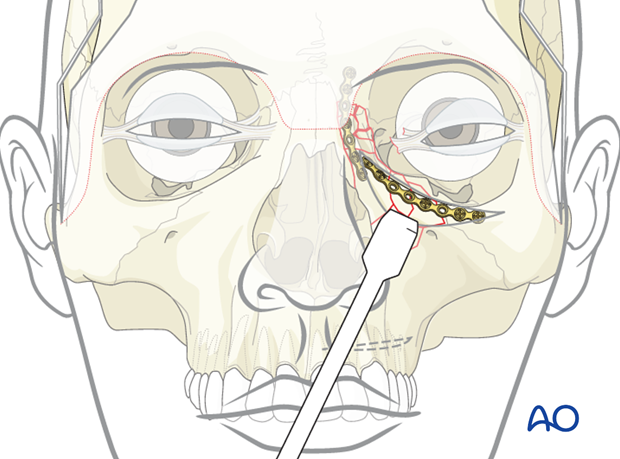
The second plate is then placed along the orbital rim through the inferior lid approach.
Placement of third plate
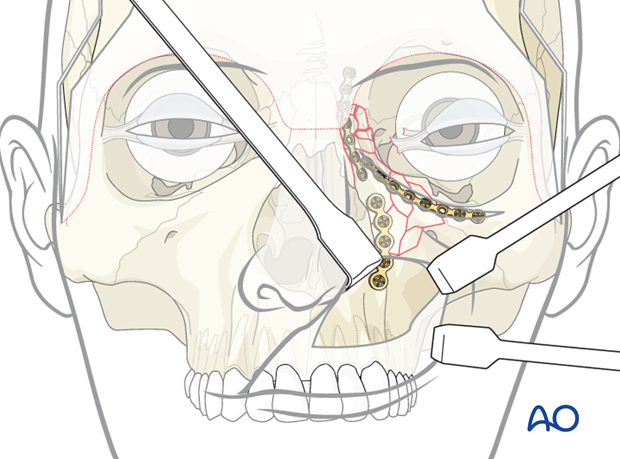
A third plate is placed along the piriform aperture through the maxillary vestibular approach.
5. Placement of transnasal canthopexy wire
Introduction
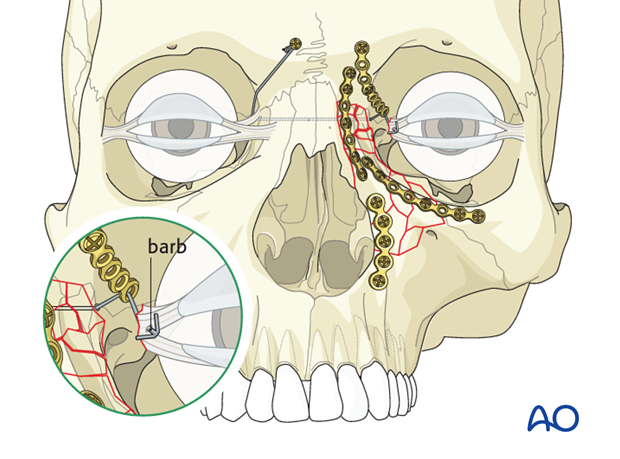
A transnasal canthopexy wire is required to secure the medial canthal tendon. A technique to assure the position of the medial canthal tendon is necessary. A fourth plate is utilized to hold the medial canthus in its proper posterior and horizontal 3-dimensional position. This can be achieved using the anchor technique with or without barb (as illustrated).
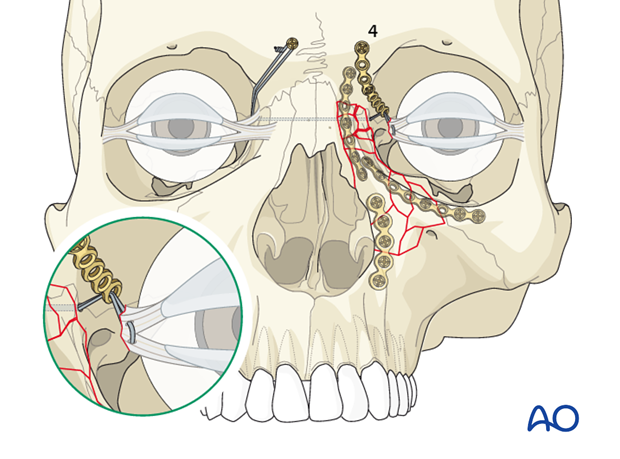
This illustration shows the transnasal canthopexy wire with barb.
Indentifying the medial canthus
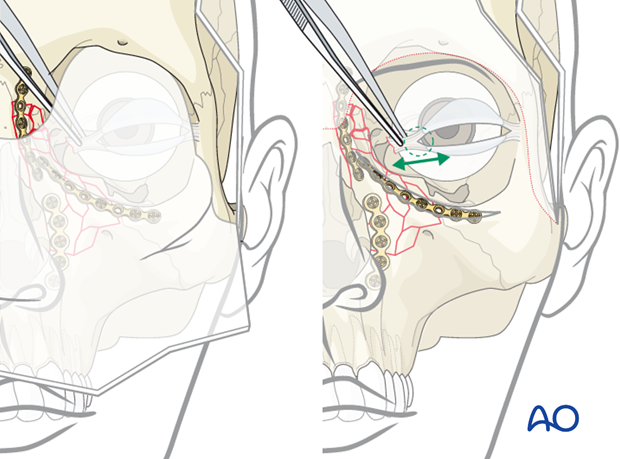
The first step in the canthopexy is to locate the medial canthus.
The medial canthus can be identified by using a forceps, through the coronal or extended glabellar approach. The forceps is used to find and pull on the medial canthus while observing the skin in the medial canthal area to confirm that the proper structure has been identified.
If the surgeon is having difficulty identifying the medial canthal ligament, a small vertical skin incision may be necessary over the ligament.
Wire placement into medial canthal tendon
Once the medial canthus has been found, the transnasal wire is placed through the medial canthus. A metal wire with a swedged-on needle that can be detached from the wire should be used.
Usually, it is sufficient to pass the wire only once through the tendon..
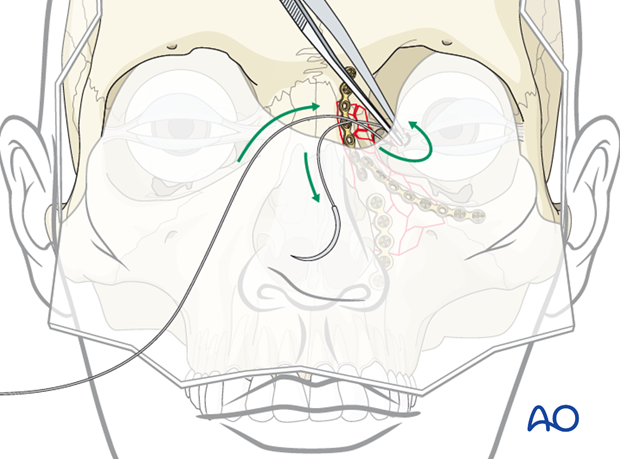
Adapt fourth bone plate and pass wire through it
Often, the fracture pattern does not allow to place the transnasal wire in its proper 3-dimensional location. Therefore a plate is needed to support the transnasal wire.
Adapt this fourth bone plate to the anatomy of the anterosuperior part of the medial orbital wall.
Pass the wire through the most posterior hole of the fourth bone plate and check the desired plate placement position.
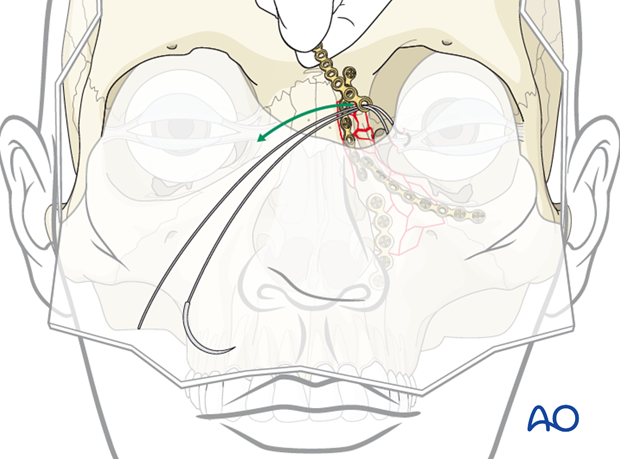
Create hole for the wire
Depending on the stability of the bone in the NOE area, the surgeon may need to drill a hole from the contralateral side, or use a spinal needle or an awl to create a passage way. Extreme caution must be used to make sure that instrument does not advance too far, injuring the globe. It is important to use a malleable or spoon retractor to protect the globe as the needle is being passed or the whole is being drilled.
When the bony nasal septum is intact it is more difficult to pass the wire.
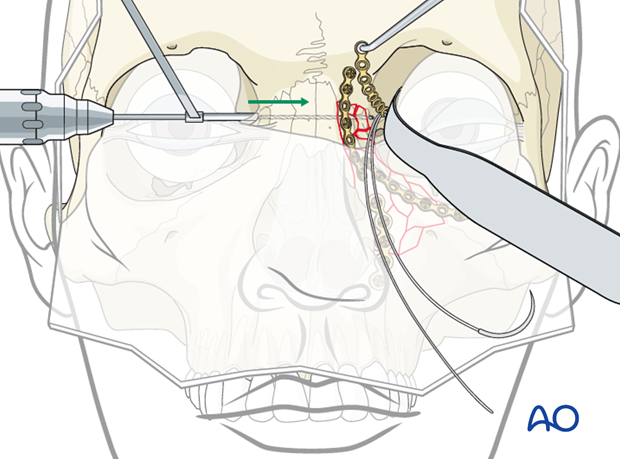
Pull the wire through the hole
The wire has been placed through the medial canthus using a swedged-on needle. A smaller needle should be used to pass the needle through the ligament to avoid shredding the ligament.
While the spinal needle is still in place, the two ends of the wire are placed through the lumen of the needle, and both the spinal needle and wire are pulled out of the contralateral side of the NOE area.
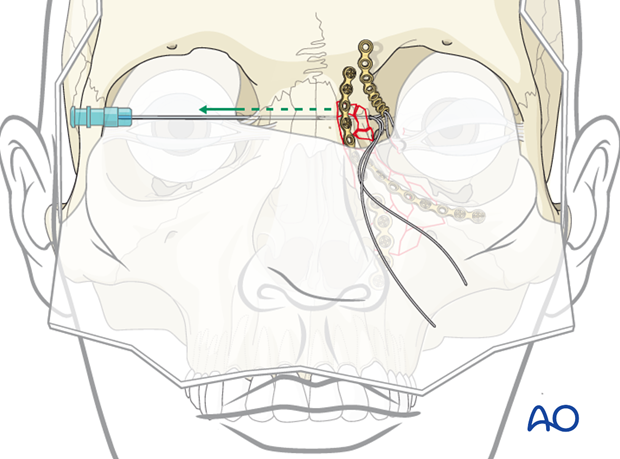
Alternative: using an awl
In this illustration an awl was first placed through the contralateral side, and then advanced to the side of the NOE type III fracture. The wire has been placed through the medial canthus using a swedged-on needle.
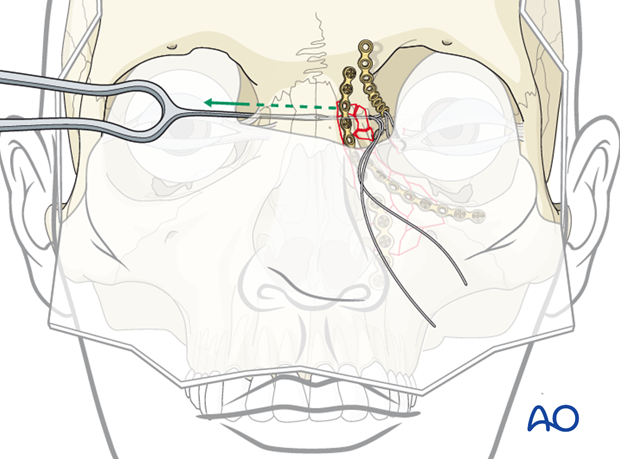
Fixation of fourth plate
The forth plate is placed to secure the transnasal wire in its proper location. The plate is secured superiorly to the frontal bone.
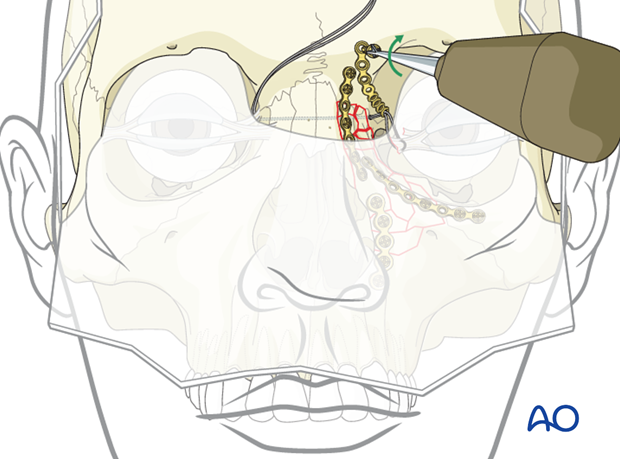
Rechecking medial canthal area
It is recommended that the surgeon perform a final check to confirm the correct position of the medial canthus.
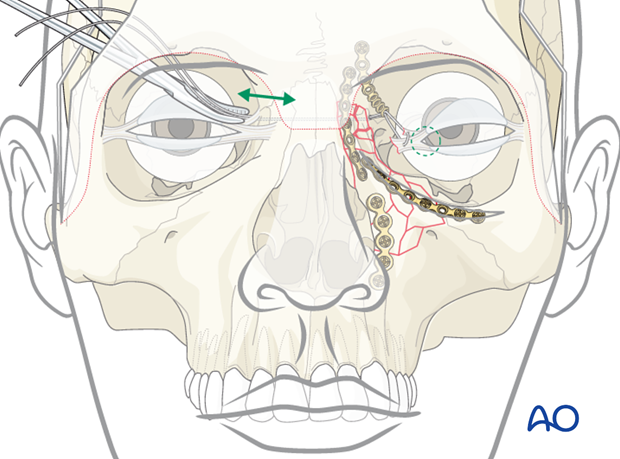
Securing transnasal wire
The transnasal wire is secured to a screw placed in the frontal bone, on the contralateral side, and tightened with the appropriate tension needed to secure the medial canthus into its proper position.
In bilateral fractures, the transnasal wire could be fixed under the plate that was used to secure the contralateral medial canthus.
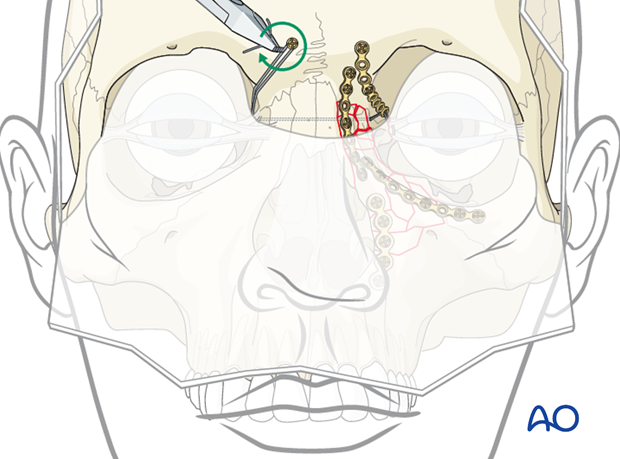
Alternative: anchor technique using a wire with barb
A canthal tendon wire with a hook or barb can be used …
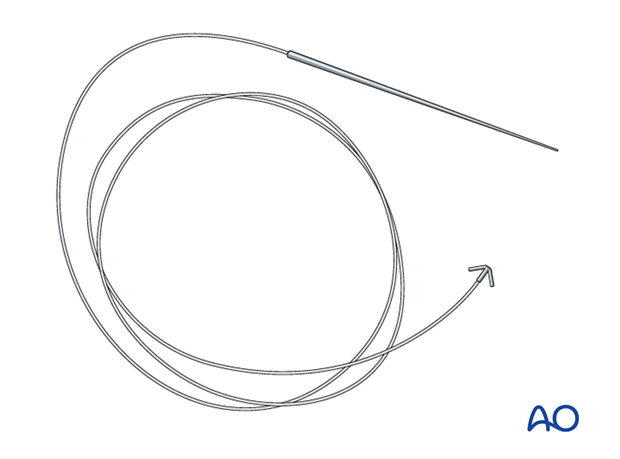
… to anchor the medial canthus into its proper position.
The medial canthal tendon may be indentified from inside the coronal flap, or alternatively through a vertical skin incision over the ligament.

Skin incision
To capture the canthal tendon with the hook or barb on the wire, the needle is guided through a small vertical skin incision over the medial canthus through the site of greatest resistance (approximately 2 mm medial to the canthus). The titanium wire is then guided through the coronal flap until the barb captures the canthal tendon.
Note: This skin incision could also be helpful in the previously described anchor technique without using a barb.
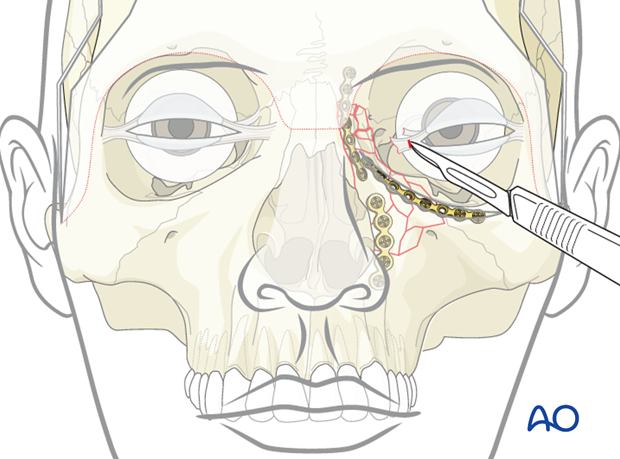
Passing the wire through
The approach to the medial canthal tendon is posterior to the lacrimal duct and should not impinge on the lacrimal system.
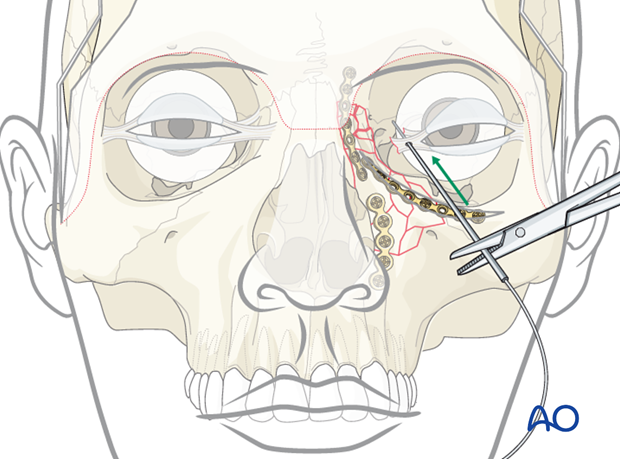
The rest of the procedure is similar as described with the anchor technique without barb except the surgeon only has to deal with one wire rather than the ends of two wires.
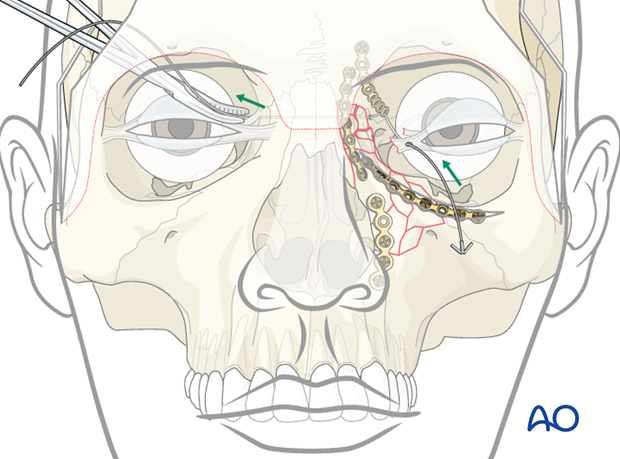
Proper position of transnasal wire
AP position of transnasal wire
NOE fractures often result in a lateral splaying of the medial canthi, resulting in telecanthus. This can often be corrected by placement of a transnasal wire.
When confronted with a NOE fracture requiring a transnasal wire, it is important to place the wire fixation in its proper posterior position. The upper illustration represents a wire that has been placed anteriorly, resulting in a further lateral splaying of the bone supporting the medial canthus, and a worsening of the telecanthus.
The lower illustration represents the proper posterior placement of the transnasal wire with a proper reduction of the bone attached to the medial canthus.
Note: The illustration shows the technique applied to a NOE type II fracture.
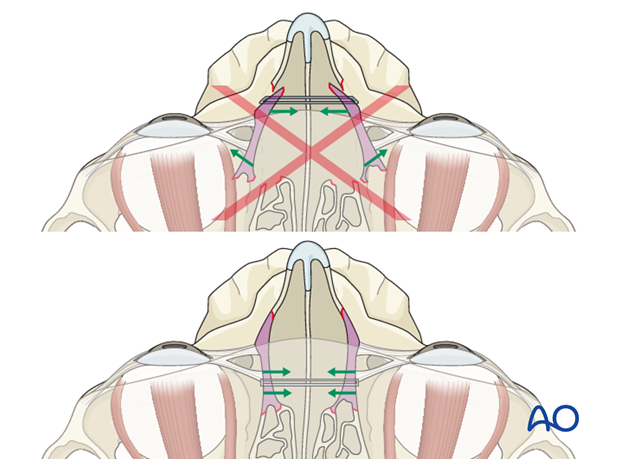
Horizontal position of transnasal wire
As much as the AP projection of the medial canthi is important, the horizontal position of the canthi is also very important.
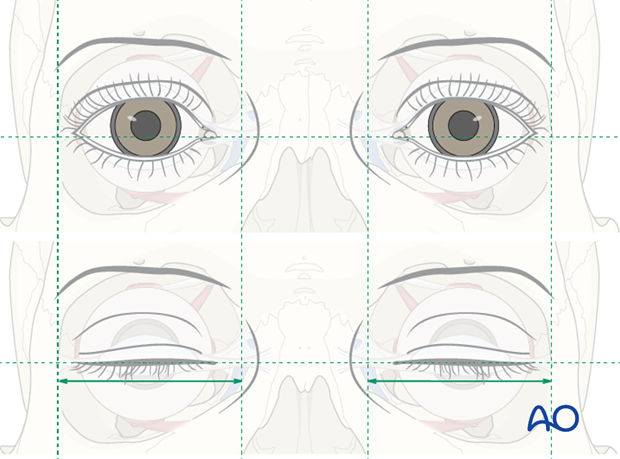
In many cases the lateral canthi appear to be cephalad to a horizontal line through the medial canthi, while the eyelids are open. With the eyelids closed and in a more relaxed position, the lateral canthi fall into more of a horizontal position with the medial canthi. A surgeon should attempt to position the medial canthi into a relative horizontal line with the uninjured canthi.
In order to avoid an inferior malposition of the repaired medial canthal ligament many surgeons try to position the canthus as superiorly as possible.
Alternative support for the transnasal canthopexy wire
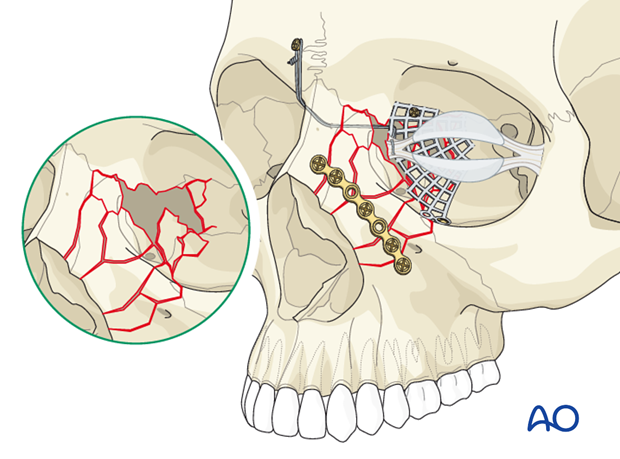
- Use mesh on one of the two sides to support the transnasal wire in its proper 3-dimensional location. This technique may be particularly useful when the NOE fracture is combined with a medial orbital wall fracture.
Click here to read about reconstruction of medial orbital wall fractures. However, keep in mind that not all methods used to reconstruct the medial orbital wall are stable enough to support the transnasal canthopexy wire.
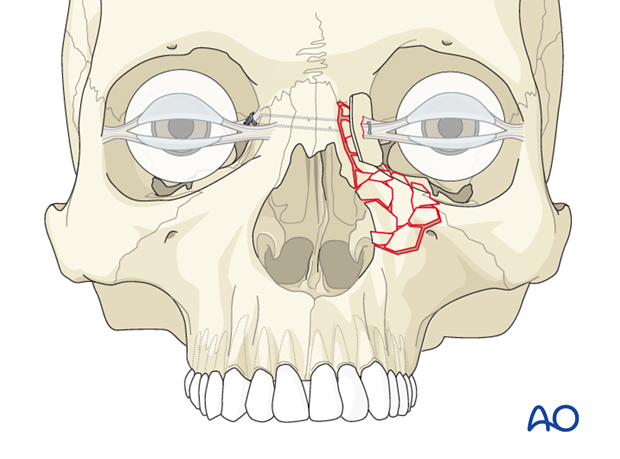
- Use bone graft to support the transnasal wire in its proper 3-dimensional location.
With each of these techniques the wire can be twisted on itself, when appropriate (as illustrated). However, in this situation it may be preferable to place a screw on the contralateral side in the area of the frontal bone and secure the wire to the screw.
6. Soft tissues
A problem with NOE fractures is that even with a perfect bony reduction there may be a lack of definition in the medial canthal area (Epicanthal fold). Many surgeons advocate placing some sort of external nasal splints at the end of the procedure. If one chooses to use this technique, extreme caution is recommended. Patients will commonly have significant postoperative edema in this area, surgical incisions and lacerations can be present. If the splints are placed too tight, the patient is at risk of having skin necrosis in the medial canthal area.
This technique may be more relevant with the increased complexity of the NOE fracture. It may not be as applicable with a simple type I fracture where there has been minimal degloving of the soft tissues from the bone in the medial canthal area. It may be more beneficial in type II and type III fractures where there has been more comminution associated with a greater need for degloving of the soft tissues to achieve adequate reduction and fixation.
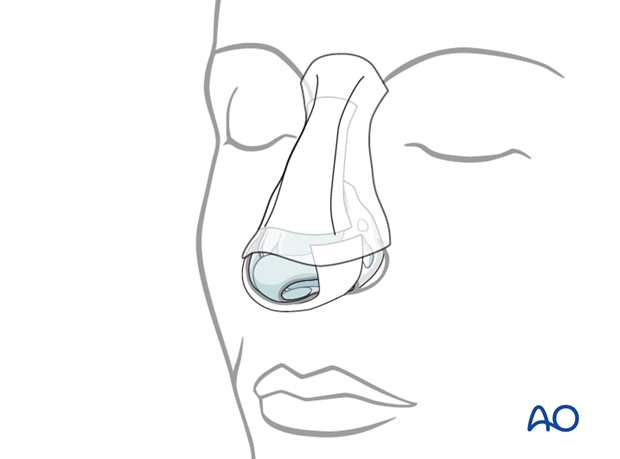
Some surgeons continue to use percutaneous bolsters to ensure adaptation of the skin to the underlying bone. However, these should be applied with great caution to avoid underlying skin necrosis.
7. Aftercare following management of NOE fractures
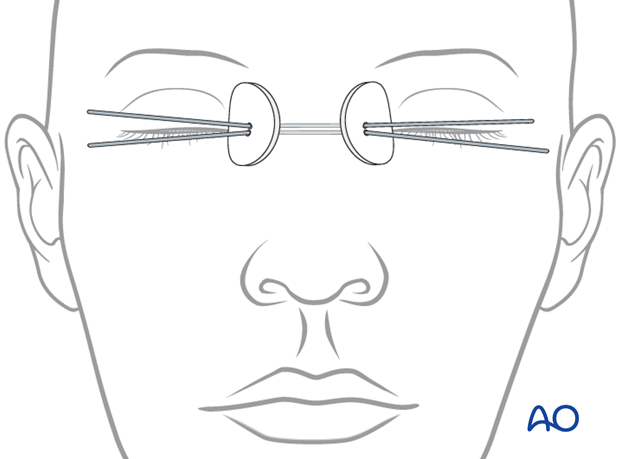
Evaluation of the patient’s vision
Evaluation of the patient’s vision is performed as soon as they are awakened from anesthesia and then at regular intervals until they are discharged from the hospital.
A swinging flashlight test may serve in the unconscious and/or noncooperative patient; alternatively electrophysiological examination has to be performed but is dependent on the appropriate equipment visual evoked potential (VEP).
Postoperative positioning
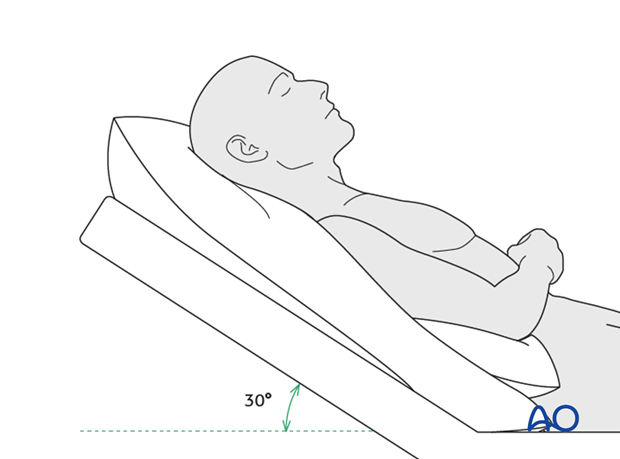
Keeping the patient’s head in a raised position both preoperatively and postoperatively may significantly improve edema and pain.
Nose-blowing
To prevent orbital emphysema, nose-blowing should be avoided for at least 10 days following NOE fracture repair.
Medication
The use of the following perioperative medication is controversial. There is little evidence to make strong recommendations for postoperative care.
- No aspirin for 7 days (nonsteroidal antiinflammatory drugs (NSAIDs) use is controversial)
- Analgesia as necessary
- Antibiotics (many surgeons use perioperative antibiotics. There is no clear advantage of any one antibiotic, and the recommended duration of treatment is debatable.)
- Nasal decongestant may be helpful for symptomatic improvement in some patients.
- Steroids, in cases of severe orbital trauma, may help with postoperative edema. Some surgeons have noted increased complications with perioperative steroids.
- Ophthalmic ointment should follow local and approved protocol. This is not generally required in case of periorbital edema. Some surgeons prefer it. Some ointments have been found to cause significant conjunctival irritation.
Ophthalmological examination
Postoperative examination by an ophthalmologist may be requested. The following signs and symptoms are usually evaluated:
- Vision
- Extraocular motion (motility)
- Diplopia
- Globe position
- Visual field test
- Lid position
- If the patient complains of epiphora (tear overflow), the lacrimal duct must be checked
- If the patient complains of eye pain, evaluate for corneal abrasion
Note: In case of postoperative diplopia, ophthalmological assessment is needed to identify the cause. Hess-chart testing should be performed if diplopia persists.
Postoperative imaging
Postoperative imaging has to be performed within the first days after surgery. 3-D imaging (CT, cone beam) is recommended to assess complex fracture reductions. In centers where intraoperative imaging is available postoperative imaging can be performed at a delayed time.
Wound care
Remove sutures from skin after approximately 5 days if nonresorbable sutures have been used.
Apply ice packs (may be effective in a short term to minimize edema).
Avoid sun exposure and tanning to skin incisions for several months.
Diet
Diet depends on the fracture pattern and patients condition but there are usually no limitations.
Clinical follow-up
Clinical follow-up depends on the complexity of the surgery, and the patient’s postoperative course.
In all patients with NOE trauma, all the following should be periodically assessed:
- Globe position
- Double vision
- Other vision problems
- Nasal airway status
Other issues to consider are:
- Facial deformity (incl. asymmetry)
- Sensory nerve compromise
- Problems of scar formation
- Anosmia
- Epiphora and dacryocystitis
Implant removal
Implant removal is rarely required. It is possible that this may be requested by patients if the implant becomes palpable or visible. In some countries it will be more commonly requested. There have been cases where patients have complained of cold sensitivity in areas of plate placement. It is controversial whether this cold sensitivity is a result of the plate, a result of nerve injury from the original trauma, or from nerve injury due to trauma of the surgery. Issues of cold sensitivity generally improve or resolve with time without removal of the hardware.
Special considerations
Travel in pressurized aircraft is permitted 4 – 6 weeks postoperatively. Mild pain on descent may be noticed. However, flying in non-pressurized aircraft should be avoided for a minimum of 12 weeks.
No scuba diving should be permitted for at least 12 weeks. Additionally, the patient should be warned of long term potential risks.


