Cerclage compression suture
1. Principles
Treatment goals
The patello-femoral joint is biomechanically very stressed when the knee is loaded. Any compromise of the joint surface is likely to lead to degenerative joint disease. It is, therefore, highly desirable, in patellar fractures to strive for anatomical reduction of the joint surface and stable fixation.
An additional treatment goal is restoration of function of the knee extensor mechanism to allow early range of motion of the knee.
Cerclage compression principles
The forces produced by the quadriceps on patellar fractures are significant and may cause early fixation failure. For example, screw fixation alone would generally fail. The physiological forces acting on the patella tend to distract the fragments, more on the anterior than at the posterior aspect.
The cerclage compression technique can be used in all fracture patterns.
This cerclage compression construct was previously called a “tension band”. More information about the tension band principle can be found here.
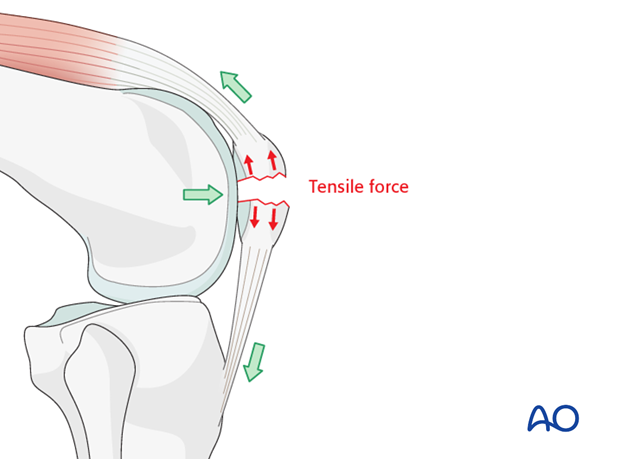
To be successful the ventral cortex must be reconstructable.

Combination of techniques
A cerclage compression suture may be used in combination with a cerclage suture/wire and/or lag screws.
Suture fixation may be helpful for inferior pole patellar fractures, especially with comminution and/or patients with significant osteoporosis.
Outside-in/Inside-out technique
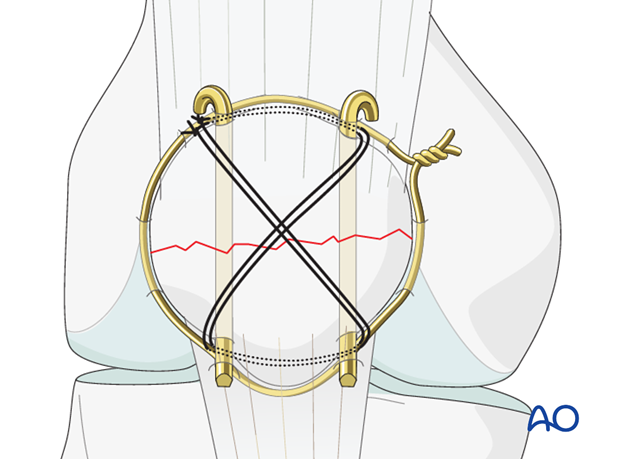
Reduction and fixation can be achieved in two ways, either by first reducing the fracture and then drilling the K-wires through the reduced fragments (outside-in technique) or by first drilling the wires into the unreduced fragments followed by reduction and completion of the fixation (inside-out technique).
Verification of reduction
Anatomical reduction of the articular surface is monitored by palpating the joint from inside, as neither inspection nor the x-ray will reveal a minor step off. This will require creation of a small arthrotomy.
Nevertheless, an image intensifier or X-ray images should always be available, so that the reduction can be checked in the AP and lateral planes if needed.

2. Patient preparation and approach
Patient preparation
This procedure is normally performed with the patient in a supine position with the knee flexed 30°.

Approach
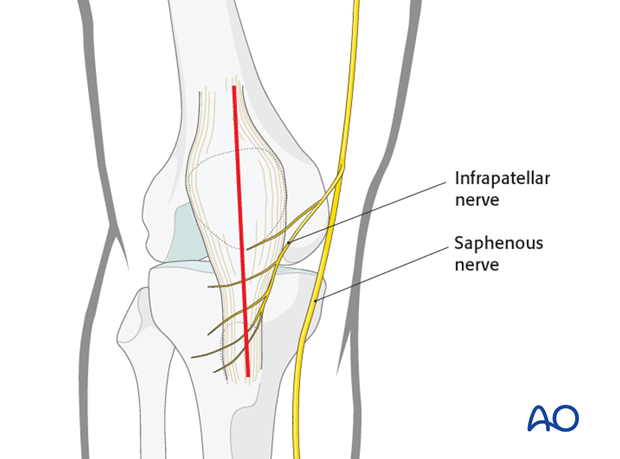
For this procedure a mid-axial longitudinal approach is used.
3. Reduction and K-wire insertion using outside in technique
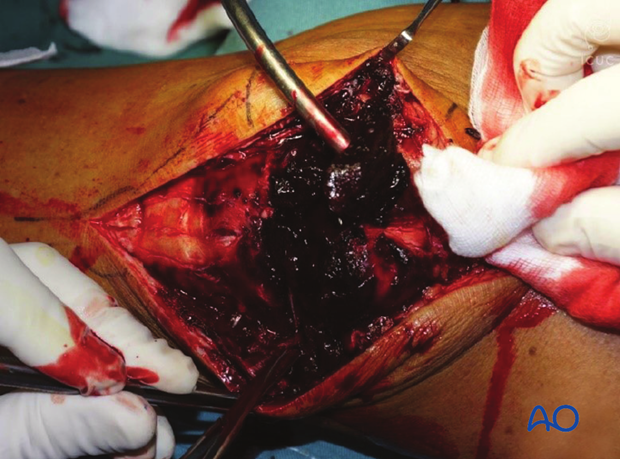
Debridement
The knee joint and fracture lines must be irrigated and cleared of blood clot and small debris to allow exact reconstruction.
Reduction
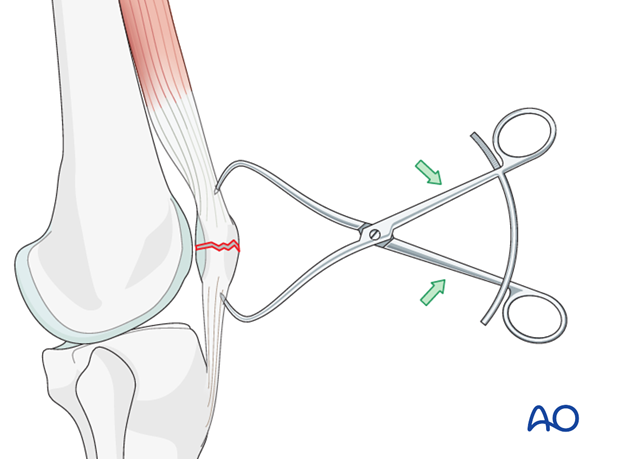
The larger fragments are reduced using a pointed reduction forceps or tenaculum.
In frontal/coronal (transverse) fractures, reduction is easier with the knee extended.
Reduction is held by one or two reduction forceps.
Verify the reduction by palpation of the retropatellar surface.
K-wire insertion
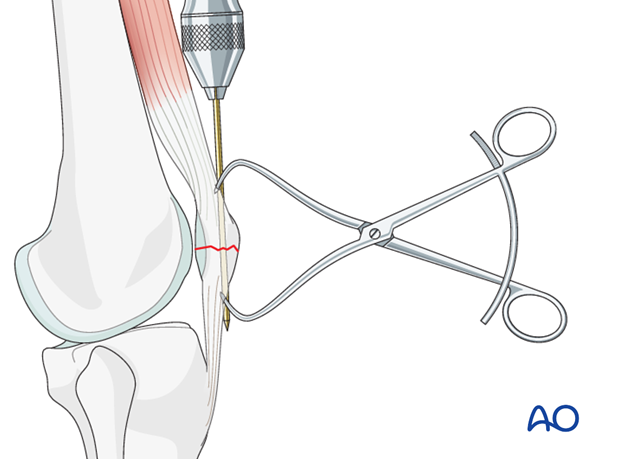
Using the outside-in technique, drill the first K-wire in an axial direction. The second K-wire is then drilled parallel to the first, through the reduced fragments ensuring the K-wires do not enter the joint. It may be difficult to find the right direction and position for the wires.
Two parallel K-wires should be inserted to give more stable fixation.
Reduction is again verified by palpation of the joint surface.
4. Reduction and K-wire insertion using inside out technique
Exact positioning of the K-wires is challenging once the fracture is reduced. Therefore, some surgeons prefer to drill the K-wires in an inside out manner.
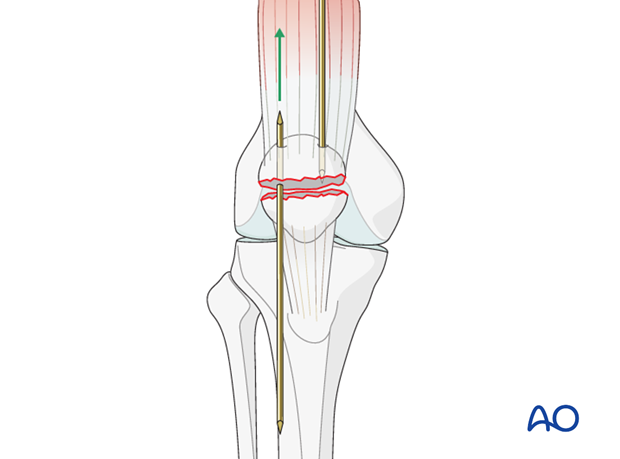
Drill two K-wires (pointed at both ends) from the fracture surface through the proximal fragment, exiting superiorly.
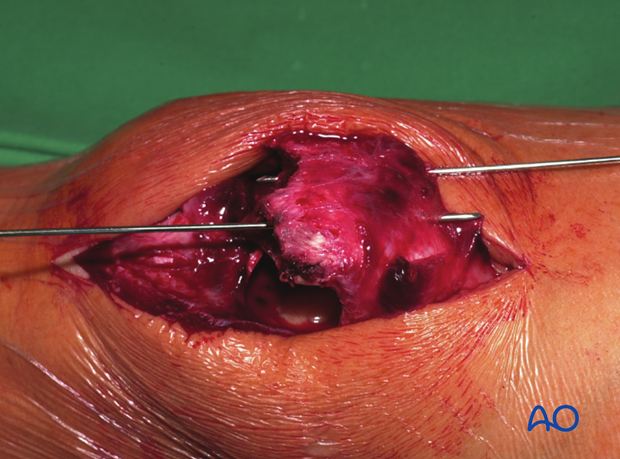
Manually reduce the main fragments and hold them with a pointed reduction forceps.
Pearl: If the available K-wires are pointed only at one end, the opposite end can be sharpened by cutting it obliquely with a K-wire cutter.

Finalize K-wire insertion
The ideal level for the K-wires lies approximately 5 mm below the anterior patellar surface. The K-wires are often successfully placed closer to the articular than to the anterior surface, however. The position of the wires may be checked with image intensifier or x-ray at this stage.
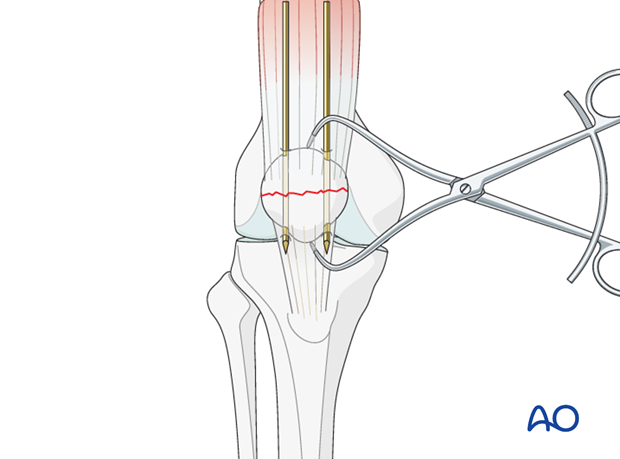
5. Neutralizing suture insertion
Insert a nr. 5 Ethibond non-absorbable suture in a figure-of-eight fashion.
Push the suture as close as possible to the angle between the bone and the protruding K-wire tips.
The suture should be as close as possible to the bone throughout its whole course both superiorly and inferiorly.
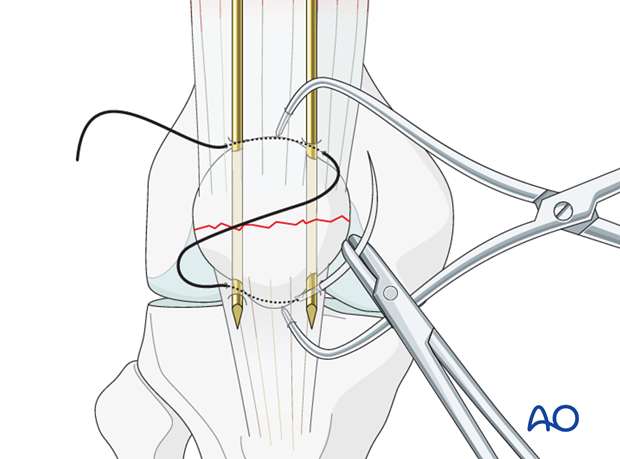
Applying the figure-of-eight suture
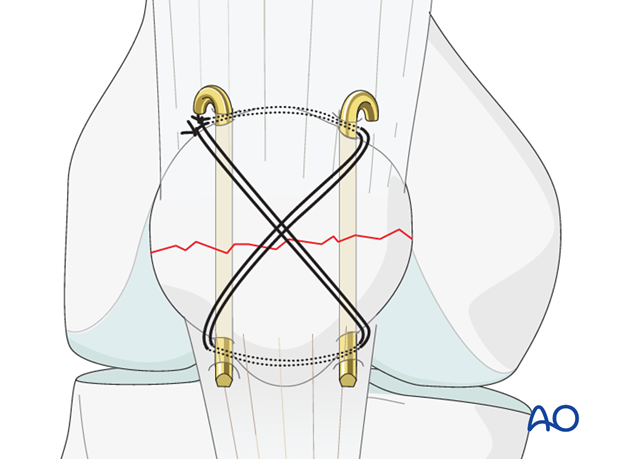
While tightening the figure-of-eight suture with the knee in extension, check the reduction by palpating the retropatellar surface (this will require creation of a small arthrotomy).
Once the suture is tightened, a second suture is placed. Care is taken not to damage the first suture with the sharp needle.
After tightening the figure-of-eight suture, bend the proximal pin ends, shorten them, turn them towards the quadriceps tendon, and drive them into the patella to prevent skin irritation and loosening. The distal pin ends are trimmed to remove the sharp points, but not bent, for easier removal. Depending on the fracture pattern and surgical exposure, this process can be reversed.
6. Case
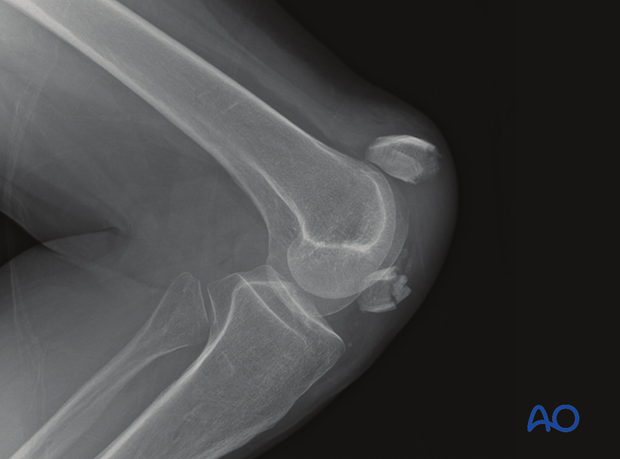
Lateral X-ray showing displaced transverse patellar fracture in an elderly woman.
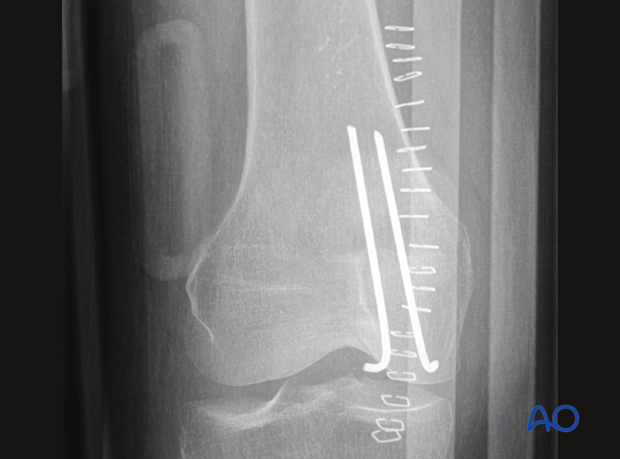
AP image postoperative showing neutralizing suture technique with fracture reduced. Note the suture cannot be seen but is resisting tensile forces on the patella.
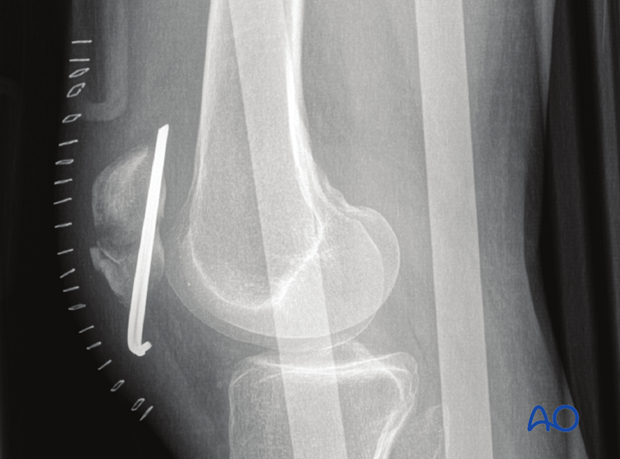
Lateral image postoperative showing K-wire fixation and non-visible figure of 8 suture resisting tensile patellar forces.
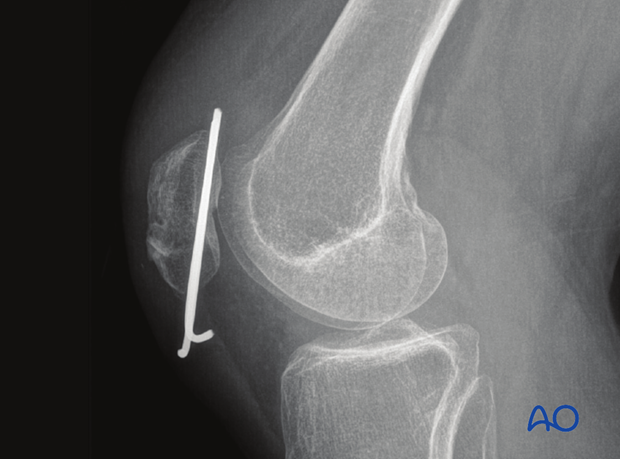
3 months AP image showing significant osteoporosis in patellar fracture patient.

Same patient three months postoperatively with healed fracture and good situation for removal of hardware later if indicated.
7. Aftercare following cerclage compression wiring/lag screw/plate fixation of the patella
Introduction
Active knee function requires an intact knee extensor mechanism, a mobile patella, a well-preserved patello-femoral joint and muscle strength.
After satisfactory reduction and fixation of patellar fractures, early controlled range of motion exercises are combined with static quadriceps strengthening exercises. The progressive increase in loading of the patello-femoral joint depends on many factors and requires planned individual programs, designed by the surgeon and physical therapists.
Functional treatment
Patellar fixation is generally quite stable. Early progressive, active mobilization is beneficial after surgery. Despite, wearing a splint to protect against never losing complete extension, range of motion is done throughout the day with the splint off. Static isometric quadriceps exercises should be started on postoperative day 1 with the splint in place. Usually the anterior incision is slow to heal as it is over a flexion surface and so it is usually best to leave the knee in extension for at least a week.
Afterwards, special emphasis should be given on active knee and hip movement.
Weight bearing
A removable full extension knee splint is applied and worn until good quadriceps control is regained. Full weight bearing may be performed with a straight knee, using crutches or a walker, from postoperative day 1.
Follow-up
Wound healing should be assessed regularly during the first two weeks. X-rays should be taken at 2, 6 and 12 weeks. A longer period may be required if fracture healing is delayed.
Implant removal
Implant removal may be required, as the wires may be prominent under the skin. Implant removal should not be undertaken until a minimum of 1 year postoperatively.
Thrombo-embolic prophylaxis
