Arthrodesis of metatarsals 1–3 (length stable)
1. General considerations
If fragmentation is such that the joint cannot be reconstructed, the options are:
- Nonoperative treatment
- Primary fusion
None of these options are ideal.
The results may be unsatisfactory because of the fracture’s intraarticular nature, and the patient may complain of pain and stiffness.
As fusion is permanent, the decision to perform fusion should be considered for only significantly damaged articular surfaces.
Soft-tissue injury
These fractures can have a severe associated soft-tissue injury.
Anatomical considerations
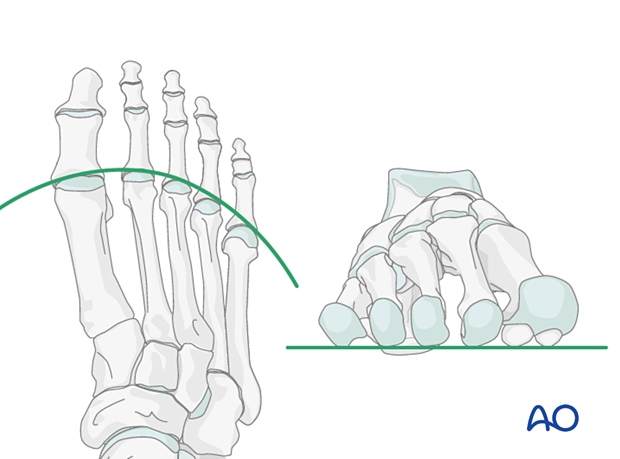
Proper alignment of the metatarsal heads is a critical goal in restoring the forefoot mechanics.
A normal curved “cascade” (Lelièvre’s parabola) appearance, which is symmetric with the other foot, is mandatory on the AP view. See illustration. This symmetry ensures that the normal length of the metatarsal is restored.
It is also critical to restore the metatarsals in their axial or horizontal plane so that all the metatarsal heads are on the same level in the axial view.
Any malalignment, particularly flexion, will recreate focally high pressure during the stance phase and toe-off, resulting in pain and subsequent callus formation.
The sesamoids, rather than the first metatarsal head, bear weight in the first row. Therefore, one must look at the sesamoid level in establishing the alignment in the axial or horizontal plane of the first metatarsal.
Hardware selection
The fixation can be ensured using lag screws, staples, or a plate.
Typically, lag screws and staples are used when the construct is length stable and compression is possible.
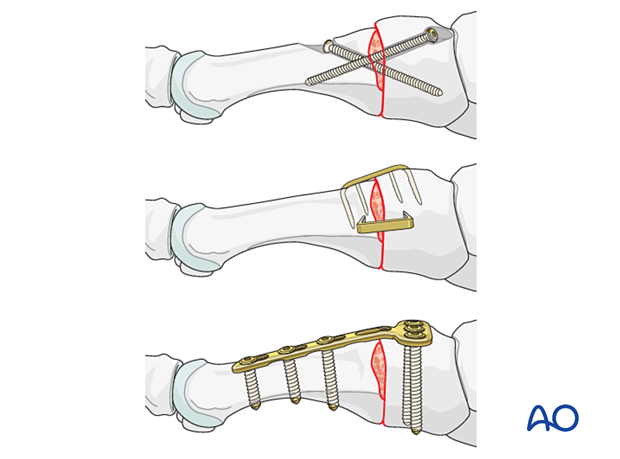
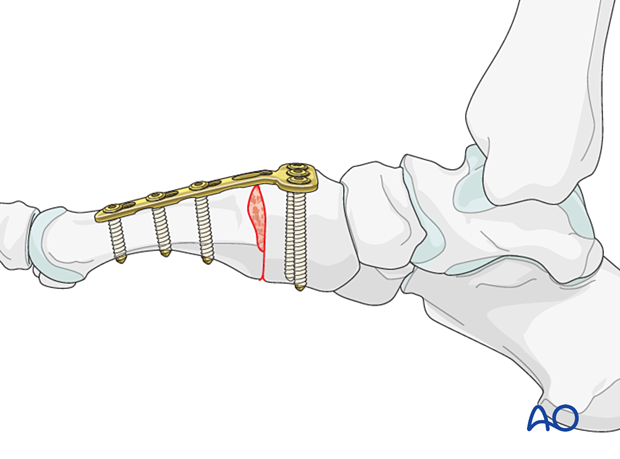
Plates are an acceptable alternative to lag screws but result in more prominent hardware. A dorsal plate is less prominent than a medially placed plate (first metatarsal).
Timing of surgery
The timing of surgery is influenced by the soft tissue injury and the patient's physiologic status.

2. Temporizing measures
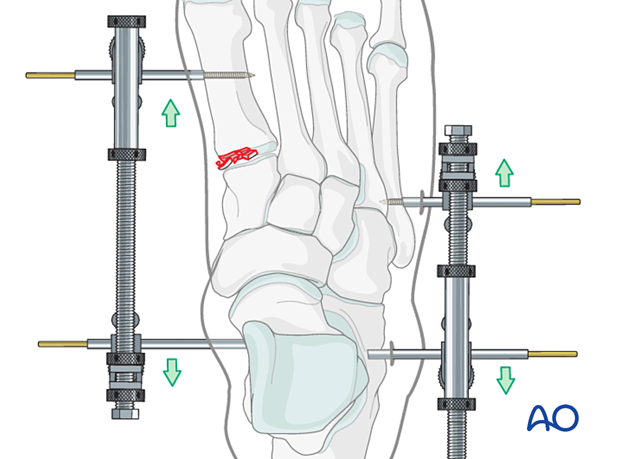
Medial and lateral external fixation (with a distractor device to restore columnar length) may be applied as soon as possible to stabilize the foot and decrease further injury to the soft tissues.
Percutaneous K-wires can be used to reduce displaced fragments and left as temporary fixation.
3. Patient preparation
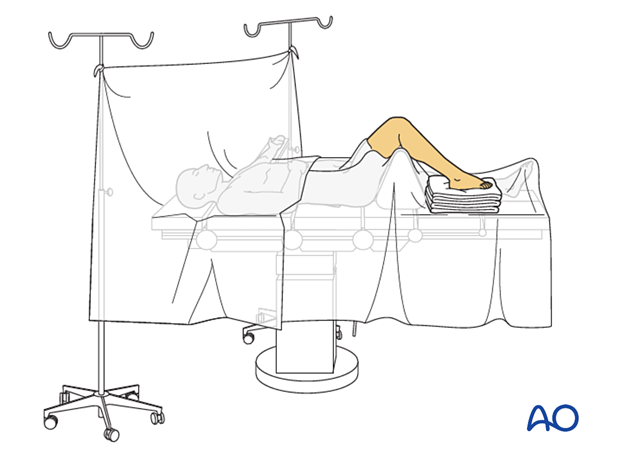
This procedure is typically performed with the patient placed supine with the knee flexed at 90°.
4. Approach
Selection of approach
Fractures of the first metatarsal can be approached through a medial or a dorsal approach:
Any single metatarsal injury in metatarsals 2–3 can be approached through the following dorsal approach:
- Dorsal approach to single metatarsals 2–4
- Dorsal approach to multiple metatarsals (when several metatarsals are injured).
Visualization
A medial-column distractor may be used to restore the length of the medial column.
If the medial distraction creates an abduction deformity, applying a lateral distractor may help minimize the angulation.
It is helpful to have comparative x-rays from the uninjured side, allowing proper length and morphology to be judged.
The proximal pin is inserted into the neck of the talus through a stab incision. Image intensification can be used to ensure correct pin placement outside the articular surfaces. The correct insertion point is often located 1–2 cm posterior to the navicular tubercle.
The distal pin is inserted in the first metatarsal.

5. Irrigation and debridement
Irrigate the fracture site using a syringe.
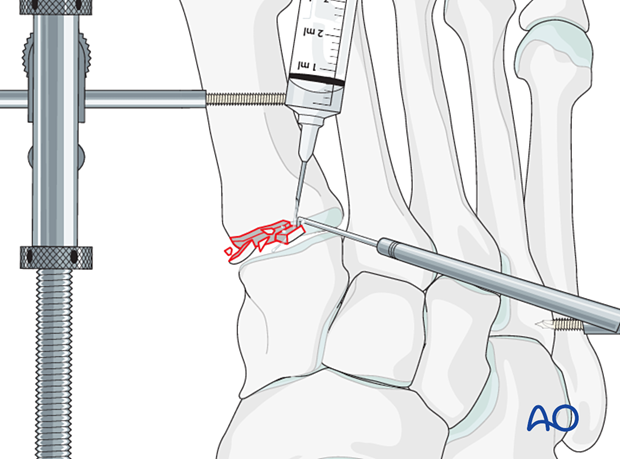
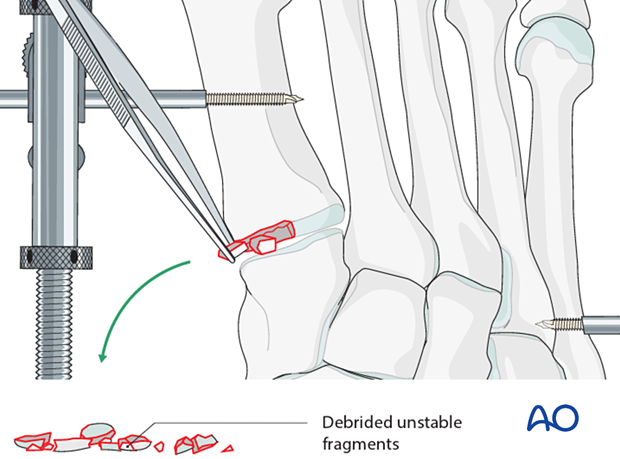
Displaced fracture fragments are debrided and mobilized with a dental pick or Freer elevator.
Once adequate visualization has been achieved and the joint thoroughly irrigated, examine the extent of articular surface involvement to validate the preoperative plan of primary fusion versus ORIF.
If joint fragmentation is not extensive and tarsometatarsal instability is absent, it may be possible to perform fixation.
6. Preparation of joint for fusion
Preparation of joint for fusion
Remove the cartilage on both sides using a curette.
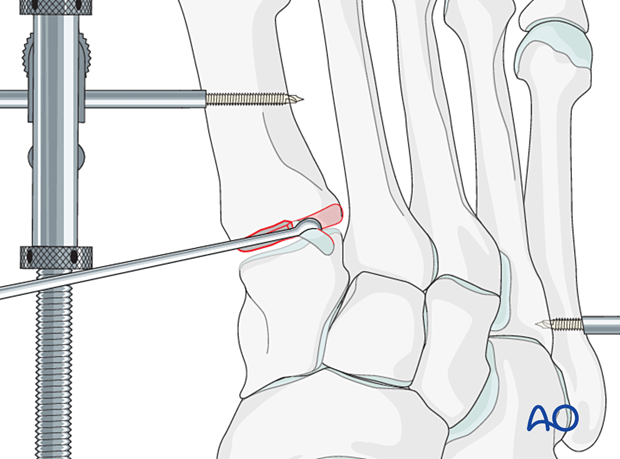
Penetrate the subchondral bone using a high-speed burr to promote bone growth.
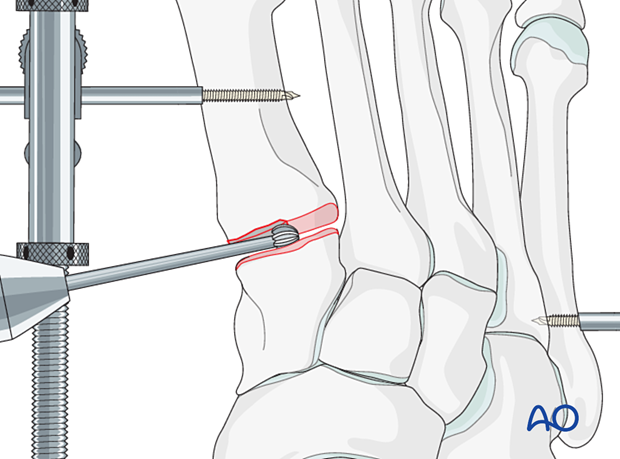
The application of bone graft, allograft, or bone substitute may be required to fill a small gap in such a length-stable situation.

7. Temporary fixation
Compress the arthrodesis site and secure the compression with K-wires.
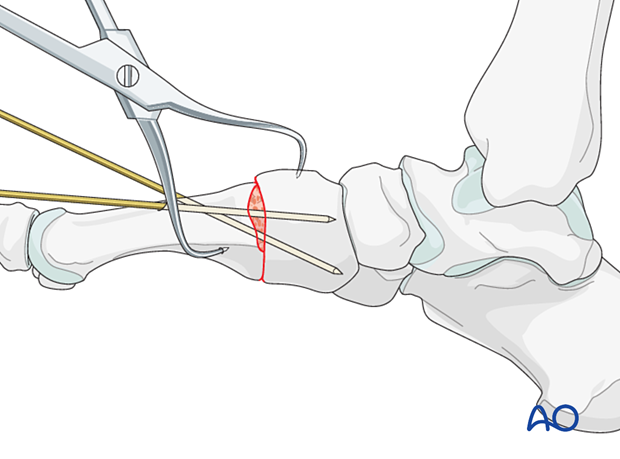
8. Lag screw fixation
Fixation
Ideally, two 3.5 lag screws are inserted. One comes from the distodorsal to proximal plantar. One comes from proximal dorsal to distal plantar.
It is often difficult to insert more than one screw in the 2nd and 3rd metatarsal.
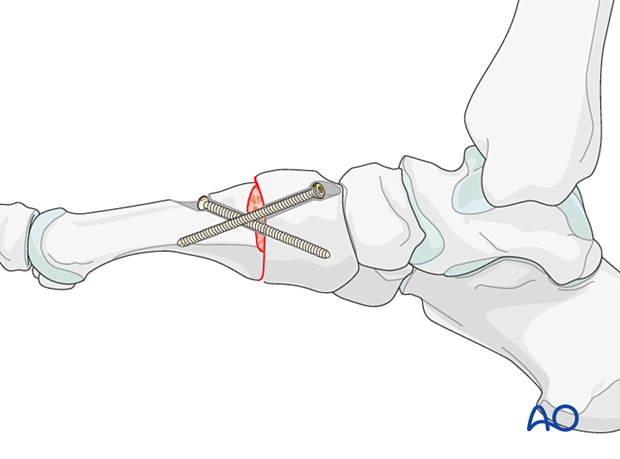
Countersinking
Countersink the glide hole to reduce screw prominence.
The metatarsal base requires significant bone removal to allow for proper screw insertion. In this case, a high-speed burr is recommended.
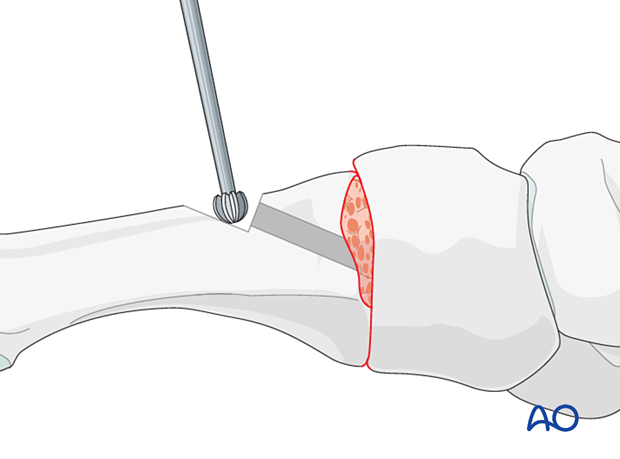
The screws should fully engage the bone proximally but should not be prominent at the plantar surface of the cuneiform as this may cause pain.

9. Staple fixation
Staple placement
For the first metatarsal, insert one staple medially and one dorsally.
Due to lack of space, one staple is frequently used for the second and third TMT joints.
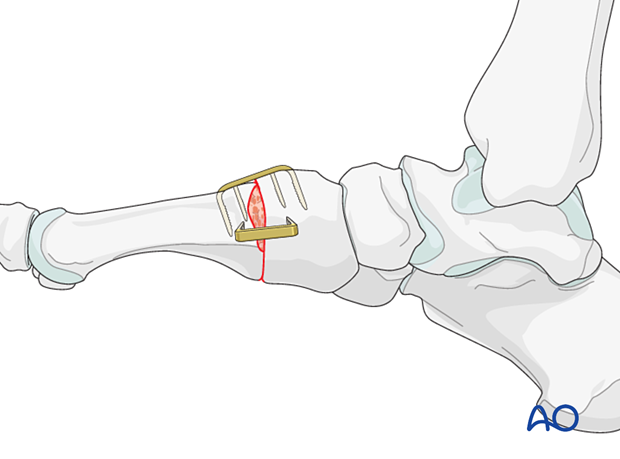
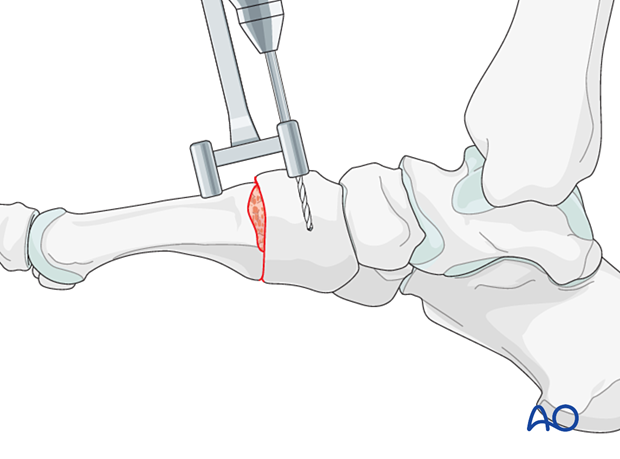
Drilling
Use the manufacturer's drill guide to prepare a hole on each side of the arthrodesis site. The depth of the hole should correspond to the length of the staple legs.
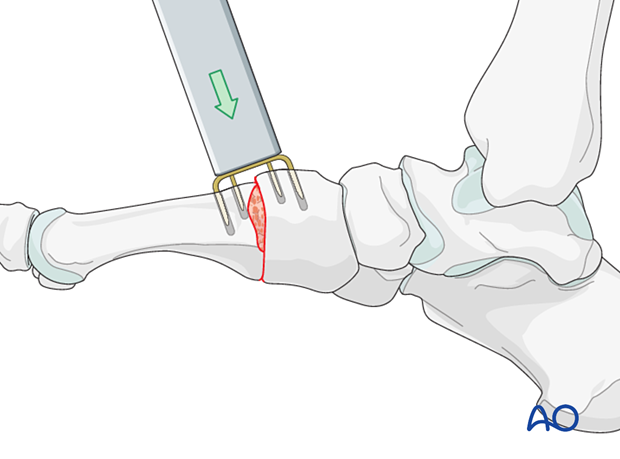
Staple insertion
Use the manufacturer's device to align the tips of the implant legs parallel with the drill holes and insert the staple.
Use an appropriate tamp to seat the staple fully.
10. Compression plating
Compression plate fixation
Contour a T-plate to fit the bone surface.
A 3.5 mm plate can be used for the first TMT joint, allowing three-screw fixation in the distal and proximal segments.
For the second and third TMT joint, a 2.7 mm T-plate can be used, which allows for two screws in the proximal and three screws in the distal segment.
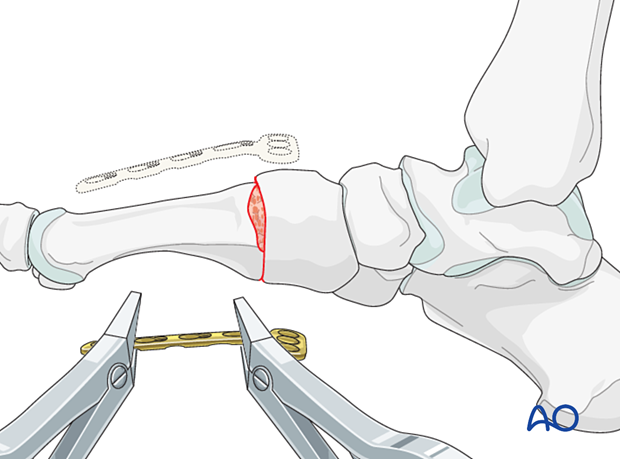
Insert screws in compression mode after appropriate length, alignment, and rotation have been verified.

11. Aftercare
An appropriate well-padded dressing should be applied to protect the surgical incision. Compression will help control swelling.
If present, the skin-pin interface should be similarly well-padded but with dressings that can be readily removed to inspect for pin site infection.
Immediate postoperative treatment is rest, ice, and elevation.
The patient should restrict weight-bearing for six weeks until signs of radiographic healing are present. After this, patients can be weight-bearing as tolerated.
Patients must exercise their ankle and subtalar joints out of the orthosis to prevent stiffness (eg, by stretching their Achilles).
X-ray the metatarsals at six weeks to confirm satisfactory union and remove K-wires if present. Once the fracture is united, the orthosis may be gradually discontinued.
A gastrocnemius release may need to be performed in cases with postoperative gastrocnemius contracture. This occurs more typically in the mid- and hindfoot.
If the gastrocnemius muscle has been released, a splint or cam walker can be used to protect the surgical site.
