Anterior plating
1. Preliminary remarks
Anterior fixation is a useful technique for anterior decompression and reconstruction of the anterior column.
Direct decompression from disk or bone material can be performed directly without mobilization of the neurological structures.
Visualization of the dura allows direct confirmation of complete decompression.
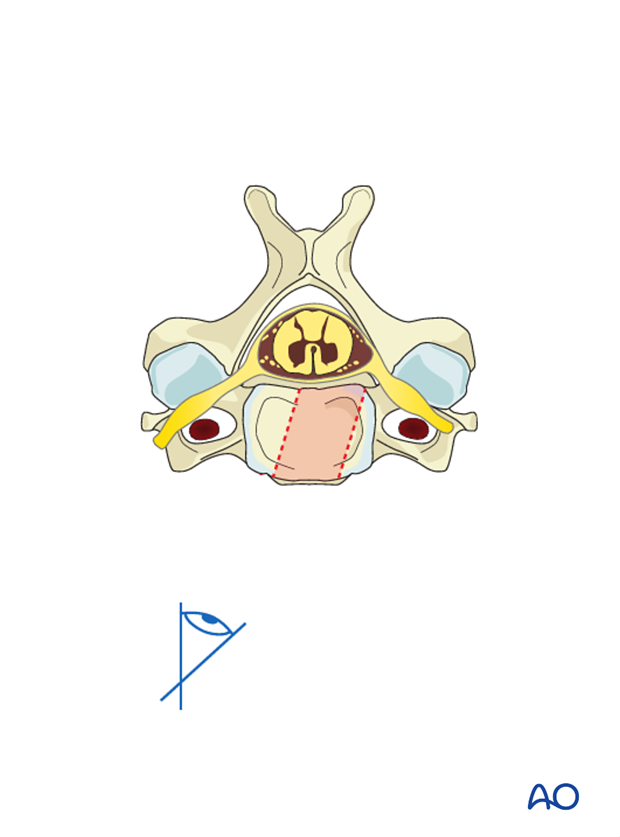
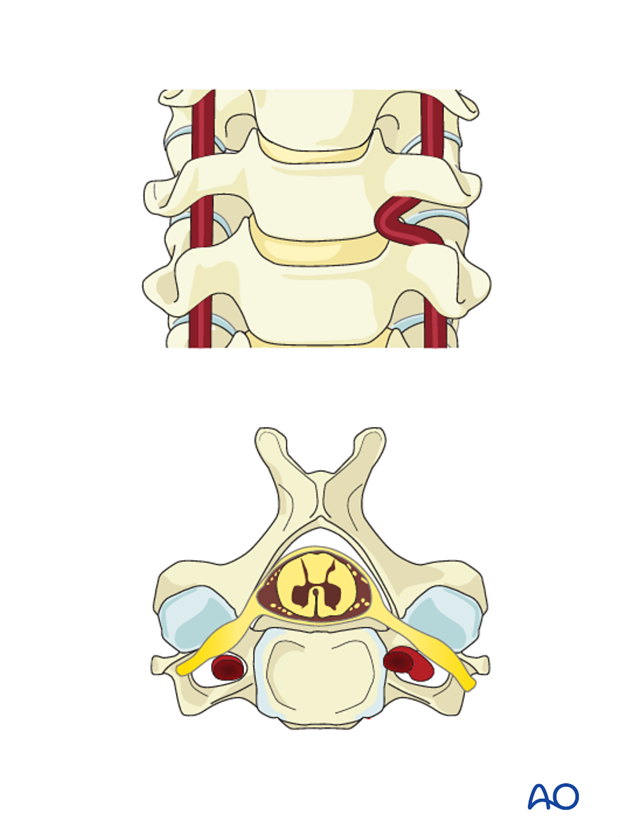
Preoperative evaluation of potential anatomic variations in the course of the vertebral artery is mandatory. Unidentified anatomical variations may increase the risk of compromising the artery during decompression.
Surgical complications
More details on surgical complications can be found here.
2. Approach and preparation
With the patient placed supine, one of the two following approaches may be used depending on the exposure needed:
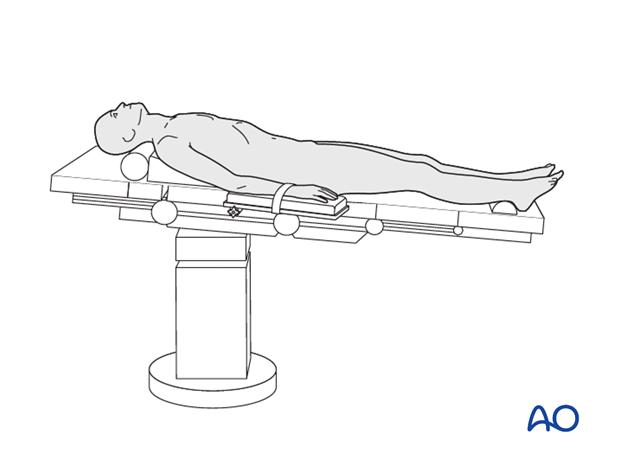
3. Indications for anterior decompression
Indications for decompression during anterior reconstruction includes:
- The presence of a traumatic disc herniation causing neurologic injury (discectomy alone)
- The need to remove a portion or entire vertebral body followed by reconstruction for stability, or for relief of symptomatic neural compression
- Kyphotic angulation with ventral compression.
Corpectomy is performed when the anterior column is severely compromised and/or to remove bone material from the spinal canal. In this procedure diskectomies above and below the fractured vertebra are performed first, allowing visualization of the upper and lower limits of the spinal canal.
Visualization
The procedure should be performed with adequate light and magnification; either loupes or a microscope.
4. Discectomy technique
Prior to performing the discectomy, the level is confirmed with intraoperative fluoroscopy.
The following landmarks are identified:
- Midline
- Unciform process
The midline will dictate the AP orientation of the discectomy.
The unciform processes dictate the lateral borders of the discectomy, establishing the safe area from the artery. This will leave a 3mm safe zone to the normal anatomy of the vertebral artery.
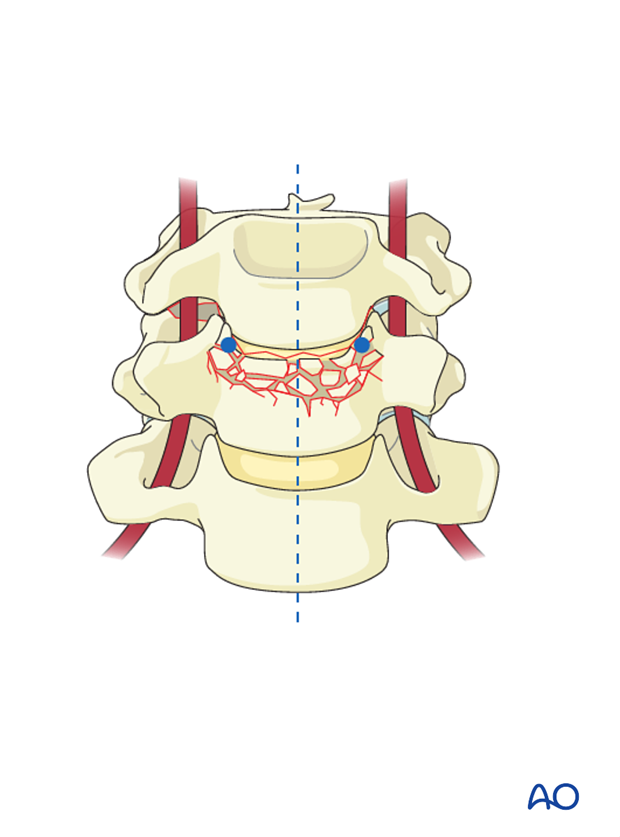
A small (nr 15) blade is used to open the annulus from uncinate to uncinate as close as possible to the endplates.
Pearls
To help stop a slipping blade, a Frasier tip suction is held in place in the direction the blade is cutting.
To prevent accidental durotomy and spinal cord transection, the annulotomy should not go deeper than 11 mm. The sharp edge of the nr 15 blade is 11 mm and can be used as a depth gauge.
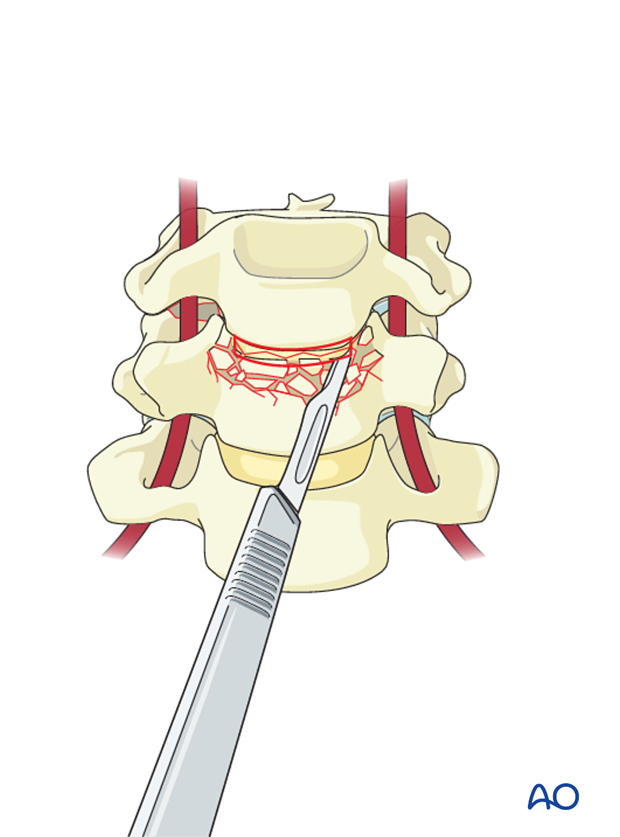
The discectomy continues using a Pituitary rongeur forceps to remove the anulus and small curettes to scrape the endplates.
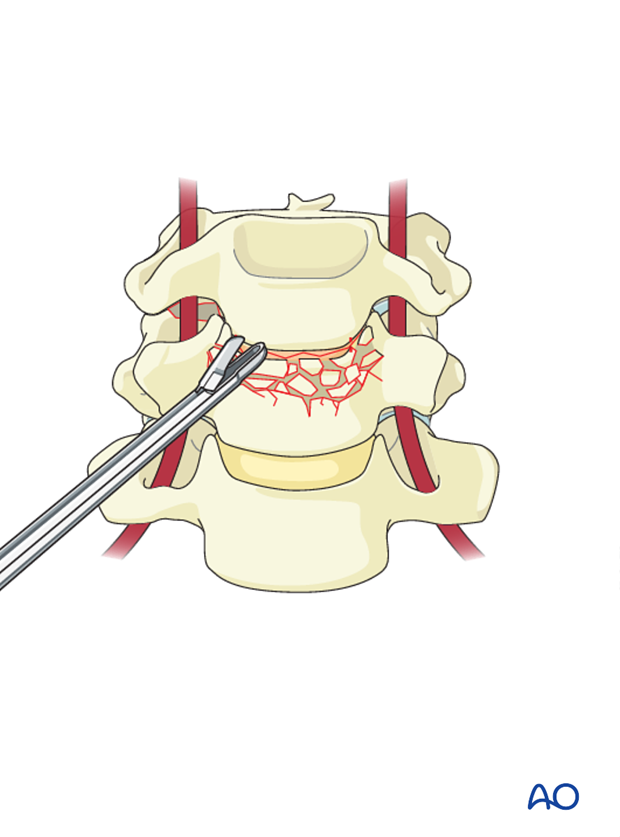
The use of a distractor or an intervertebral distractor will facilitate the removal of the posterior half of the disk and visualize the posterior longitudinal ligament.
The normal height of the area should be reconstructed. However, care should be taken not to over distract.
A complete discectomy will allow good visualization of the spinal canal and enhance fusion.
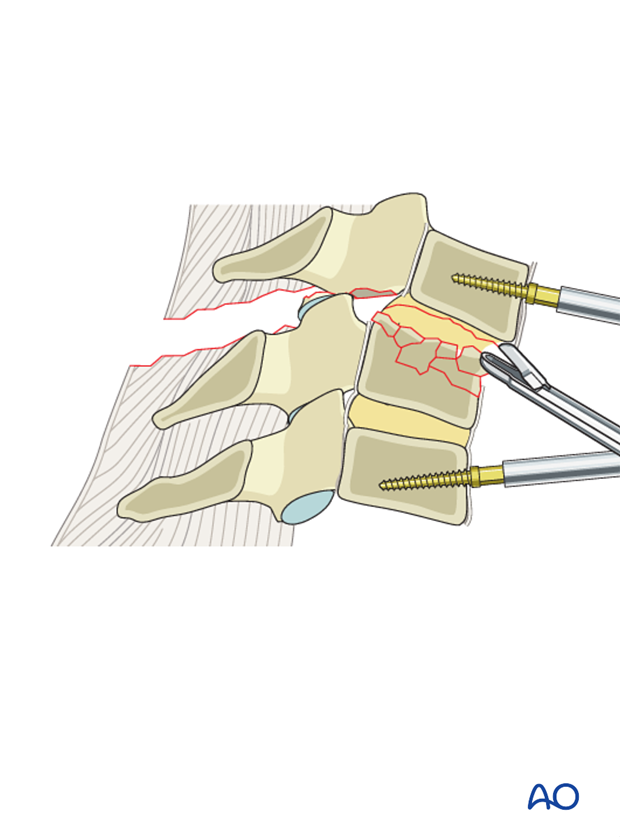
Meticulously remove all cartilage from the endplates. Pieces of cartilage may inhibit fusion if present either on the endplates or in the bony material used for the fusion.
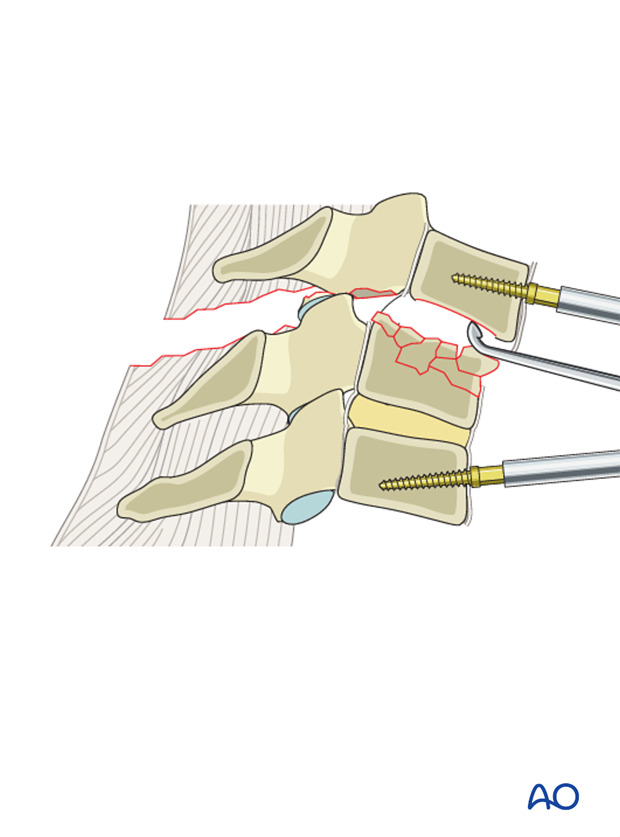
A small probe is used to ensure that no fragments are left in the area behind the vertebra which is not directly visualized, or in the foramen.
Magnification and correct illumination is essential to make the final decompression.

5. Full corpectomy technique
Corpectomy technique
Prior to performing a full corpectomy, both the superior and inferior discs are removed to define the safe depth of bone resection.
Segmental vessels are identified and ligated in the mid vertebral body, away from the natural foramen. These vessels may already be disrupted due to the trauma.
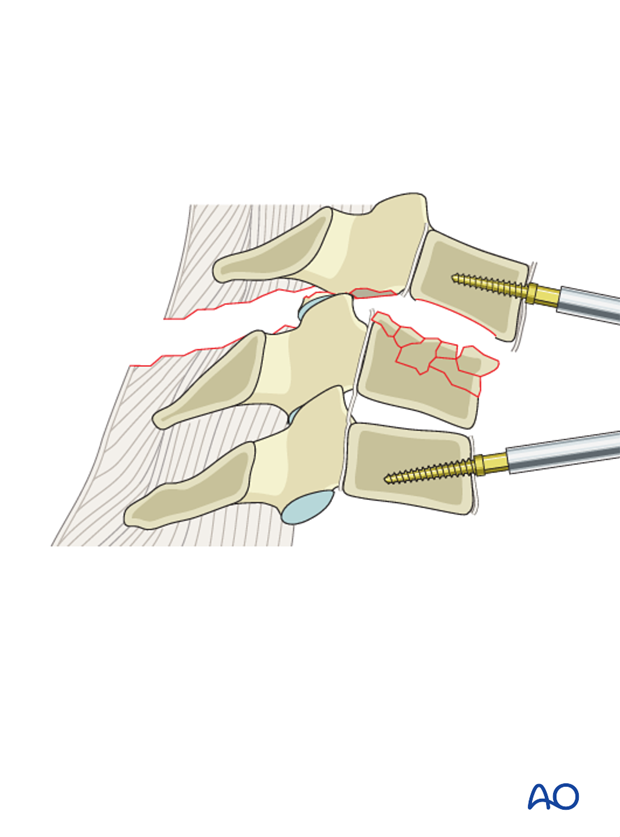
Laterally the corpectomy is limited by the medial boarder of the unciform process.
The unciform processes dictate the lateral borders of the corpectomy, establishing the safe area from the artery. This will leave a 3mm safe zone to the normal anatomy of the vertebral artery.
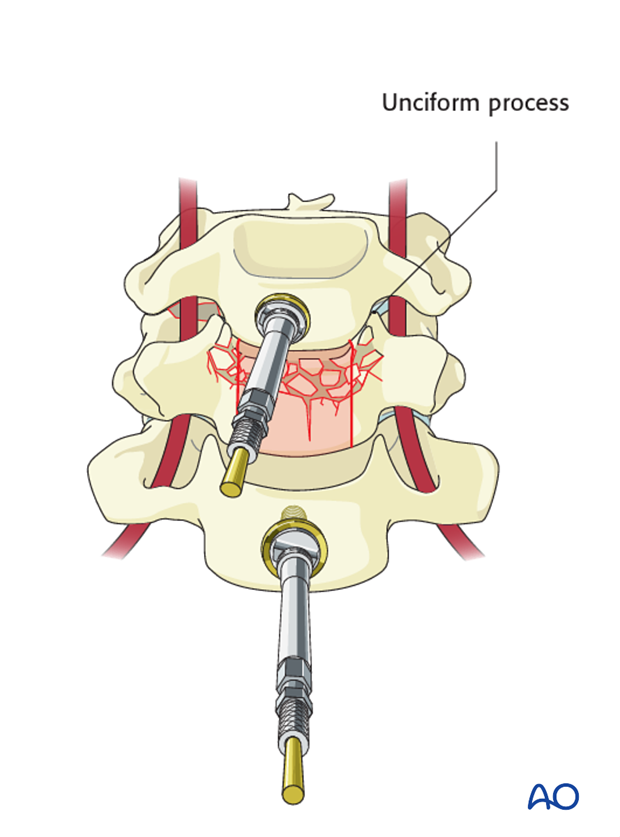
At this point, the fractured portion of the vertebral body (but not the posterior third) is removed using a combination of Leksell rongeurs and osteotomes.
If a cage is used for the reconstruction, an instrument producing larger fragments of bone is preferred as it facilitates filling of the cage.
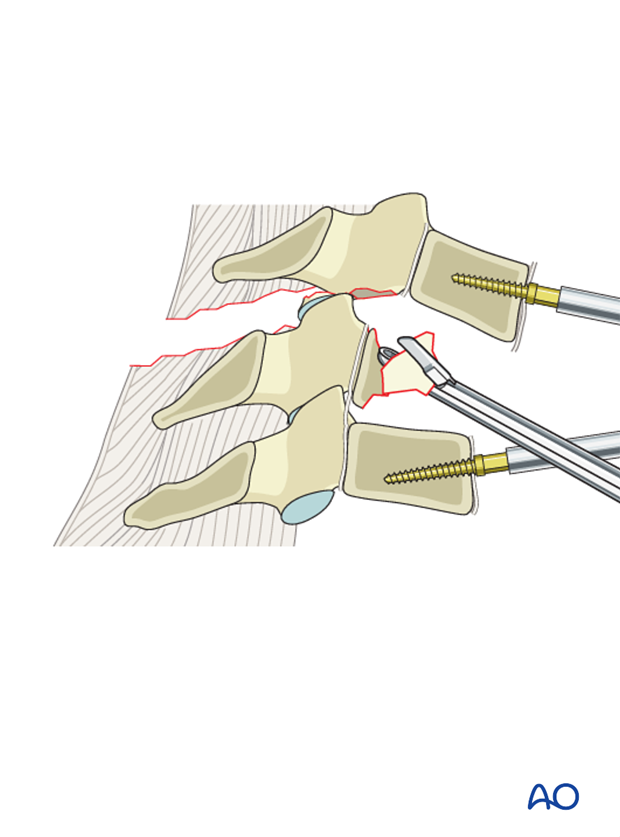
A burr is used to remove the posterior portion of the vertebral body as the spinal canal is approached.
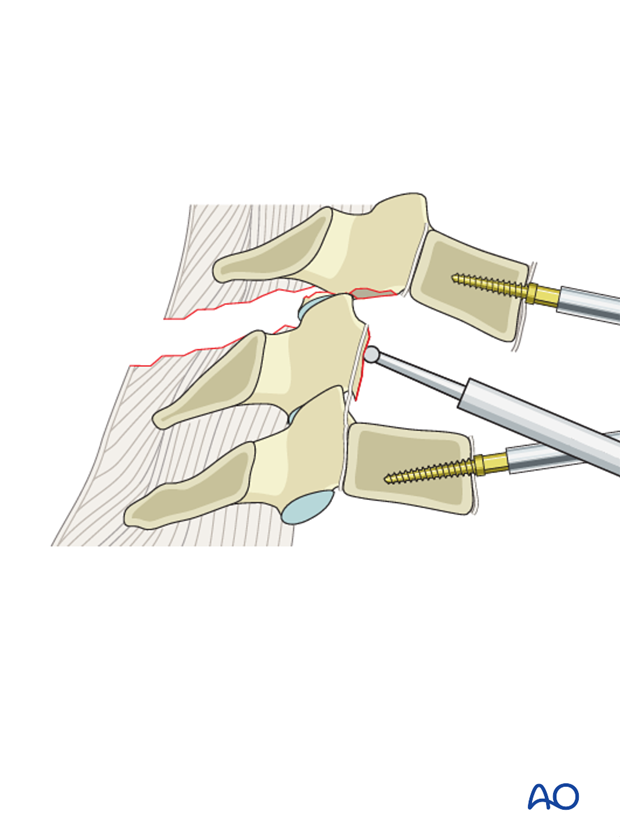
The spinal canal is decompressed by the resection of the posterior wall of the vertebral body.
The posterior cortex should be thinned with the burr to an eggshell. Retropulsed bone fragments can be removed with curettes and thin footplate Kerrison punches.
This is optimally done with a high speed burr and curettes under loupe or microscopic magnification.
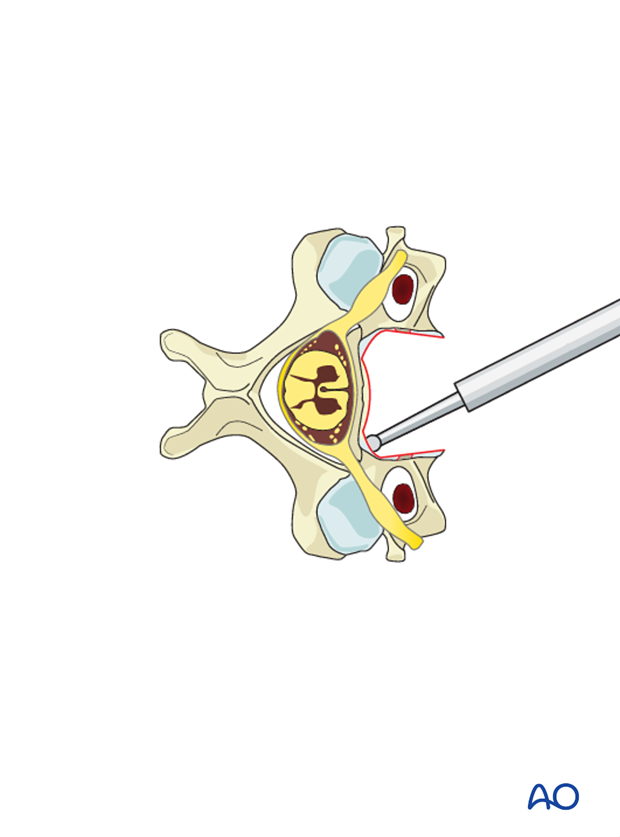
Pearl: protection of the dura
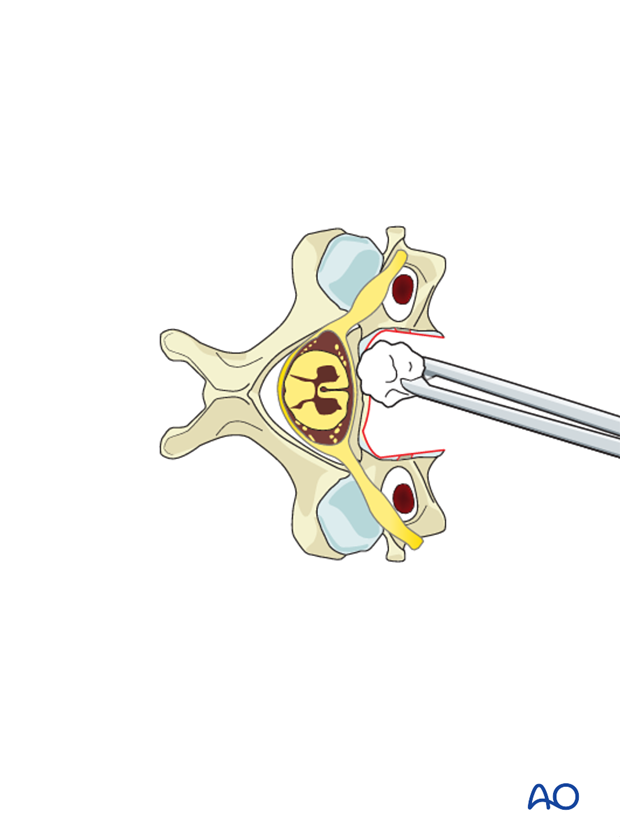
Care should be taken to protect the dura. Epidural venous bleeding can be troublesome at times, so meticulous hemostasis with bipolar cautery, cottonoid patties, and hemostatic adjuncts can be helpful.
6. Partial corpectomy technique
Partial corpectomy
In selected cases where there is enough uncompromised bone to hold the plate a partial corpectomy removing only one disk allows reconstruction of the spine, saving one mobile segment.
A partial corpectomy involves removal of the fractured superior or inferior vertebral body and adjacent disc.
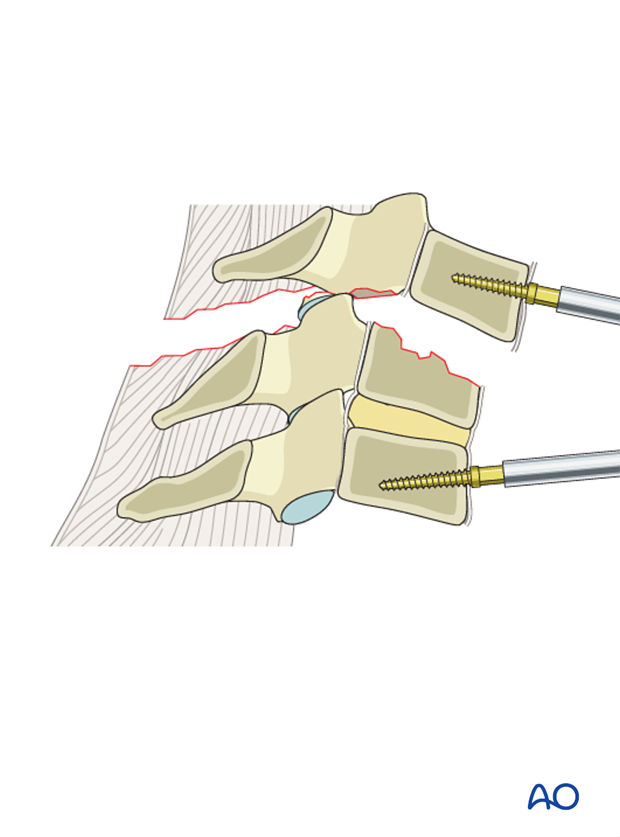
Prior to performing a partial corpectomy, segmental vessels are identified and ligated in the mid vertebral body, away from the natural foramen. These vessels may already be disrupted due to the trauma.
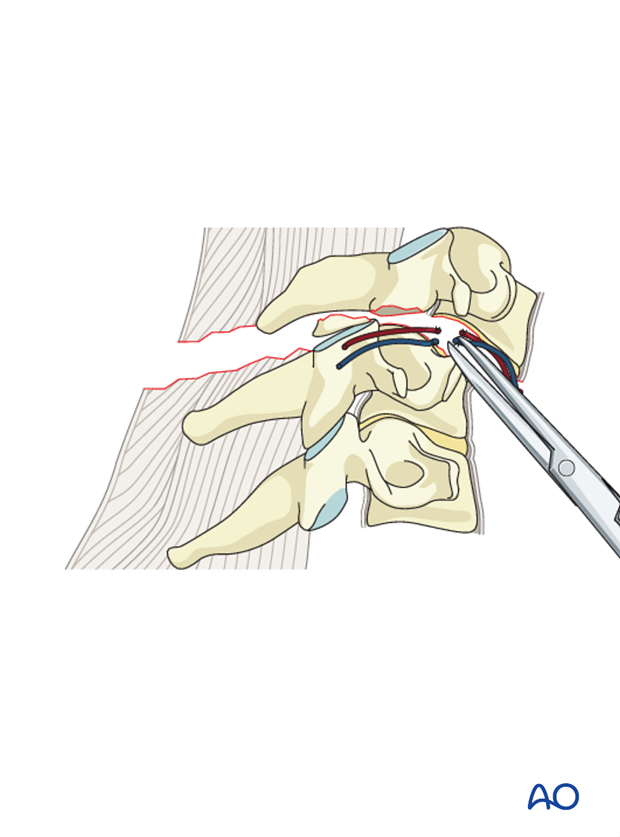
The disc adjacent to the fractured endplate is removed as described above to define the safe depth of bone resection.
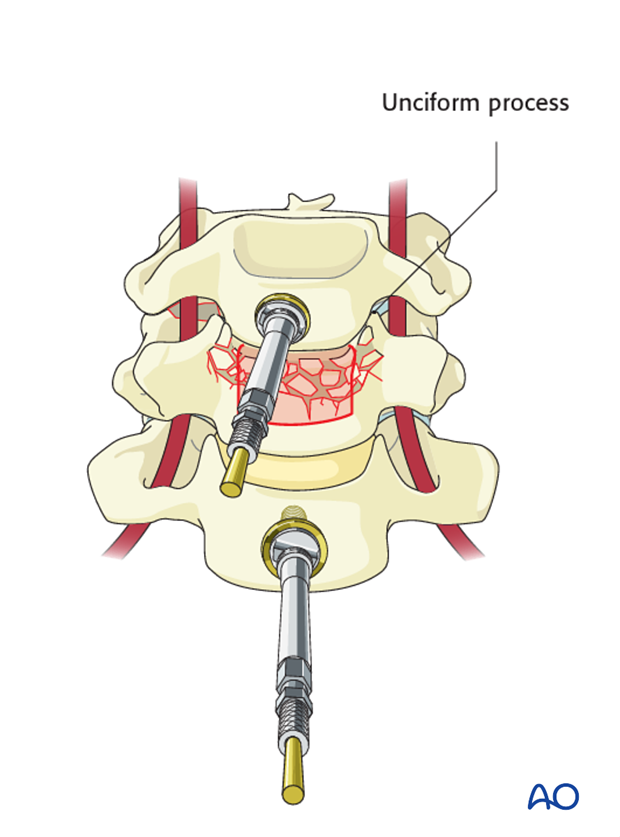
Laterally the partial corpectomy is limited by the medial boarder of the unciform process.
The unciform processes dictate the lateral borders of the corpectomy, establishing the safe area from the artery. This will leave a 3mm safe zone to the normal anatomy of the vertebral artery.
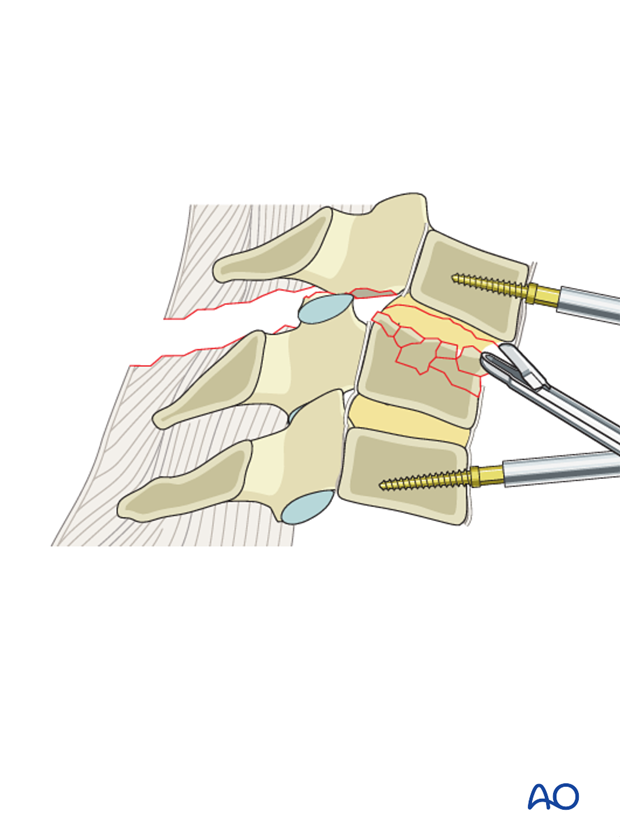
At this point, the fractured portion of the vertebral body (but not the posterior third) is removed using a combination of Leksell rongeurs an osteotomes.
If a cage is used for the reconstruction, an instrument producing larger fragments of bone is preferred as it facilitates filling of the cage.
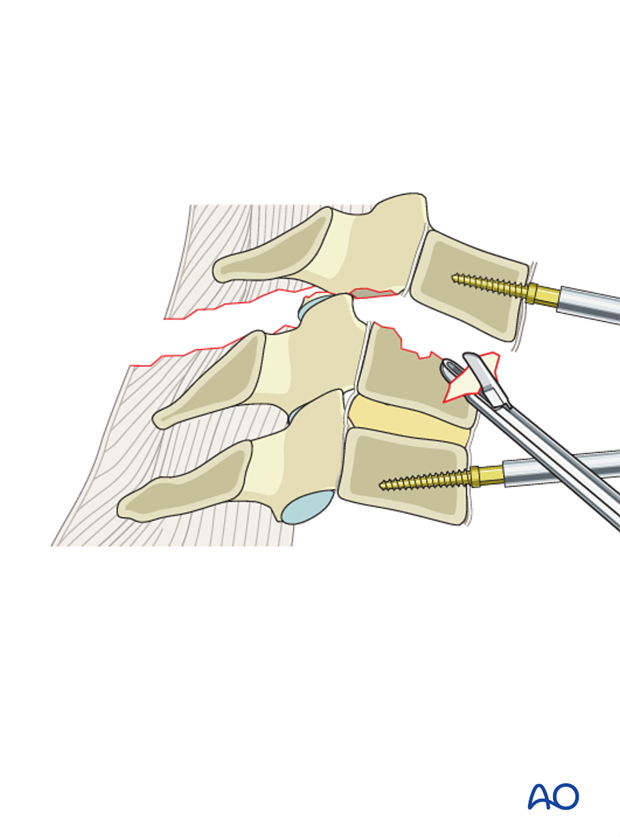
A burr is used to remove the posterior portion of the vertebral body as the spinal canal is approached.
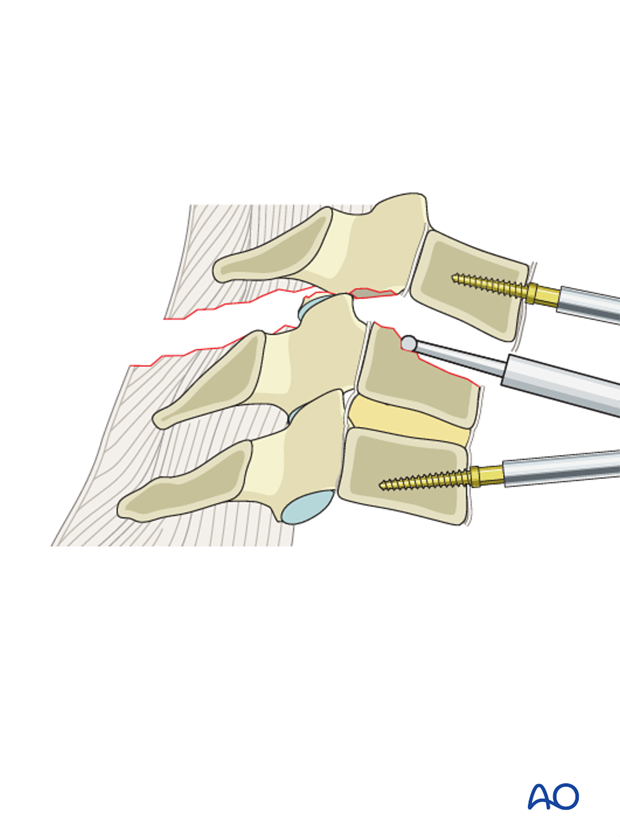
The spinal canal is decompressed by the resection of the posterior wall of the vertebral body.
The posterior cortex should be thinned with the burr to an eggshell. Retropulsed bone fragments can be removed with curettes and thin footplate Kerrison punches.
This is optimally done with a high speed burr and curettes under loupe or microscopic magnification.
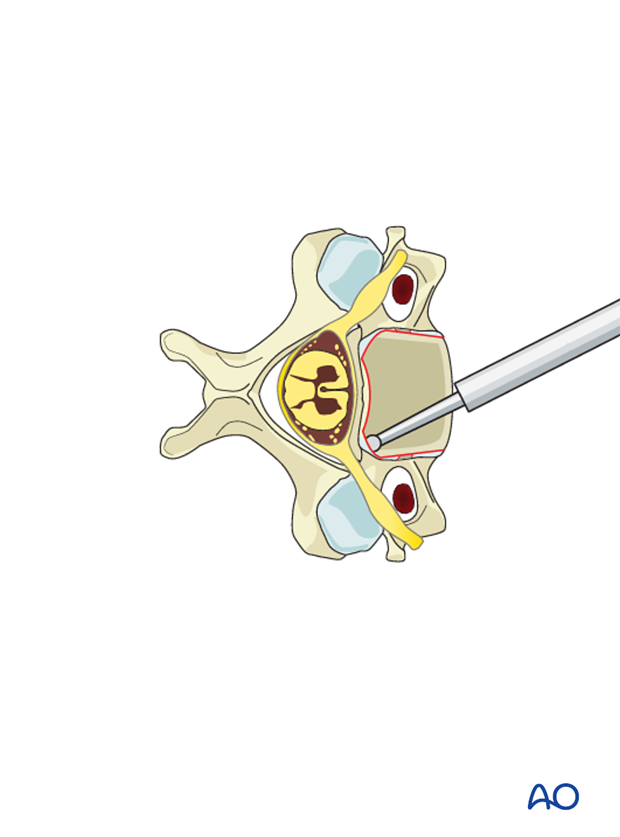
Pearl: protection of the dura
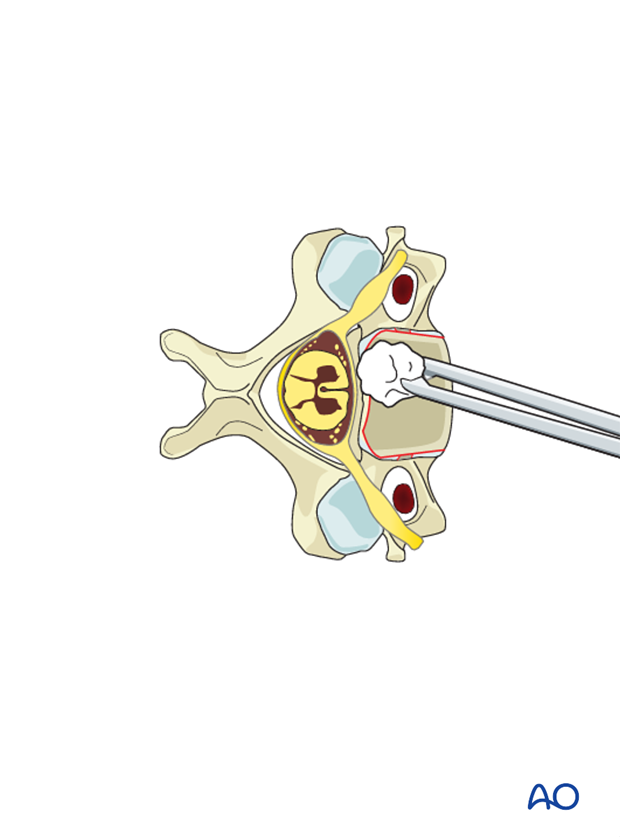
Care should be taken to protect the dura. Epidural venous bleeding can be troublesome at times, so meticulous hemostasis with bipolar cautery, cottonoid patties, and hemostatic adjuncts can be helpful.
7. Reduction
Unless over distraction is noted on images, limited distraction is applied to restore alignment.
Successful realignment must be followed by interbody spacer/graft and anterior plate.
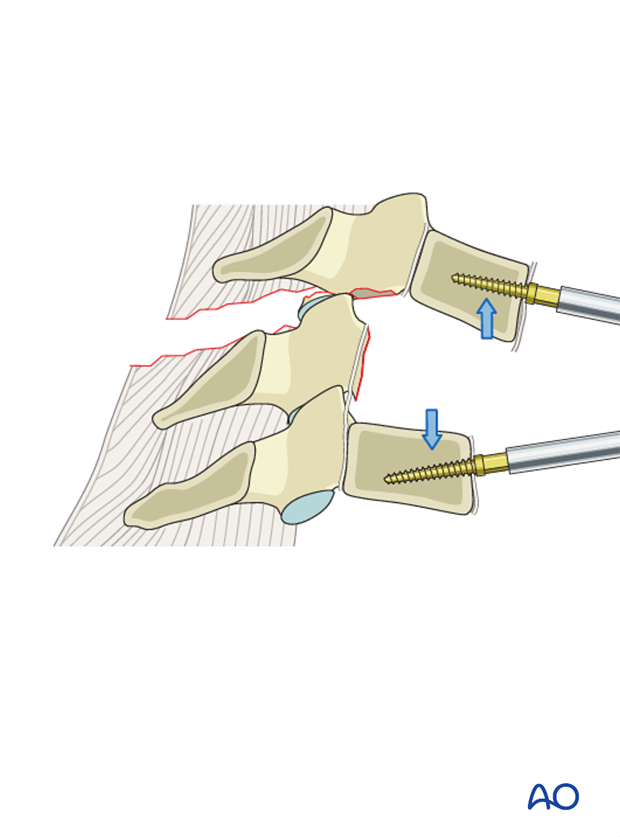
Reduction of displaced/locked facets
Malalignment of posterior elements can be corrected according to one of these two methods:
- Caspar pin distraction
- Intervertebral distraction with lamina spreader

Caspar pin distraction
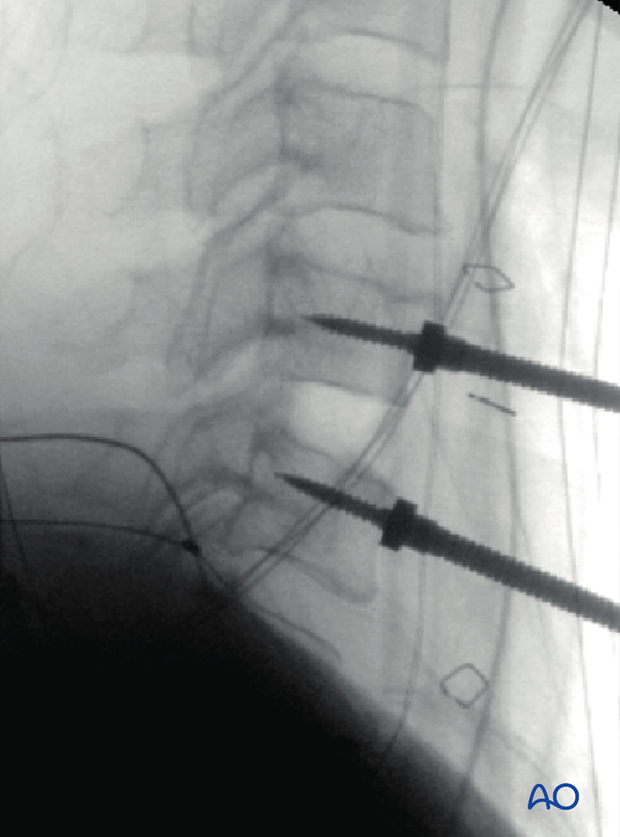
Caspar pins are strategically placed to achieve open reduction of the facet dislocation. The longest possible pins should be used as the forces applied during reduction can be considerable.
In the sagittal plane this requires convergent placement of the pins.
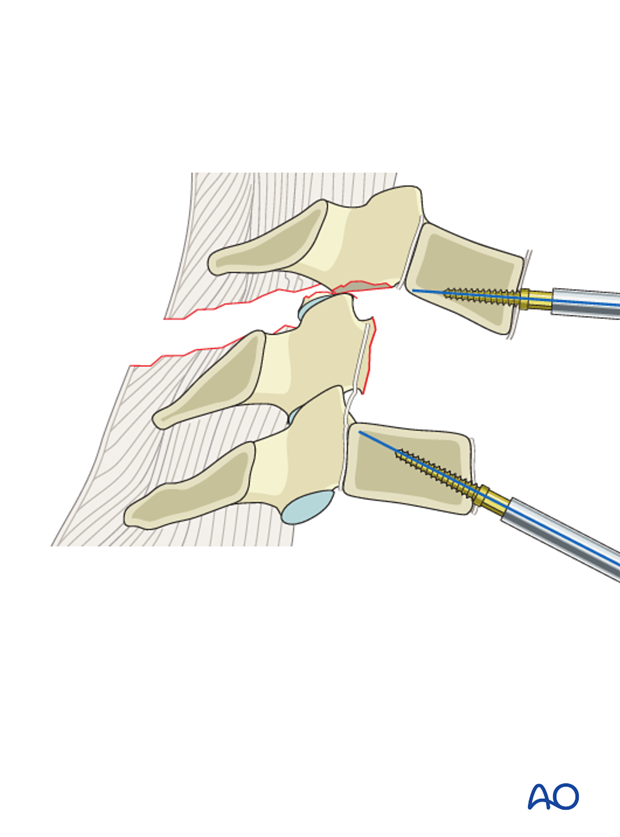
In the transverse plane, the pins should be placed perpendicular to the axis of each individual vertebra, taking into account the rotational deformity. This will help with correction of rotational malalignment.
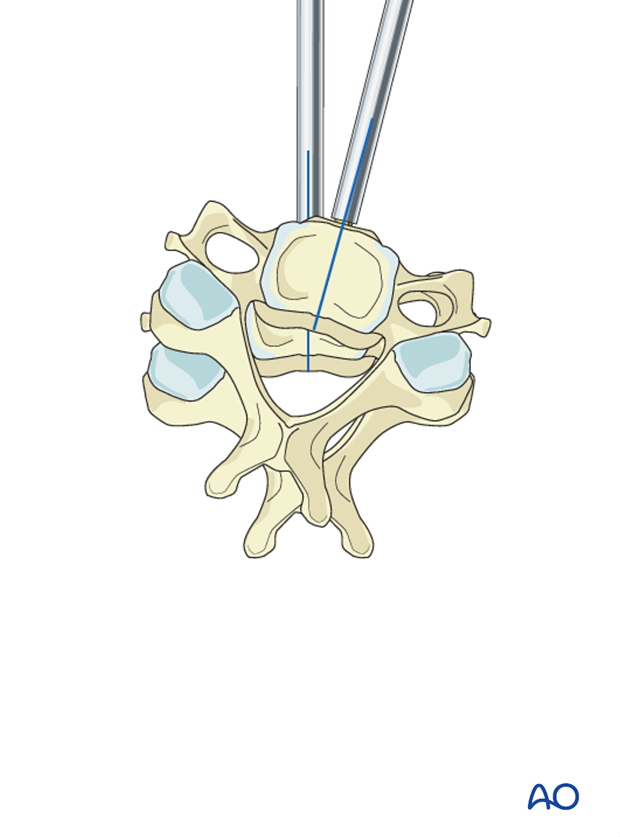
In order for the pins to engage the Caspar distractor, they must be brought parallel to each other which distracts and unlocks the dislocated facet.

Gradual distraction is achieved under lateral fluoroscopic monitoring until the dislocated facet is unlocked.
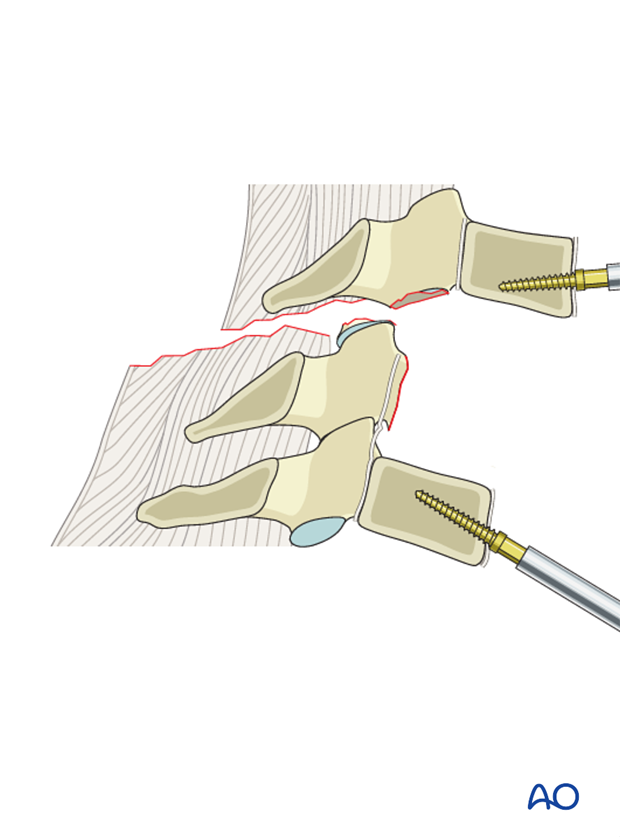
The head can then be laterally rotated toward the dislocated facet to complete the reduction.
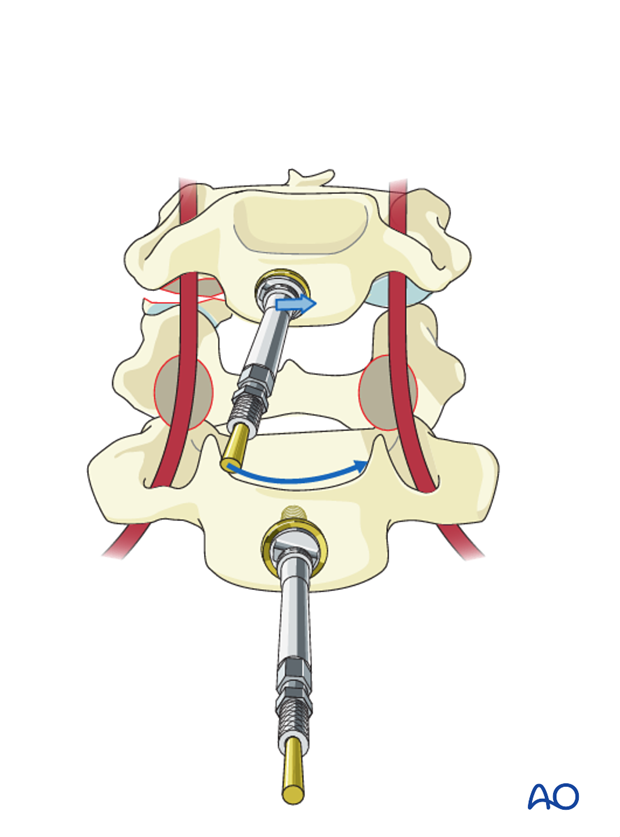
Successful reduction is confirmed.
In this case the distraction needed for reduction must be released to normal disk height.
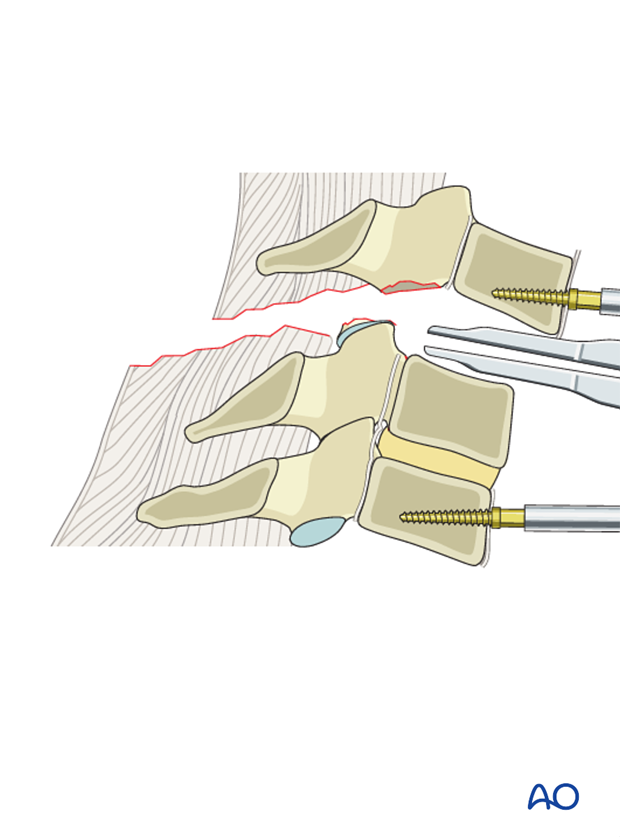
Intervertebral distraction with lamina spreader
Once the discectomy is complete, a lamina spreader is inserted within the posterior half of the intercerebral disk space. If the lamina spreader is placed too anteriorly, a lordotic force is applied which prevents the facet dislocation from disengaging.
Gradual distraction is achieved under lateral fluoroscopic monitoring until the dislocated facet is unlocked.
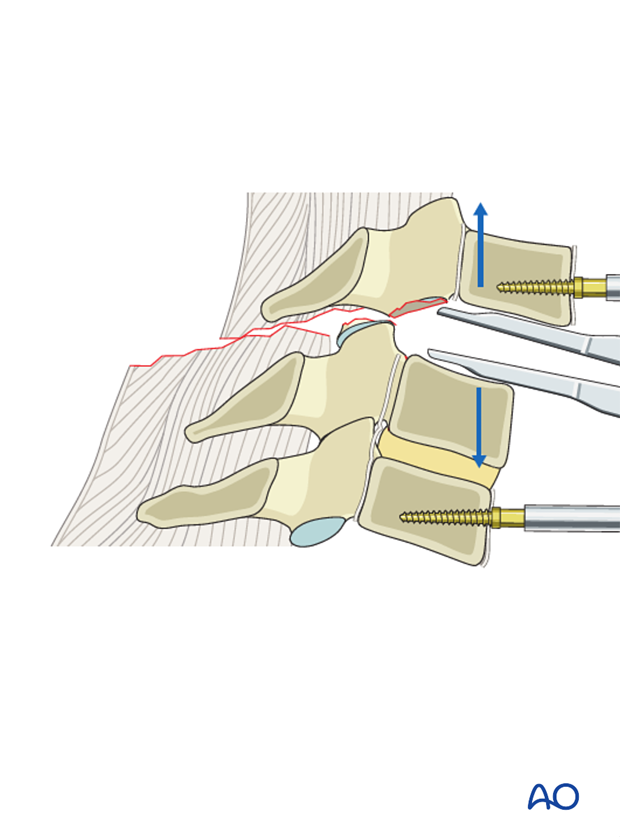
The head can then be laterally rotated toward the dislocated facet to complete the reduction.
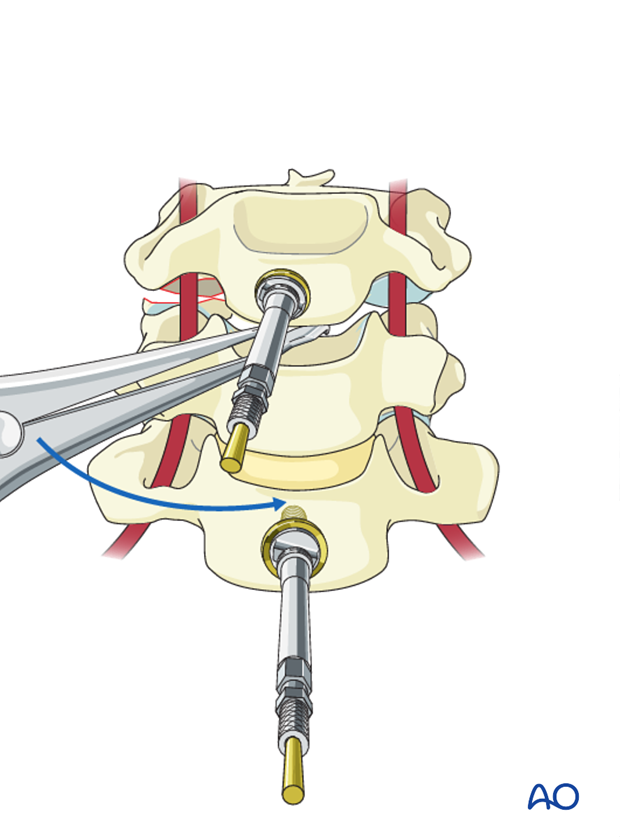
In this case the distraction needed for reduction must be released to normal disk height.
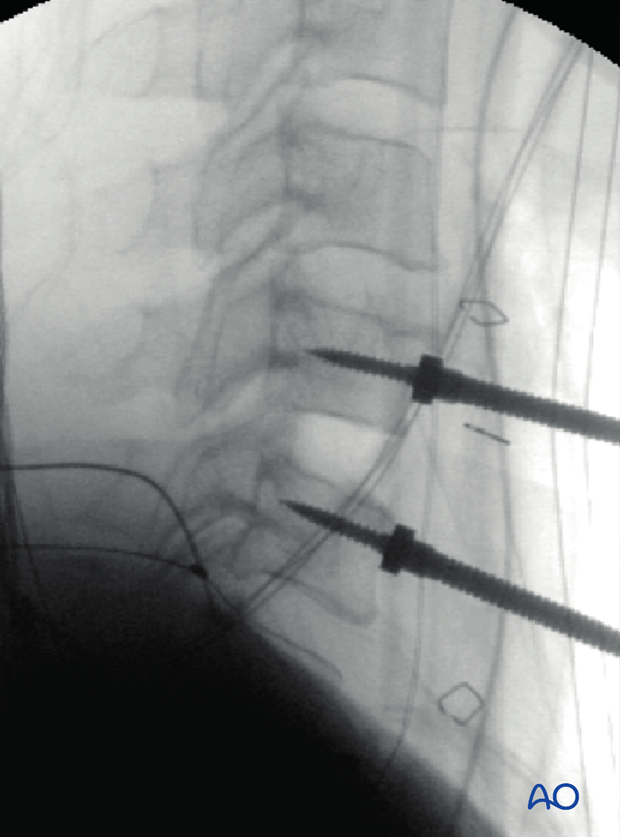
The procedure must be completed by placing an interbody spacer/graft and anterior plate
8. Fusion after discectomy
Reconstruction using tricortical graft or allograft with plate
Tricortical graft is harvested from the iliac crest and inserted in to the empty disk space. Great care must be taken to trim the graft so that it shares axial load with the plate.
After the bone graft (or cage) is placed, the Caspar pins are removed.
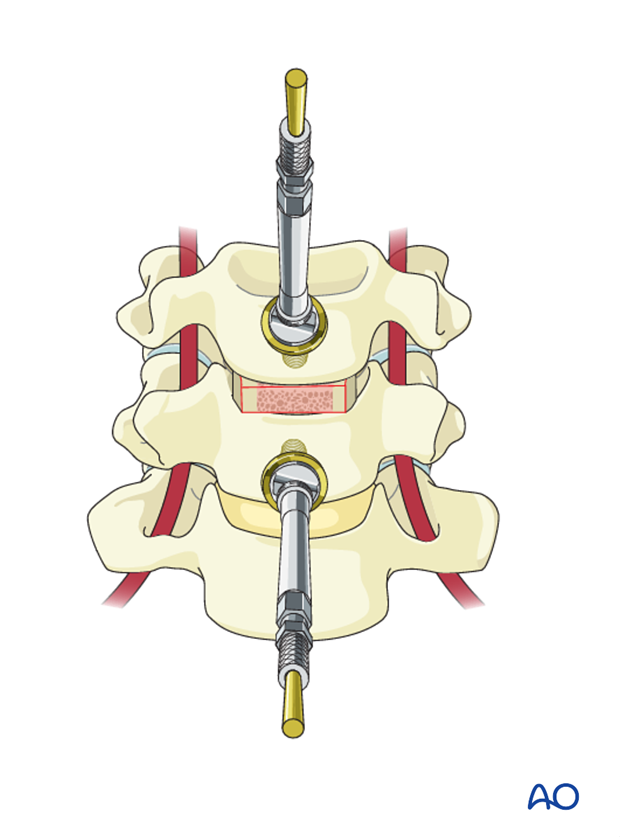
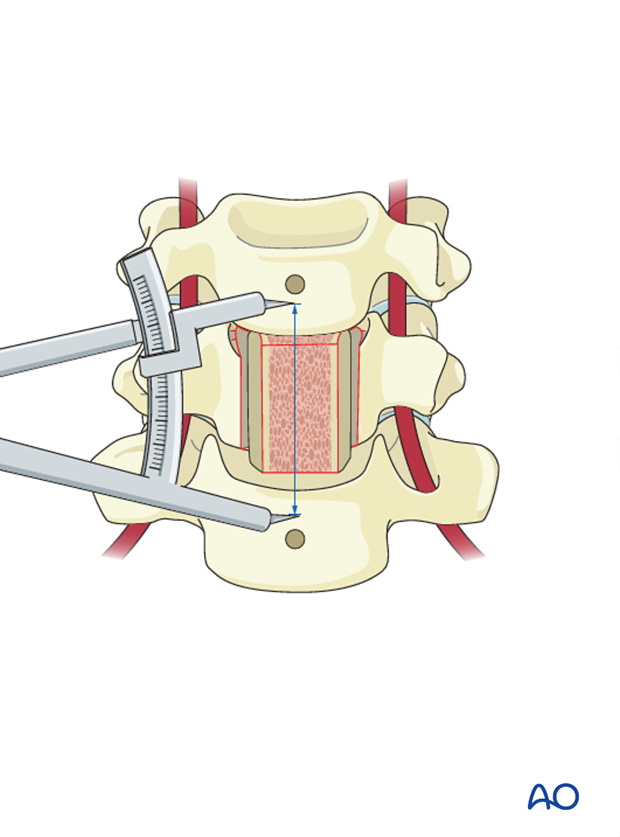
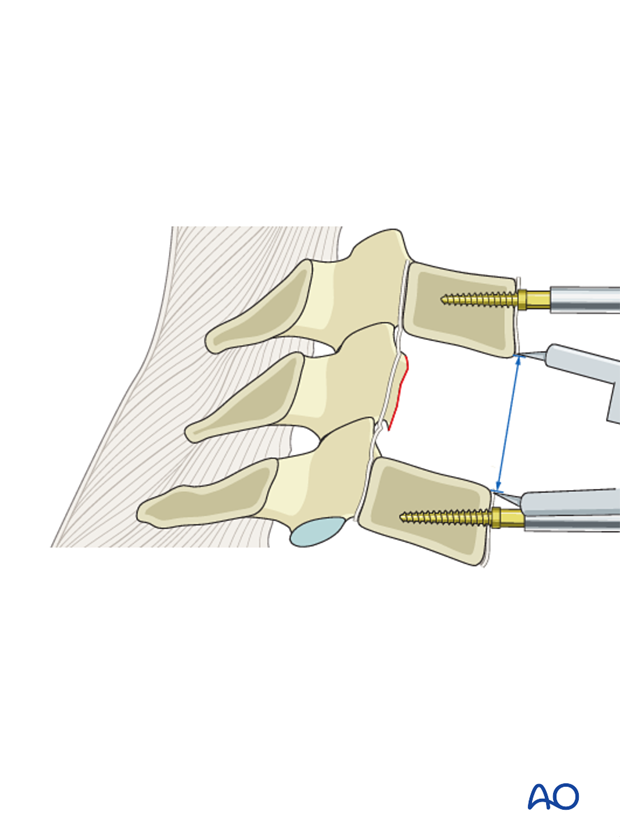
When choosing the plate length, care must be taken to prevent it from damaging the mobile disks above and below. The necessary plate length (blue) is measured using a caliper.
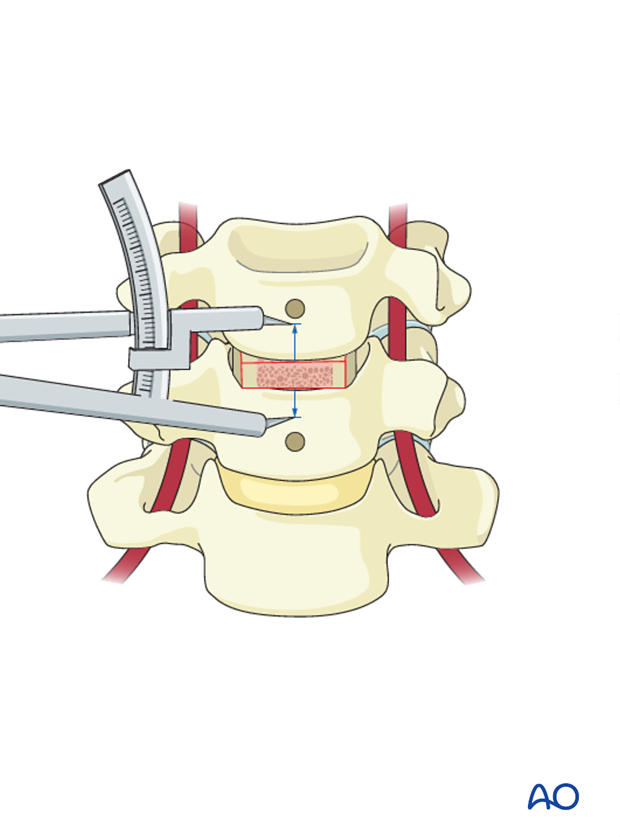
Ideally the plate would extend as little as possible above and below the endplates of the injured level.
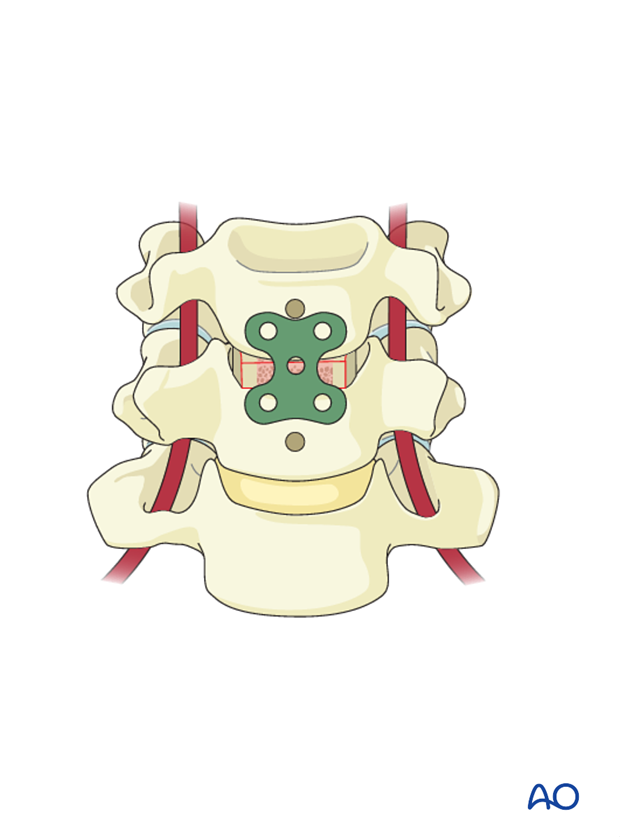
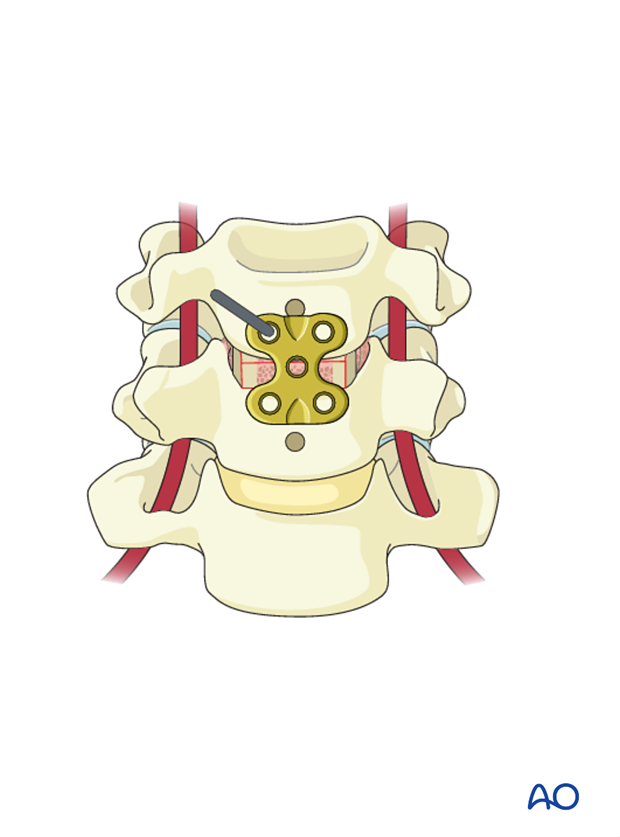
The plate is bent to accommodate the patients lordosis and fixed in place with two temporary pins placed in holes diagonal to each other.
The appropriate positioning of the plate is verified in AP and lateral views.
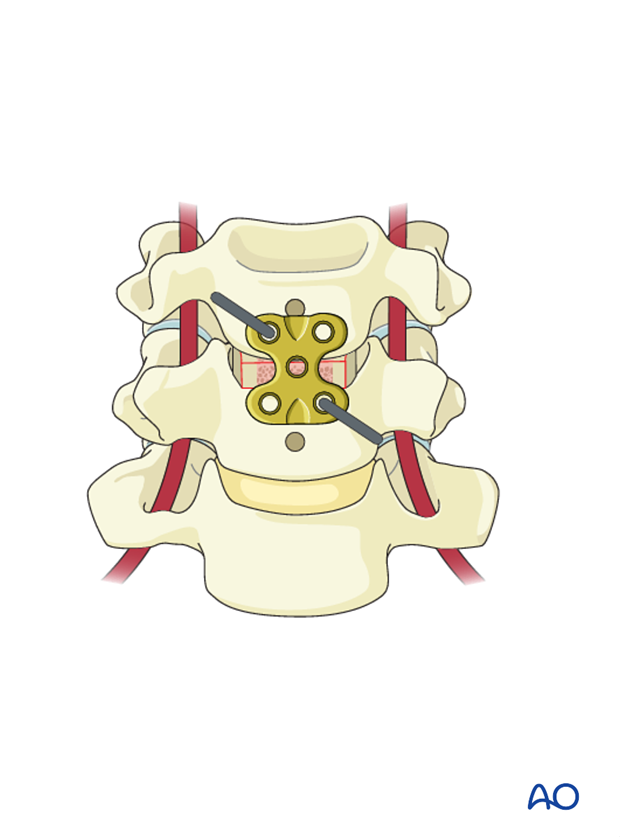
Malrotation of the plate is commonly seen on the AP view and can be adjusted by temporarily removing one pin while adjusting the rotation.
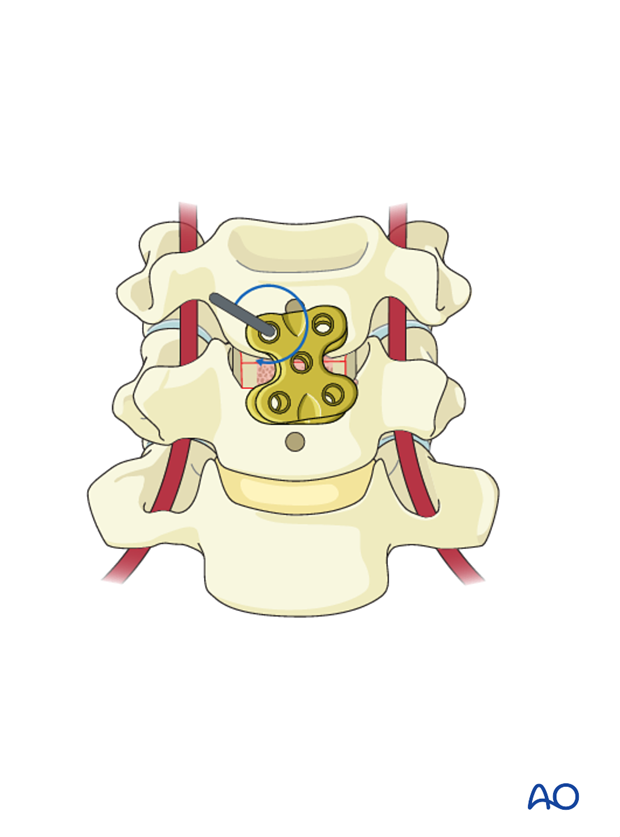
Based on a preoperative measurement of vertebral body depth, screw holes are prepared with the appropriate depth. This is performed under lateral fluoroscopic guidance.
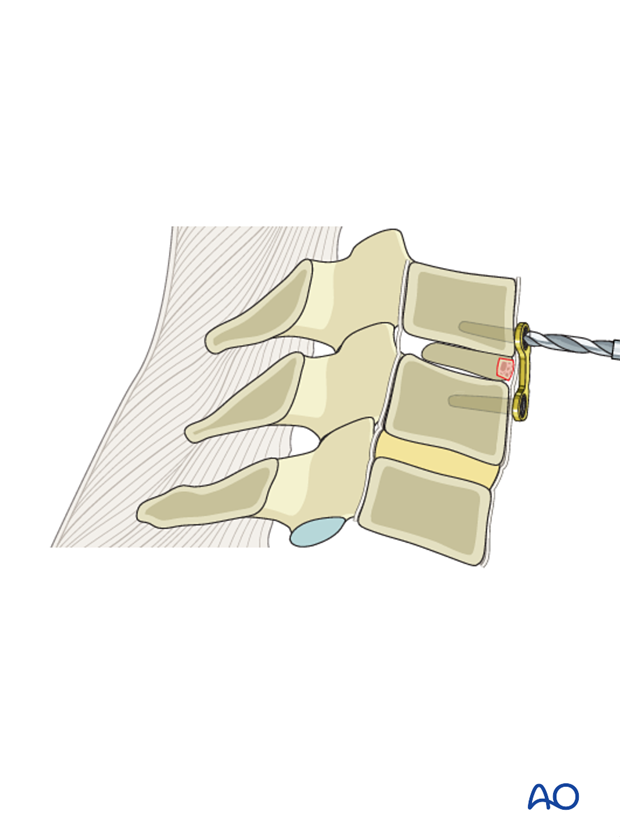
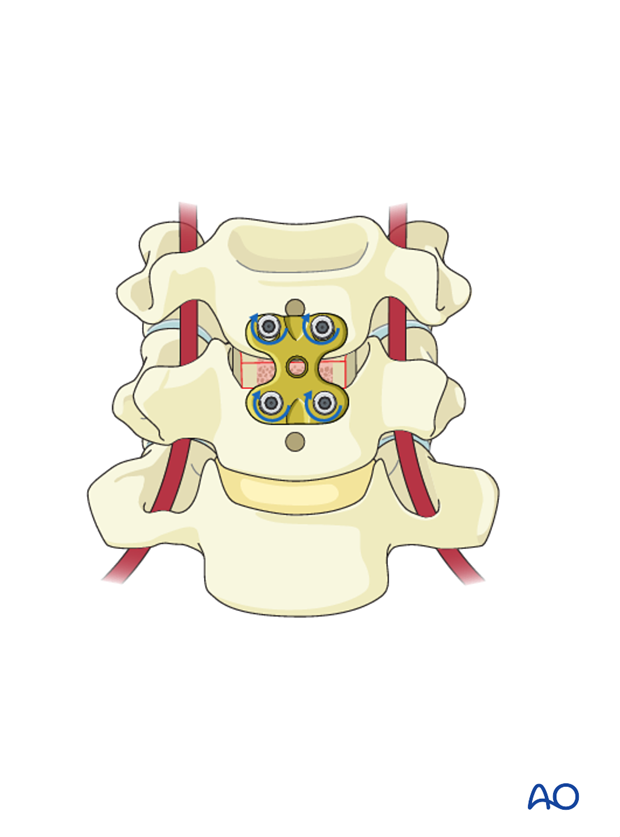
Screws are then inserted but not fully tightened until all screws have been applied.
Final hardware positioning is verified in lateral and AP view.
9. Fusion after partial/full corpectomy
Fusion after partial and full corpectomy follows the same principles. To illustrate these we will here show the fusion after a full corpectomy.
The following two options are available for reconstruction after corpectomy:
- Tricortical graft and plate
- Mesh cage and plate
Care should be taken not to over distract the segment as this may compromise the postoperative stability.
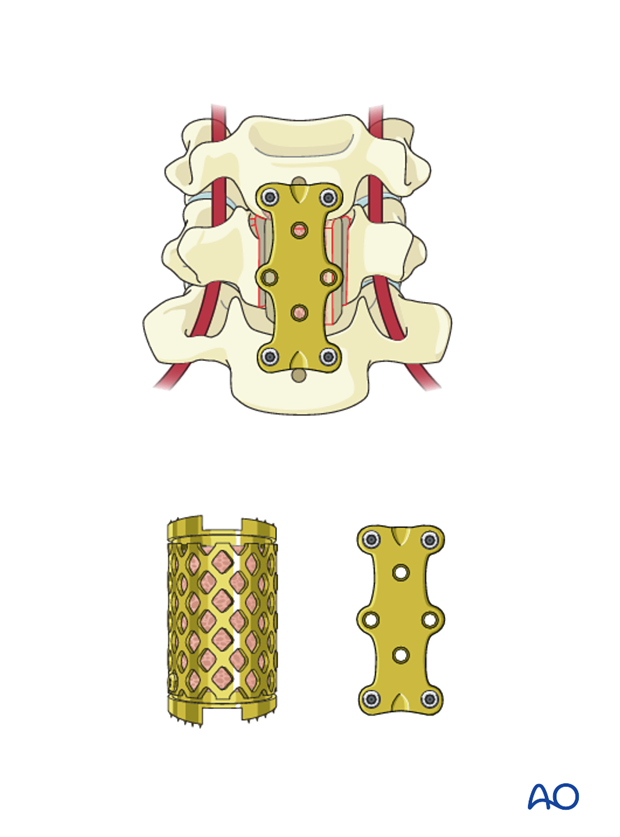
Reconstruction using tricortical graft and plate
Tricortical graft is harvested from the iliac crest and inserted into the defect. Great care must be taken to trim the graft so that it shares axial load with the plate.
Allograft may also be used.
After insertion of the graft, the Caspar pins are removed.
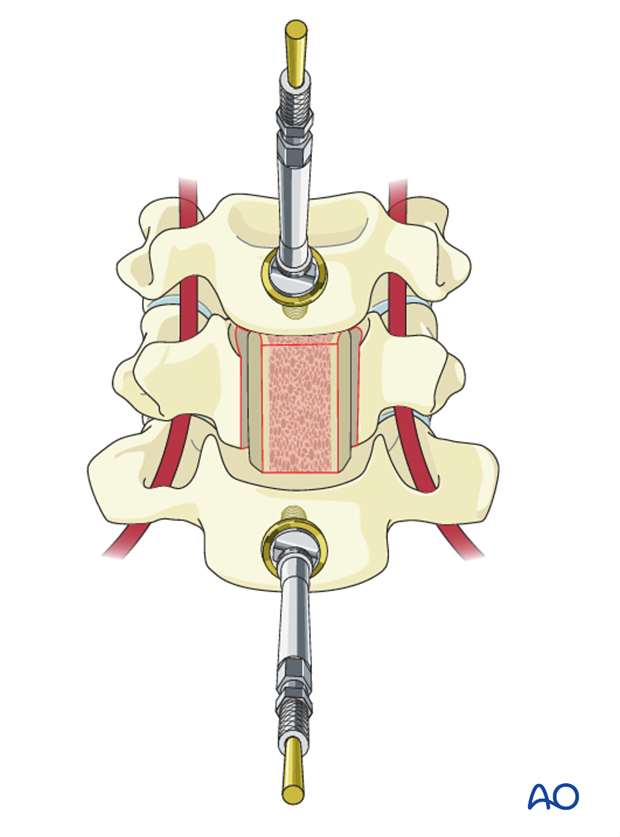
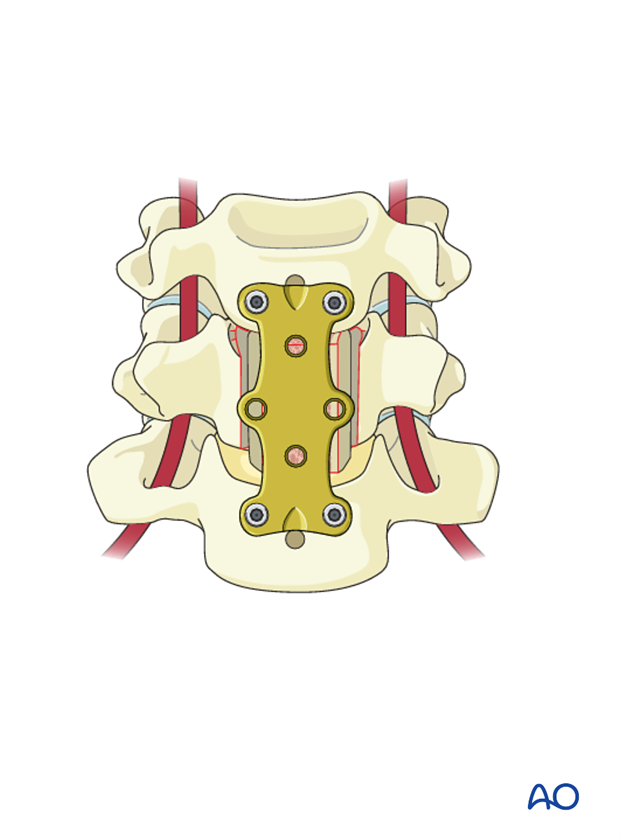
When choosing the plate length, care must be taken not to prevent it from damaging the mobile disks above and below.
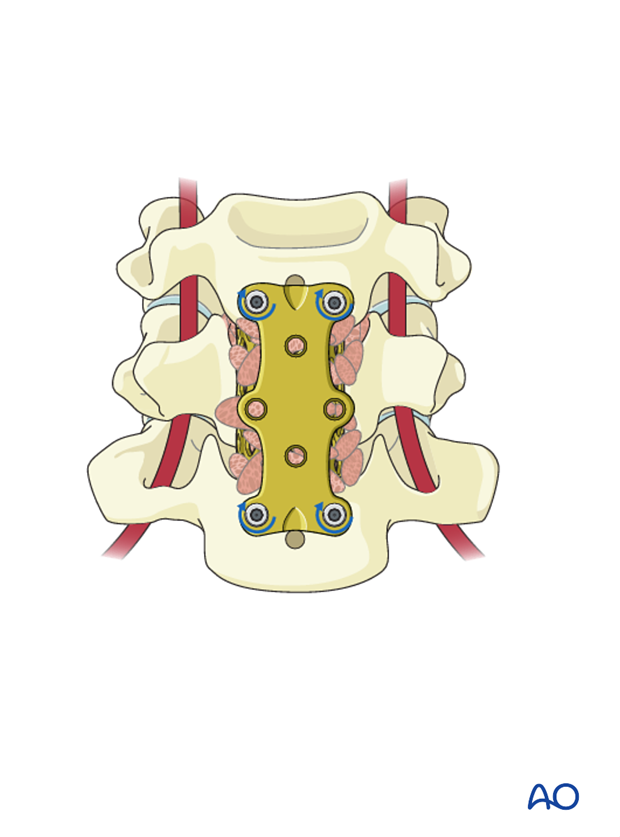
The plate is finally bent to accommodate the patient's lordosis and fixed with two screws in each vertebra.
Reconstruction using Mesh cage and plate
The corpectomy defect is measured using caliper.
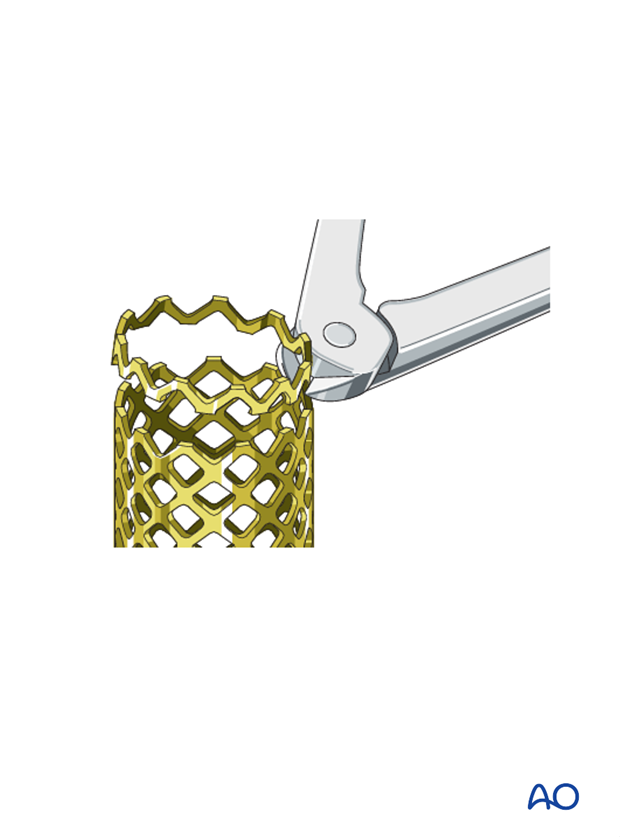
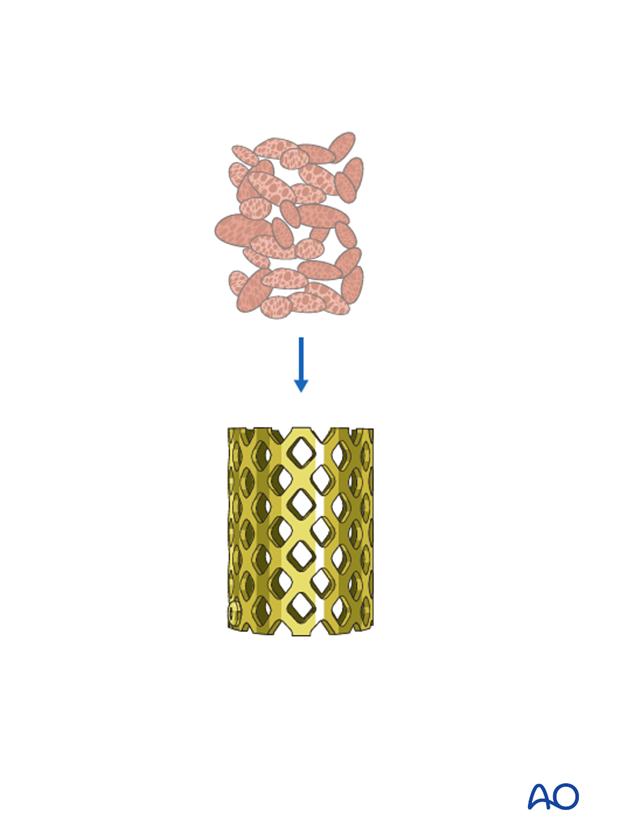
A mesh cage of the largest possible diameter is cut to a corresponding length.
The cage filled with tightly packed bone obtained from the corpectomy.
End plate rings should be added in patients with osteoporosis. They are optional in patients with normal bone. These often have variable angulation and can be used to accommodate nonparallel endplates.
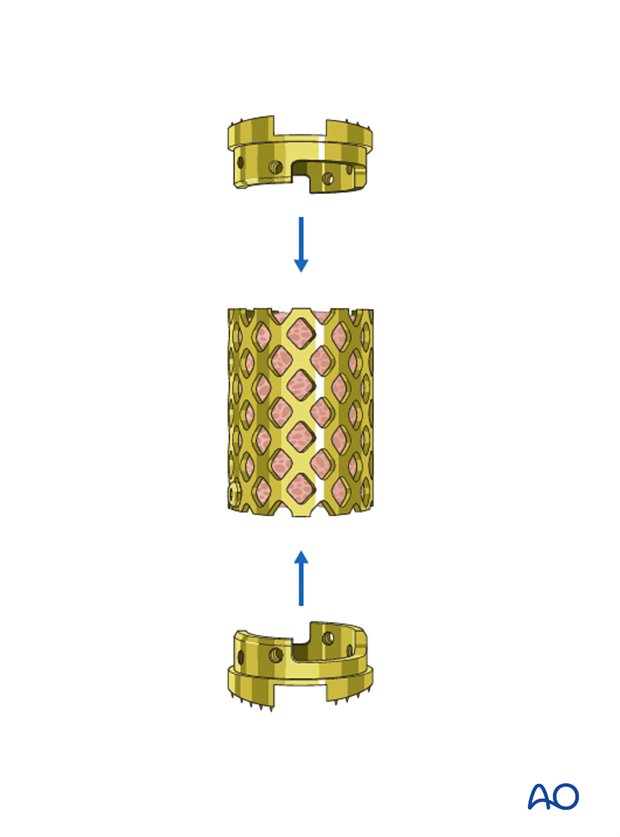
The cage is inserted and tapped into its final position under lateral fluoroscopic monitoring.
The Caspar pins are removed.

When choosing the plate length, care must be taken to prevent it from damaging the mobile disks above and below.
Note: Dynamic plates should be avoided in trauma as their principles often conflict with the goals of stabilization in the unstable spine.
Variable angle plates with locking screws are also an option if thought to be necessary.
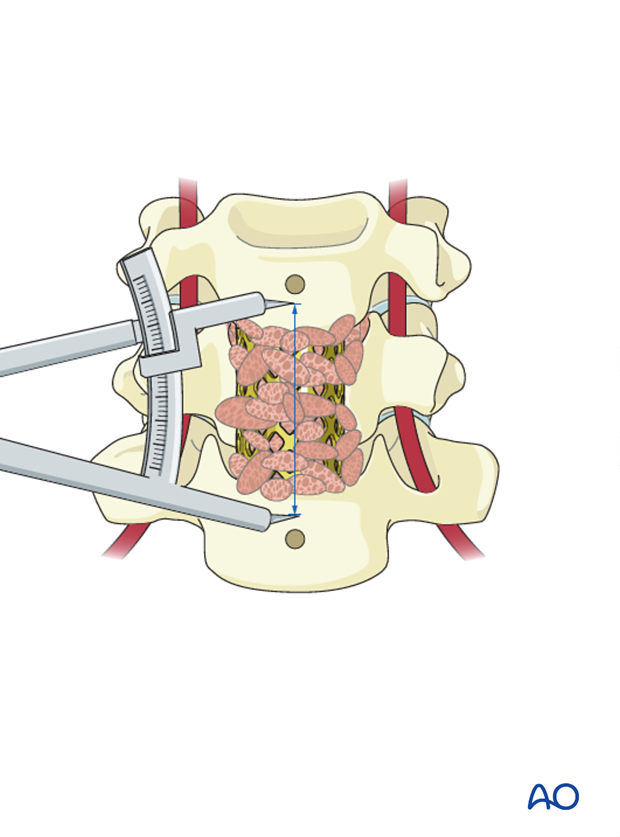
Ideally the plate would extend as little as possible above and below the endplates of the injured level.
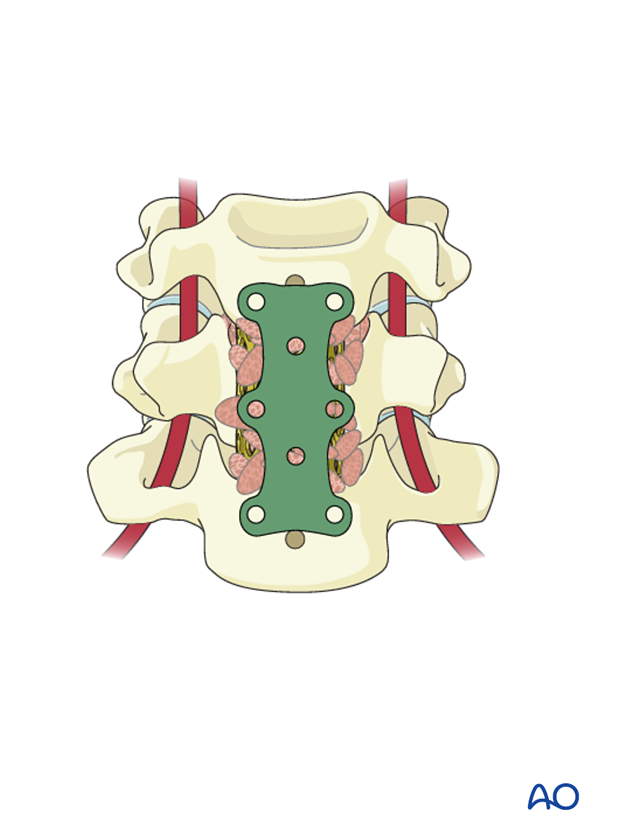
The plate is bent to accommodate the patient’s lordosis and fixed in place with two temporary pins placed in holes diagonally to each other.
The appropriate positioning of the plate is verified in AP and lateral views.
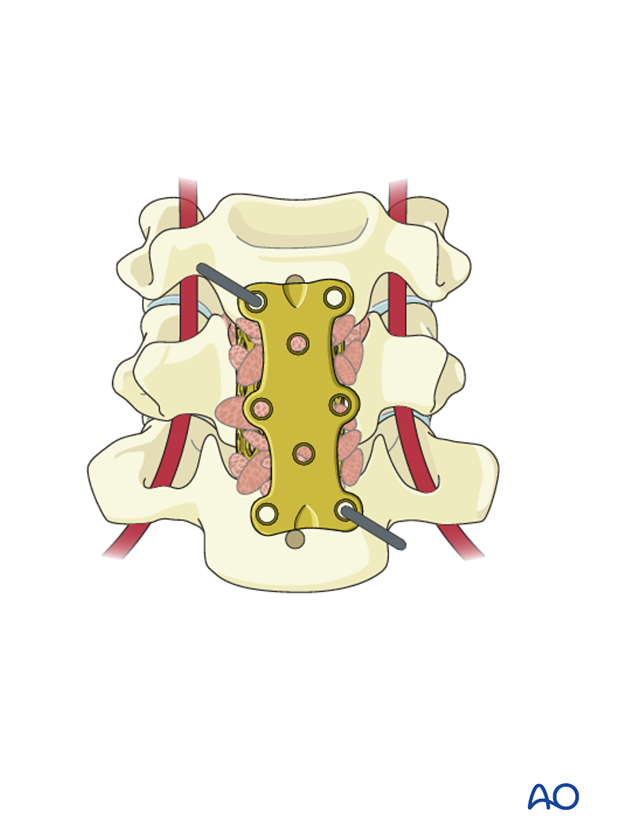
Malrotation of the plate is commonly seen on the AP view and can be adjusted by temporarily removing one pin while adjusting the rotation.
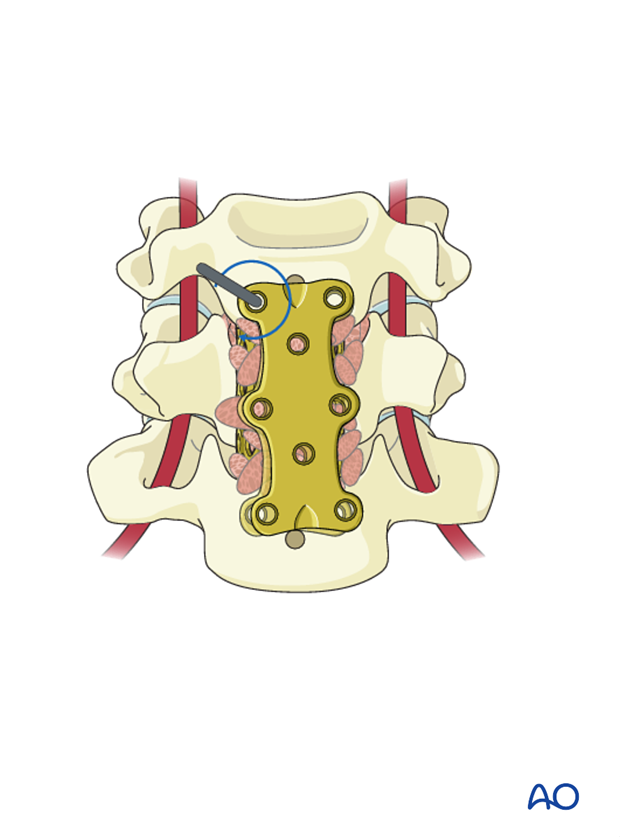
Based on a preoperative measurement of vertebral body depth, screw holes are prepared with the appropriate depth. This is performed under lateral fluoroscopic guidance.
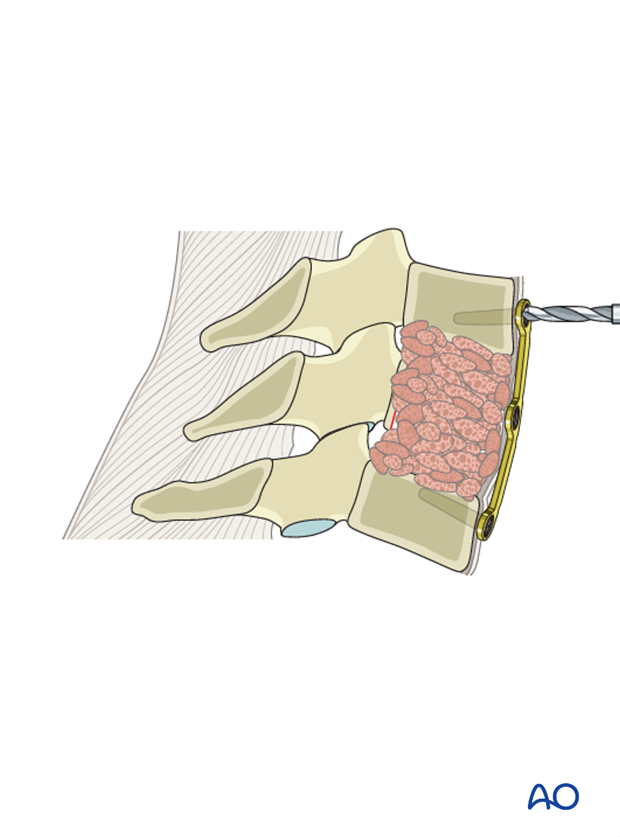
Screws are then applied but not fully tightened until all screws have been inserted.
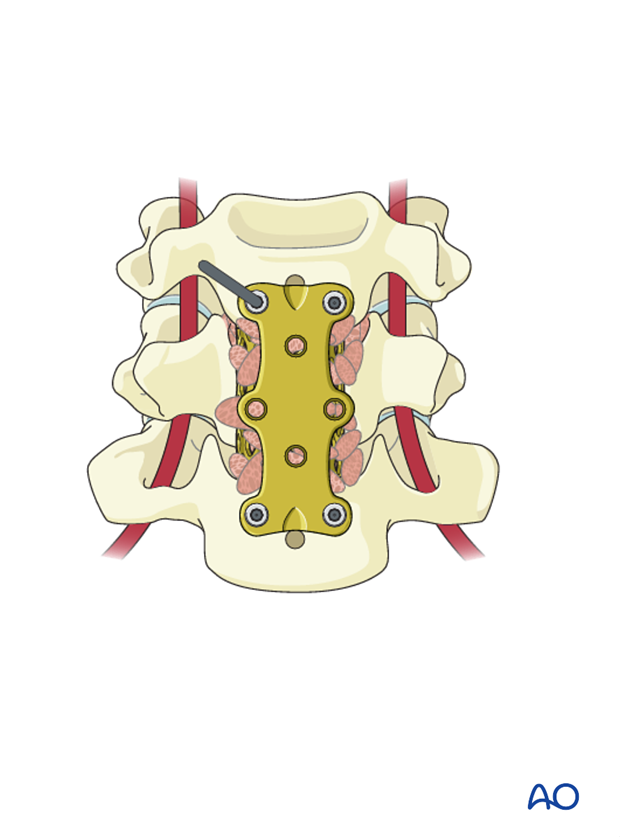
Final hardware positioning is verified in lateral and AP view.
10. Aftercare
Patients are made to sit up in bed on the first day after surgery.
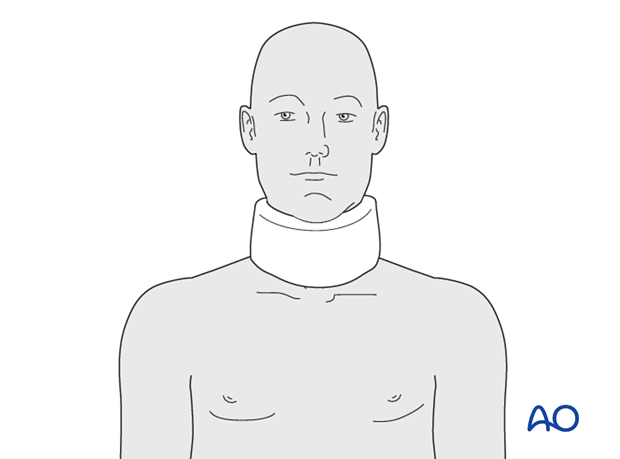
A collar is commonly used following surgical stabilization to moderate patient activity.
The purpose of a collar is to prevent ranges of motion outside of limits deemed unfavorable for fracture healing. Collar is optional.
Patients with intact neurological status are made to stand and walk on the second day after surgery. Patients can be discharged when medically stable or sent to a rehabilitation center if further care is necessary. This depends on the comfort levels and presence of other associated injuries.
Patients are generally followed with periodical x-rays at 6 weeks, 3 months, 6 months, and 1 year.
