Posterior Hybrid
1. Introduction
The aims of surgery are to:
- improve the spinal curve,
- improve the three dimensional alignment of the spine,
- prevent progression of the curve in the future
- improve cosmesis
- reduce pain
- optimize pulmonary function
- maintain neurological integrity.
This is achieved by correction of the deformity and creation of a solid arthrodesis of the deformed part of the spine.
To illustrate this procedure, we will use a right thoracic curve.
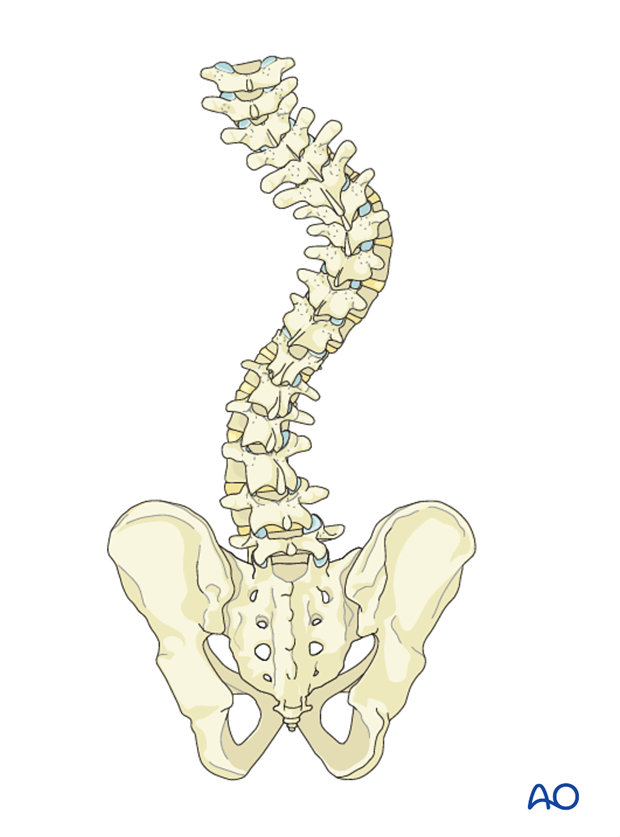
Details on selection of fusion levels can be found here.
2. Approach and preparation
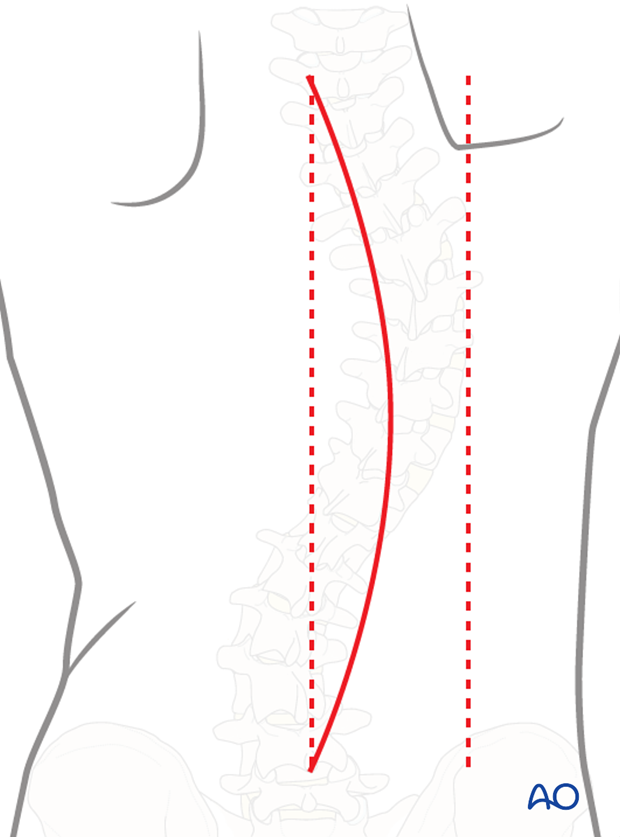
The procedure is performed through a posterior approach with the patient in the prone position. The lengths of the incision will depend on the levels being fused.
3. Hook/screw configuration and placement
The hook configuration and placement may vary depending on levels to be fused. We will here illustrate the principle in a typical T5 to L3 fusion in a Lenke 3 curve.
If for any reason a pedicle screw or hook is not feasible, one may consider the use of sublaminar cables or wires as a substitute. However, compressions and distractions will not be possible with these implants.
In general, pedicle screws should be used for lumbar segments and hooks for thoracic segments.
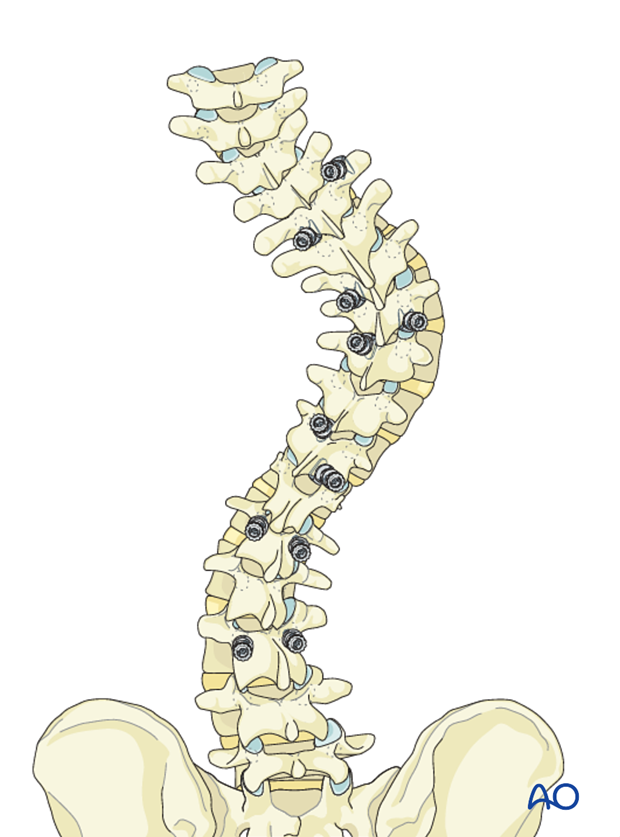
Pedicle screw placement
Pedicle screws are placed bilaterally in the LIV and L1
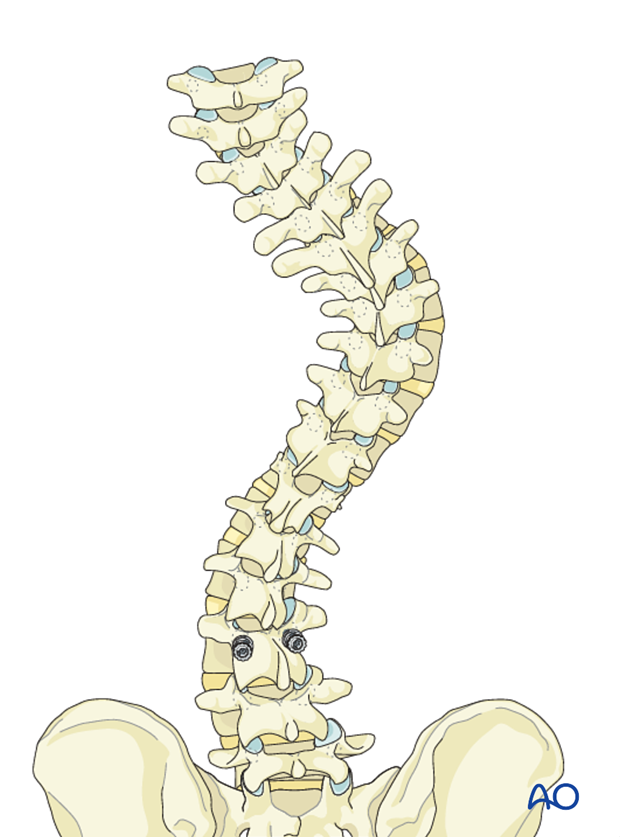
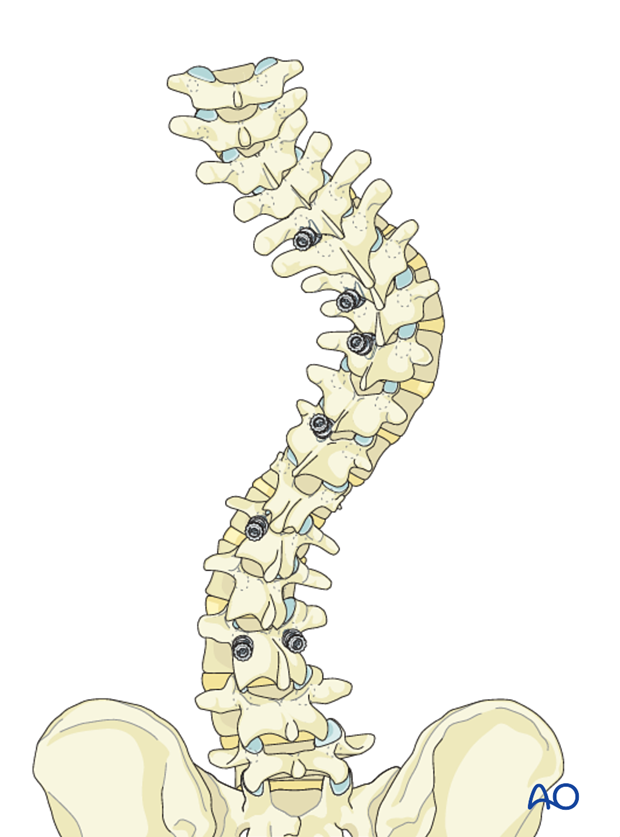
Left side hook placement
For distraction between T5 - T11, and compression between T11-L3, the following hooks are planned:
- Cranially pointing pedicle hooks at T5 and T7.
- Caudally pointing supralaminar hooks at T9 and T11.
- a cranially pointing sublaminar hook can be used at L1 as an alternative to the pedicle screw.
Hook sites are prepared and tested for stability. The hooks are then removed to avoid inadvertent damage to the dura during preparation of other anchor sites.
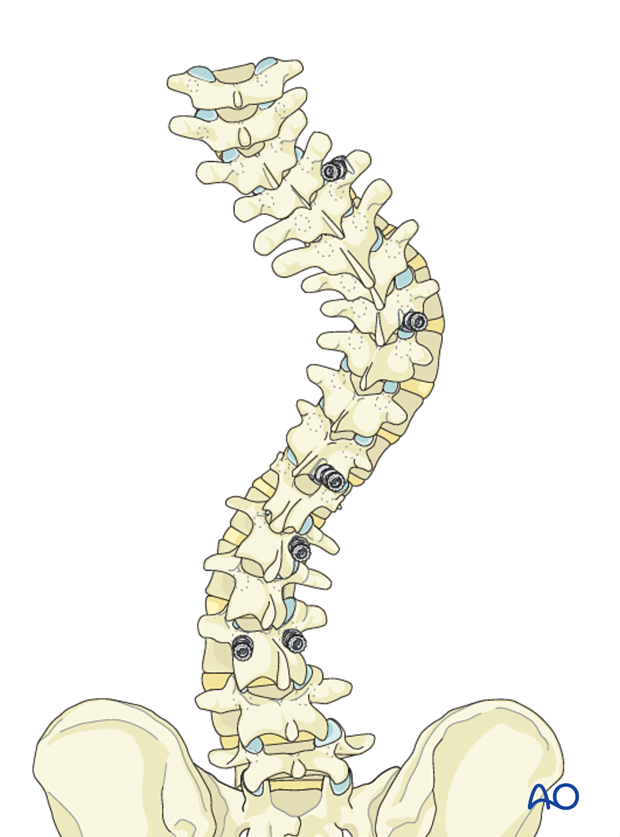
Right side hook placement
For compression between T5 – T11- L3, the following hooks are planned:
- Caudally pointing transverse hook at T5
- Cranially pointing pedicle hook at T8
- Cranially pointing sublaminar hook at T11
- a caudally pointing sublaminar hook can be used at L1 as an alternative to the pedicle screw.
Hook sites are prepared and tested for stability. The hooks are then removed to avoid inadvertent damage to the dura during preparation of other anchor sites.
4. Release
Indications for release
Depending on flexibility findings, the release can be carried out only at the apex of the curve, which is usually the stiffest, or the whole length of the instrumented spine.
A release is generally performed if the spine cannot easily align to the rod during surgery. This can be predicted preoperatively based on the bending X-ray. For stiff curves, fulcrum bending X-ray and the traction X-ray under general anesthesia is the method of choice for determining flexibility.
A soft tissue release can be performed by removal of the interspinous ligaments along with the midline ligamentum flavum of the apical regions of the deformity. If additional release is desired, then formal Posterior Column Osteotomy (PCO) can be performed at the same levels. PCO is also called SPO (Smith-Petersen osteotomy) or Ponte osteotomy. The shaded area to the left outlines the bony resection performed during a PCO.
All posterior releases begin by resecting the inferior aspect of the spinous process, followed by removal of the interspinous ligament utilizing a standard rongeur.
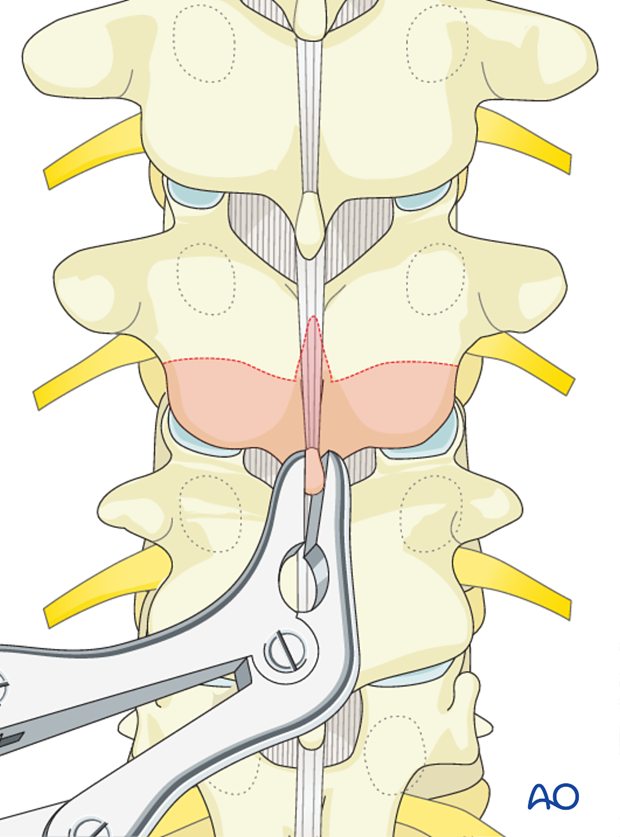
Removal of the 3-5 mm of the inferior aspect of the inferior facet joint is performed at each level of the planned fusion using an osteotome.
The ligamentum flavum is removed with a Kerrison rongeur beginning in the midline and exiting lateral until abutting against the medial aspect of the superior facet. It is important not to penetrate deeply against the dura or tear the dura.
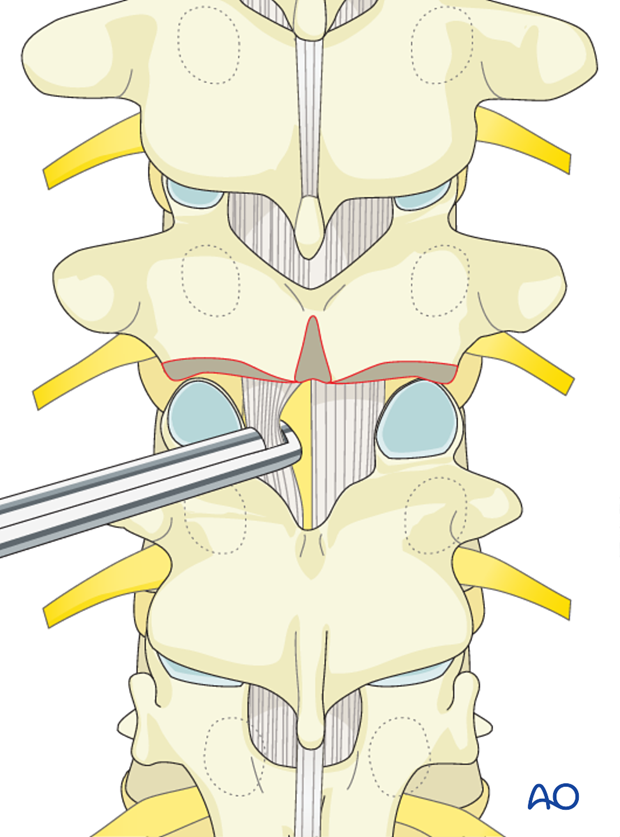
Care should be taken not to tear the dura particularly on the concavity of the curve where the neuro tissues preferentially lie.
A Kerrison rongeur is utilized to remove the most cephalad portion of the superior articular facet exiting out lateral into the neuroforamen. This completes the PCO and is usually repeated at other levels.
Epidural bleeding within the neuroforamen is controlled with hemostatic agents and cottonoid packing.

5. Facet joint fusion
The inferior articular facet is removed with an osteotome exposing the articular cartilage of the superior articular facet.

Remove the articular cartilage from the superior articular facet using a gouge or a curette.
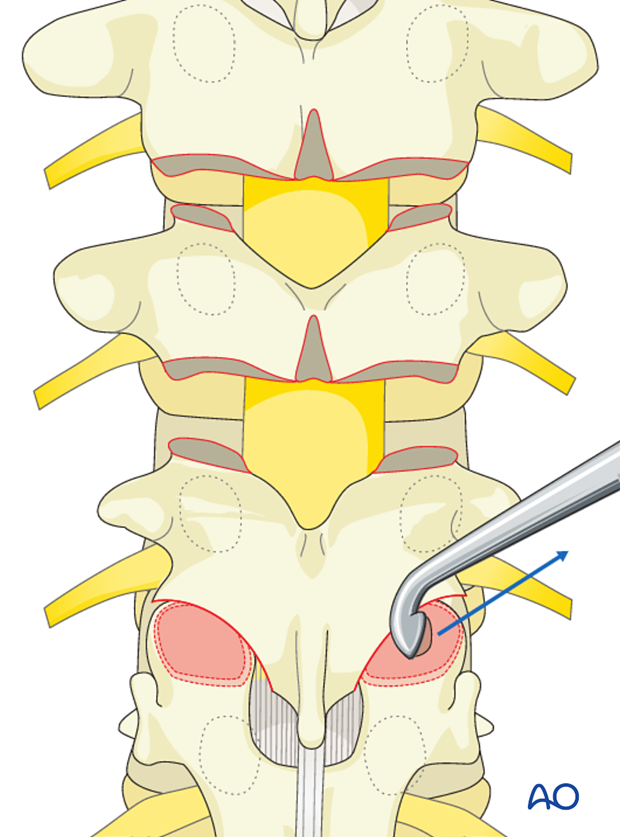
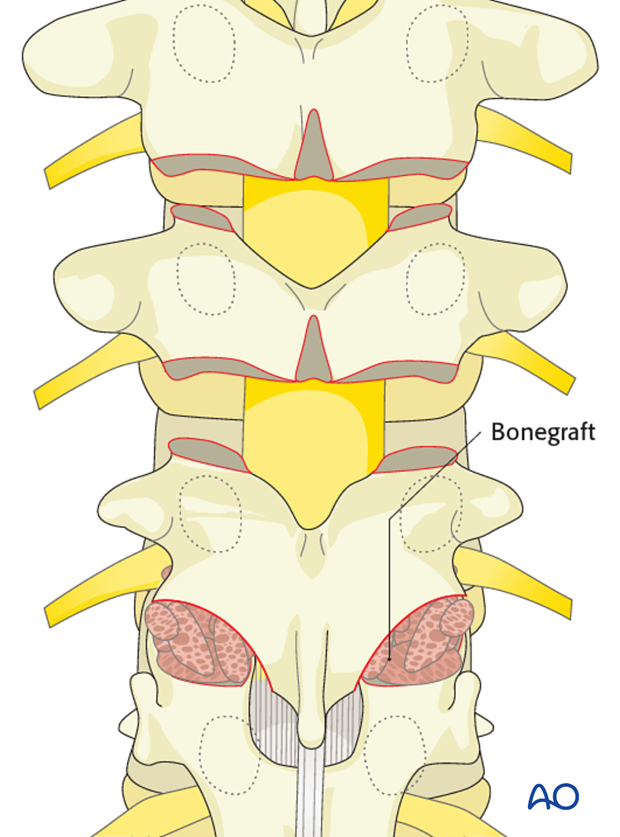
Insert pieces of bone graft (autograft, allograft, or bone substitute) into the decorticated facet joint for arthrodesis.
These steps are repeated for all the levels on both sides.
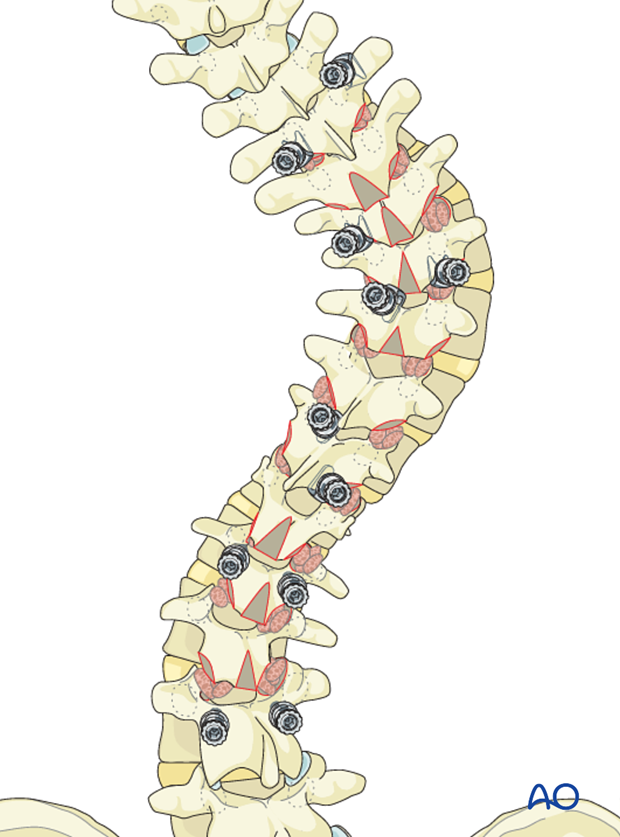
6. Hook insertion
The hooks are inserted in the prepared sites as planned.
7. Left rod
Rod insertion
The concave rod is bent to the appropriate thoracic kyphosis as preoperatively planned with the appropriate transition into lordosis of the thoracolumbar junction as necessary.
The amount of thoracic kyphosis bent into the left rod will be based on:
- curve size
- curve flexibility
- number and purchase of bone anchors
- size and material of the rod utilized.
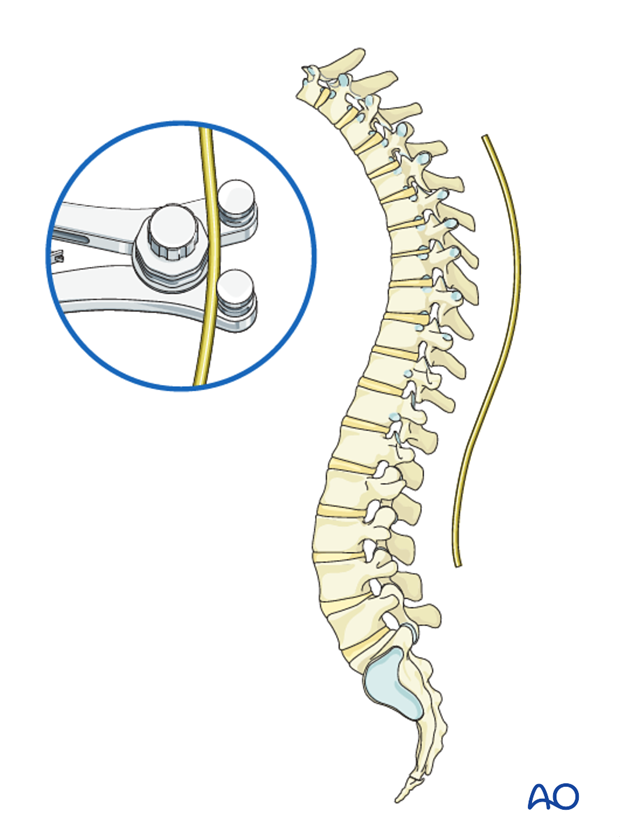
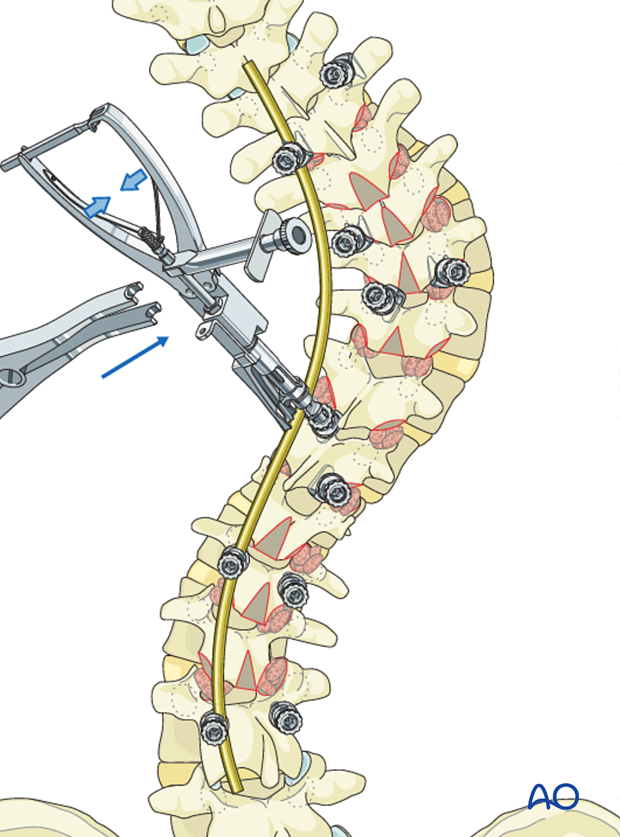
Starting with the most cranial hook (T5) the rod is connected to the hooks on the concave side of the thoracic and convex side of the lumbar curve including the L3 pedicle screw conforming to the two deformities without being locked.
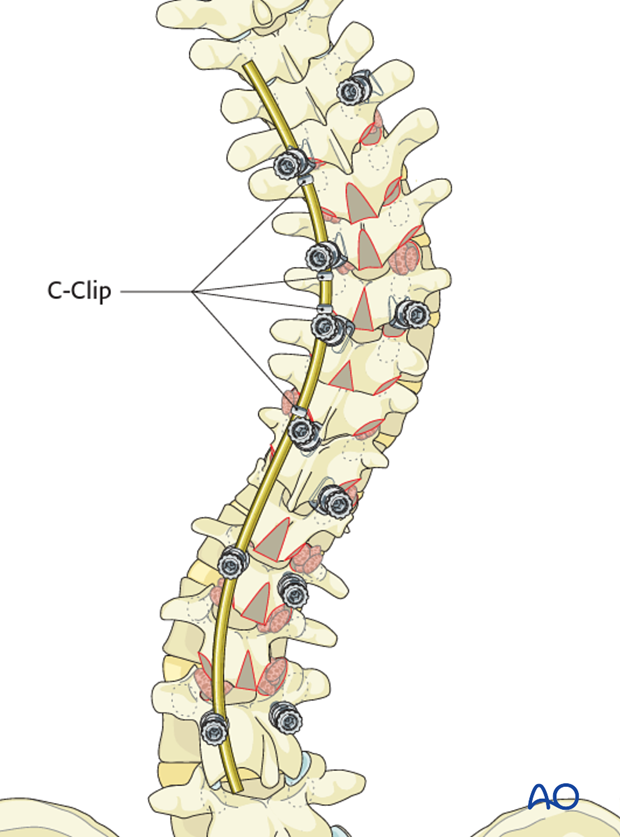
One should ensure that the hooks do not back out during rod rotation. A temporary C clip or rod grippers may be applied behind the hooks to prevent this.
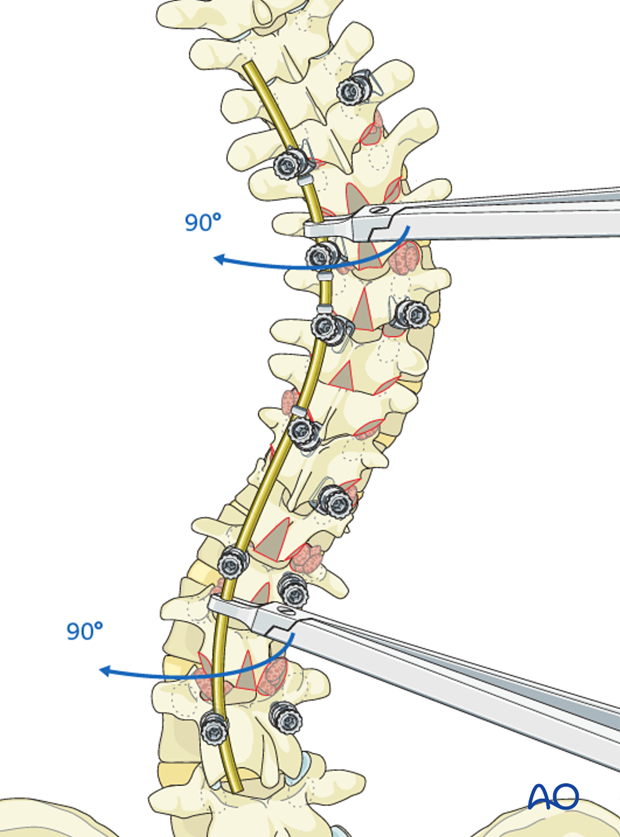
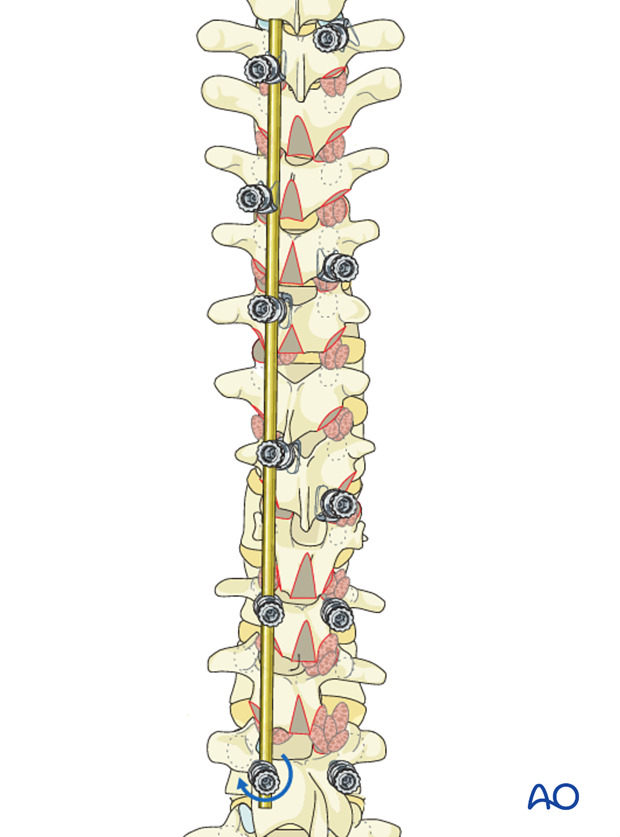
Rod holders are then applied onto the rod and the rod is rotated 90° around its axis correcting the scoliosis, and restoring the kyphosis in the thoracic spine and the lordosis in the lumbar spine.
This rod-rotation maneuver should be performed slowly and cautiously with careful attention to both the implant-bone interface to avoid pullout, and to the neuromonitoring signals.
The rod is locked to the caudal screw (L3) to prevent the rod from rotating back. The other hooks and screws are kept unlocked.
Compression/distraction left rod
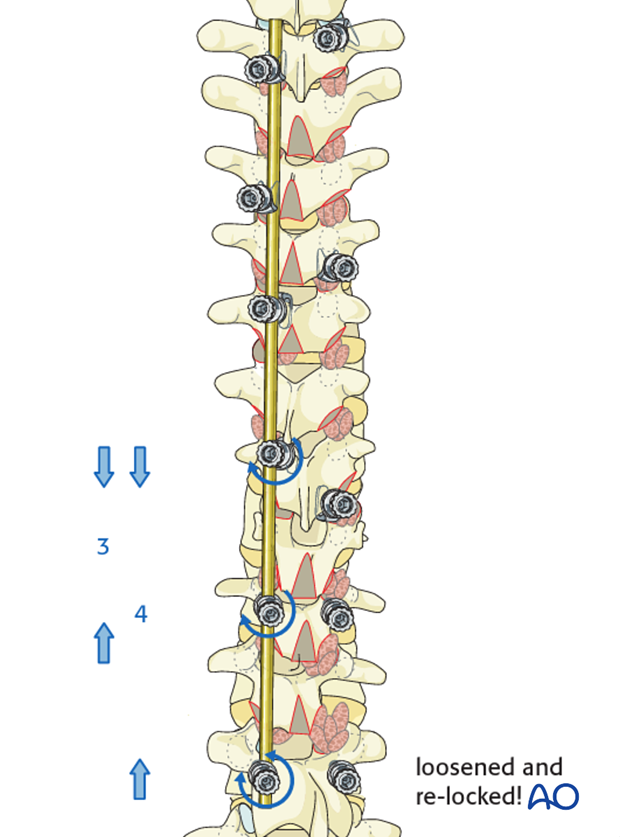
Distraction of the concave side of the thoracic curve and compression on the convex side of the lumbar curve is achieved by following the below sequence:
1. Distraction is first performed between T7 and T9 followed by locking of these two hooks.
2. Distraction is then performed between T5 and T11 followed by locking of these two hooks.
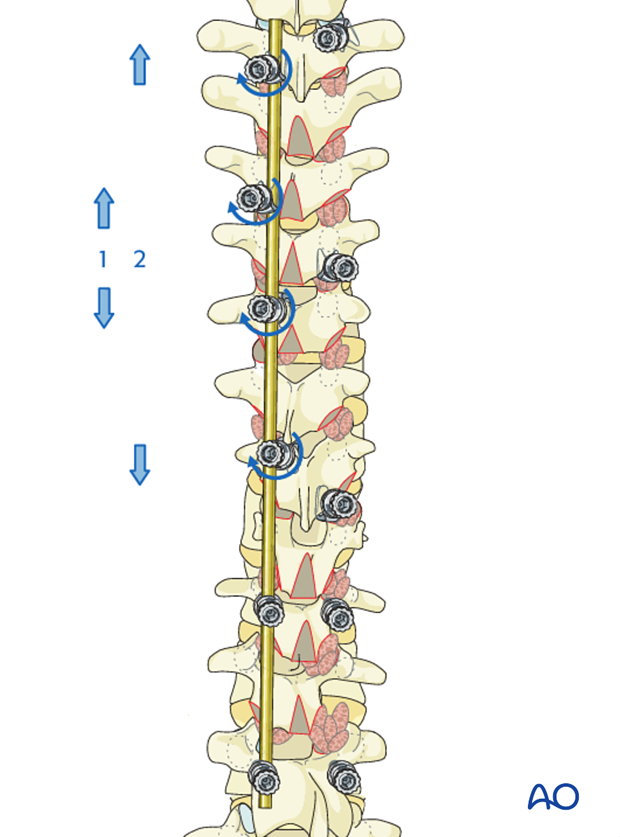
3. Compression between T11 – L1 is performed. The L3 screw is now loosened, and compression is then performed between T11 and L3 to further restore lumbar lordosis.
4. The L3 screw is then re-locked.
8. Right rod
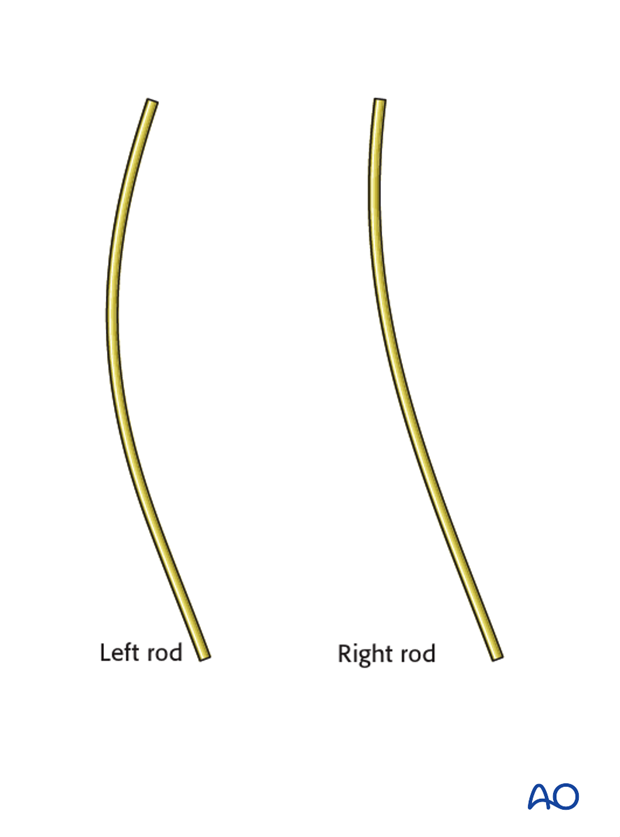
Right rod bending
The right side rod is bent to slightly less kyphosis in the thoracic section and less lordosis in the lumbar section compared to the left side.
The right rod is attached to the most cranial thoracic hook (T5) in its normal sagittal plane and locked.
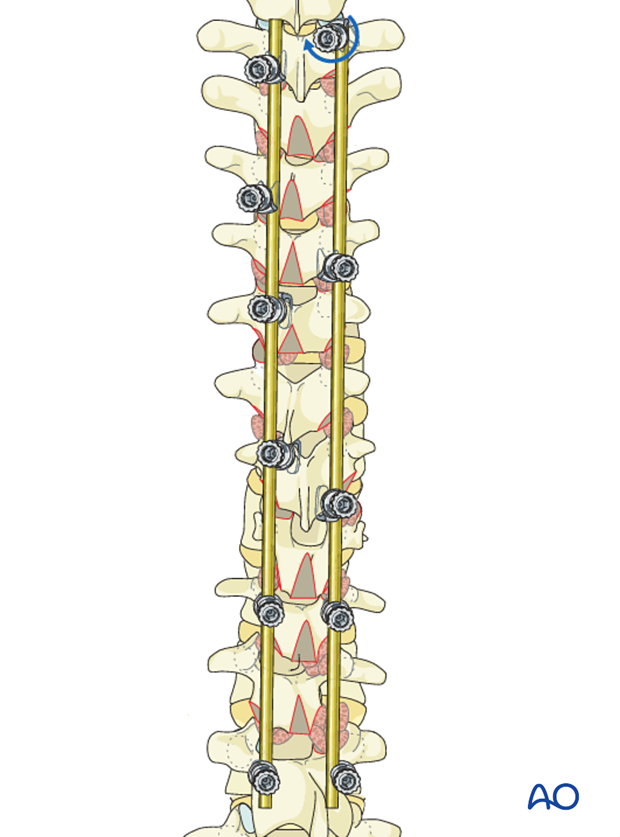
The distal end of the rod is then levered down using a rod holder and is sequentially attached to T7, T9, and T11 hooks. This maneuver will push the thoracic apical hump anteriorly, thereby achieving derotation of the apical segments.
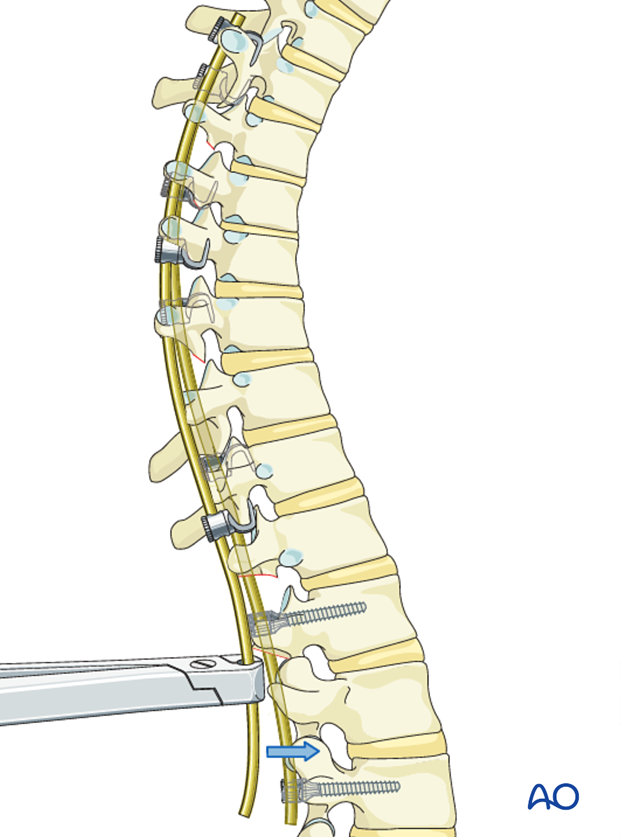
On attaching the right rod to the L1 and L3 screws, the lumbar segment will be lifted dorsally and partially derotated.
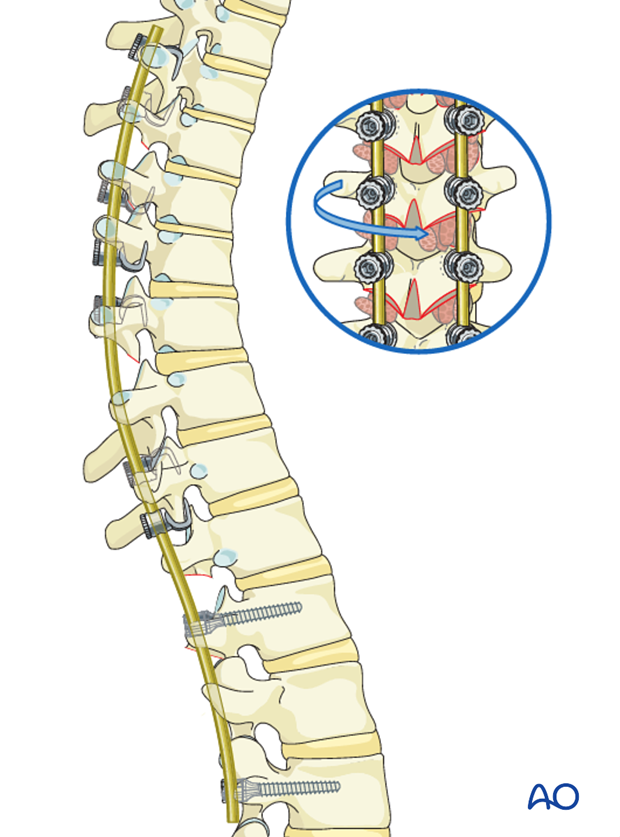
Compression/distraction right rod
Compression on the convex side of the thoracic curve and distraction of the concave side of the lumbar curve is achieved following the below sequence:
- Compression between T5 and T8 hooks are first carried out and then locked. Next, T11 hook is compressed against T8 and locked.
- Distraction is applied between T11 – L1 hook/screw, and then between L1 - L3.
Over distractn should be avoided because it will flatten the lumbar lordosis.
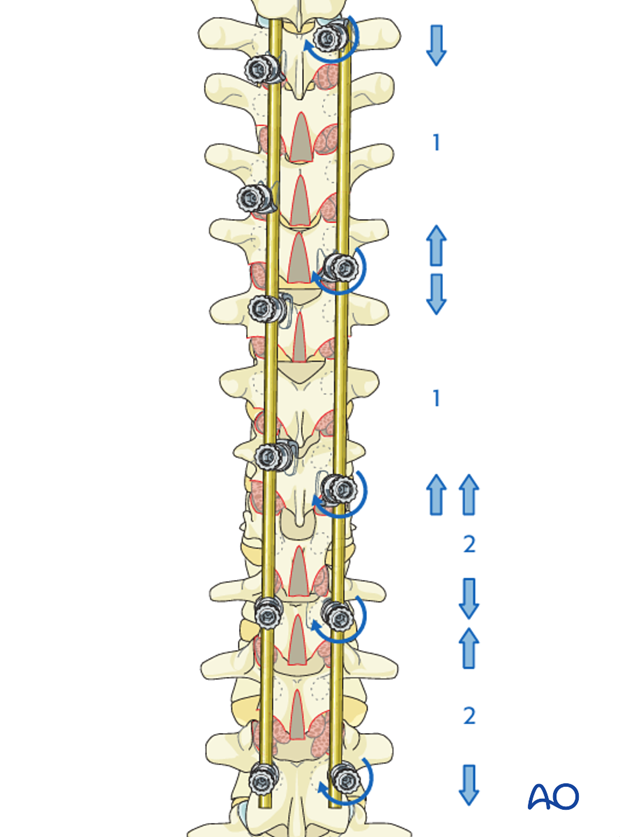
9. Spinal fusion
Decortication
The laminae and the transverse processes are decorticated with an osteotome.
Care should be taken to always point the osteotome away from the spinal canal.
Alternatively, the decortication may be performed with a powered burr.
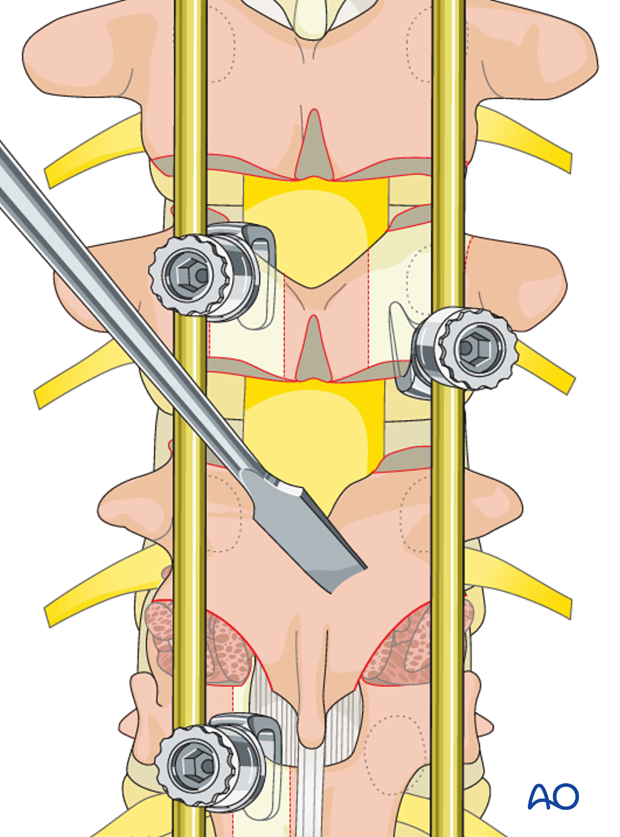
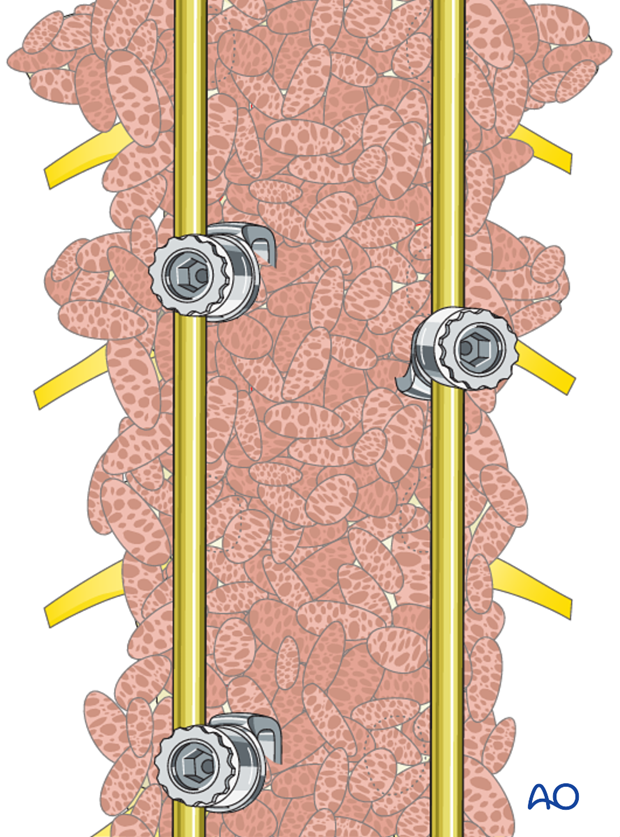
Bone grafting
Bone graft (allograft, autograft, or bone substitutes) is copiously placed over the entire decorticated area.
10. Transverse rod connectors
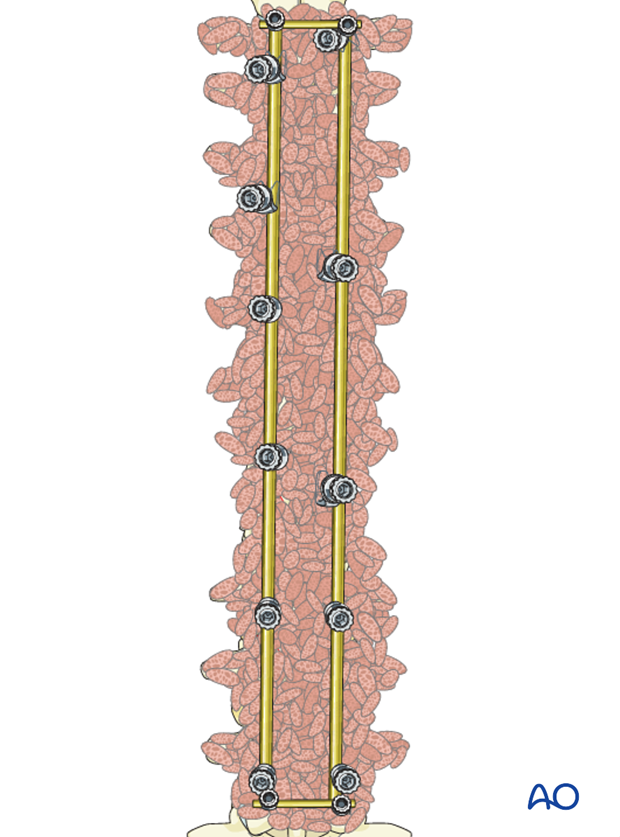
Transverse connectors are then inserted one at each end of the construct.
11. Intraoperative imaging
At some point prior to wound closure intraoperative imaging should check:
- Fusion levels
- Screw position
- Overall coronal and sagittal correction and alignment
12. Aftercare following correction of spinal deformity
Immediate postoperative medication
Intravenous antibiotics are administrated for at least 24 hours, depending on hospital protocol. The use of an epidural pain catheter vs. intravenous patient controlled analgesia (PCA) are utilized for acute pain management.
Mobilization
Early mobilization out of bed, is preferably started the day after surgery. Generally a postoperative brace/orthosis is not required.
Postoperative imaging
It is appropriate to obtain upright PA and Lateral xrays of the patient at some point early postoperative either before the patient is discharged from the hospital or at the 1st postoperative visit as an outpatient
Restriction of activities
To allow the bone to heal and form a solid arthrodesis, some restriction of sports activities, especially contact sports, is usually advised for 6 months.
Postoperative complications
Early postoperative complications include:
- Postoperative wound infection
- Urinary tract infection
- Respiratory complications such as pneumonia
Late postoperative complications include:
- Pseudarthrosis with loss of correction
- Late deep wound infections
- "Adding on" which is progression of scoliotic deformity in the non-instrumented spine.
- Crankshaft phenomenon (progression of scoliotic deformity within the instrumented spine).
- Implant failure or other implant related complications
In the long term adjacent segment degenerations above and below the instrumented spine may occur.


