MIO - Bridge plating
1. Principles
Bridge plating
Bridge plating uses the plate as an extramedullary splint, fixed to the two main fragments, while the intermediate fracture zone is left untouched. Anatomical reduction of the shaft fragments is not necessary, but it is essential to restore length, axial alignment and rotation.
Furthermore, direct manipulation of the intercalary fragments risks disturbing their blood supply. If the soft-tissue attachments are preserved, and the fragments are relatively well aligned, healing is predictable.
Alignment of the main shaft fragments can usually be achieved indirectly, utilizing traction and soft-tissue tension.
If the fibula has a simple fracture pattern, direct reduction of this fracture can provide an indirect reduction of the tibia, establishing length and approximate rotational and axial alignment. For this reason, plate fixation of the fibula is commonly performed prior to bridge plating of appropriate tibia fractures.
Mechanical stability, provided by the bridging plate, is adequate for indirect healing (callus formation).
This minimally invasive surgery requires the use of an image intensifier.
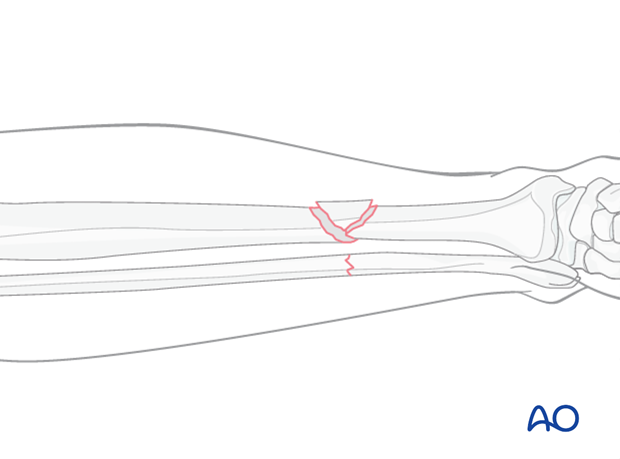
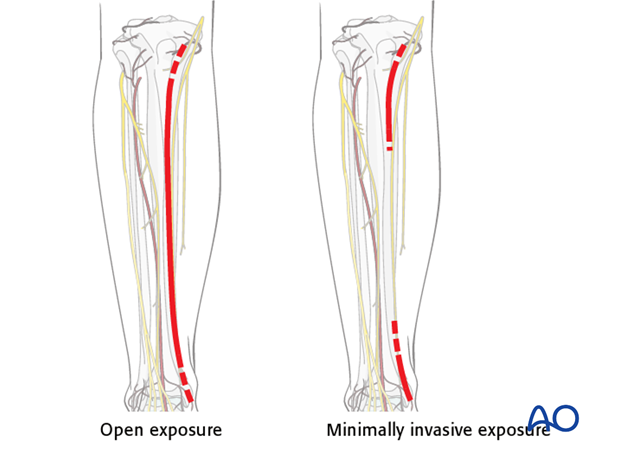
Bridge plating: open vs. MIO
Bridge plates can be inserted either with an open exposure that respects soft-tissue attachments to the fractures, or through a minimally invasive (MIPO) approach that leaves soft tissues intact over the fracture site.
In the latter case, incisions are made proximally and distally, and the plate is inserted through an extraperiosteal tunnel. This should be done with fluoroscopic monitoring.
Reduction
It is important to restore length, axial alignment and rotation.
Exceptionally, a large fragment has been separated from the fracture with a sharp end impaled in the adjacent muscle. The widely displaced fragment should be repositioned either directly or indirectly. Be careful to preserve the soft-tissue attachments.
2. Patient preparation and approaches
Patient preparation
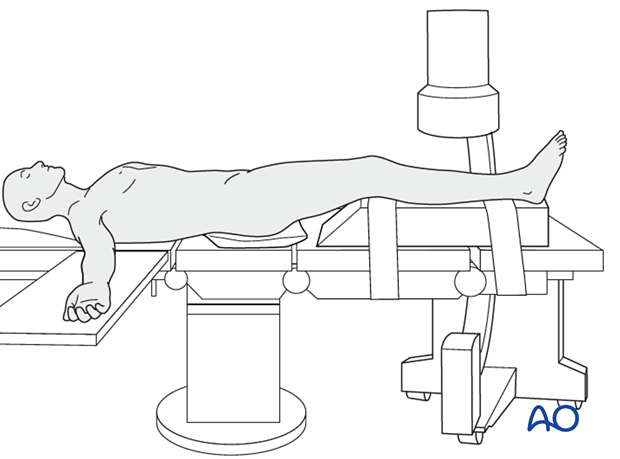
The patient is in a supine position on a radiolucent table or a standard operating table with a radiolucent extension. A pad is placed underneath the buttock to prevent external rotation.
A large foam bolster or cushion is placed under the affected leg to raise it above the opposite leg and facilitate lateral C-arm images.
Approaches
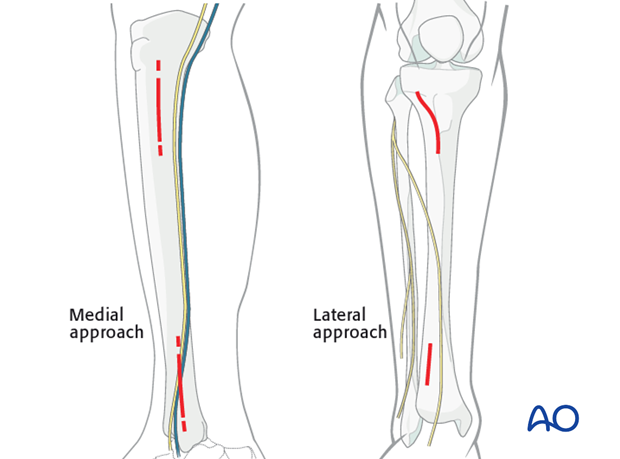
If the soft tissues allow, a medial approach is preferred because it is easier to pass the screws percutaneously with less soft-tissue interference.
The lateral approach should be chosen if the medial soft tissues are significantly injured.
3. Reduction
Reduction principle
The key to all reduction is restoring axial length.
Ways of gaining length are:
- Manual traction
- Distractor/external fixator
- Articulated tension device (ATD)
- Push-pull screws.
These techniques may be used alone or in combination.
Manual traction
Apply longitudinal traction to the foot.
After correct length and axial alignment have been achieved, evaluate and correct the rotational deformity. One should determine the correct rotation from the uninjured extremity preoperatively.
Manual traction can be effective in fresh fractures; however it may be ineffective in fractures with soft-tissue contractures, significant shortening or early fracture healing.
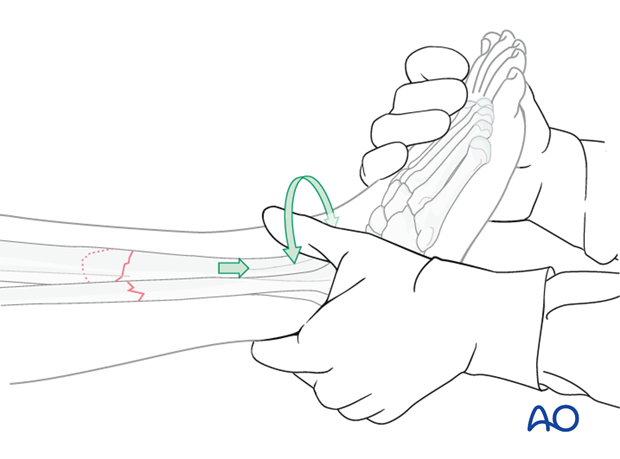
Large distractor or external fixator
If manual traction is not successful, use a large distractor for closed reduction. Place a Schanz pin in both proximal and distal fragments. Distraction is applied across these pins by turning the nut on the threaded rod.
If the plate is to be placed medially, then the distractor should be placed anteriorly.
Note: The pins must be placed in the same anatomical plane, so that when the distractor is attached, rotational alignment of the tibia is correct. With the distractor in place, rotational alignment is hard to change.
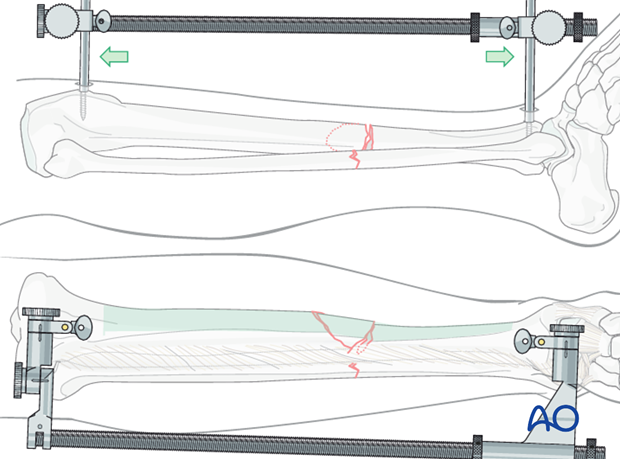
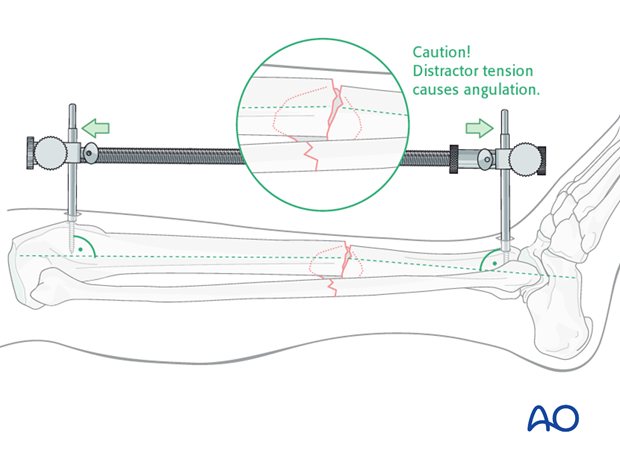
Pitfall
With significant tension of the distractor, the fracture may angulate, with concavity on the side opposite to the distractor.
If the distractor is medial, it can produce valgus. If it is anterior, it can cause flexion (apex-anterior angulation) at the fracture, as shown here.
If the surgeon recognizes this problem, it can be corrected by adjusting the distractor pin clamps to favor the opposite deformity.
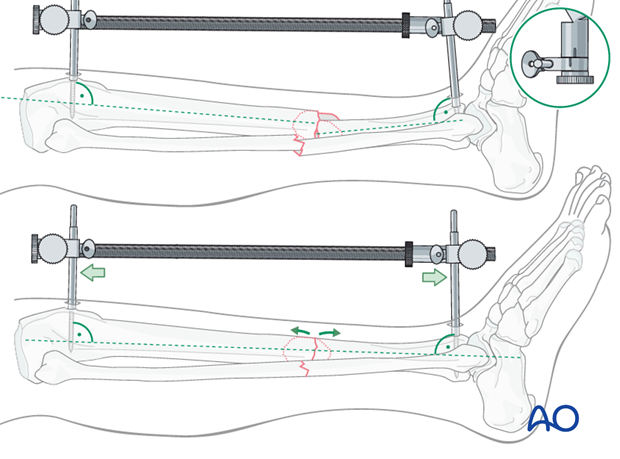
Solution
The distractor or external fixator pins can be adjusted to correct the angular deformity. When the distractor is lengthened, tension is asymetrically applied to the soft tissues, so that angulation is produced at the fracture. The side opposite the distractor becomes concave.
As shown here, the distractor pin-clamps have been angulated to produce apex-posterior angulation.
As tension is applied, length is restored, and the apex-posterior deformity is corrected.
Alternative: Articulated tension device (ATD)
To use the ATD, in distraction mode, a precontoured plate is applied to one of the main fracture fragments. The distracting forces are then applied with the ATD against the opposite end of the plate.
This technique is a valuable supplement for completing a reduction that has begun with the distractor.
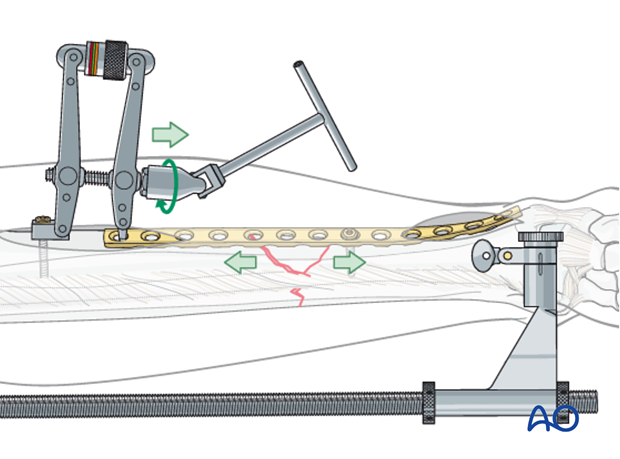
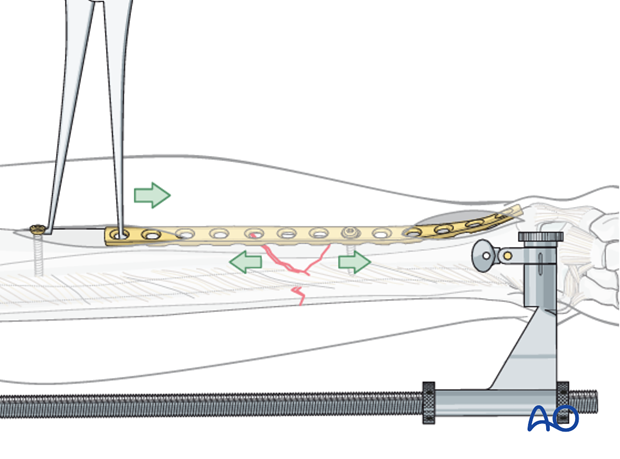
Alternative: Push-pull screw
A precontoured plate is applied to one of the main fragments. A bicortical screw is then placed near the free end of the plate and the bone spreader is used to apply distraction force between the screw and the plate.
Rotation
Rotational alignment must be considered during application of any of the previous reduction methods.
The distractor or simple external fixator are uniplanar devices. Rotation of the fracture fragments cannot be adjusted significantly once the pins have been placed and attached to the device.
Thus, the pins should be placed so that when they are in the same plane, the fracture is reduced.

4. Plate selection and preparation
Choice of the plate
Plate length is based upon symmetry above and below the fracture zone. At least 3-4 screw holes on either side of the fracture are necessary.
Another guideline, when fracture location permits, is that the plate should be roughly three times the length of the fracture zone.
Generally, longer plates with less screws are most effective.
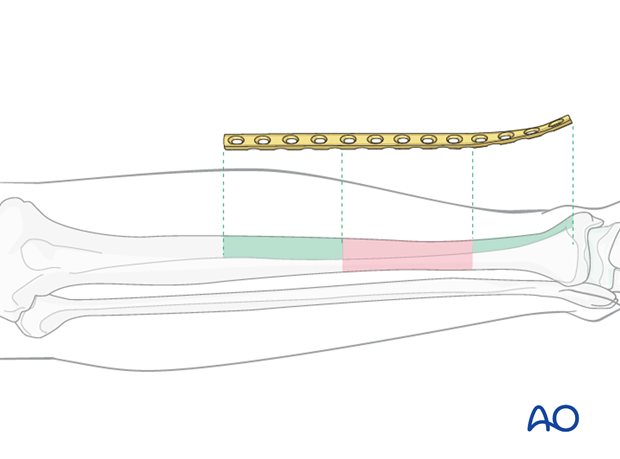
When the fracture zone is very distal or proximal, there may not be room enough for symmetric plate length in the segment nearest the articular surface. In this situation, a plate with multiple hole options in the metaphysis is chosen to improve fixation in the short periarticular segment.
A locking plate may be indicated if the bone quality is poor or when the fracture extends into softer metaphyseal bone.
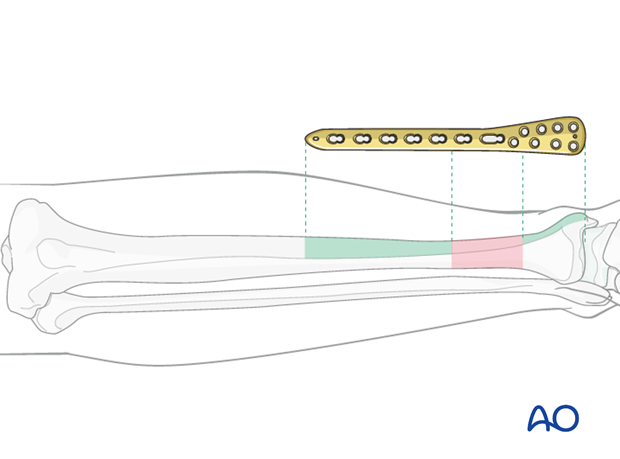
Traditionally a 4.5 mm plate has been advised for the tibial shaft. Its advantages include increased plate thickness and larger screw size for added strength. These plates are, however, more difficult to contour and may be too prominent.
A 3.5 mm plate offers improved contourability and multiple screw options in metaphyseal (end-segment) zones. However, they are less durable than the large fragment plates.
Another consideration is the choice between an anatomically precontoured plate or one which the surgeon contours. For plates which need to be contoured, the following steps have to be employed.
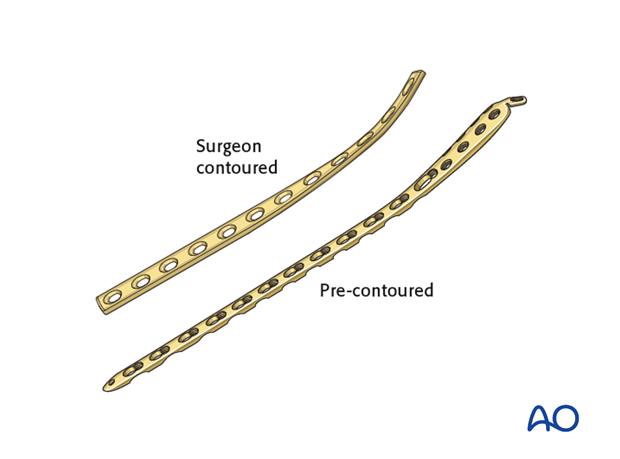
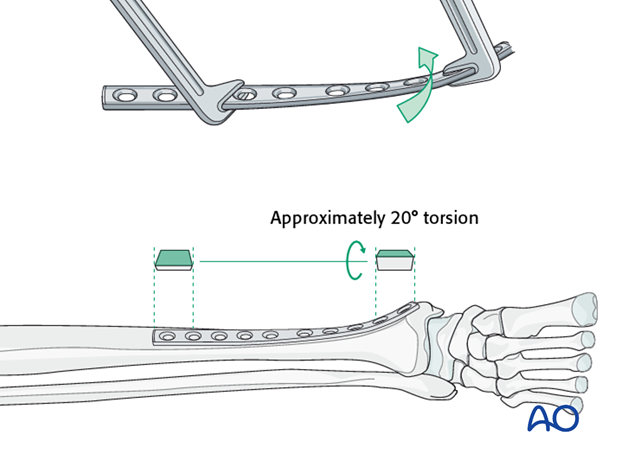
Twisting the plate
The anteromedial surface of the tibial shaft twists internally approximately 20° as it approaches the medial malleolus.
The first step of plate contouring is to twist the plate so it matches the tibial surface upon which it will lie.
If the plate is bent before it is twisted, the process of twisting will alter the bend that has been created.
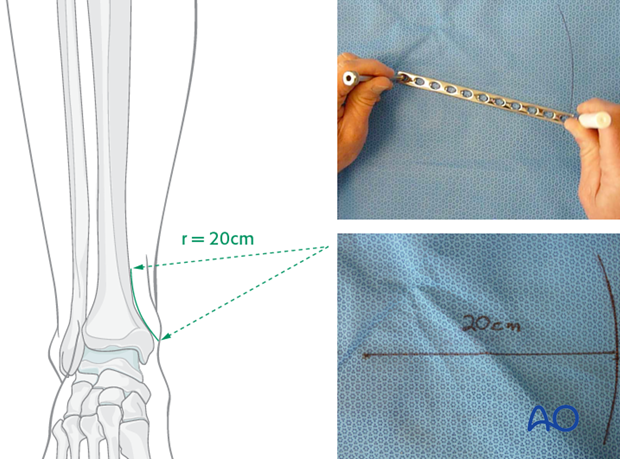
Matching the curvature
Depending upon the plate location, more or less bending of the plate will be required to match the contour of the intact (or reduced) bone. Much of the medial tibial shaft is quite straight, so that little bending is required. However, the distal medial surface has a significant concavity, with a typical radius of curvature of 20 cm as illustrated.
Such a 20 cm radius can be drawn on a sterile drape and used as a template for plates to be used in this location.
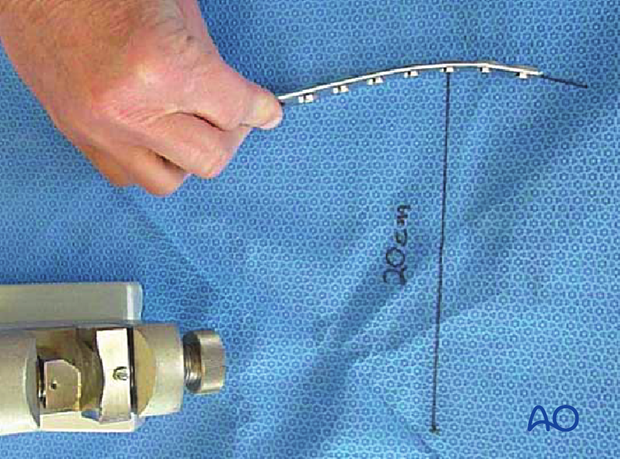
Bending the plate
The plate can be bent with bending irons alone, but it is preferable to bend with a bending press, because the press gives more control.
In either case, the bending is done in small steps to produce a smooth contour. Contouring only takes place over the distal 10-12 cm of the plate. When finished, the plate should match the 20 cm radius of curvature.
5. Fixation
Plate application
A properly contoured plate will help to reduce the fracture. Generally speaking, the plate is applied first with one screw to the smaller of the two major fragments, usually the distal fragment. This will still allow some adjustment of the plate in the sagittal plane.
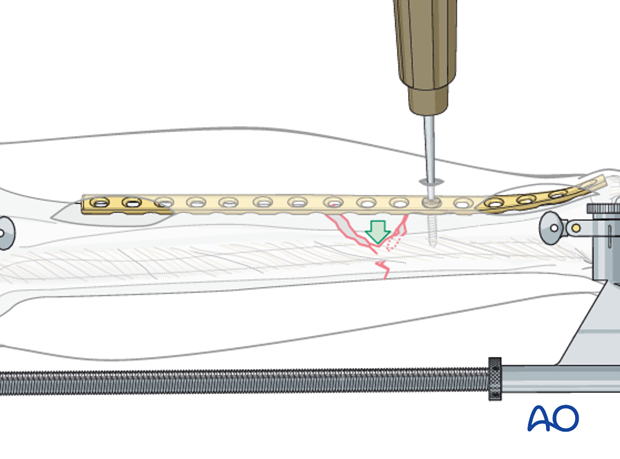
Plate as reduction aid
The plate is then used to aid reduction of the distal main fragment to the proximal main fragment, by bringing the properly contoured plate, along with the distal fragment, into position against the proximal fragment.
Confirm reduction and plate position with image intensification. Remember to check external appearance for alignment, particularly rotation.

Finish plate fixation
If reduction and plate position are satisfactory, insert the second screw into the opposite main fragment. This screw and all subsequent screws are put in a neutral load mode.
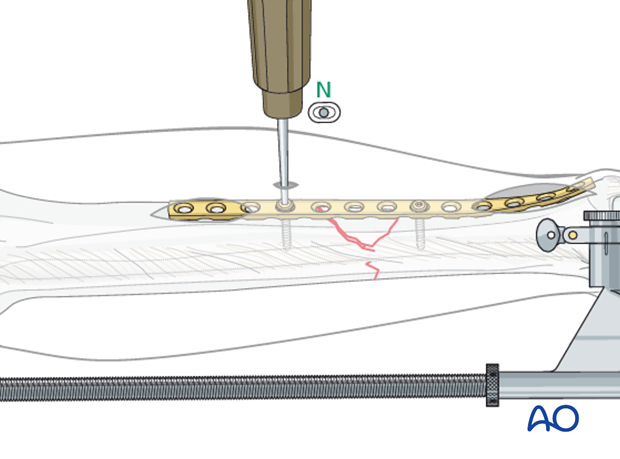
Insert the remaining proximal and distal screws, using at least two screws on each side of the bridged fracture zone. More screws may be safer with osteoporosis or unreliable patients. Unless bone quality is very poor, there is little evidence to support use of locking screws in the diaphysis.

Locking plate
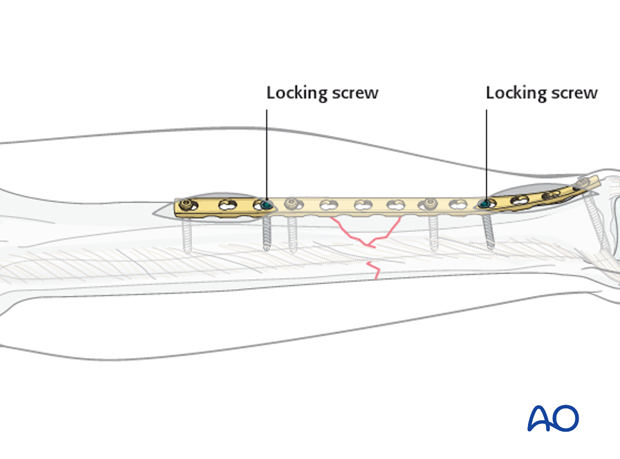
If a locking plate is used, placing the locking screws directly adjacent to the bridged zone should be avoided.
Notice in this illustration that non-locking screws are the ones closest to the fracture site.
But the long working length segment is probably much more important for avoiding fixation failure than is the screw type.
6. Aftercare of tibial shaft fractures
Weight bearing
If weight bearing without plaster is not advisable or possible, a walking cast is a better option than unprotected walking completely without weight bearing.
After intramedullary nailing, weight bearing is allowed in an earlier phase (immediately postoperatively) compared to plate fixation. After the latter, progressive weight-bearing is usually possible after 8-12 weeks.
If external fixation is considered as the definitive device, weight bearing starting at 10–15 kg should be encouraged early, as in plate fixation.
As soon as callus formation is visible and once there are no clinical signs of instability, the patient can start to bear full weight. After removal of the external fixator, it may be prudent to protect the leg temporarily in a splint or brace.
Follow-up
After suture removal 2 weeks after surgery, the patient should be seen every 4-6 weeks in follow-up with examination and x-rays until union is secure, and range of motion and strength have returned.
Inspection of external fixators every two weeks is optional.
Hardware removal
Interlocking screws are always removed.
As far as plates create stress raising, removal is advisable. The earliest time of implant removal being two years postoperatively.


