Fracture management with limited resources
1. General considerations
The primary goal of treatment for tibial shaft fractures is to restore normal anatomy (“reduction” ie, realignment of the fracture) and normal function of the leg. Treatment should be effective and should avoid unnecessary risks.
Essential operative treatment
Operative fracture management
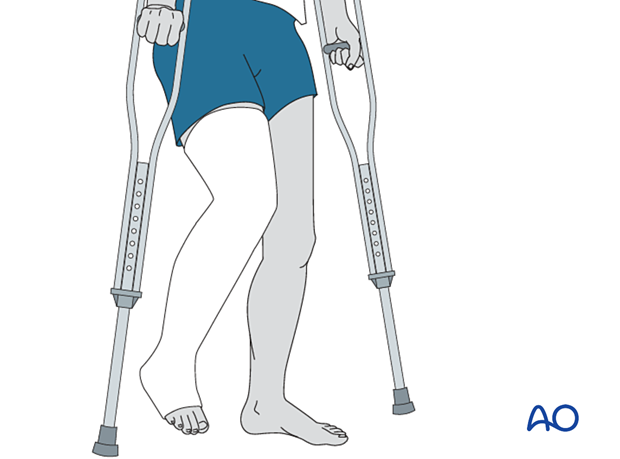
Operative treatment of displaced unstable tibia shaft fractures is the treatment of choice if the necessary skills and equipment are available.
Nonoperative fracture management
Nonoperative treatment of these injuries is chosen when safe, appropriate operative treatment is unavailable.
Non-operative treatment options to immobilize the fracture include splints, traction, or in most cases circular plaster of Paris (POP) casts. Splints are used as a first aid emergency treatment or for short term initial management.
Fiberglass/resin cast material is an alternative to plaster of Paris. It is more expensive but is also more durable and lighter. If available, a thin layer of fiberglass may be used to reinforce a plaster cast.
2. First aid for tibial fractures
The ABCs of primary care for the injured always take precedence over fracture treatment. Once the safety of the patient is established, attention is turned to the fracture.
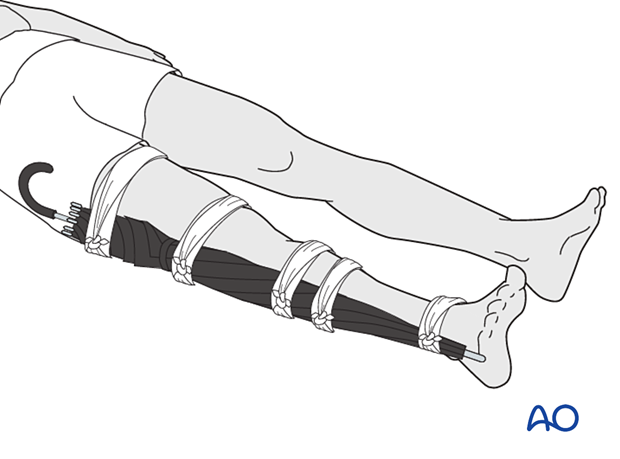
An important step in treating a tibia shaft fracture is to promptly realign the deformed leg and splint it in the corrected alignment. Splinting can be done with two firm boards or sticks alongside the leg, from above the knee to below the ankle.
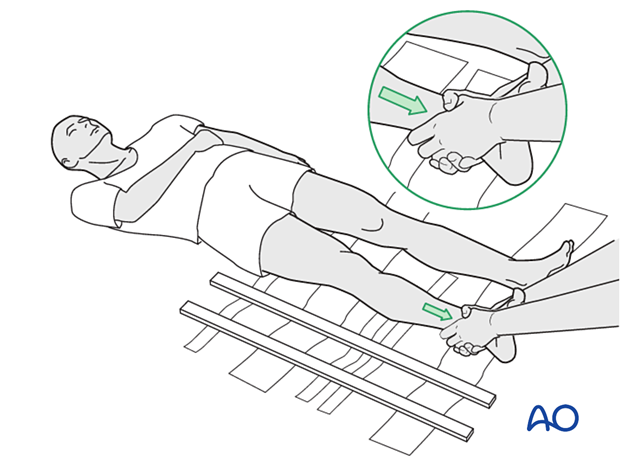
It is essential to apply padding between a splint and the injured leg. Any soft material such as clothing, blankets, etc. can be used as emergency padding.
The splints should then be held together by bandages around both splints and the leg.
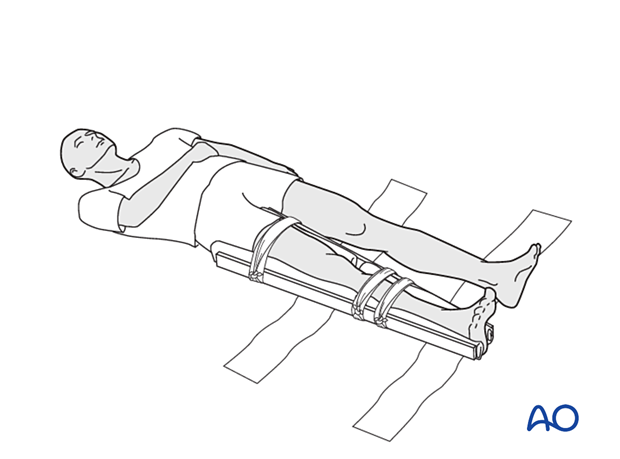
Additional stabilization can be achieved by splinting the fractured leg to the normal contralateral lower extremity.
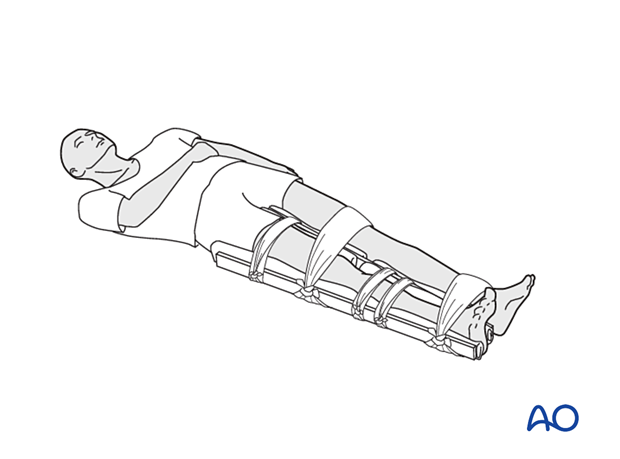
Any padded splintage is better than none, but circumferential wraps must not be so tightly applied that they interfere with blood flow.
3. Open fractures
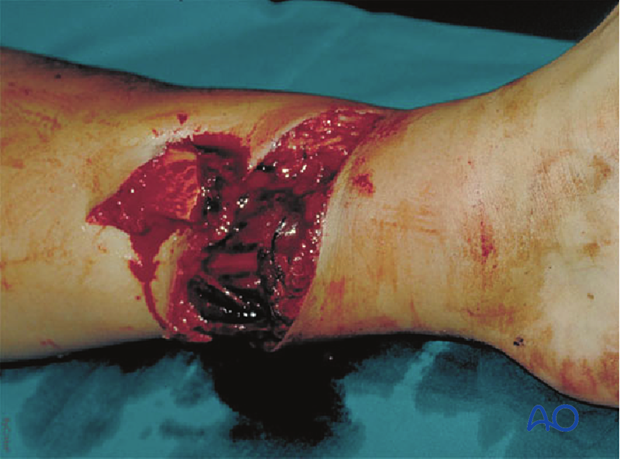
For open fractures, the wound should be covered with the cleanest material available, preferably a sterile dressing.
This initial temporary cover should not be disturbed until the patient is in the cleanest available hospital setting.
Wound debridement
Adequate surgical debridement is essential to decrease the risk of infection, a major concern for all open fractures. The dressing and splint should remain in place until the patient is anesthetized for debridement in the operating room. Debridement involves excising dead tissue, removing foreign material, and thorough irrigation of the soft tissue envelope and bone. Unless the open wound can be sutured in a tension-free manner, wound closure is delayed, and the wound is covered with a moist sterile dressing. Post-debridement immobilization is typically provided with skeletal traction, splints, or circular cast, but if available, a properly applied external fixator is often better.
4. Calcaneal pin traction
Application of calcaneal pin traction
If an external fixator is not available, open fractures, especially if they need repeated wound care, can be treated in the short term with calcaneal pin traction on a Braun frame.
Skeletal traction on a Braun frame is also valuable for maintaining length of unstable multifragmentary closed tibial fractures (those for which stability cannot be restored with realignment alone).
Calcaneal pin insertion
If the patient is not under general or regional anesthesia, a traction pin is inserted under local anesthetic (eg, 2% lidocaine, 5 ml on each side of the calcaneus) 2 cm below and 2 cm behind the medial malleolus in the calcaneus.
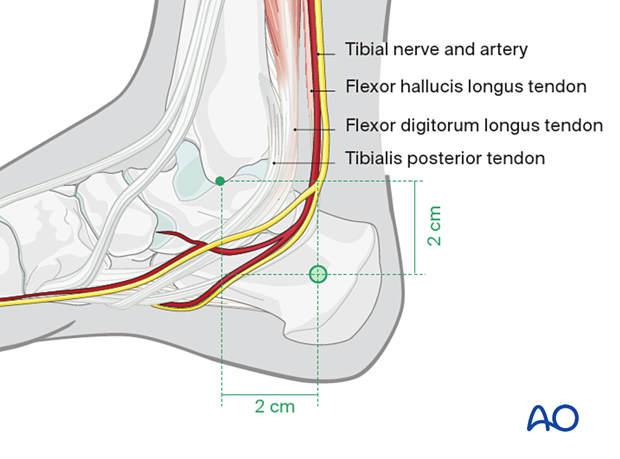
A stirrup is then attached to the pin; it is important that the stirrup is able to rotate around the pin to prevent rotation of the pin in the bone.
Rotating pins loosen quickly. Loose pins significantly increase the risk of pin track infection.
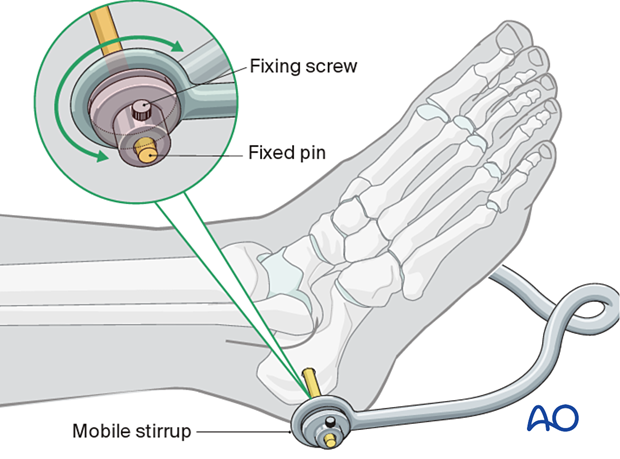
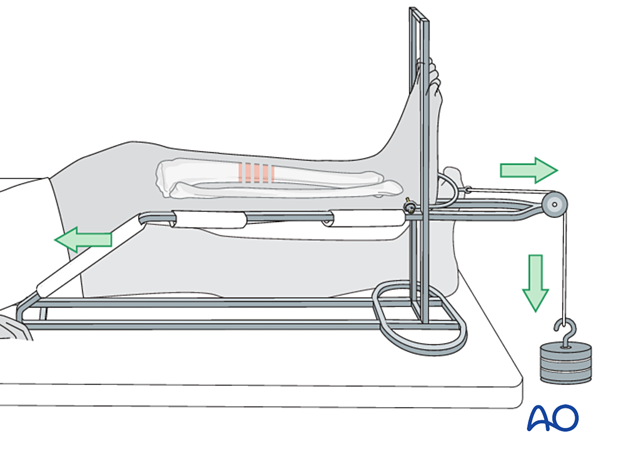
Positioning in Braun frame with 3–4 kg traction
The illustration shows a tibia fracture immobilized with calcaneal traction and supported on a Braun frame. The frame supports the thigh and the proximal tibial segment. Pressure against the thigh provides counter traction. The traction force, and the frame with its fabric supports, maintain fracture alignment.
The non-elastic fabric supports on the Braun frame are arranged to leave a gap, which allows wound care without changing the position of the leg.
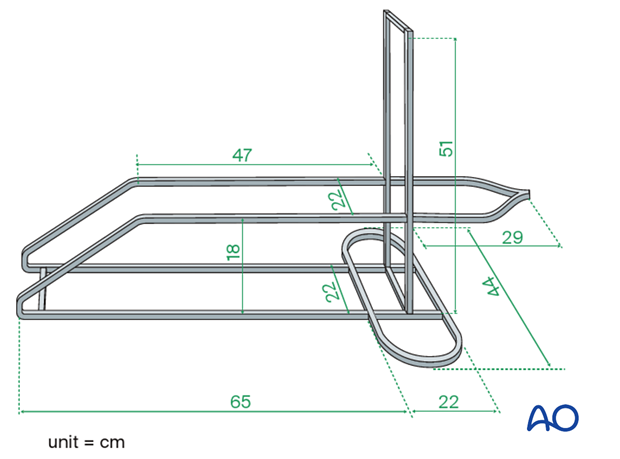
Construction of a Braun frame
Braun frames may be difficult to obtain. A satisfactory Braun frame can be made from metal bar stock (5 mm x 20 mm) as shown in the illustration.
5. Introduction to tibial fracture reduction and cast application
If there is no need for wound care, and the fracture is length-stable, either from its configuration and/or reduction, or after development of sufficient callus, a cast can be applied.
Usually, for a tibial shaft fracture, particularly if proximal, the cast should extend above the knee – a half to two-thirds up the thigh.
Tibia fractures rarely shorten more than the amount present on the initial x-ray (presuming this is obtained without traction). If shortening is greater than 1.5–2 cm, and if a length-stable reduction (transverse; end-on-end and supported effectively by the cast) cannot be achieved, traction, or surgical fixation (external or internal) will be necessary to prevent shortening. Lesser degrees of shortening are usually well tolerated.
6. Preparation for cast application
It is essential to prepare the patient and all necessary material and equipment before beginning the processes of fracture reduction and cast application.
Anesthesia
Both fracture manipulation and motion related to cast application are painful. Fracture reduction is therefore best done with a regional or general anesthetic. If regional or general anesthesia cannot be given, a fresh closed fracture can be anesthetized with sterile injection of local anesthetic into the fracture hematoma.
Required material
The following materials are required:
- Examination couch or table
- 2–4 rolls of 150 mm padding
- 8–9 plaster of Paris (POP) rolls, 150 mm wide
- Bucket full of cool water
- Pillows to support fractured leg
- Aprons to protect team members and patient
- Paper to cover floor
Everything must be assembled and ready before beginning the procedure.
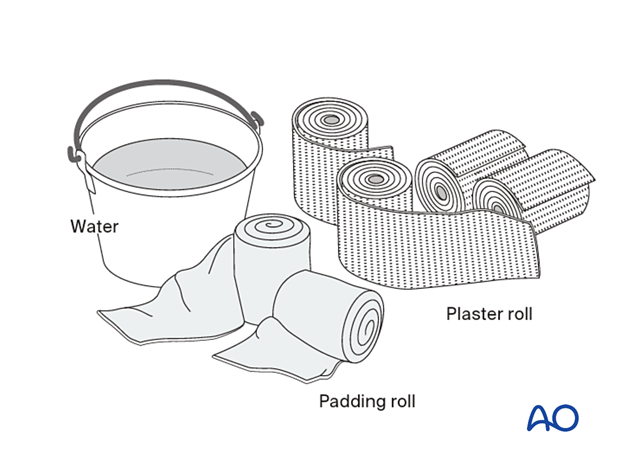
Required equipment
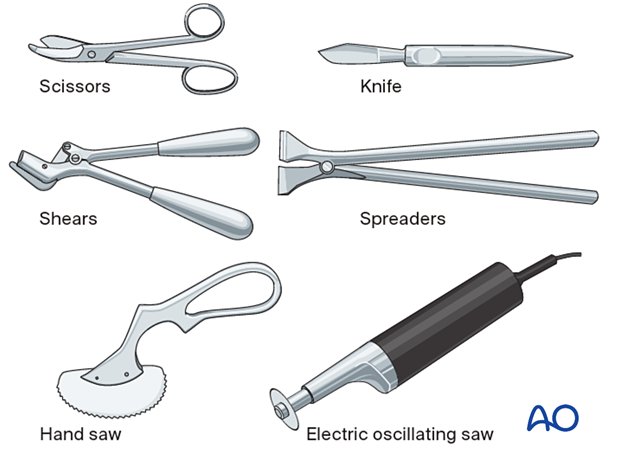
Scissors and a knife can be used to cut the POP cast when it is still wet, just before it sets.
The other tools are required for cutting dry POP.
7. Fracture reduction
Reduction principles
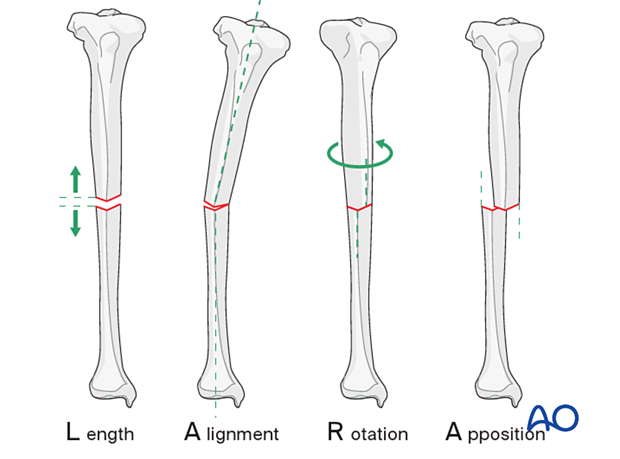
Reducing a fracture means restoring acceptable alignment.
Proper reduction of a tibial shaft fracture requires correction of the following:
- Length
- Axial alignment
- Rotation
- Apposition (bone contact)
If x-rays are not available during the procedure, the reduction is orientated with reference to the uninjured leg.
Reduction
During fracture reduction, the patient needs pain relief and muscle relaxation. Depending on the resources available, this might be analgesia plus sedation, but is preferably regional or general anesthesia.
Once the pain relief takes effect, the splint can be removed, and the knee gently bent so that the lower leg is in a hanging position.
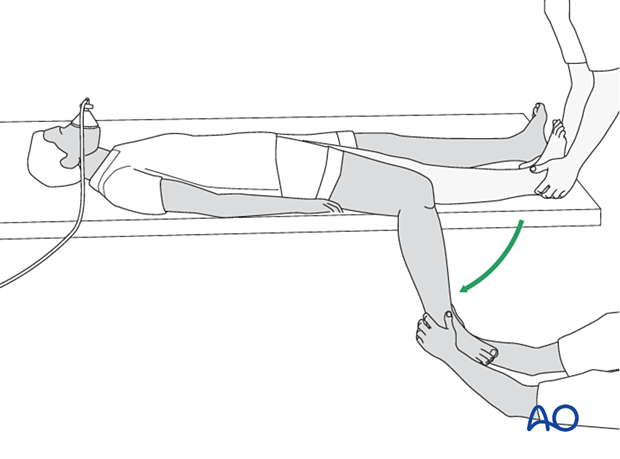
Fracture reduction is easiest with the leg hanging beside the table, with enough space between the leg and the table edge to apply the cast. The fully flexed knee relaxes the calf muscles, helps control rotation, and permits ankle dorsiflexion to neutral (90° to the leg).
The person treating the fracture pulls with both hands on the heel and ankle to overcome any shortening.
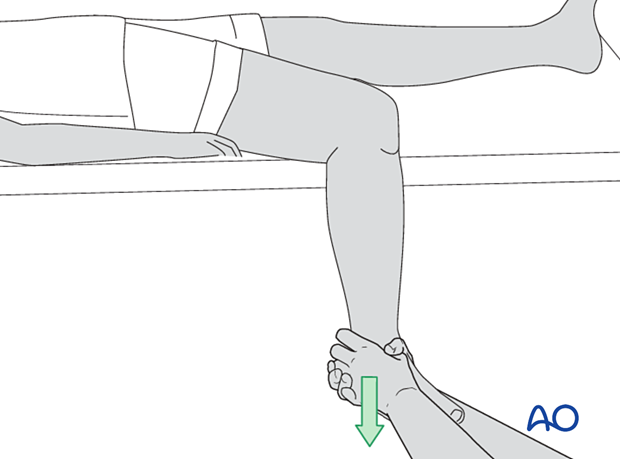
The illustration demonstrates reduction of a transverse fracture. Reducing the distal fracture fragment anatomically restores length. The length is stable as long as the distal fragment is “hooked onto” the proximal one. A cast can maintain this length-stable reduction fairly easily.
Fractures which are not transverse (spiral, oblique, or multifragmentary) cannot be “hooked on” and thus lack length stability. Shortening of 1 cm or even 2 cm is acceptable, but it is still important to restore axial alignment, rotation and apposition.
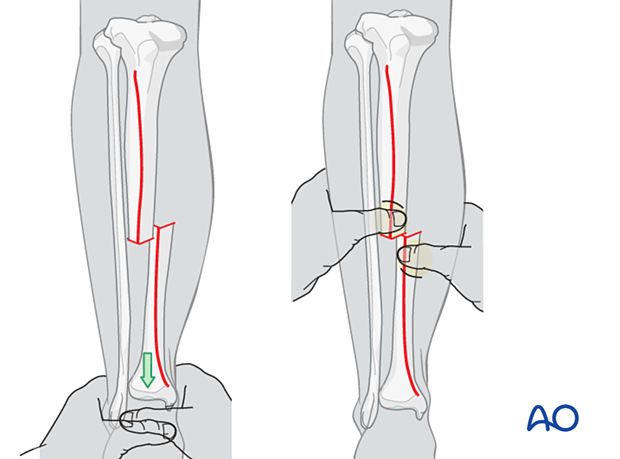
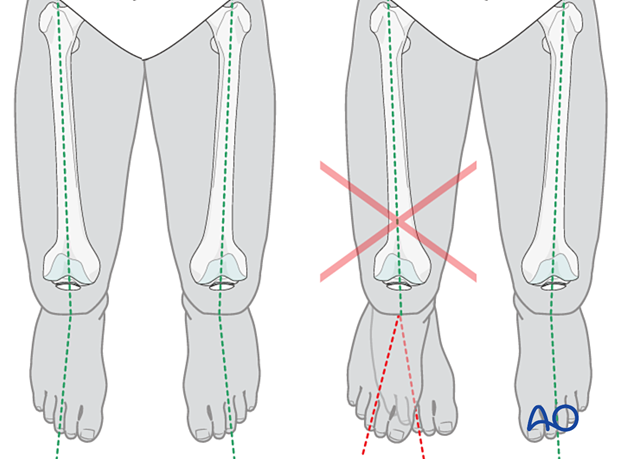
Rotation and apposition can be judged and corrected by aligning the anterior tibial crest of the distal fragment with the proximal one. This part of the reduction is aided and confirmed by local palpation. Rotational alignment is indicated by the angle between the foot axis and that of the thigh. This angle should match that of the opposite lower extremity.
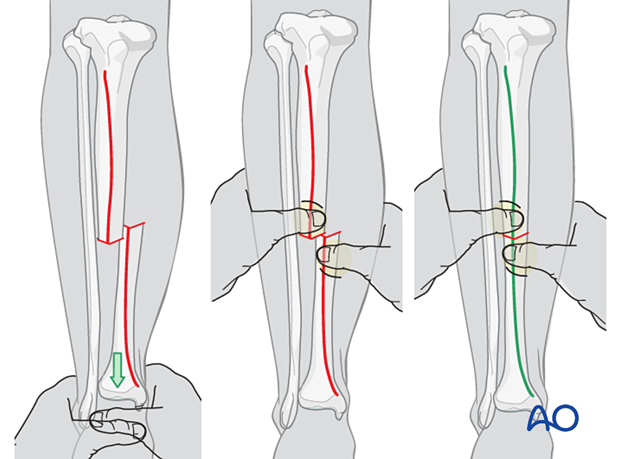
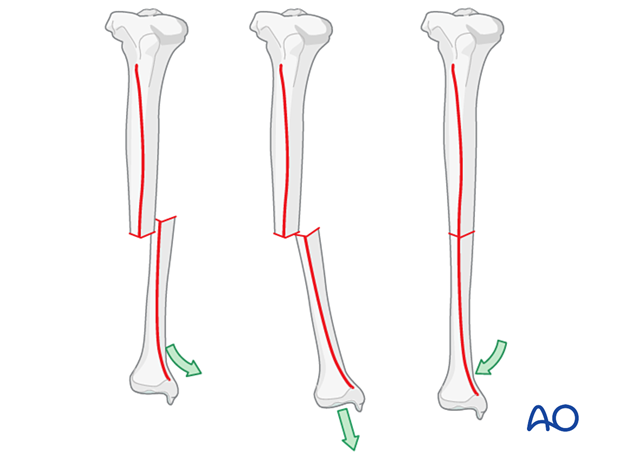
End-on-end apposition of a transverse fracture can be difficult to achieve with traction and transverse pressure. In this case, as illustrated, increasing angulation may allow the fracture ends to be hooked on to each other, followed by deangulation to correct the tibial axis.
8. Cast application
Cast application is far easier with the aid of an assistant. One person holds the reduction while the other (the operator) applies the cast. Reduction should be repeatedly verified during cast application.
Holding the reduced position
The leg-holder stands on the medial side of the injured leg and controls the knee and thigh position while holding the ankle dorsiflexed to neutral. Rotational alignment is approximated by holding the big toe in line with the patella, as seen from a superior or anterior view. This maintains the normal slight external rotation of the tibia.
This technique usually holds the reduction that has been achieved and allows the operator to apply the padding and the plaster cast.
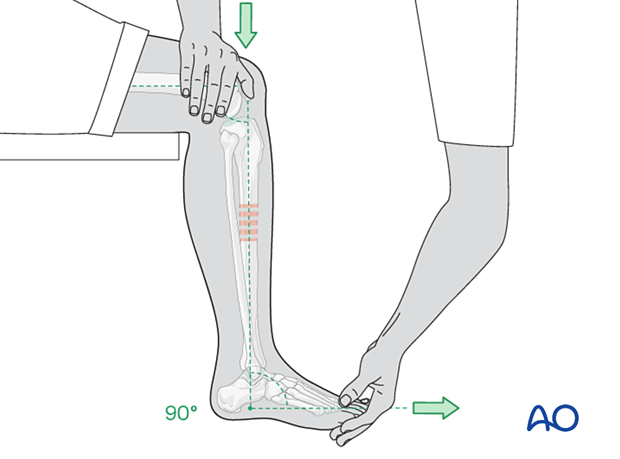
Assessment of rotational reduction
The best way to assess the rotational alignment of the tibia is by means of the angle between the long axes of the thigh and of the foot. If the rotational reduction is correct, the long axis of the foot is slightly externally rotated relative to the axis of the thigh. This foot-thigh angle should be the same as for the opposite lower extremity.
Application of POP
One of the treating team applies the padding from below the ankle to just above the knee.
Next, while maintaining the fracture reduction, 2–3 rolls of POP are applied around the lower leg (dipped in cold water to give more time until hardening takes place).
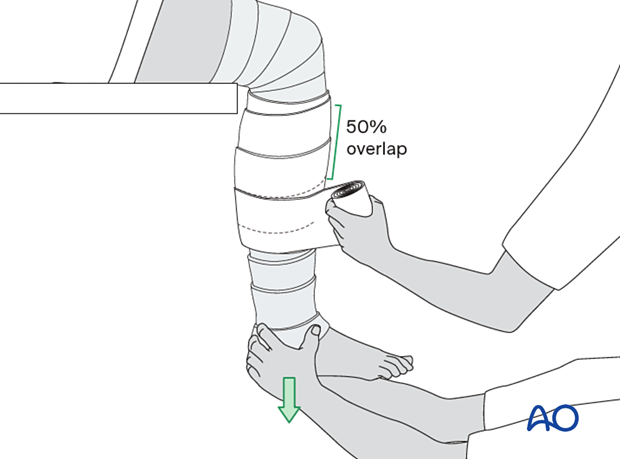
The POP cuff is molded firmly to the lower leg whilst keeping traction on the heel. Relax the molding pressure only when the POP cuff is firm (4–5 minutes).
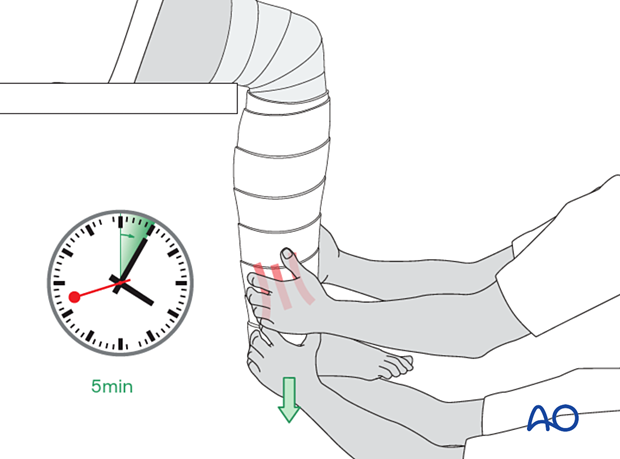
Once the plaster cuff around the lower leg has dried and stabilized the fracture, the padding and the plaster are extended down around the ankle and the foot as far as the metatarsophalangeal (MTP) joints. Take care not to extend the plaster over the dorsum of the MTP joints, as this blocks dorsiflexion.
Do not let padding lie between layers of plaster.
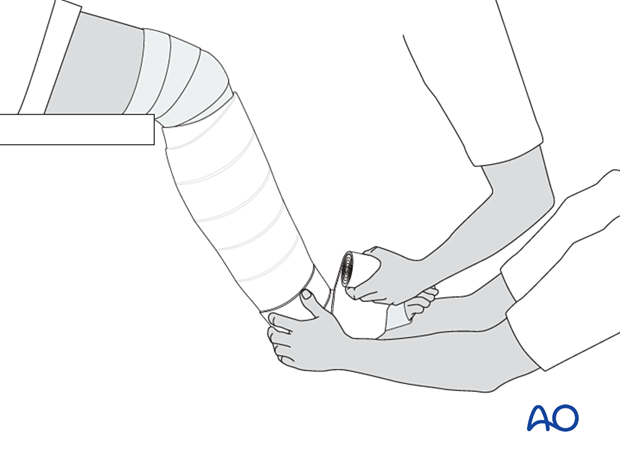
Once the below-knee plaster cast is firm, the knee is extended, and the lower leg lifted onto a cushioned leg support. One caregiver holds the foot and lower leg to maintain flexion of the knee at about 30° and the other extends the padding and the plaster as high as the upper thigh, remembering not to place padding between layers of plaster.
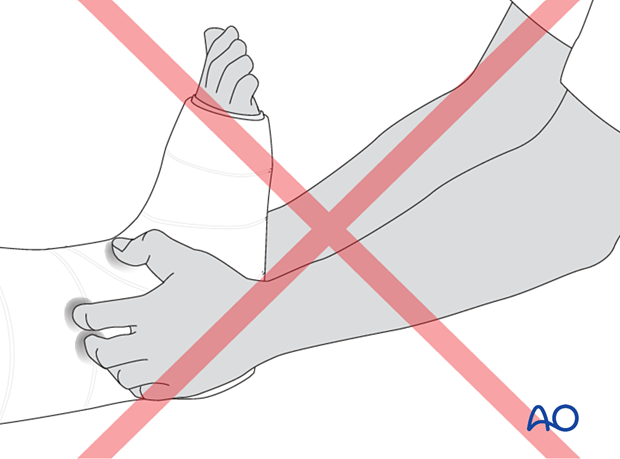
Always support the wet plaster with the hand flat, do not press dimples into the plaster with the fingertips, as this can cause pressure points inside.
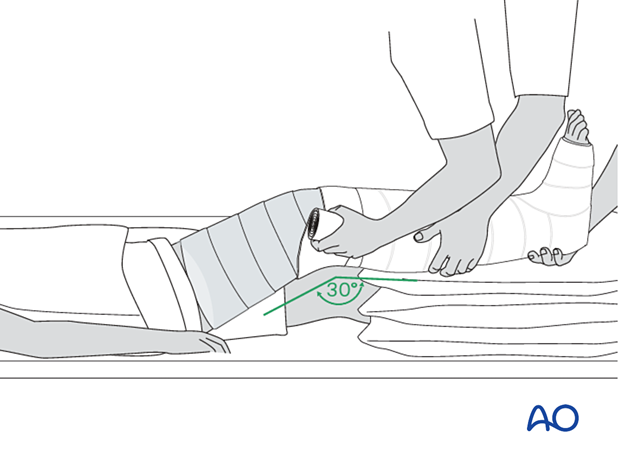
It is important to hold the knee position until the entire cast is firm.
The weak point of the plaster is the junction between the already well-dried below-knee POP and the extension to the above-knee cast.
This region should be reinforced with an extra roll of plaster.
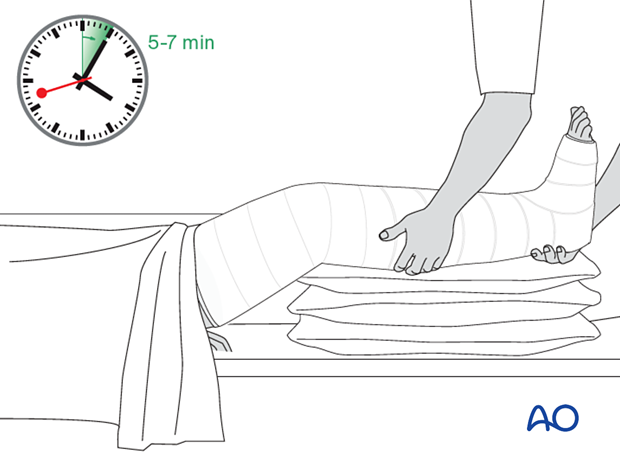
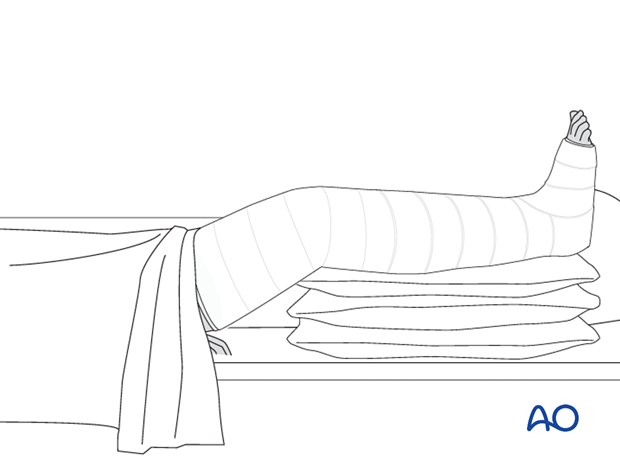
To minimize swelling, elevate the lower leg on two or three pillows for a few days.
X-ray control after reduction should be obtained to determine whether an appropriate reduction has been obtained.
9. Drying of the cast
The patient should be warned that the leg in plaster will feel warm initially and will then feel cool and moist. The warmth is due to the chemical reaction that takes place as the plaster sets. The leg then cools because of the evaporation of water from the plaster. Once the cast is dry, the moist, cold feeling will disappear.
During the evaporation period, the limb in plaster should remain exposed and not be fully covered by blankets.
10. Splitting of a plaster
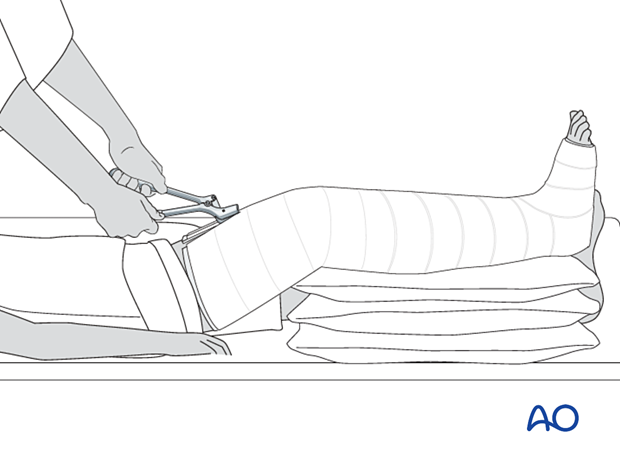
When significant swelling is expected, it may be advisable to split and loosen the plaster. This can be made easier by placing a protective leather or plastic strip along the leg before the cast is applied. If the plaster is still damp, it can be cut with a very sharp knife, above the protective strip which is then removed.
Instead of making a single split in the cast, a strip of plaster 1–2 cm wide can be removed. This makes it easier to release the underlying padding.
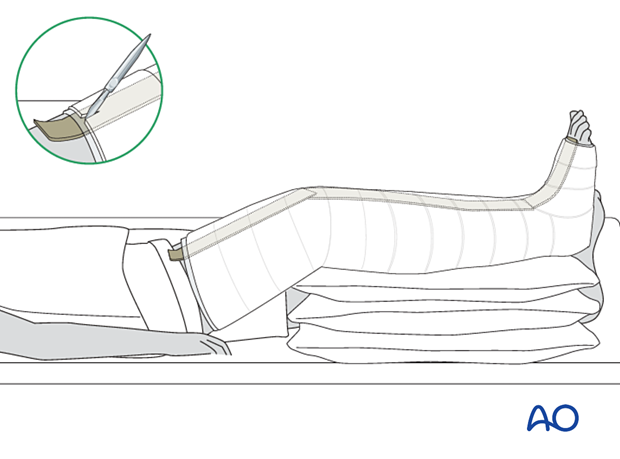
Alternatively, the plaster can be split using a plaster cutter. An oscillating saw is the easiest way to cut dry plaster; it is not effective if the plaster is still wet.
Either way, splitting alone does not loosen the cast. It must be spread to increase its volume.
Cast padding must also be cut down to the skin. Do this carefully using guarded scissors. Even a small strand of hardened padding can act as a circumferential band and cut into a swollen leg.
11. Compartment syndrome
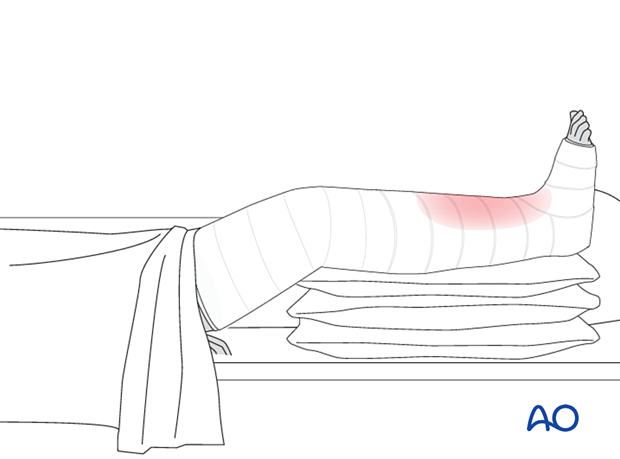
Any plaster, especially one without adequate padding, or applied tightly to an injured leg that is likely to swell, carries a risk of obstructing circulation and causing compartment syndrome. Fresh fractures and fractures that have undergone significant manipulation are more likely to swell.
In the event of increasing pain, made worse by passive dorsiflexion or plantarflexion of the toes, the plaster and padding should be immediately split down to the skin, over its whole length, and spread open to ensure that no constriction remains. Then, the leg should be watched carefully. In the absence of rapid recovery, a compartment syndrome may be present. This will require an emergency fasciotomy. Loosening the cast, even if it leads to loss of reduction, is better than risking muscle necrosis.
If the slightest suspicion of compartment syndrome remains, ensure that the plaster is completely loose and consider urgent fasciotomy.
Click here for further information on compartment syndrome in tibial shaft fractures.
12. Pins in plaster
Using Steinmann pins to prevent displacement
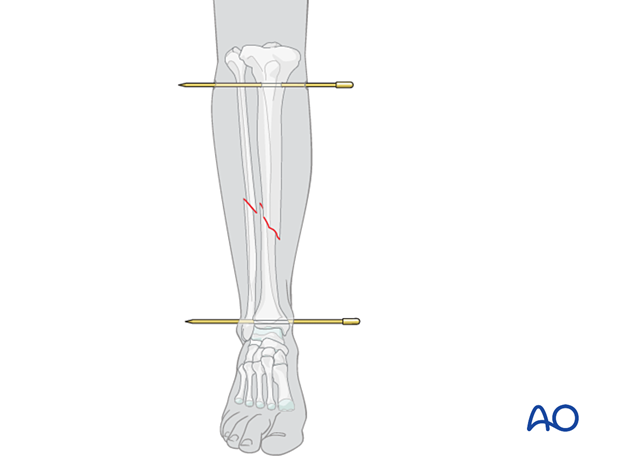
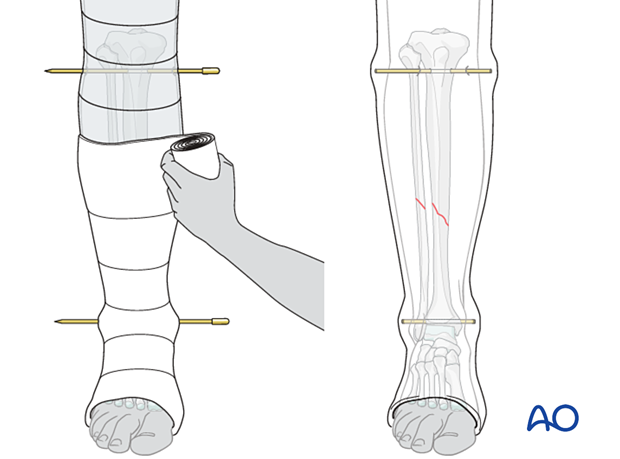
In unstable fracture types, in which maintaining a stable apposition at the fracture site is not possible, the risk of displacement, especially shortening, can be reduced by first passing Steinmann pins through the tibia proximally and distally. The leg is then plastered, and the pins and the plaster hold the reduction in place.
Ensure to infiltrate local anesthetic into the sites of pin placement.
Insertion of proximal pin
At the entry point, a stab incision is made through the skin with a pointed scalpel.
A Steinmann pin mounted in a T-handle is inserted manually at a point about 2 cm dorsal to the tibial tuberosity.
As the pin is felt to penetrate the far cortex, check that the exit will coincide with the area of local anesthetic infiltration. If not, inject additional local anesthetic. Once the point of the pin clearly declares its exit site, make a small stab incision in the overlying skin.
Once the pin is in place, ensure there is no tension on the skin at the entry and exit points. If there is, a small relieving incision may be necessary.
Insertion of distal pin
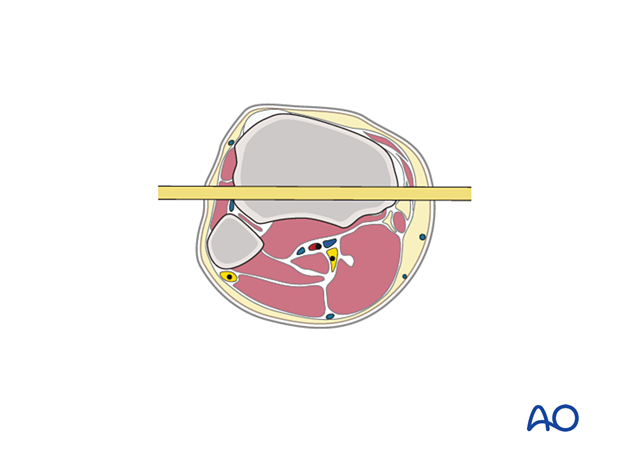
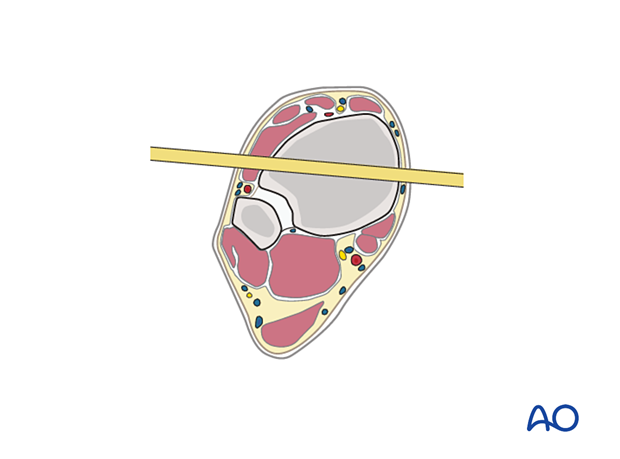
When inserting pins in the distal zone, take into account the position of the anterior tibial artery and vein. Percutaneous insertion of pins in this area is dangerous. A minimal incision will allow preparation and safe insertion.
The pin should be inserted from lateral to medial through the middle of the tibia anterior to the fibula, in the frontal plane, so it emerges medially through the subcutaneous surface of the tibia.
Plastering
Make sure that the skin is not under tension from the pins. Incise the skin if necessary to release tension. With a small incision no sutures are necessary. Apply antibacterial ointment and a sterile dressing to the pin sites. Then apply the cast. Incorporate the pins with a thick cuff of plaster (2 cm) around each end. Be careful not to pull the plaster tightly from one end of the pin to the other, since there should be no extra pressure on the skin. Excessive pin length can be reduced with a pin cutter, but at least 2 cm of pin should be incorporated in the plaster, both medially and laterally.
The pins can be used as reduction aids. Traction, rotation, and angulation of the pins can be used to correct deformities. This is done before plaster application. Then, with the fracture held reduced, POP is applied, incorporating the pins as described. Once hard, the cast functions as the frame of an external fixator, using the pins to maintain fracture alignment.
This procedure is usually done under general or regional anesthesia.
Initially the cast should be extended above the knee for better stability and comfort. It can be shortened to a below-knee plaster later on (after 3–4 weeks), with the pins still incorporated in the plaster.
Once the fracture begins to heal with callus (after approximately 6 weeks), remove the cast and pins and apply a new cast without pins. At this point it may be appropriate to begin progressive weight bearing.
13. Cast wedging
Small angular malalignments can be corrected by wedging without changing the plaster. Wedging needs to be delayed until the plaster cast is completely hardened. Wedging is safer if sufficient padding is applied during the original cast application.
Central wedging (preferred technique)
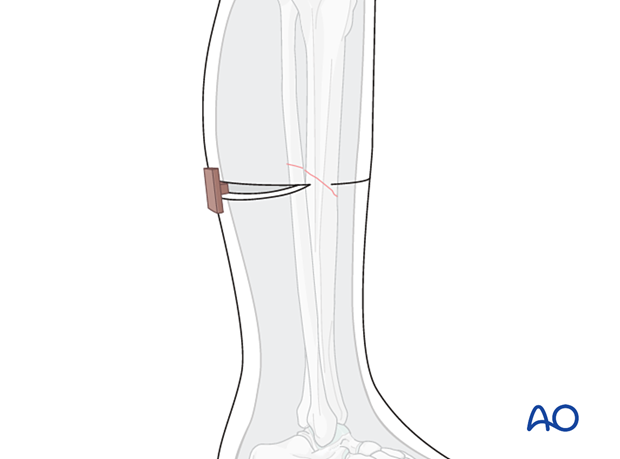
Make a half-circumferential cut in the cast on the concave side of the angulation. An appropriate wedge is then removed from the convex side, not quite meeting the first cut, but leaving a 1 cm bridge, as shown. The angulation is then gently corrected.
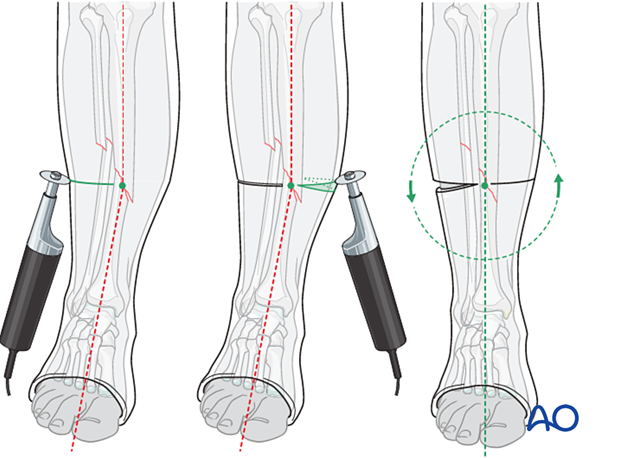
The first cut is held open with a piece of wood or cork. Note that the anterior and posterior plaster bridges lie on the axis of rotation, perpendicular to the plane of angulation. The illustration shown indicates correction of a valgus deformity with a wedge placed in the lateral aspect of the cast.
The wedging site is then repaired with fresh POP bandaging. Smoothly work the plaster into the open wedge without skin pressure, and wrap it circumferentially around the cast, 4–5 cm proximally and distally, to restore strength.
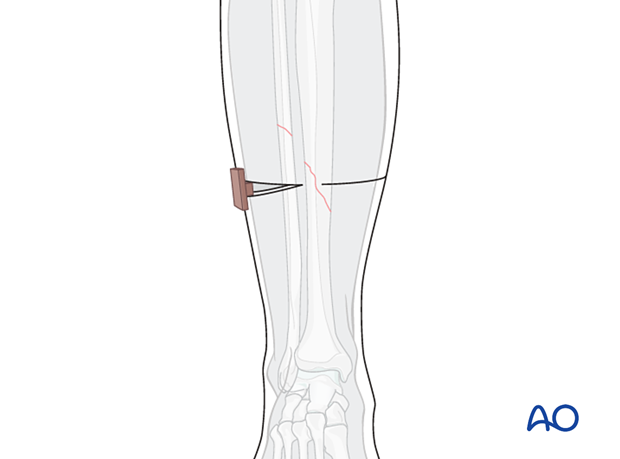
The first half-circumferential cut (opening wedge) must be placed on the concave surface, opposite the apex of deformity. The axis of deformity correction (the ends of the first cut) is thus properly oriented. This illustration shows correction of an apex anterior (procurvatum) deformity.
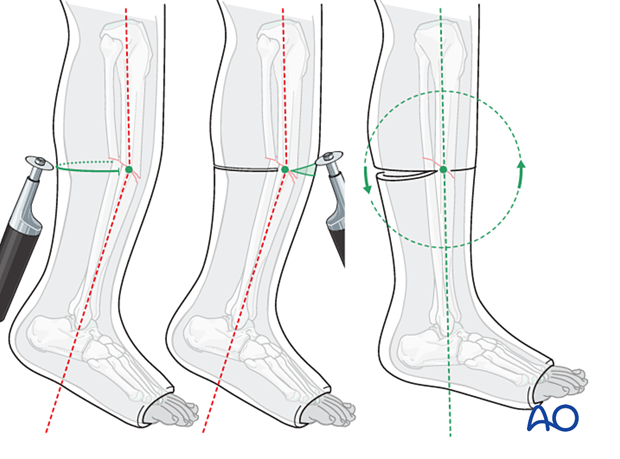
The illustration shown indicates correction of a procurvatum deformity with a wedge placed in the posterior aspect of the cast.
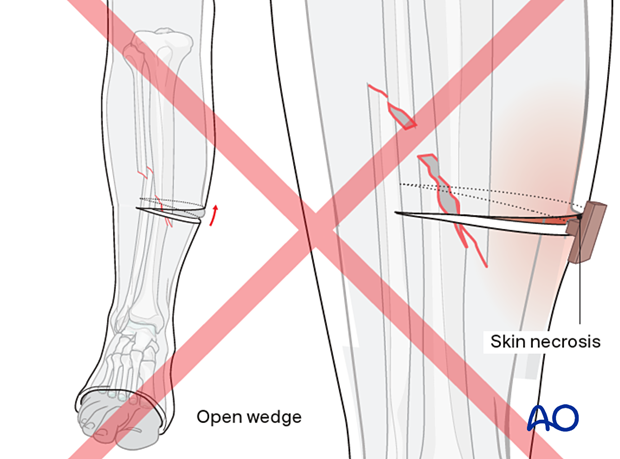
- The wedge that is inserted to maintain the opening of the cast can cause underlying skin and subcutaneous tissue necrosis. It may also have the effect of shortening the cast, as well as the tibia.
- Open wedging may also distract the fracture fragments: in a transverse fracture, this can contribute to impairment of union.
14. Mistakes to avoid
The following mistakes should be avoided:
- Manipulation without traction
- Failure to assess inappropriate pain
- Failure to loosen cast if there is increasing pain, or suspected compartment syndrome
- No elevation after POP application
- Covering POP before it dries
- Creating indentations with fingertips (as illustrated)
- Failure to place padding over bony prominences
- Pressure on common peroneal nerve (lateral fibular neck) or fibular head
- Application of a thinly padded cast before swelling has ceased
15. Aftercare
General guidelines
Analgesics should be prescribed for 2-4 weeks.
If a plaster cast becomes loose, it should be removed and replaced with a new one. This is preferably done once the fracture has healed with enough callus (+/- 4 weeks) to avoid losing the reduction during the replacement procedure.
Weight bearing should be avoided for 2–4 weeks depending on the fracture type. Graduated partial weight bearing should be started and increased to full weight bearing by approximately 6 weeks.
Weight bearing requires protection of the cast bottom with a cast shoe, oversized sneaker, or equivalent.
Tibial shaft fractures usually take 3–5 months for complete healing. If the foot is in a functional position, graduated partial weight bearing can begin as soon as possible once comfort and presumed fracture stability permit.
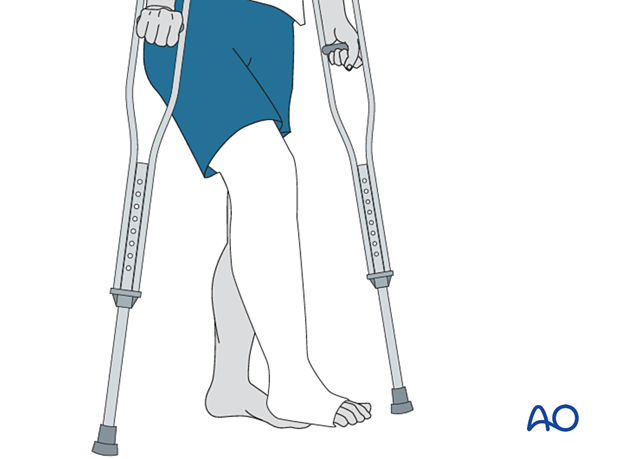
The plaster cast should not be removed until the fracture is stably healed. This is usually indicated by x-ray or, in the absence of x-ray, by the patient’s ability to bear full weight in the cast without pain. For tibial shaft fractures, this will rarely occur before 14 weeks after injury. Displaced fractures, or fractures caused by high energy forces, usually take longer to heal.
It is usually necessary to replace the first cast before the fracture is healed sufficiently.
Check stability carefully when definitive removal is done. Sometimes alignment that initially feels stable will be lost during the first week or two after cast removal. It is wise to check the patient within a couple of weeks to avoid missing such delayed deformity as it is very hard to correct.
After removal of the cast, and confirmation of a stable, non-tender fracture, rehabilitation should involve dedicated knee and ankle mobilization for a prolonged period. Even if fully weight bearing before cast removal, the patient may need crutches and partial weight bearing for a period after cast removal.
At this stage, it may be advisable to give an anti-inflammatory for four weeks.
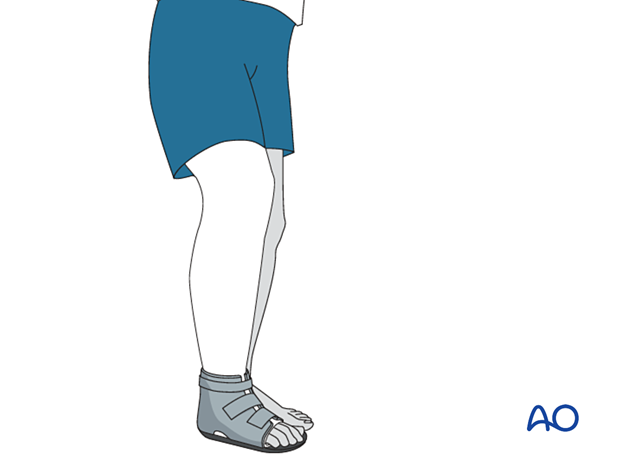
16. Alternative cast for weight bearing
Hinged knee cast-brace
For proximal tibial fractures, the knee may be mobilized with the aid of a hinged cast. This is applied when the fracture is sufficiently healed (typically after six weeks). The hinged cast has two parts as shown.
A fresh cast has to be applied below the knee as well as above. The lever arms of the hinge are incorporated in the plaster cuffs above and below the knee. Great care needs to be taken to align the axis of the hinge with that of the knee joint. Remember that the knee axis is proximal to the joint line, roughly at the level of the femoral epicondyles, and that it is perpendicular to the knee’s arc of motion.
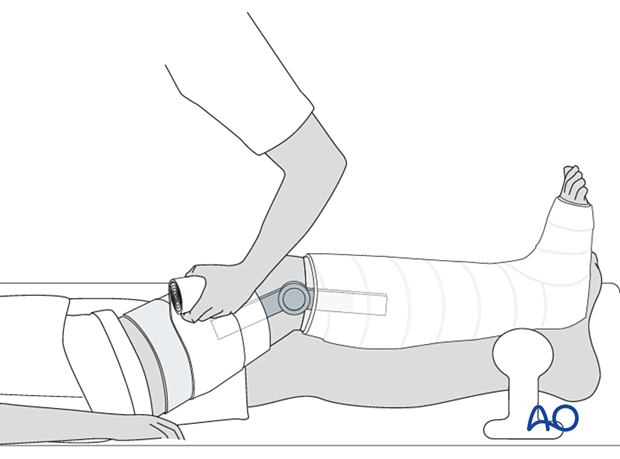
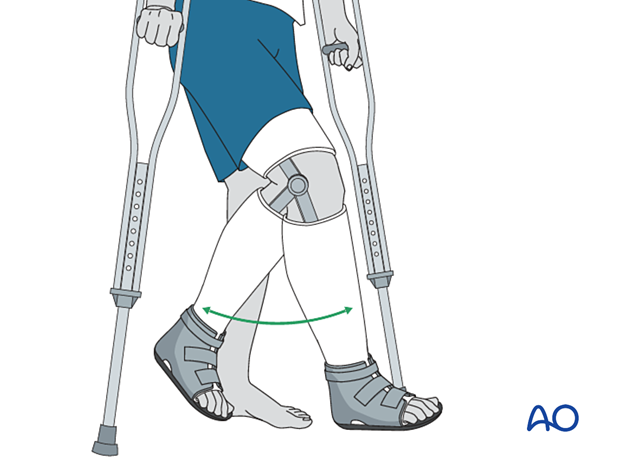
This cast-brace, a form of functional bracing, allows mobilization of the knee joint before the fracture is completely healed. It provides continued protection of the healing fracture, as well as progressive partial weight bearing, at the discretion of the treating surgeon.
Where materials are available, such functional braces can be made of fiberglass or appropriate thermoplastics.
If mobilization of the ankle is desired, a hinged foot support can be used to replace the foot portion of the cast.
17. Patellar tendon-bearing cast
In mid shaft and more distal tibial fractures, a patellar tendon-bearing (PTB) cast, as described by Sarmiento, can be applied. For more stable fractures, this cast may sometimes be applied earlier than 6 weeks. For undisplaced tibia shaft fractures without significant swelling it might even be used as the initial cast. This type of cast is ideal as it allows the patient to weight bear and move the ipsilateral knee.
The application of such a cast, especially the molding in the infrapatellar region, requires considerable experience.
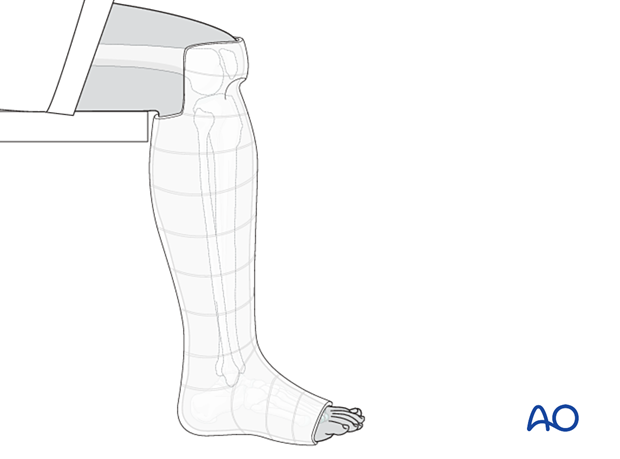
Application of the Sarmiento cast
The cast can be made of fiberglass or thermoplastic material if available.
A hinged foot support can be used to replace the cast around the ankle and foot, permitting mobilization of the ankle.
The patient sits on the edge of a table. The lower leg is steadied, and a stocking and padding are applied from the foot to above the knee. All bony prominences are protected by extra padding.
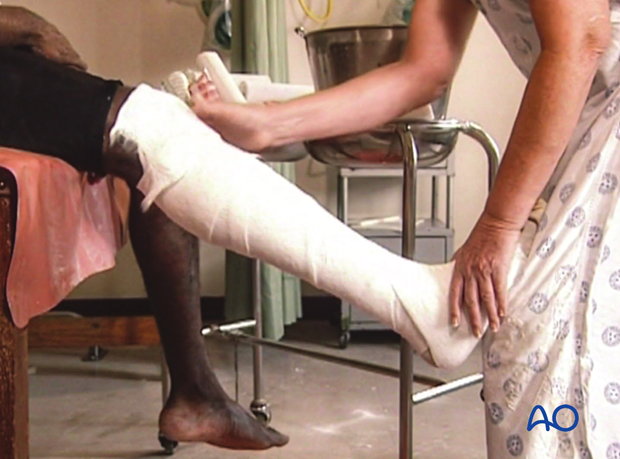
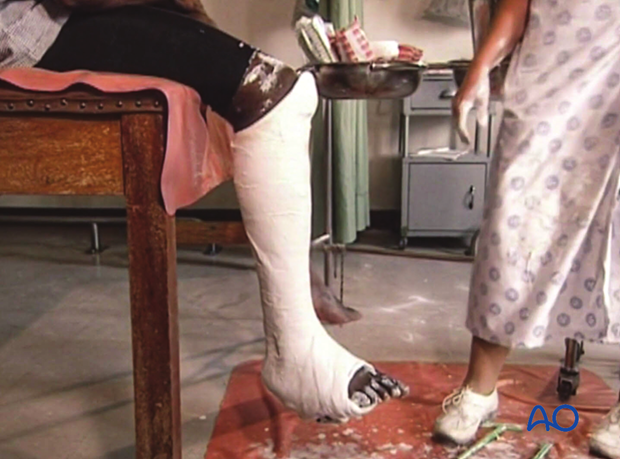
The POP is applied from the foot to above the knee and is later trimmed so it is above the patella anteriorly, and below the popliteal fossa posteriorly.
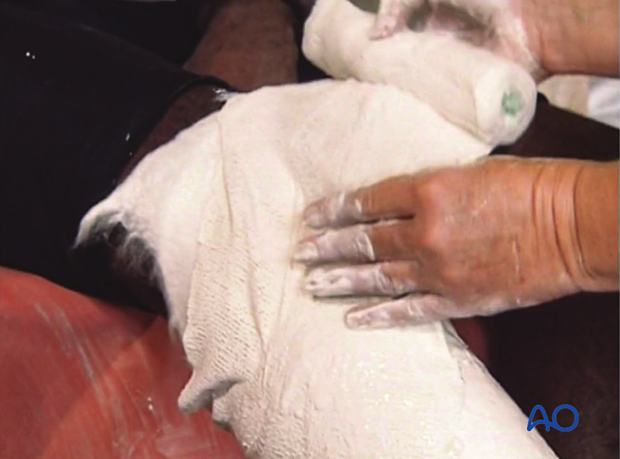
Molding of the Sarmiento cast
Before setting, the plaster is molded to fit the contours of the proximal tibia and fibula, not only around the tibial tubercle and patellar tendon, but also around the fibular head and posterior proximal calf. The cast should be triangular in cross section, flat posteriorly, and molded to match the prominent tibial tubercle. This molding forces the cast away from the fibular head and peroneal nerve, helping to avoid local pressure.
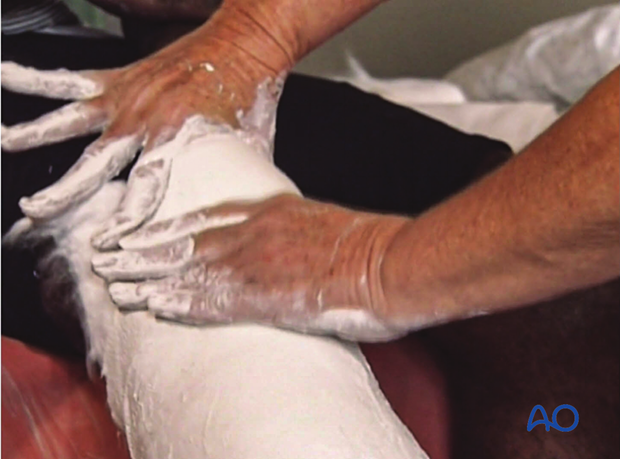
Trimming of the Sarmiento cast
Once firm, the proximal margin of the cast is trimmed from the proximal pole of the patella, circumferentially to the proximal part of the calf. Note that the posterior trim line is thus more distal than the anterior edge of the cast, since it must be just below the popliteal flexion crease.
Check that knee extension is full, and that the knee can flex to 90°. Then the padding and stocking are turned down to provide cushioning. The stocking is then secured to the outside of the cast with a little additional plaster.
Weight bearing
Once the plaster is fully hardened, a cast shoe may be applied and weight bearing, and knee flexion started. The cast is retained until union is sound, and the patient can comfortably bear full weight.
Gait training in a Sarmiento cast is essential to ensure full knee extension, which is necessary for optimal fracture stability in this cast.
AO teaching video on Sarmiento/patellar tendon-bearing cast application
