ORIF - Sacrum
1. Introduction
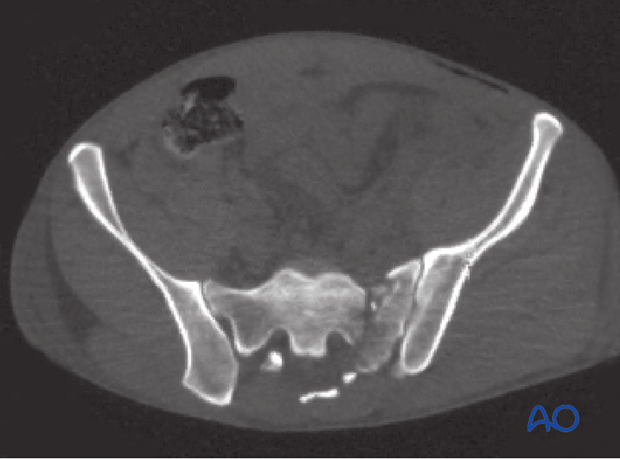
Vertical sacral fractures that do not involve the sacroiliac joint typically pass obliquely through the transforaminal region. They are often comminuted.
Because of the risk of nerve injury from compressing the comminuted fracture, interfragmentary compression may not be a good option in some patients.
Plate fixation of the sacrum must be performed posteriorly and typically involves the use of several small plates.
2. Patient preparation and approach
Patient preparation
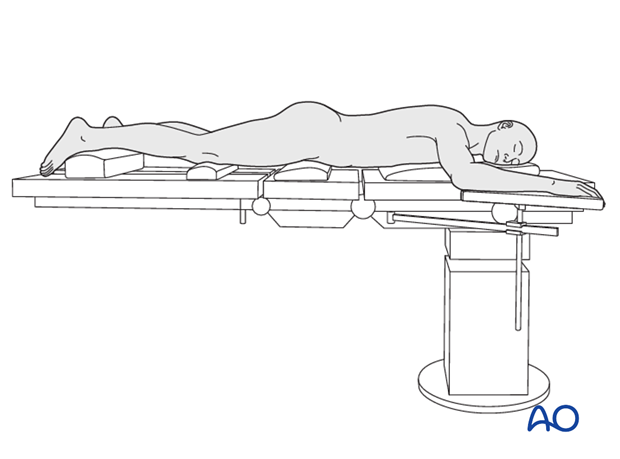
This procedure is performed with the patient in a prone position.
Approach
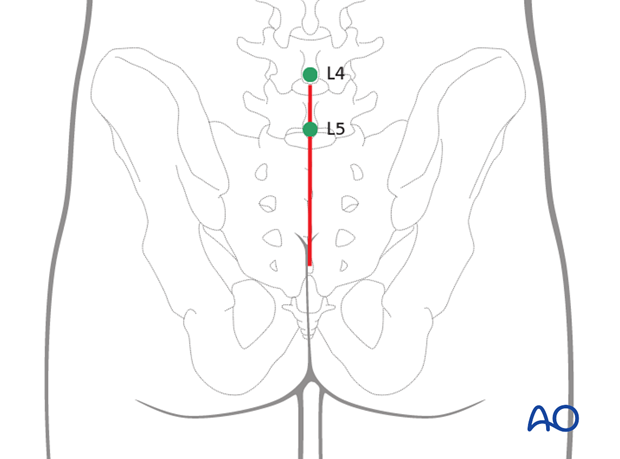
For this procedure a posterior approach to the sacrum is used.
3. Preparation of the fracture site
Identify and remove small bony fragments from the comminuted fracture zone. They may be located in the transforaminal region and may hinder fracture reduction.
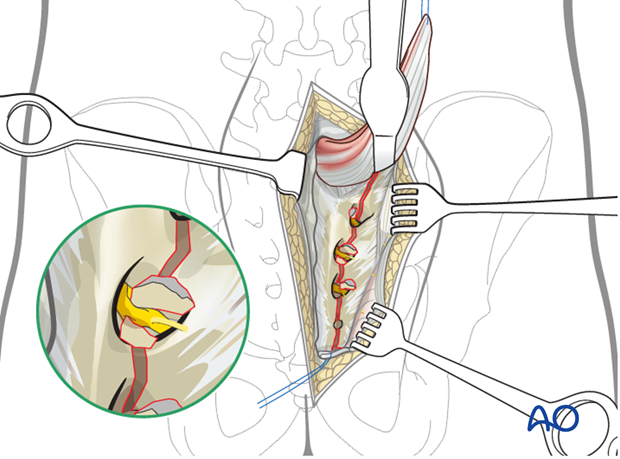
Sacral nerve root decompression
The complete fracture line has to be cleaned out and inspected.
Enhance the exposure by using a lamina (bone) spreader.
Extract fragments that may compromise the sacral nerve roots.
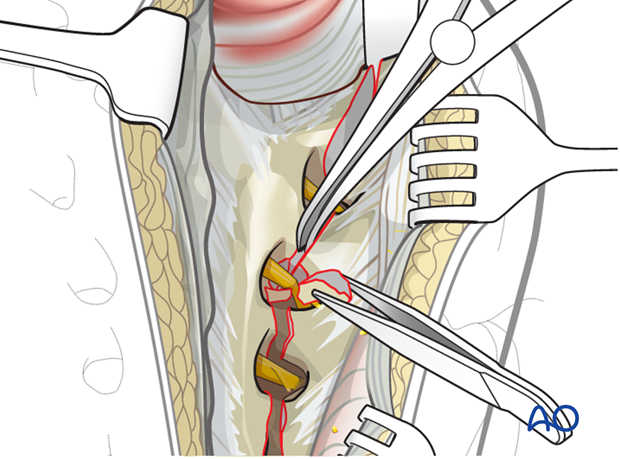
4. Reduction
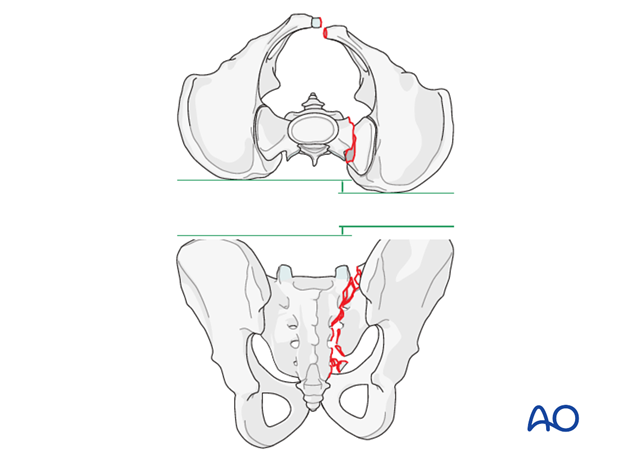
The typical displacements are cranial and posterior together with sagittal plane rotation.
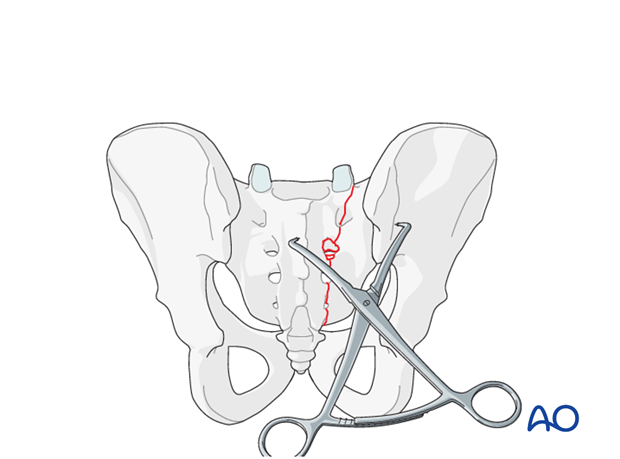
Preliminary fixation
The primary reduction maneuver typically involves the use of two pointed reduction forceps (Weber clamps).
These span from the spinous process to the lateral ilium and are used to incrementally obtain a step by step reduction by alternating translation and clamping.
Additional reduction techniques
Preliminary fix the anatomic reduction with pointed reduction forceps.
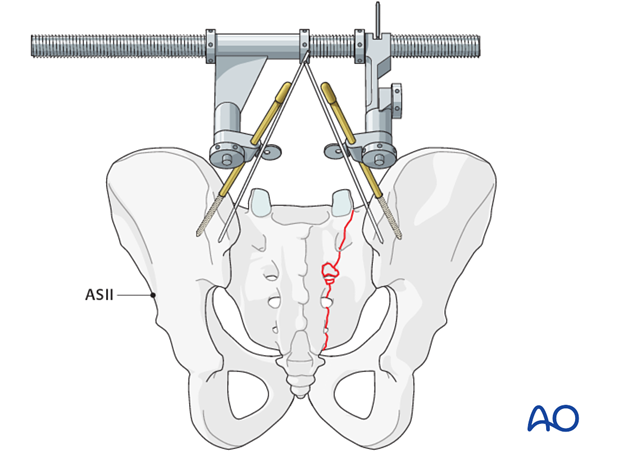
If needed, insert Schanz screws to both posterior iliac crests as a reduction aid for better rotational alignment.
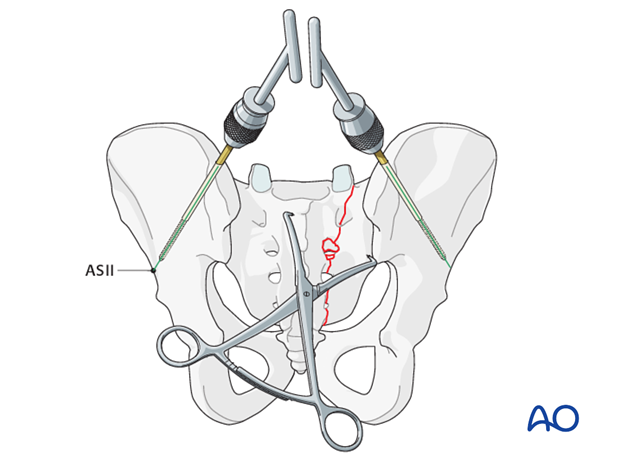
The AO distractor may be used as a distraction aid.
K-wires may be placed into the SI joints in order to determine the joint orientation.
5. Planning of the internal fixation
Entry points for sacral screw fixation
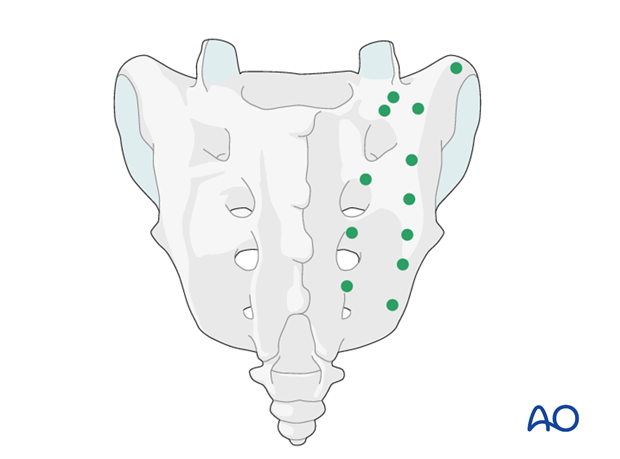
The implant fixation in the sacrum is complicated by the spinal canal, the sacral foramina, and the neurovascular structures close to the anterior sacrum lamina.
The density of the sacral lamina is different in the various anatomic locations of the sacrum. Dense bone can be expected at the region of the pelvic brim, close to the SI joints, and at the interforaminal regions (green spots).
Planning in the sagittal plane
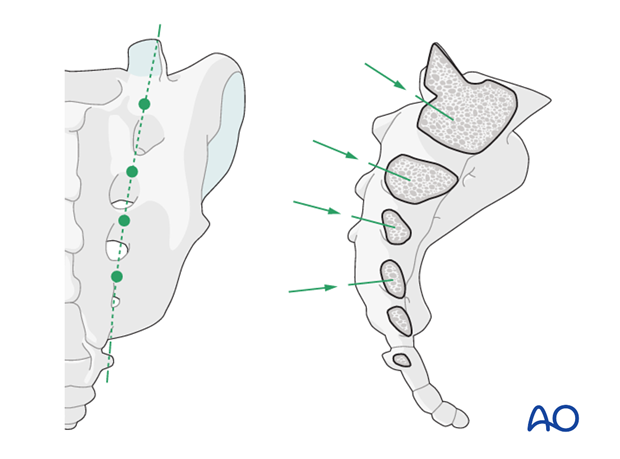
The sagittal cutaway model of the sacrum reveals that solid bone is present between the foramina. The pattern of the intraosseous foramina varies from patient to patient, but in principle, screws can be placed here safely.
The use of an oscillating drill is generally recommended in the sacrum for increased safety.
Preoperative planning, using the 3D-CT image is recommended to determine direction and length of screws.
6. Plate application
H-plate fixation
Implants for stabilization are standard H plates that are cut to the required length, and flattened.
One-third tubular plates and standard small fragment DC-plates are also possible variants in plate fixation.
Cross the fracture line by at least two implants, preferably at the S1 and S3 or S4 level.
The position of the implants is determined by the specific fracture pattern.
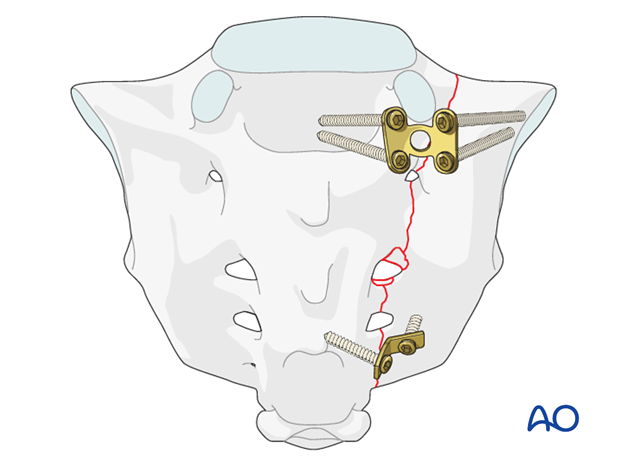
Lateral screw fixation (alar screws)
Apply the screw as far lateral as possible, using the more solid bony substance close to the SI joint.
Position 3.5 mm screws in the sacral ala parallel to the plane of the SI joint.
Give special consideration to the internal iliac vessels located ventrally.
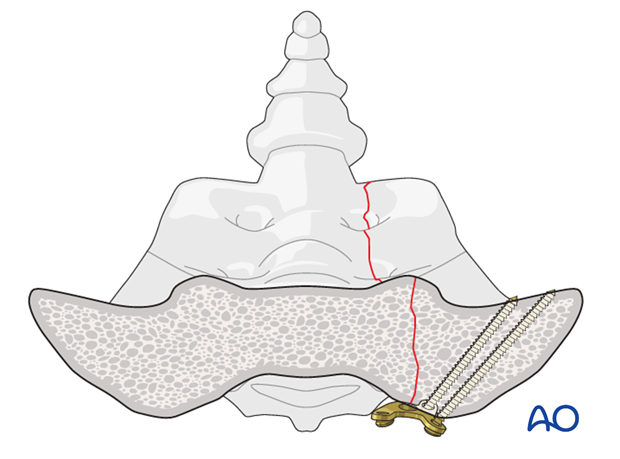
Medial screw fixation
Insert the medial screws perpendicular to the posterior aspect of the sacrum.
Diversify the direction of the screws according to the fracture line.
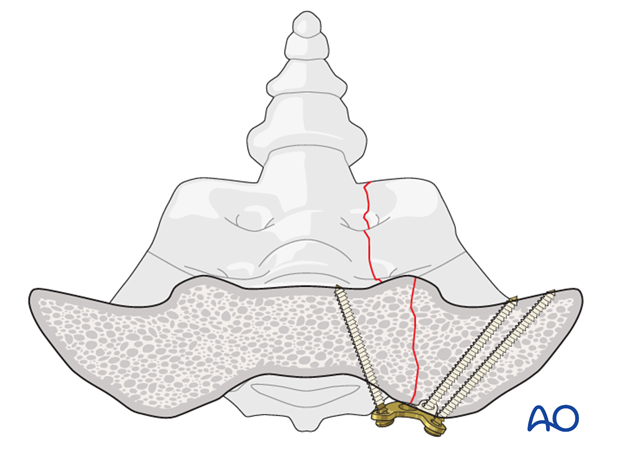
Medial screw fixation in the sagittal plane
When placing screws into the sacrum at the level of S1 take into consideration the cranial sacral border.
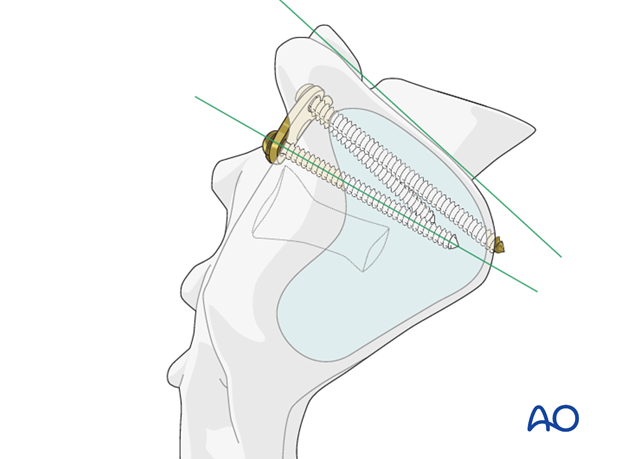
Completion of the H-plate fixation
Complete screw placement when H-plate is inserted with the application of the medial screws.
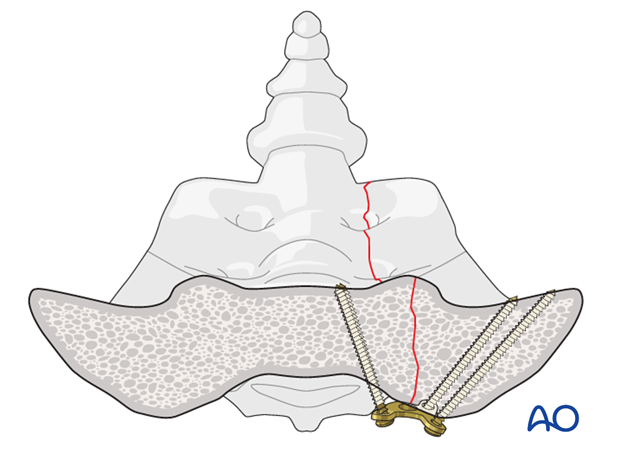
Iliosacral plating in transalar fractures
In case of a laterally located sacral alar fracture, it may be advisable to bypass the zone of comminution by placing screws in the posterior ilium.
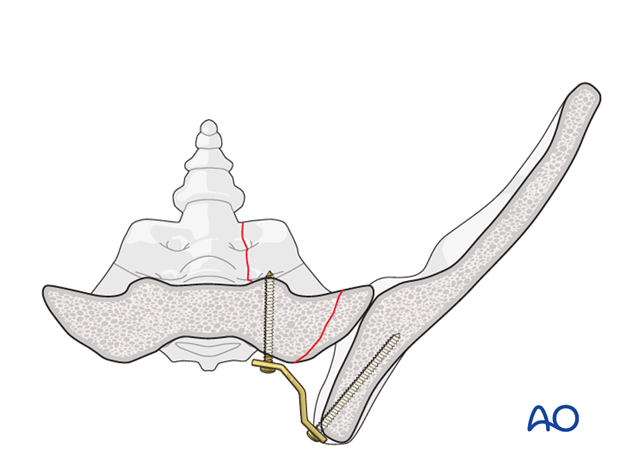
7. Various options for plate fixation
Transforaminal fractures
The use of a special sacrum plate allows the placement of two lateral and two medial screws at the level of S1.
Additional dorsal fixation with one flattened and contoured 2-hole one-third tubular plate should be performed to provide additional stability at the level of S4.
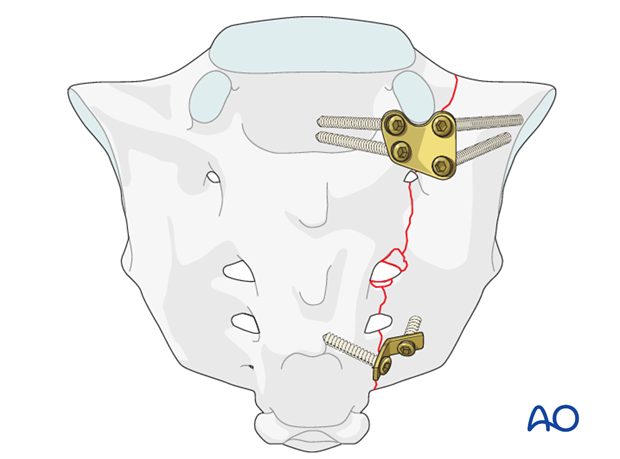
Alternative fixation technique
Fixation may be spanned across the entire sacrum, extending from one sacral ala to the other.
Contour two 3.5-mm LC-DC plates to the posterior aspect of the sacrum as neutralization plates.
Position both plates parallel to each other at the S1 and S3 level.

8. X-ray control
After completion of internal fixation, confirm the final reduction and hardware position intraoperatively by AP, inlet and outlet radiographic imaging.

9. Aftercare following open reduction and fixation
Postoperative blood test
After pelvic surgery, routine hemoglobin and electrolyte check out should be performed the first day after surgery and corrected if necessary.
Bowel function and food
After extensile approaches in the anterior pelvis, the bowel function may be temporarily compromised. This temporary paralytic ileus generally does not need specific treatment beyond withholding food and drink until bowel function recovers.
Analgesics
Adequate analgesia is important. Non pharmacologic pain management should be considered as well (eg. local cooling and psychological support).
Anticoagulation
Prophylaxis for deep vein thrombosis (DVT) and pulmonary embolus is routine unless contraindicated. The optimal duration of DVT prophylaxis in this setting remains unproven, but in general it should be continued until the patient can actively walk (typically 4-6 weeks).
Drains
Dressings should be removed and wounds checked after 48h, with wound care according to surgeon's preference.
Wound dressing
Dressings should be removed and wounds checked after 48h, with wound care according to surgeon's preference.
Physiotherapy
The following guidelines regarding physiotherapy must be adapted to the individual patient and injury.
It is important that the surgeon decide how much mechanical loading is appropriate for each patient's pelvic ring fixation. This must be communicated to physical therapy and nursing staff.
For all patients, proper respiratory physiotherapy can help to prevent pulmonary complications and is highly recommended.
Upper extremity and bed mobility exercises should begin as soon as possible, with protection against pelvic loading as necessary.
Mobilization can usually begin the day after surgery unless significant instability is present.
Generally, the patient can start to sit the first day after surgery and begin passive and active assisted exercises.
For unilateral injuries, gait training with a walking frame or crutches can begin as soon as the patient is able to stand with limited weight bearing on the unstable side.
In unstable unilateral pelvic injuries, weight bearing on the injured side should be limited to "touch down" (weight of leg). Assistance with leg lifting in transfers may be necessary.
Progressive weight bearing can begin according to anticipated healing. Significant weight bearing is usually possible by 6 week but use of crutches may need to be continued for three months. It should remembered that pelvic fractures usually heal within 6-8 weeks, but that primarily ligamentous injuries may need longer protection (3-4 months).
Fracture healing and pelvic alignment are monitored by regular X-rays every 4-6 weeks until healing is complete.
Bilateral unstable pelvic fractures
Extra precautions are necessary for patients with bilaterally unstable pelvic fractures. Physiotherapy of the torso and upper extremity should begin as soon as possible. This enables these patients to become independent in transfer from bed to chair. For the first few weeks, wheelchair ambulation may be necessary. After 3-4 weeks walking exercises in a swimming pool are started.
After 6 weeks, if pain allows, the patient can start walking with a three point gait, with less weight bearing on the more unstable side.
Full weight bearing is possible after complete healing of the bony or ligamentous legions, typically not before 12 weeks.
