MIO - Intramedullary nail
1. Principles
General considerations
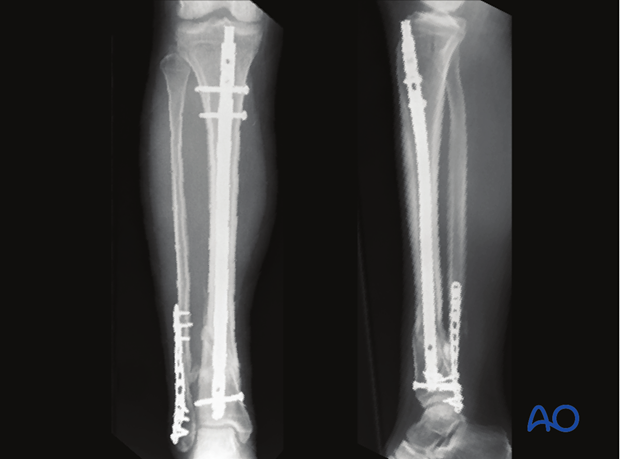
Several extraarticular fractures of the distal tibia can be treated with intramedullary nailing. The nail design determines the number, location, and orientation of distal interlocking screws. There must be enough screws appropriately distributed in the short distal tibial segment to provide sufficient stability. We recommend a minimum of 2 and preferably 3 well distributed distal interlocking screws.
Fractures that are too distal (within 1 or 2 cm of the articular surface) may not be adequately stabilized with an intramedullary nail.
Distal tibial fractures must be reduced correctly by the surgeon before the nail is driven home, and the reduction confirmed with the image intensifier.
Read more about assessment of reduction.
Some complete articular fractures with undisplaced articular extensions can be treated with intramedullary nailing. The undisplaced fracture lines must first be fixed with lag screws. Plate fixation of an associated fibular fracture is recommended for additional stability when intramedullary nailing is used for distal tibia fractures.
Teaching video: reamed nailing technique
AO teaching video: Tibia Fractures - Intramedullary Nailing with the Expert Tibial Nail (with reaming)
Teaching video: non-reamed nailing technique
AO teaching video: Tibia Fractures - Intramedullary Nailing with the Expert Tibial Nail (without reaming)
2. Patient preparation and approach
Patient preparation
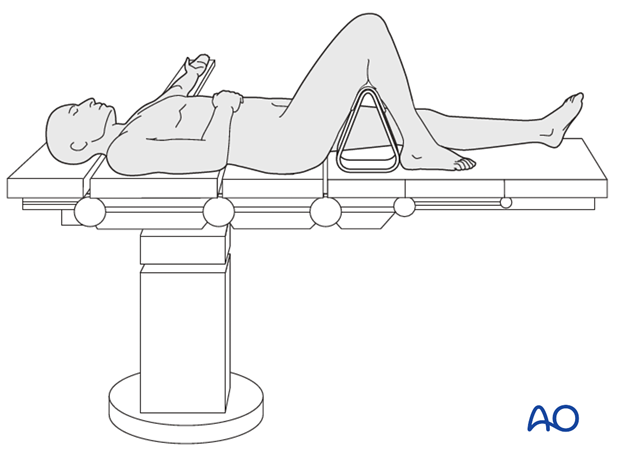
This procedure is normally performed with the patient in a supine position with knee flexed.
Approach
For this procedure a limited open approach for nailing is used.
3. Reduction
Preliminary remark
Nail insertion does not reduce a distal tibia fracture the way it does for isthmic diaphyseal fractures. There is no cortical bone contact in the distal segment. Accurate provisional reduction of distal fractures is essential. It must be maintained during nail insertion and distal locking.
A variety of provisional reduction methods are possible. The choice depends on personal preference and experience. The following reduction techniques are often well suited for intramedullary fixation of distal tibia fractures.
Manual traction
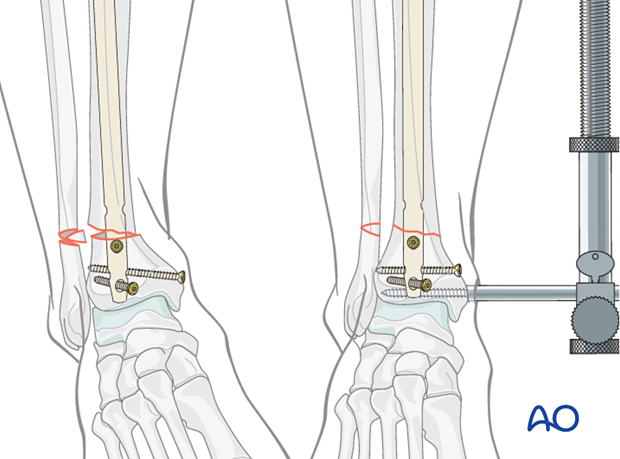
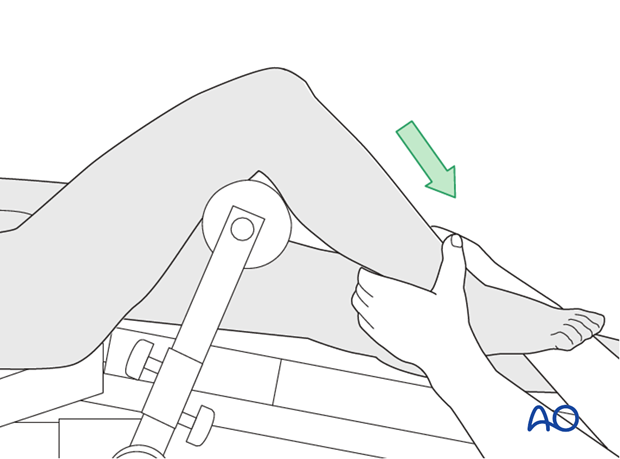
The distal femur is supported by a leg rest. Manual traction is applied to the foot, to restore length, and to correct angulation and rotation. Manual support must be maintained as the nail is inserted, typically with back pressure against the nail.
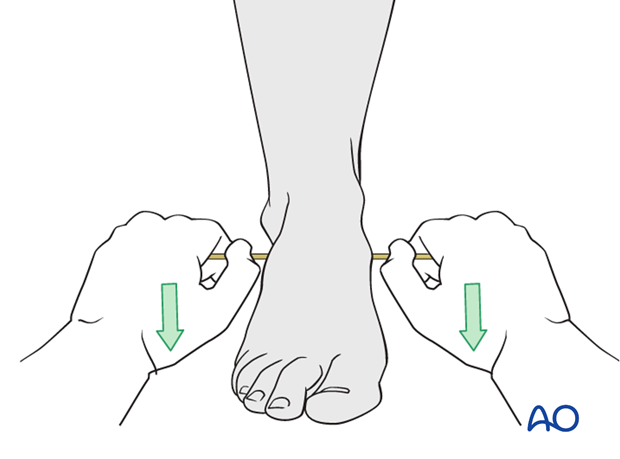
For very distal fractures, use of a traction pin in the calcaneus, talus, or distal tibia may be required to apply manual traction.
Traction table
The patient is positioned supine on the fracture table. The contralateral uninjured leg is placed on a leg holder.
Place a traction pin or wire in the distal tibia, talus, or calcaneus. The more proximal the fixation point, the easier it is to control the distal tibial segment. However, the pin must not obstruct the nail.
Reduction will be achieved by first pulling in line with the tibial shaft axis. Once the fragments are distracted, angulation and rotation are corrected, and the nail can be passed across the fracture. Depending upon soft-tissue integrity, traction may increase angular deformity, and need to be released partially. Reduction should be controlled under image intensification. Rotation must be confirmed by physical exam.
If closed reduction is unsuccessful, a reduction clamp may be added percutaneously or with a small incision.
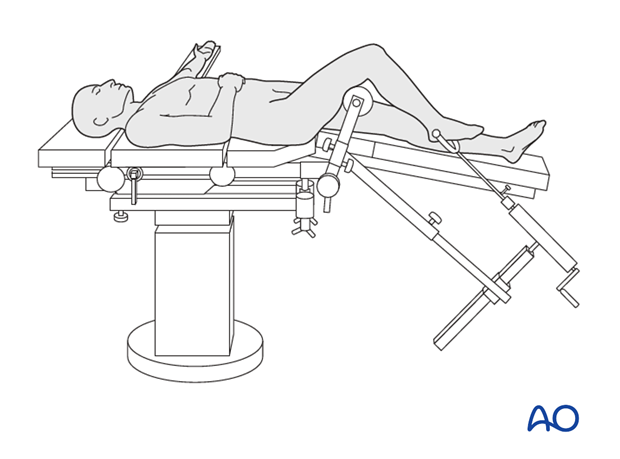
Option: mobile reduction frame
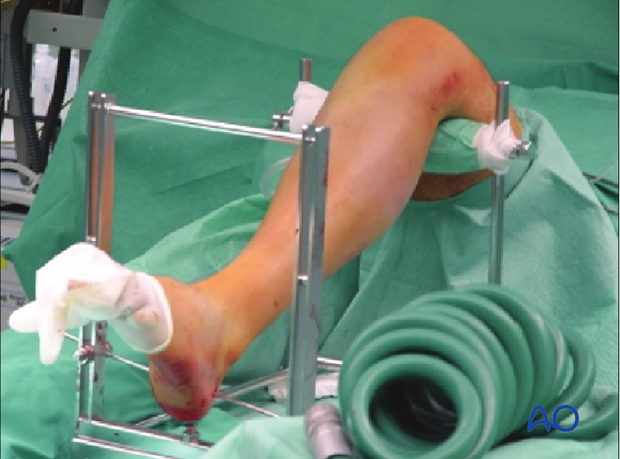
An option to apply traction intraoperatively without a traction table, is the use of a mobile reduction frame. Traction is applied over a Steinmann pin inserted through the calcaneus.
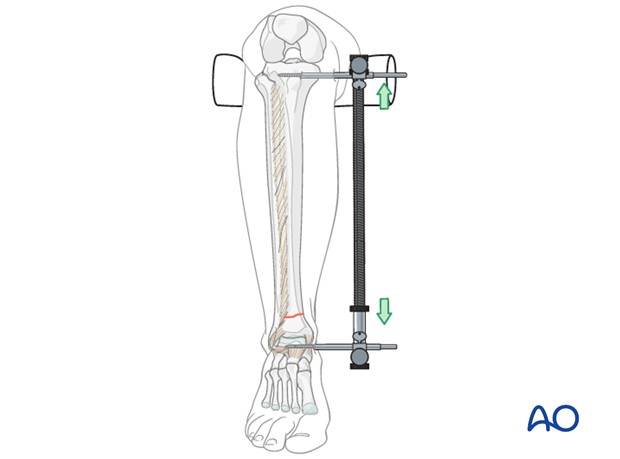
Large distractor positioning
The large distractor is placed on the medial side of the tibia. Alternatively, a laterally placed distractor can be very helpful to resist valgus malalignment. The use of transfixion pins and medial and lateral distraction can be useful.
If no large distractor is available, external fixators can be used instead.
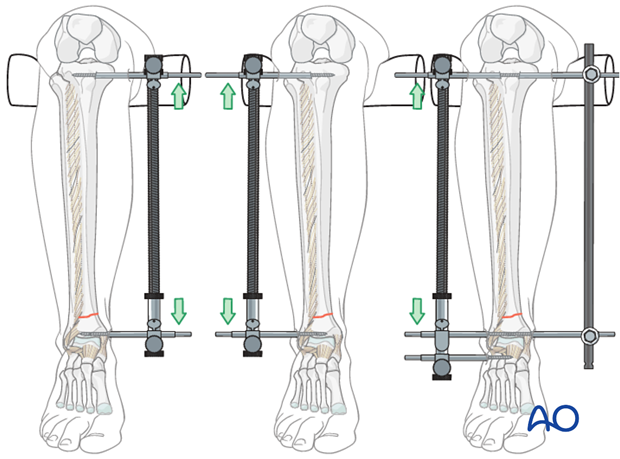
Be certain the proximal pin is posterior enough to avoid blocking the nail. The distal pin can be placed in the talus or calcaneus rather than the tibia to avoid impingement with the nail.
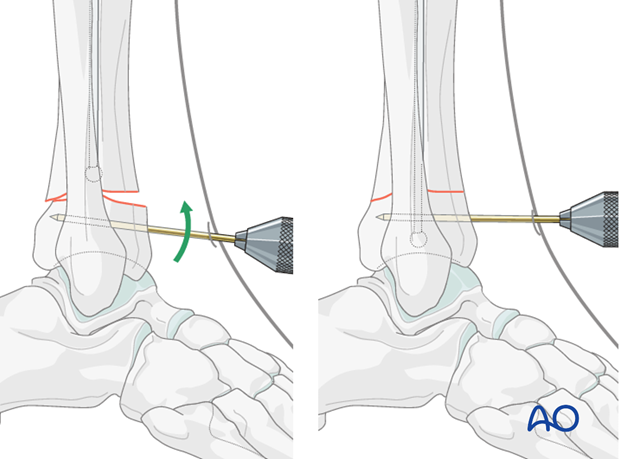
Joystick
Angulation of the distal fragment can be controlled with a percutaneous pin (joystick). Place the pin outside the path of the nail.
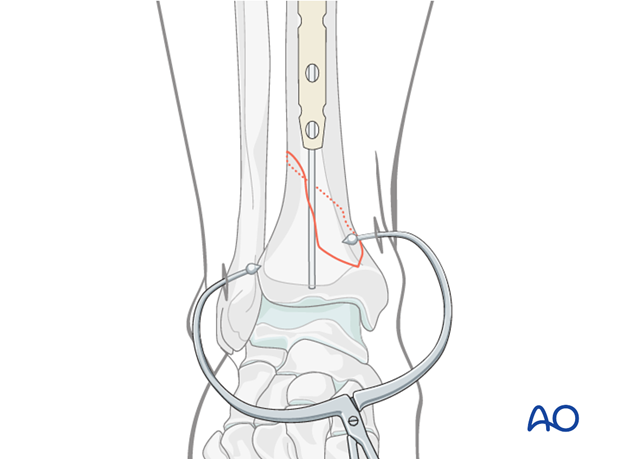
Percutaneous pointed reduction clamp
If shortening is corrected, simple oblique or spiral fractures can be reduced with a percutaneous reduction clamp and held during passage of the nail. It is sometimes necessary to leave the clamp in place until distal locking has been completed.
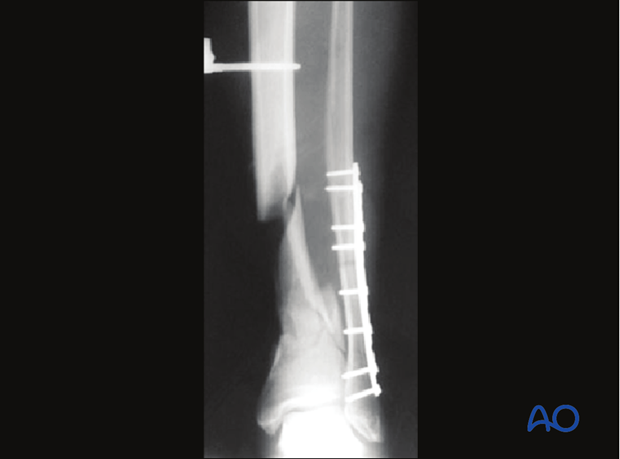
Fibular fracture reduction
Preliminary reduction and fixation of an associated simple distal fibula fracture will often help by indirectly reducing the distal tibial fracture via ligamentotaxis.
Open reduction
In the event of delayed treatment, or if a cortical bone fragment is stuck in the canal, open reduction of the tibia may be required.
4. Creation of the nail entry site
Approach
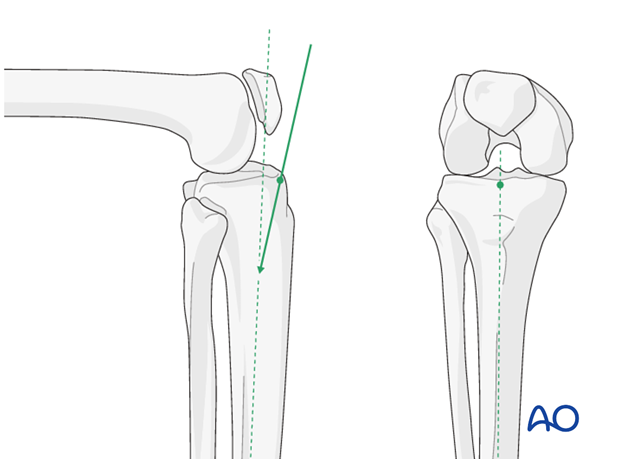
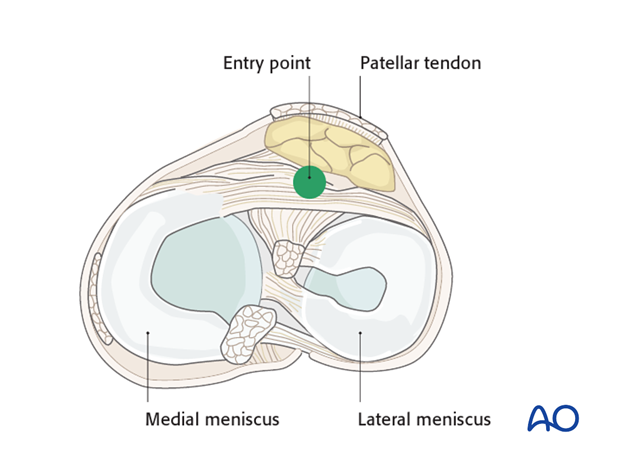
The entry point is on the anterior edge of the tibial plateau, missing the menisci, and centered over the medullary canal on the AP view.
(See nailing approach).
Opening the cortex
Different instruments are available for opening the cortex, such as:
- Cannulated drill or cannulated cutting instrument inserted over a guide wire or pin. Initial placement of a guide pin allows radiographic confirmation before entering the bone
- Curved entry site awl
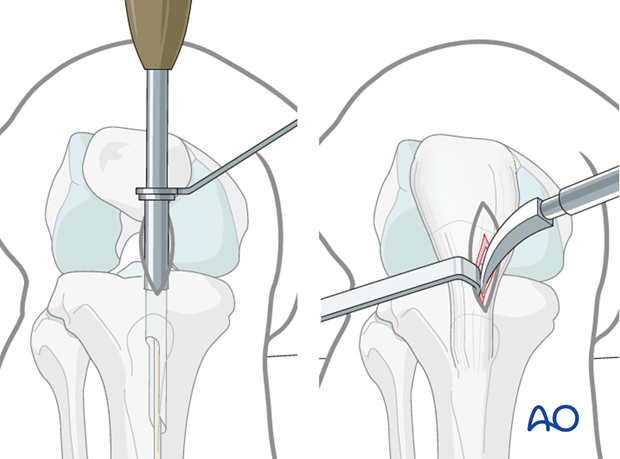
Insertion of centering pin (for cannulated instrument)
Insert a 4 mm centering pin (Steinmann pin). Pass the pin distally, angled 15° in the sagittal plane to the axis of the tibial shaft, into the proximal aspect of the medullary canal. In the coronal plane, the pin is inserted in line with the axis of the tibia shaft.
Verify placement under image intensification, especially in the lateral view.

Opening the medullary canal with a cannulated cutter
Insert a cannulated cutter over the centering pin. Manually advance the cutter rotating it to remove a core of cancellous bone until the canal is entered. Use the protection sleeve to prevent damage of the patellar tendon. This technique offers the opportunity to harvest 2-4 cm3 of autologous cancellous autograft.
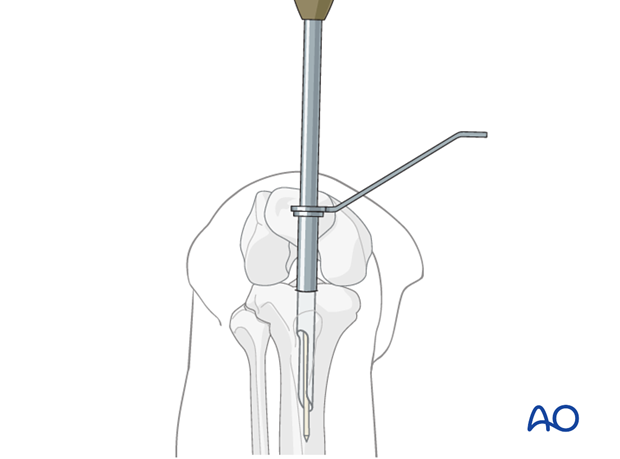
Alternative: Opening of the medullary canal with an awl
Press the sharp tip of the awl into the cortex at the entry site, aim posteriorly, and advance it, turning the awl back and forth. Stay posterior to the anterior cortex, and in the midline aiming down the medullary canal on the AP view. Gradually rotate the awl to align it with the center of the canal on the lateral view.
The shaft of the awl should finish parallel to the anterior cortex of the tibia.
Protect the patellar tendon with a retractor.
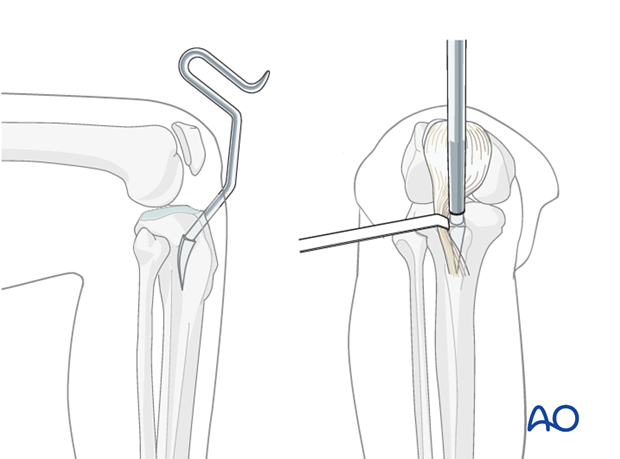
5. Insertion of guide wire
Principle
The fracture must be reduced before the guide wire is placed across it.
Hand reamer (optional)
If some cancellous bone remains in the way, a small hand reamer can be passed through the entry site to create a tunnel for the guide wire through dense bone of the proximal metaphysis.
Ball-tip guide wire
A ball-tip guide wire is passed down the medullary canal, and as deeply as possible into the distal metaphysis.
It is important to ensure the fracture has been accurately reduced at the time of passage of the guide wire through the fracture, and that the guide wire ends up as near to the center of the distal articular tibial segment as possible.
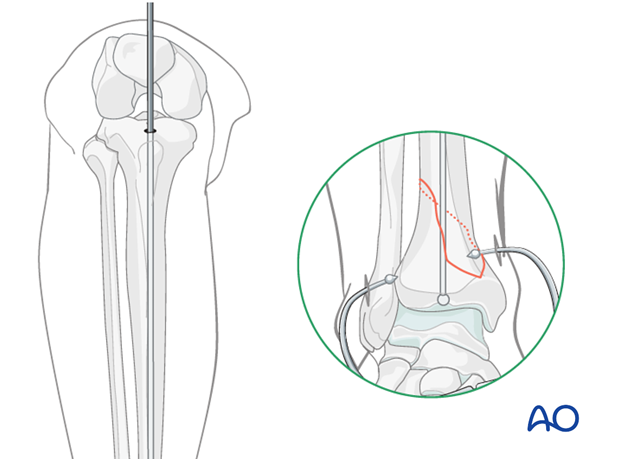
Bending the guide wire
Slightly bending the guide wire 10-15 mm above its tip is helpful for two reasons:
- Passing through the fracture site into the distal fragment is easier since rotation of the guide wire redirects its tip.
- It also facilitates the proper position of the tip in the distal metaphysis. Avoid an acute angulation that will prevent the reamer heads from reaching the ball tip and lead to shallow placement of the nail.
Fluoroscopic control
Use fluoroscopy to check that the guide wire is positioned above the center of the ankle joint. It is very important with distal fractures to confirm the correction of the angular deformity in the lateral, and AP views before moving on to the next step.
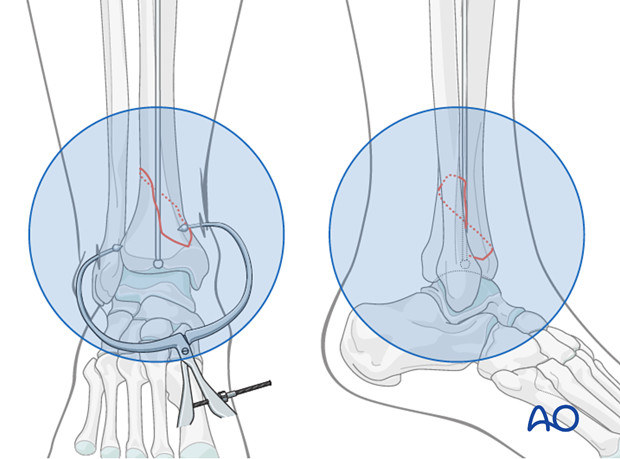
6. Determination of nail length and diameter
Determination of nail length
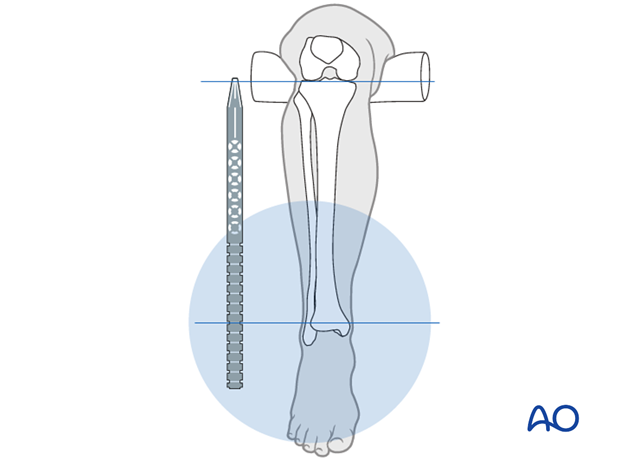
For distal tibial fractures, it is essential that the nail be placed as deeply as possible. It thus must be long enough, by nail selection, or with some nail systems by adding a proximal extension. However, the nail must not protrude proximally. The length of the intact opposite tibia may be used as a helpful guide. If comminution is present, make sure that length has been restored accurately before measurement.
Use of a radiographic ruler
Nail length can be determined intraoperatively, preferably by using a radiographic ruler. With the fracture reduced, measure the required nail length from the center of the distal tibia to the planned nail entry point.
Caution: Such measurement may result in a nail that is too short. It is always advisable to double-check the measured length by comparison with the contralateral (intact) tibia.
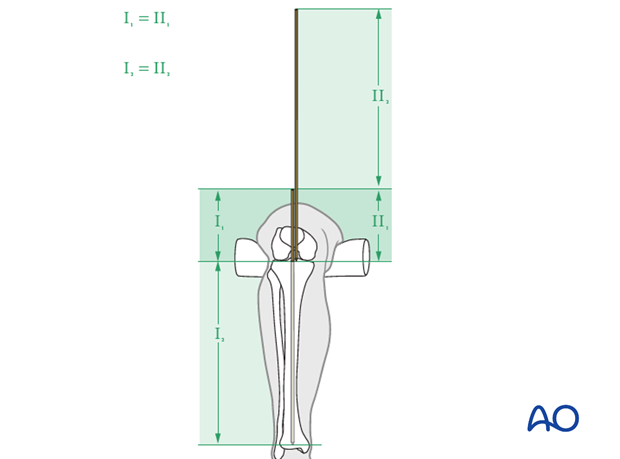
Use of guide wires
First insert the guide wire (I) across the reduced fracture to its maximal depth. Place a second guide wire (II), of equal length, at the entry portal and measure the difference in length between the two wires. This difference represents the proper nail length.
Determination of nail diameter
The nail is correctly dimensioned when:
- Provides adequate fixation
- Can be inserted through the tibial isthmus without excessive reaming and is strong enough to securely hold adequate distal locking screws
Typically, this requires a nail diameter of 9 -10 mm or larger. This will depend upon the chosen nailing system.
Usually, reaming is necessary to increase the diameter of the tibial isthmus sufficiently for easy insertion of an appropriately sized nail. The distal shaft may not require reaming. However, the dense distal epiphyseal bone usually must be reamed to where the tip of the nail will lie.
The canal should be reamed to a minimal diameter (reamer size) of at least 0.5 -1 mm greater than that of the selected nail. The nail should fit easily through the tibial isthmus.
7. Reaming
Protecting the soft-tissues
Insert the flexible reamer over the guide wire. Use a sleeve or other soft tissue protector.
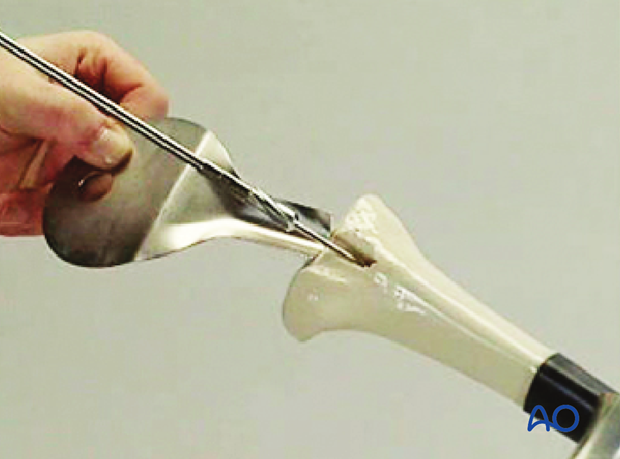
Reaming technique
Reaming is undertaken in sequential steps by increments of 0.5 mm. Do not force the reamer! Frequently retract the reamer partially to clear debris from the medullary canal.
The purpose of reaming is primarily to increase the diameter of the tibial canal isthmus sufficiently for easy insertion of a large enough nail. Distal to the isthmus, canal preparation may not require reaming. However, the dense epiphyseal bone usually must be reamed to where the tip of the nail will lie.
Ream the canal to a minimal diameter (reamer size) of at least one millimeter greater than that of the selected nail. This will depend upon the chosen nailing system. Usually, a 9 -10 mm or larger should be chosen.
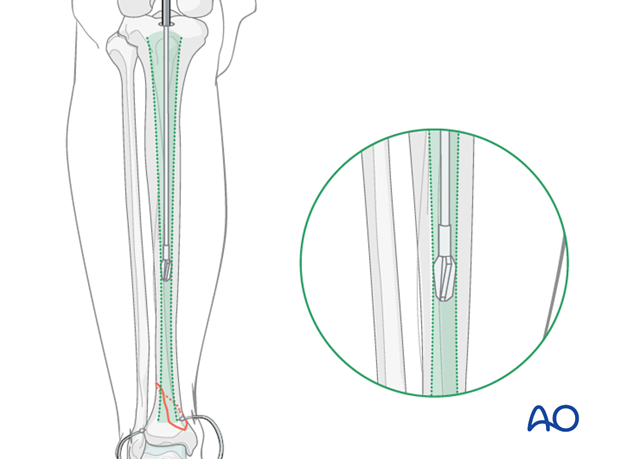
Pitfall: Heat necrosis by overaggressive reaming
Overaggressive reaming should be avoided because it may cause heat necrosis of the tibial canal. This applies especially for narrow midshaft canals (9 mm or less in diameter). Use of a tourniquet during reaming is strongly discouraged.

8. Cannulated nail insertion
Preparing nail insertion
If necessary, replace the ball-tip guide wire with one that can be removed through the inserted nail. (This technique is described for a cannulated nail system.)
Insertion of the cannulated nail
Achieving and maintaining an accurate provisional reduction is essential for successful alignment of distal tibial fractures. Do not lose the reduction during nail insertion.
To prevent distraction or displacement of the fracture, it may be necessary to provide counter-pressure or manual support.
The nail should advance easily over the guide wire, by hand or with gentle hammer strokes. Make sure the nail is properly aimed down the tibia. Remove it and ream to a larger diameter if the nail is still hard to insert.

The tip of the nail should be placed deeply in the center of the distal tibia, usually to the level of the physeal scar. Confirm this position with AP and lateral image intensifier views.
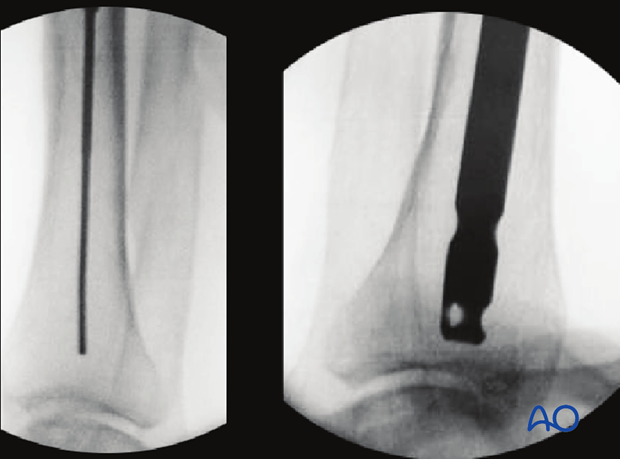
Pearl: use of Poller screws
Blocking screws (Poller screws) can be placed in the distal fragment to guide the nail and correct fracture deformity. These screws are placed from anterior to posterior to correct coronal plane deformities, and from medial to lateral to correct sagittal plane deformities. They can be left for stability or removed after nail insertion.
For a valgus deformity, a proximal Poller screw should be placed more laterally, to prevent the nail from migrating to the lateral cortex of the proximal segment and/or a distal Poller screw should be placed more medially to prevent the nail tip from migrating medially.
Conversely, for a varus deformity, a proximal Poller screw should be placed more medially and a distal Poller screw should be placed more laterally.
Alternatively, two screws can be placed (medially and laterally) to effectively centralize the nail in the distal fragment.
Blocking screws may be preplanned or used to correct intraoperative displacement. In the latter, the nail is withdrawn, and the principal blocking screw is placed to keep the nail from following its initial path and to redirect it towards the center of the distal fragment.
The fracture is manually reduced, and the nail is advanced past the blocking screw.
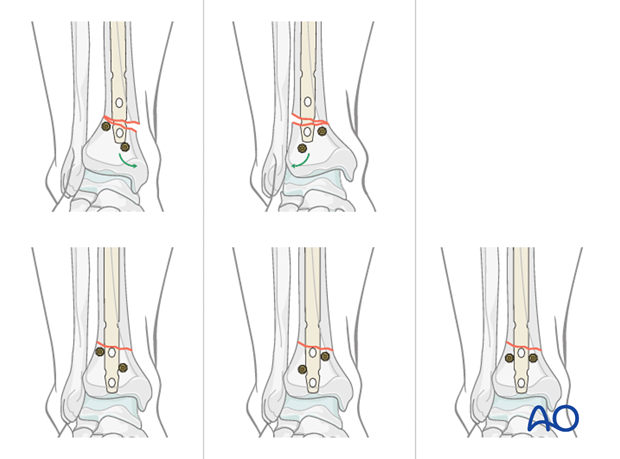
Pitfall: Undisplaced intraarticular fracture
Sometimes, a distal tibia fracture that appears to be extraarticular may have an undisplaced extension into the ankle joint. This is typically in the sagittal plane. Displacement may occur as the nail is driven into the distal fragment.
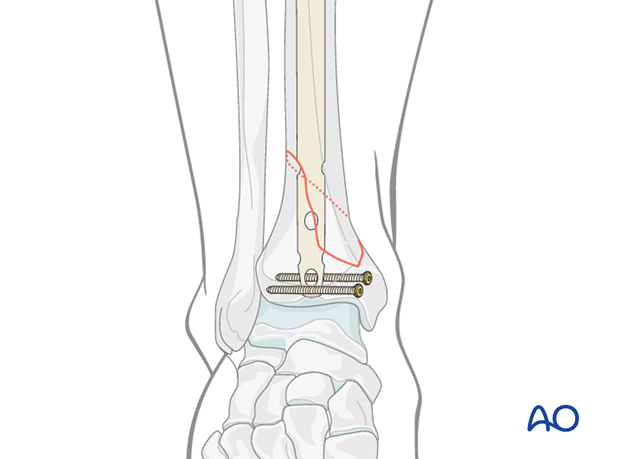
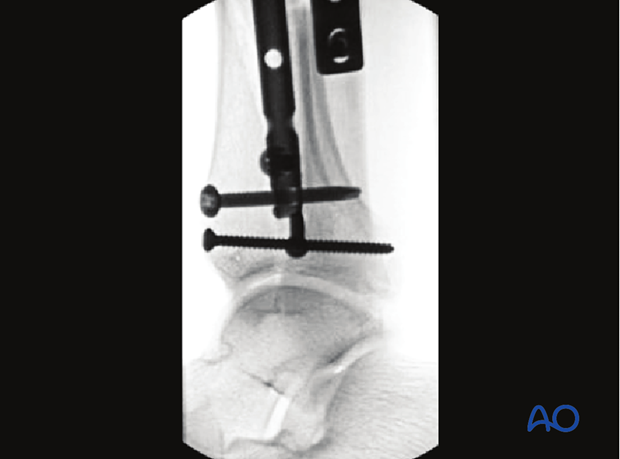
It is wise to have a very low threshold for inserting percutaneous “protection screws” or pointed bone clamp just above the level of the joint to reduce & compress the fracture if such a fracture is suspected.
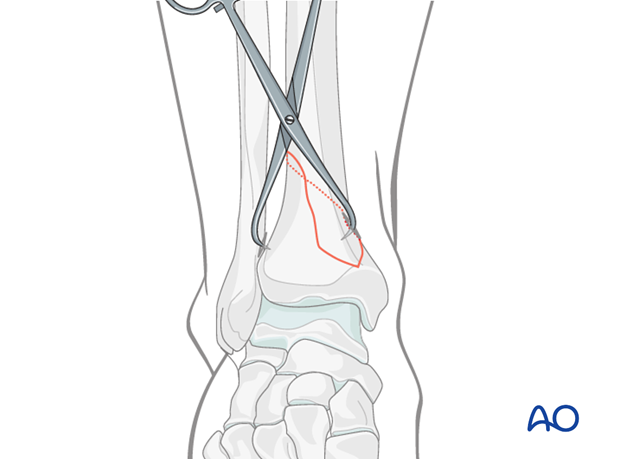
Example of treatment of undisplaced intraarticular distal tibia fracture.
9. Proximal and distal nail locking
Proximal locking
Because the fracture is distal to the isthmus of the tibia, which is the narrowest part of the medullary canal, a single proximal static locked screw is sufficient unless there are concerns about the quality of the bone.
Distal locking
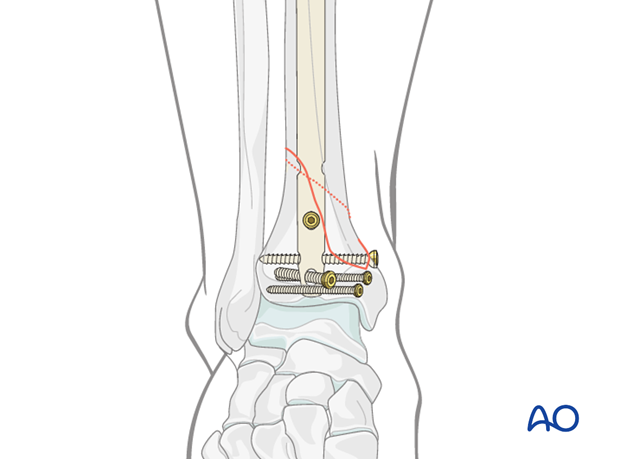
It is important to maintain accurate reduction of the distal segment while distal locking is carried out. The number and position of distal locking screws is determined by the individual locking configuration of the nail and by the fracture morphology. Insert the greatest number of screws distal to the fracture as possible.
Screws may injure local vessels and nerves. Anterior/posterior screws can irritate the anterior tibialis tendon. Bluntly dissect to the bone surface before drilling to reduce this risk.
Occasionally, the most proximal of the distal locking screws can help reduce or fix a more proximal extension of the fracture pattern as shown in the illustration.
Note: It is important to assess alignment accurately before completing this step, because the image intensifier view can be misleading.
10. Aftercare following intramedullary nailing
Intramedullary nailing of distal tibia fractures
After intramedullary nailing, immobilization may be unnecessary. Alternatively, to avoid any equinus contracture, apply a well-padded splint with the ankle in full dorsiflexion.
Leg elevation is recommended for the first 2-5 postoperative days. The patient may be briefly out of bed on crutches.
Physiotherapy with active assisted exercises of toes, foot and ankle should begin as soon as possible.
Mobilization
When wound healing is satisfactory, begin flat footed, weight of the leg weight bearing (10-20kg).
Follow up
Clinical and radiological follow-up is recommended after 2, 6 and 12 weeks. Depending on the consolidation, weight bearing can be increased after 6-8 weeks with full weight bearing usually after 3 months.
Implant removal
Implant removal may be necessary in cases of soft-tissue irritation caused by the interlocking bolts (especially antero-posterior bolt near anterior tibial tendon). The best time for actual nail removal is after complete remodeling, usually at least 12-18 months after surgery.
