Ilioinguinal approach
1. Introduction
The ilioinguinal approach was developed by Emile Letournel based on cadaveric dissections to provide anterior access for fractures of the acetabulum.
It provides exposure of the inner aspect of the innominate bone from the SI joint to the pubic symphysis.
This approach can be used for ORIF of periprosthetic acetabular fractures.
The surgical exposure requires development of three wound intervals. Mobilization of the femoral vessels and nerve, as well as the spermatic cord (male) or round ligament (female), are key to the development of these intervals.
Inguinal or femoral hernias or previous hernia surgery may complicate the surgical approach, particularly in older individuals. In these cases, it may be prudent to limit or omit the second wound interval exposure and expand visualization through the first and third windows.
Scar tissue due to previous exposure might obscure typical landmarks.
Exposure
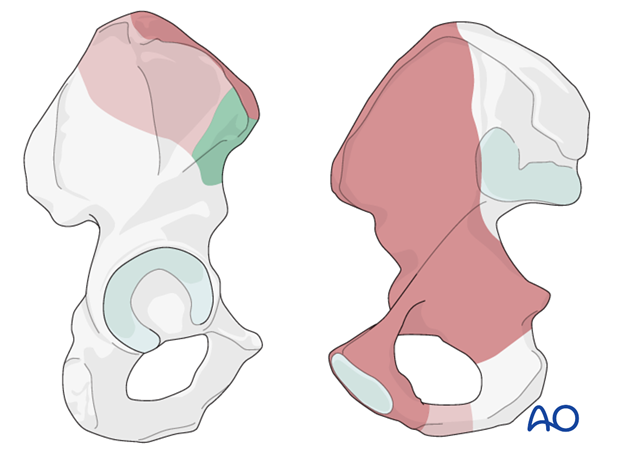
The approach allows direct access to the vast majority in the anterior ilium as depicted in dark brown.
Extended access of the outer ilium can be achieved by elevating limited portions of the tensor fascia latae origin (green) as well as the glutea (light brown). Additionally, clamps may be applied submuscularly in these regions to limit additional muscular trauma.
2. Skin incision
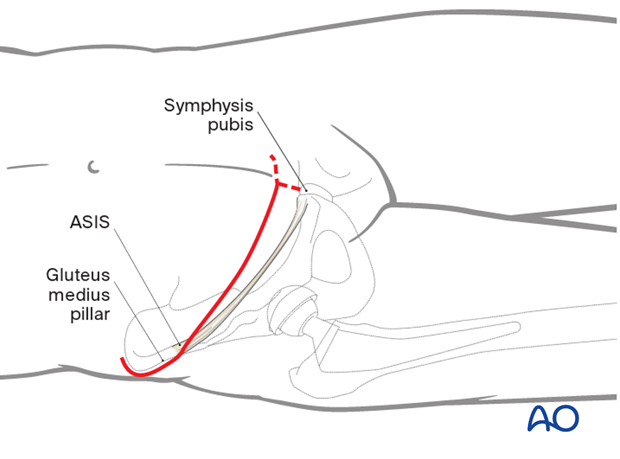
Make a curved incision beginning posterior to the gluteus medius pillar and extend past the midline 2 cm proximal to the symphysis.
In case of thin individuals, placing the lateral limb of the incision distal to the iliac crest may avoid a tender scar.

3. Expose the internal iliac fossa
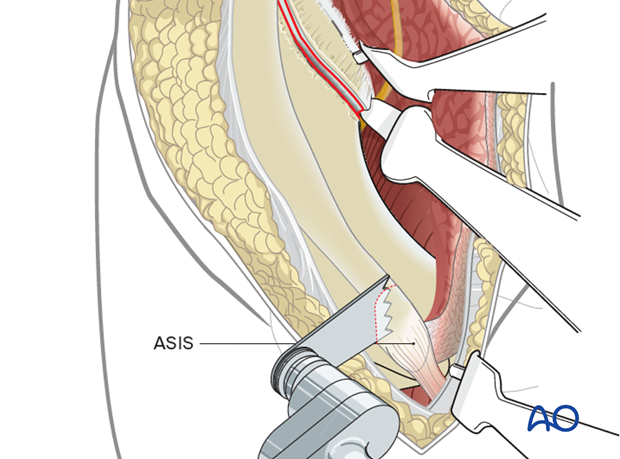
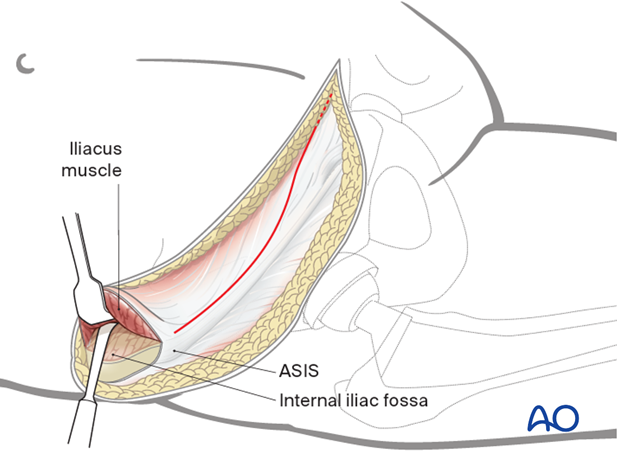
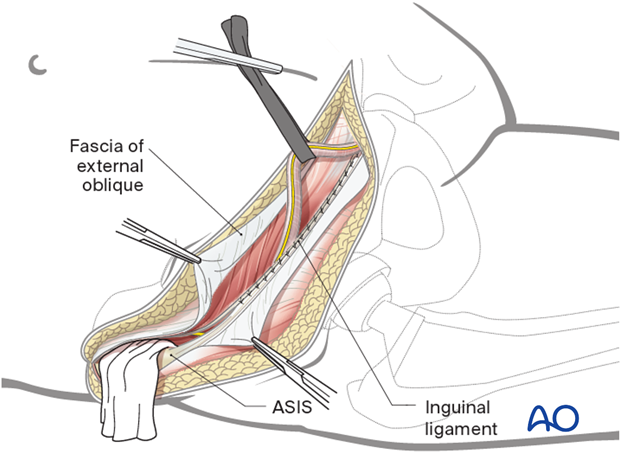
Begin by exposing the internal iliac fossa. Release the external oblique insertion onto the iliac crest, taking care to leave a thick fascial/periosteal cuff to facilitate repair. Initially, leave the tissues attached to the anterior superior iliac spine (ASIS).
In continuity with this release, expose the internal iliac fossa subperiosteally by mobilizing the iliacus muscle. Pack the fossa with a sponge.
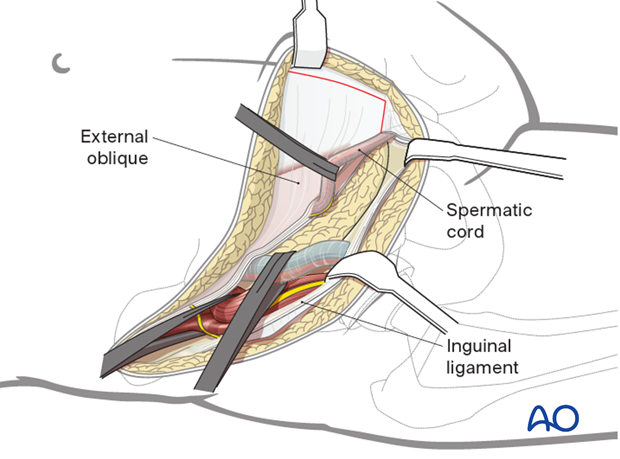
Next, the external oblique aponeurosis is incised from the ASIS to the lateral border of the rectus sheath, passing cranial to the external inguinal ring.
4. Release the muscular attachment from the inguinal ligament
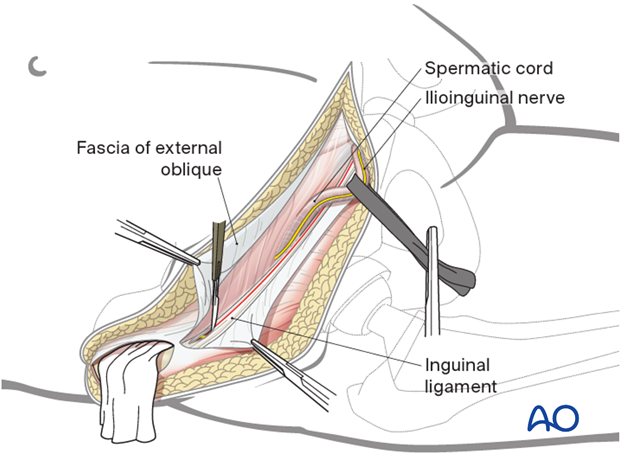
The spermatic cord (or round ligament) is mobilized in the medial aspect of the wound.
Medially, the transversus abdominis is then released from the inguinal ligament, usually taking 1-2 mm of the ligament with the tendon.
This release begins at the ASIS and progresses medially to the conjoint tendon of the internal oblique and the pubic tubercle.
Care must be taken to protect the ilioinguinal nerve which normally lies just proximal to the inguinal ligament after penetrating the abdominal wall.
5. Secure the lateral femoral cutaneous nerve
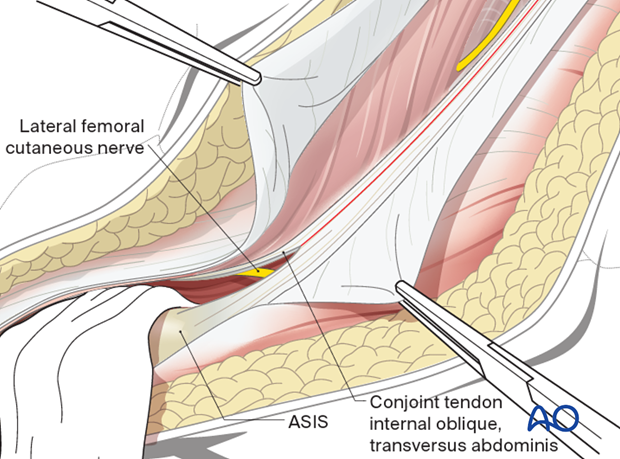
The lateral cutaneous nerve of the thigh is usually encountered just deep to the conjoint tendon (of the internal oblique and the transversus abdominis) approximately 1-2 cm medial to the ASIS.
This nerve can usually be preserved if it is mobilized, as it exits the abdominal wall and enters the fascia of the thigh.
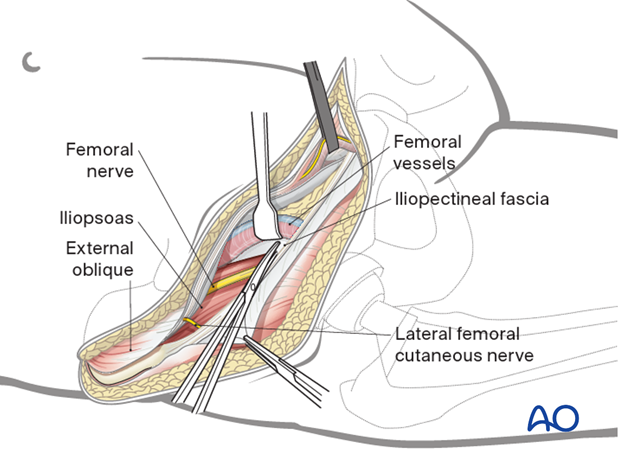
The anterior aspect of the iliopsoas muscle is thus exposed in the lateral portion of the wound with the femoral nerve lying on its anteromedial surface.
6. Femoral canal anatomy
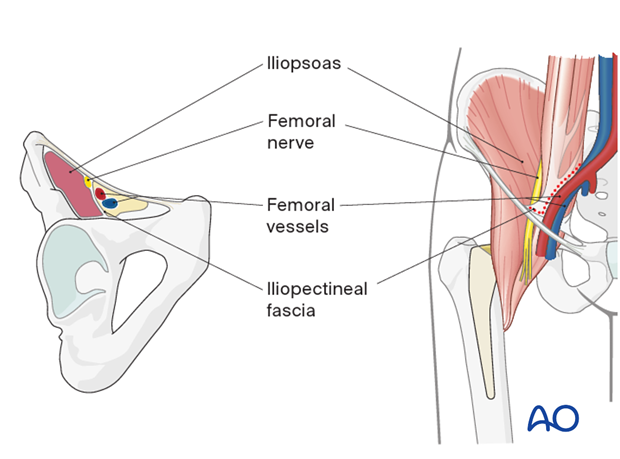
The key to the next portion of the dissection is to understand the anatomy of the femoral canal and the iliopectineal fascia.
This fascia separates the neural and vascular compartments and blocks access to the true pelvis from the internal iliac fossa.
7. Develop the iliopectineal fascia
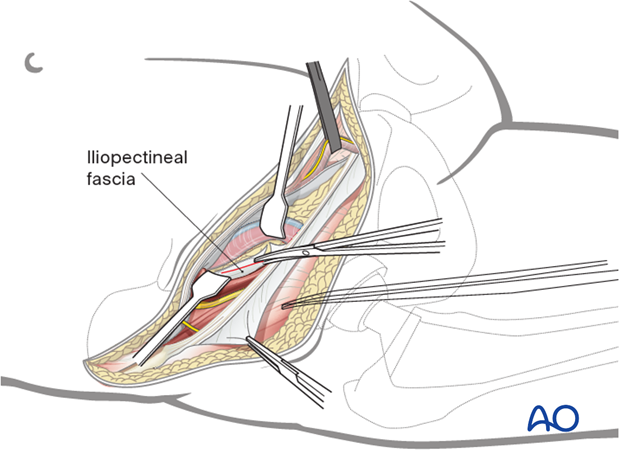
The iliopectineal fascia is delineated by careful retraction of the femoral vessels medially and the femoral nerve and iliopsoas laterally.
It is then divided distally, under direct visualization, down to the pubic root.
8. Release the iliopectineal fascia
The iliopsoas is then retracted laterally, exposing the fascial attachment to the pelvic brim which can be divided safely.
Once the iliopectineal fascia has been released, the true pelvis can be entered from the internal iliac fossa.
Dissection around the iliac vessels should be minimized. This limits risk of vascular injury and also preserves the path of the primary lymphatic trunk to the lower extremity which passes medial to the vein.
9. First window
The three windows of the ilioinguinal approach can now be fully exploited.
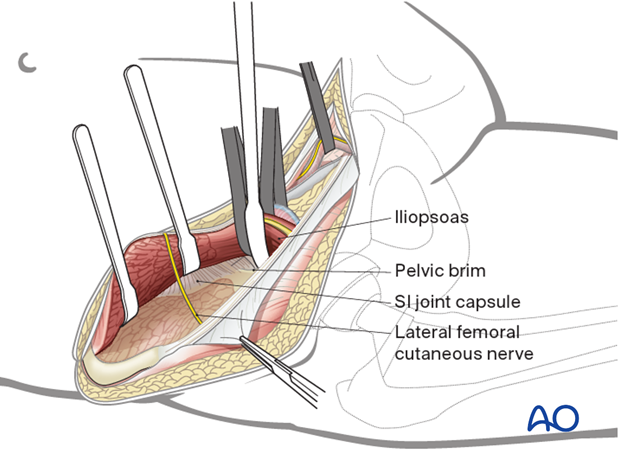
The first window encompasses the entire internal iliac fossa from the SI joint posteriorly to the iliopectineal eminence anteriorly.
This window is optimized with hip flexion to relax the iliopsoas.
Medial retraction usually requires placement of retractors on the quadrilateral surface.
10. Second window
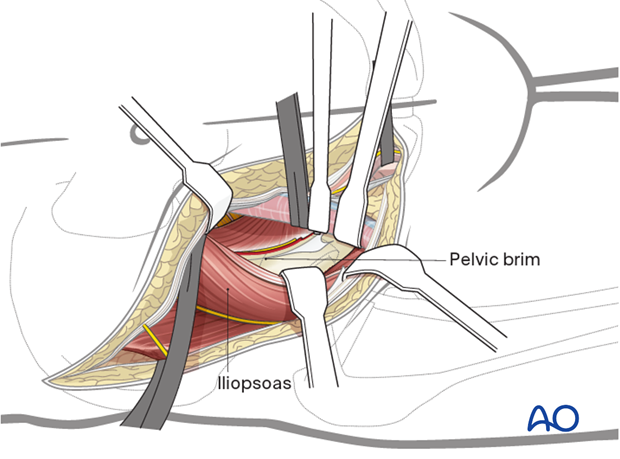
The second window provides access to the pelvic brim and quadrilateral surface from the SI joint to the lateral third of the superior pubic ramus. Medial retraction of the femoral vessels should be gentle and must be carefully monitored.
11. Third window
The third window can be developed in several different ways.
Regardless of method the bladder must be bluntly dissected off the pelvis and protected. This can be achieved by packing the space of Retzius with a sponge after the bladder has been identified by palpation of the urinary catheter bulb.
The most limited of these methods leaves the ipsilateral rectus insertion attached and visualization is provided between the rectus and the spermatic cord (or round ligament).
Alternatively, if the fracture pattern requires, the entire medial portion of the superior ramus and symphysis can be visualized by release of the ipsilateral rectus insertion.
The same visualization can be achieved by leaving the rectus attached and splitting the rectus heads in the midline. With the rectus still attached, retraction is carried out posterior to the rectus with a Hohmann retractor placed along the superior ramus.
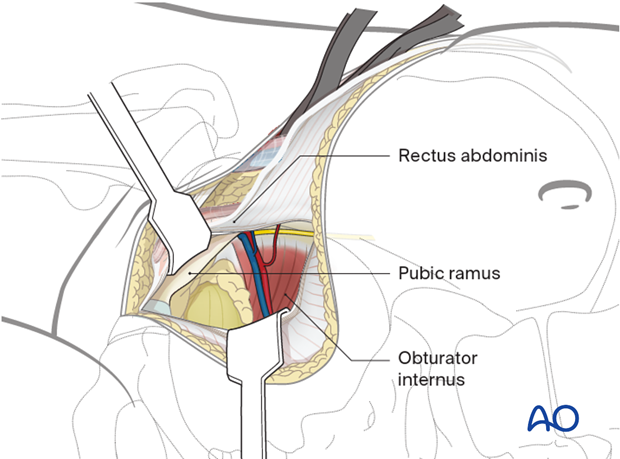
12. Option: modification of the third window optimizing intrapelvic access
The third window can be expanded to allow direct, intrapelvic access to the entire quadrilateral surface and the posterior column.
The third window developed in this manner provides surgical access equivalent to the anterior intrapelvic approach.
It is frequently useful for the operating surgeon to perform the third window exposure from the opposite side of the table for optimum visualization (as illustrated). This provides a view from the symphysis looking laterally along the superior ramus and pelvic brim.
The linea alba has been incised and the rectus heads separated at the midline. A retractor is placed elevating the ipsilateral rectus laterally from the pubic ramus.
Infrapectineal dissection carefully proceeds along the medial surface of the pubic ramus and posteriorly following the pelvic brim. The iliopectineal fascia was previously dissected, allowing elevation of the femoral vessels and nerve. The obturator internus can be elevated to expose the entire quadrilateral surface and posterior column.
13. Retropubic vascular anastomoses
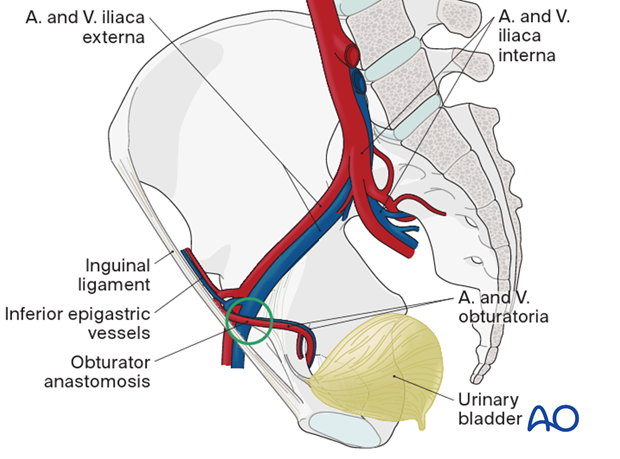
From the opposite side of the patient, one can more easily see any retropubic vascular communications between the obturator vessels and either the inferior epigastric (corona mortis) or external iliac vessels. Such retropubic anastomoses, present in 40% or more of patients, are at risk of being torn. They may require ligation and division to allow mobilization of the iliac vessels.
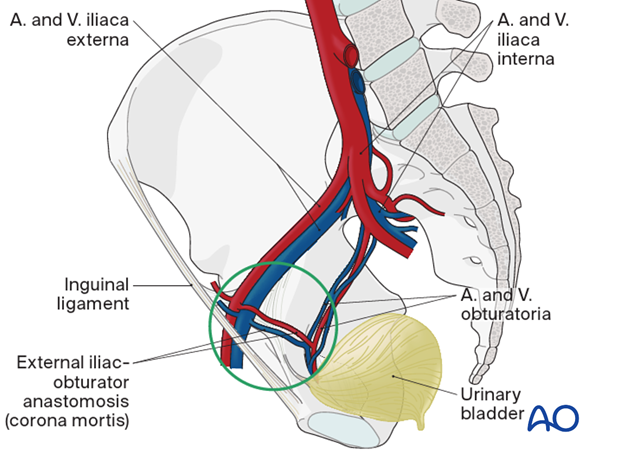
This illustration shows obturator vessels coming from the external iliacs rather than from the internal iliacs.
14. Wound closure
Before closure, one may place drains in the space of Retzius and anterior internal iliac fossa.
Layered closure then begins with repair of the conjoint tendon to the inguinal ligament. A careful fascial repair restores the floor of the inguinal canal.
The external oblique aponeurosis and the rectus sheath are then repaired, followed by secure reattachment of the abdominal wall origin to the iliac crest, in the lateral portion of the incision. A hernia-free repair and avoidance of entrapment of the spermatic cord should be achieved.
Subcutaneous drains may be inserted.
Finally, perform an appropriate subcutaneous and skin closure.
15. Possible extensions
An osteotomy of the ASIS can be performed to improve exposure and visualization.
