ORIF - Bridge plating
1. Principles
General considerations
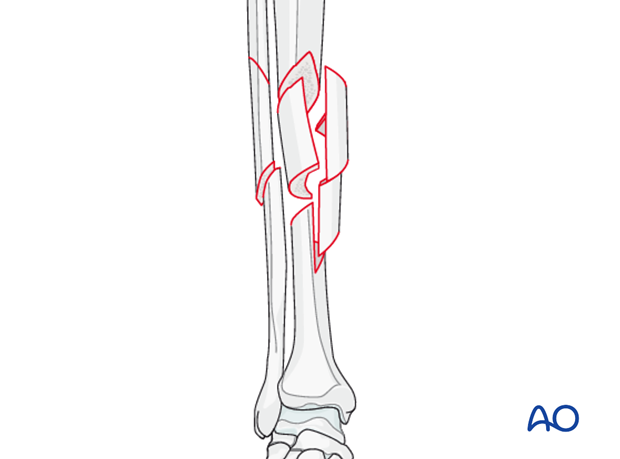
Complex multifragmentary fractures, are often high-energy injuries.
Utmost care is necessary to minimize stripping soft tissues of the intermediate fragments as the blood supply to these is usually tenuous. It may be possible to place the skin incision posterior to the planned plate position, so that it is neither directly over the plate, nor over the anterior tibial crest. However, large flaps are not desirable.
Indirect reduction
Like closed intramedullary nailing, bridge plating is a technique well suited for preserving fracture fragment vascularity. If done open, it is essential that the surgeon use only indirect reduction for realignment of the fracture and intercalary fragments – with a distractor, external fixator, or plate as reduction tool (“push-pull” screw, or articulated tension device). An anatomical reduction of the intermediate fragments is not desirable.
Occasionally judgment must be used about reduction of an exceptionally displaced fragment which may threaten soft tissues. Try to mobilize this with the least possible additional soft-tissue damage, (extra distraction may help), with the goal of the safest repositioning – not necessarily an anatomic one.
If definitive fixation must be delayed, make every effort to obtain a provisional reduction, primarily by restoring length, and applying an external fixator. Its pins can be placed proximal and distal to the planned plate location – even in the distal femur and calcaneus. Add a well -added splint if needed to support the unstable comminuted zone. If length is maintained this way, plating can be deferred until soft tissues have recovered, and necessary preparations for surgery have been accomplished. Sometimes, fixation of a simple associated fibular fracture can aid preliminary stabilization.
Indications
Open bridge plating should be considered as an alternative to minimally invasive plate osteosynthesis, when surgeon experience and/or intraoperative imaging are not sufficient for such a procedure. If done open, the surgeon should mimic the closed procedure as closely as possible, opening the fracture zone only enough to permit the least traumatic placement of a long plate that stabilizes diaphyseal reduction, after indirect restoration of length, axis alignment, and rotation.
Plate position
It is important to place the plate appropriately against both proximal and distal fragment. With proper reduction and plate position, the plate should lie in the middle of the surface to which it is applied, both adjacent to and distant from the fracture zone. Visual confirmation of this placement, which confirms that angulation has been corrected, is the main justification for open bridge plating, which also allows placement of screws quite close to the fracture zone (about 10 mm, and perhaps angled away from the fracture plane).
The plate should be applied with provisional fixation in place, with an incision just wide enough to permit extraperiosteal placement of the plate. Gentle probing confirms the anterior and posterior borders of the tibia without unnecessary exposure, so that proper plate position (as above) can be achieved.
2. Patient preparation and approaches
Patient preparation
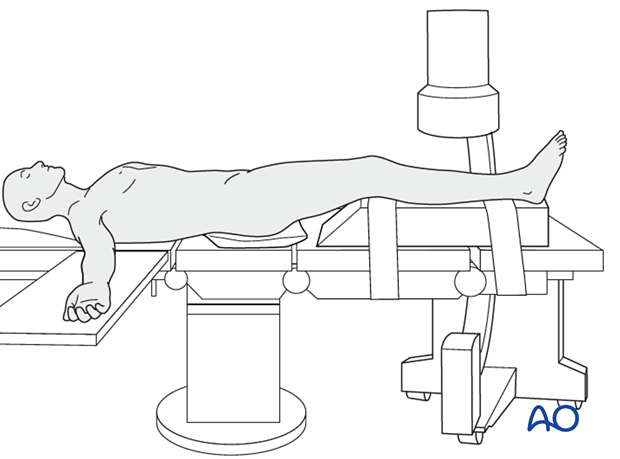
The patient is in a supine position on a radiolucent table or a standard operating table with a radiolucent extension. A pad is placed underneath the buttock to prevent external rotation.
A large foam bolster or cushion is placed under the affected leg to raise it above the opposite leg and facilitate lateral C-arm images.
Approaches
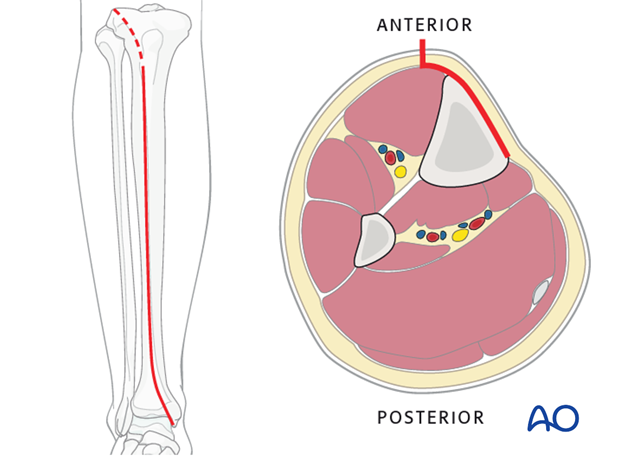
An anteromedial approach is preferred. The advantage of this approach is, that it removes no muscle from the fracture fragments. Also, the medial surface of the tibia is normally flat and conventional plates can be contoured to fit the surface or precontoured plates fit with minimal or no modification.
The anterolateral approach should be chosen if the soft tissues don’t allow for an anteromedial approach. It is difficult to use this approach distally due to soft-tissue interference and contouring the plate along the lateral aspect of the tibia.
3. Reduction
Reduction principle
The key to all fracture reduction is restoring axial length.
Ways of gaining length are:
- Distractor/external fixator
- Push-pull screws
- Articulated tension device (ATD).
Large distractor or external fixator
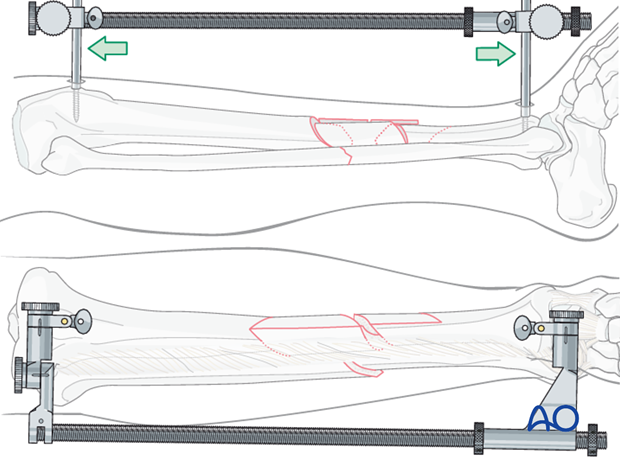
A large distractor is very helpful for reduction. Apply one of these devices before exposing the comminuted fracture zone to obtain stability which protects soft tissue attachments and bone vascularity. Place a Schanz pin in both proximal and distal fragments. Distraction is applied across these pins by turning the nut on the threaded rod.
If the plate is to be placed medially, then the distractor should be placed anteriorly.
Note: The pins must be placed in the same plane.
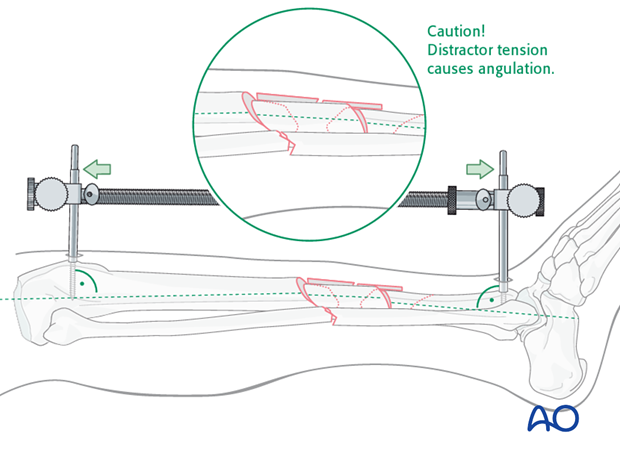
Remember that tension with the distractor may produce angulation. Adjust the pin clamps appropriately.

Pitfall
With significant tension of the distractor, the fracture may angulate, with concavity on the side opposite to the distractor.
If the distractor is medial, it can produce valgus.
If it is anterior, it can cause flexion (apex-anterior angulation) at the fracture, as shown here.
If the surgeon recognizes this problem, it can be corrected by adjusting the distractor pin clamps to favor the opposite deformity.
Pitfall - Solution
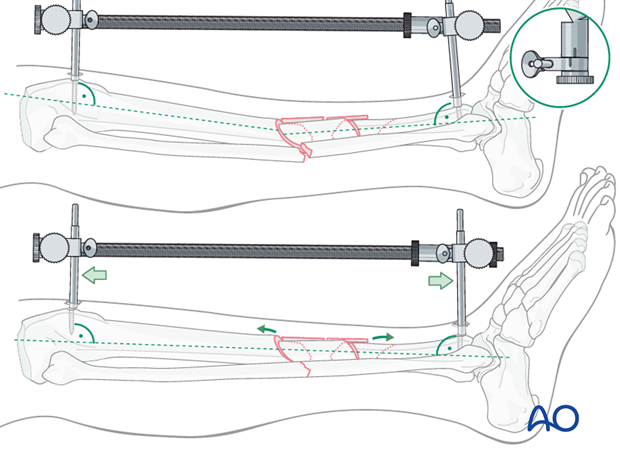
The distractor or external fixator pins can be adjusted to correct the angular deformity. When the distractor is lengthened, tension is asymetrically applied to the soft tissues, so that angulation is produced at the fracture. The side opposite the distractor becomes concave.
As shown here, the distractor pin-clamps have been angulated to produce apex-posterior angulation.
As tension is applied, length is restored, and the apex-posterior deformity is corrected.
Option: Articulated tension device (ATD)
To use the ATD, a precontoured plate must first be applied to one of the main fracture fragments. For open bridge plating, a distractor or external fixator should be used for initial stability. The ATD may be added, if necessary, to assist with final reduction, beginning with additional distraction for the main fragments. This facilitates reduction, permitting clamps to be used to reduce the fracture planes, one at a time. If fracture configuration permits, the ATD can be used to tension the plate and provide interfragmentary compression.
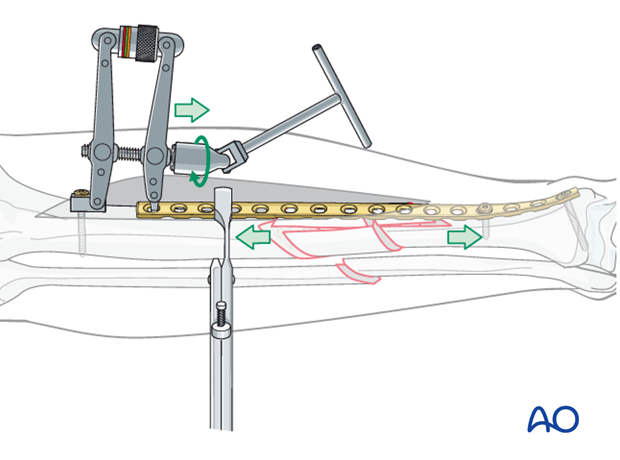
Option: Push-pull screw
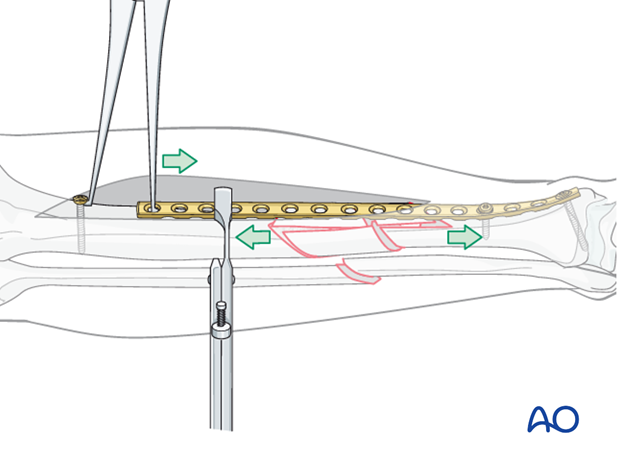
For open bridge plating, a distractor or external fixator should be used for initial stability. A push-pull screw may be added, if necessary, to assist with final reduction, beginning with additional distraction for the main fragments. A precontoured plate is applied to one of the main fragments. A bicortical screw is then placed near the end of the plate and the laminar spreader is used to apply distraction force through the plate. This permits the fracture planes to be reduced, one at a time. If fracture configuration permits a Verbrugge clamp hooked over the screw and into the plate can be used to provide interfragmentary compression.

Rotation
Rotational alignment must be considered during application of any of the previous reduction methods.
Especially when placing pins for the distraction device, rotation should be corrected prior to restoration of length.

4. Plate selection and preparation
Choice of the plate
Plate length is based upon symmetry above and below the fracture zone, which in this case includes each fracture plane. In C -type fractures, at least 3-4 screw holes are necessary in both proximal and distal fragments, i.e. on either side of the fracture zone.
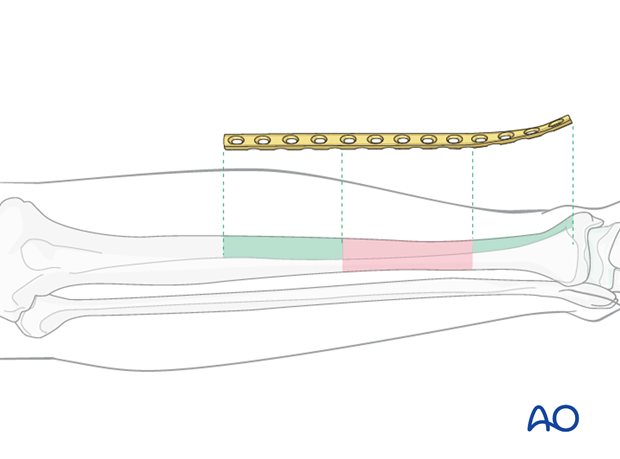
When the fracture zone is very distal or proximal, there may not be room enough for symmetric plate length in the segment nearest the articular surface. In this situation, a plate with multiple hole options in the metaphysis is chosen to improve fixation in the short periarticular segment.
A locking plate may be indicated if the bone quality is poor or when the fracture extends into softer metaphyseal bone.
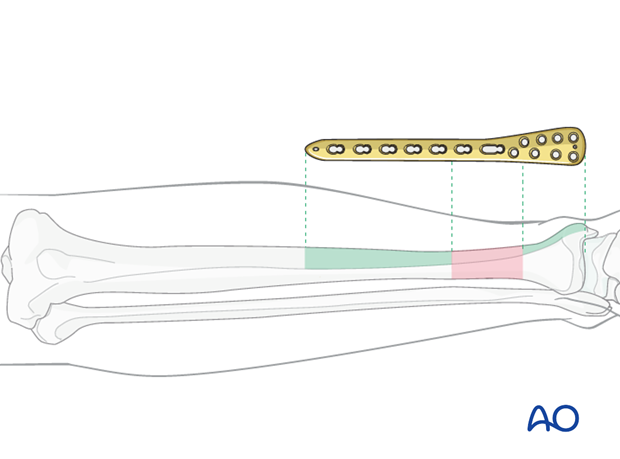
Traditionally a 4.5 mm plate has been advised for the tibial shaft. Its advantages include increased plate thickness and larger screw size for added strength. These plates are, however, more difficult to contour and may be too prominent.
A 3.5 mm plate offers improved contourability and multiple screw options in metaphyseal (end-segment) zones. However, they are less durable than the large fragment plates.
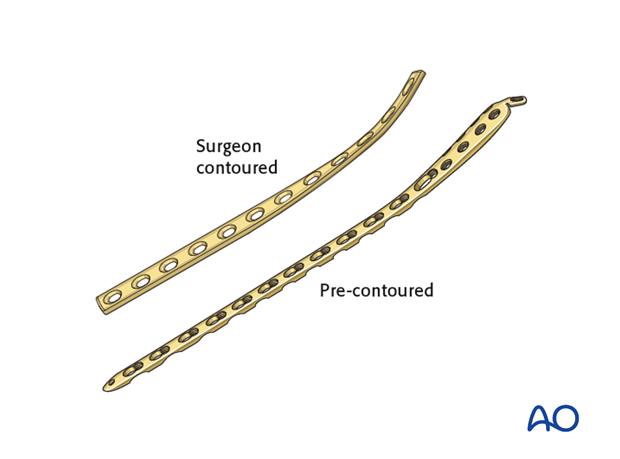
Another consideration is the choice between an anatomically precontoured plate or one which the surgeon contours. For plates which need to be contoured, the following steps have to be employed.
Twisting the plate
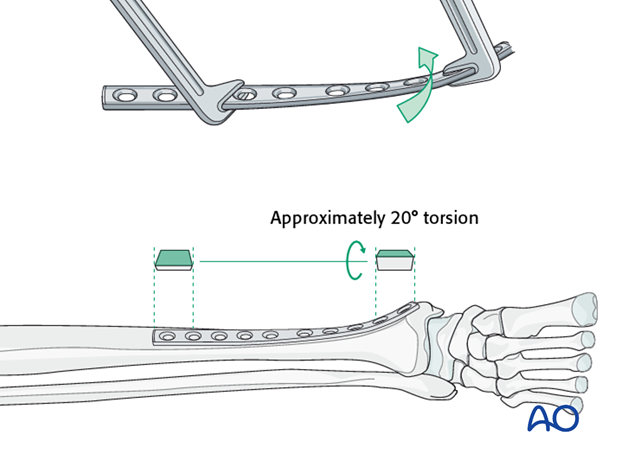
The anteromedial surface of the tibial shaft twists internally approximately 20° as it approaches the medial malleolus.
The first step of plate contouring is to twist the plate so it matches the tibial surface upon which it will lie.
If the plate is bent before it is twisted, the process of twisting will alter the bend that has been created.
Matching the curvature
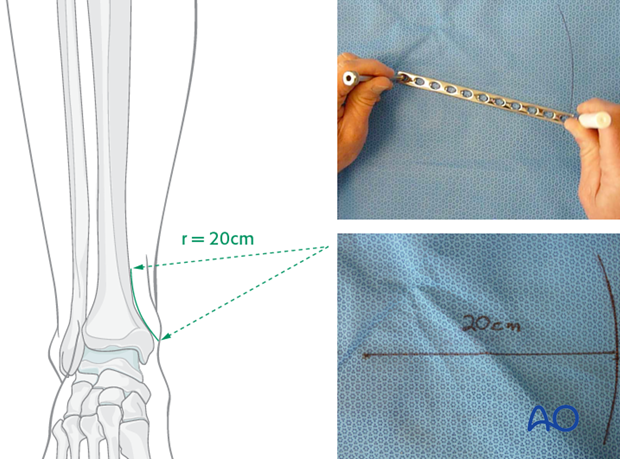
Depending upon the plate location, more or less bending of the plate will be required to match the contour of the intact (or reduced) bone. Much of the medial tibial shaft is quite straight, so that little bending is required. However, the distal medial surface has a significant concavity, with a typical radius of curvature of 20 cm as illustrated.
Such a 20 cm radius can be drawn on a sterile drape and used as a template for plates to be used in this location.
Bending the plate
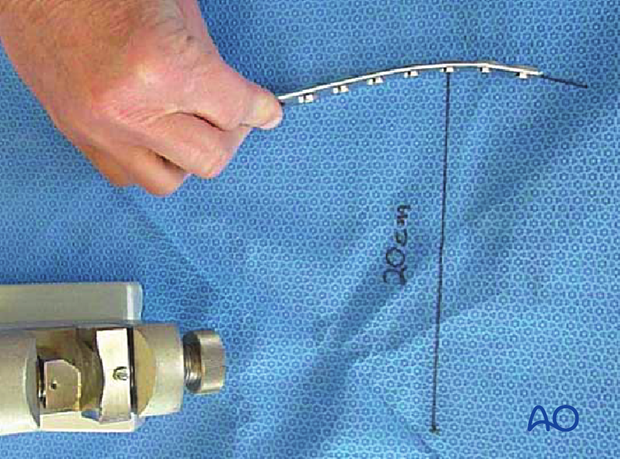
The plate can be bent with bending irons alone, but it is preferable to bend with a bending press, because the press gives more control.
In either case, the bending is done in small steps to produce a smooth contour. Contouring only takes place over the distal 10-12 cm of the plate. When finished, the plate should match the 20 cm radius of curvature.
5. Plate application
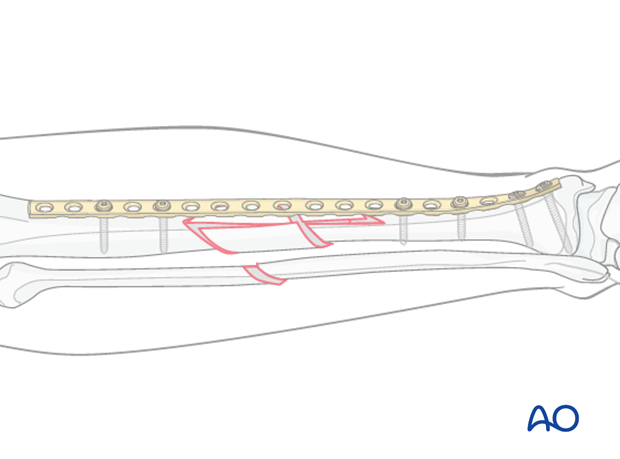
Reduction and plate position are secured by insertion of two screws in proximal and distal main fragments. At this point, the distracting & stabilizing device can be removed. Additional screws can be placed as needed to allow 3 or 4 screws as desired in each main fragment. Remember that plate length is more important than the number of screws. If possible, choose a longer plate that allows a lower screw density, with some holes left empty. As with all bridge plating, no screws are placed into the comminuted fracture zone.
Once screws are placed, minimally traumatic subcutaneous & skin closure are carried out.
6. Postoperative care
Perioperative antibiotics may be discontinued before 24-48 hours.
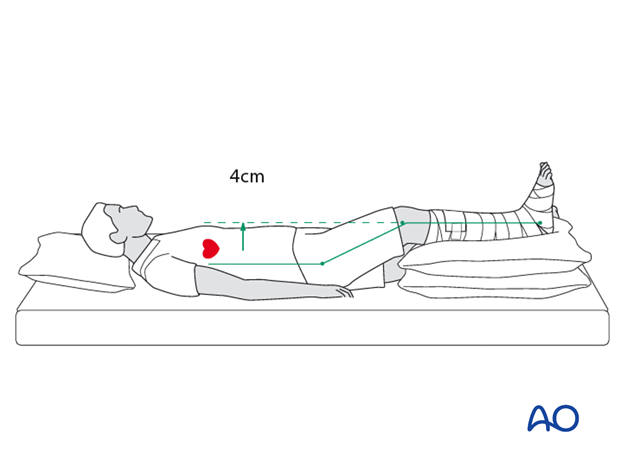
After surgery, the patient’s leg should be slightly elevated, with the leg placed on a pillow, 4 cm above the level of the heart.
Attention is given to:
- Pain control
- Mobilization without early weight bearing
- Leg elevation when not walking
- Thromboembolic prophylaxis
- Early recognition of complications
Soft-tissue protection
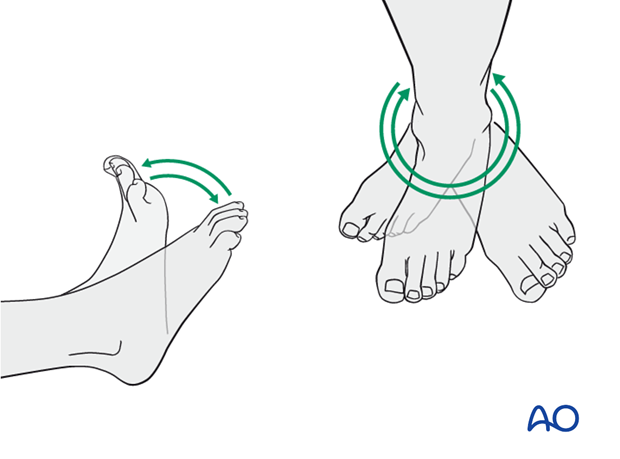
A brief period of splintage may be beneficial for protection of the soft tissues, but should last no longer than 1–2 weeks. Thereafter, mobilization of the ankle and subtalar joints should be encouraged.
Mobilization
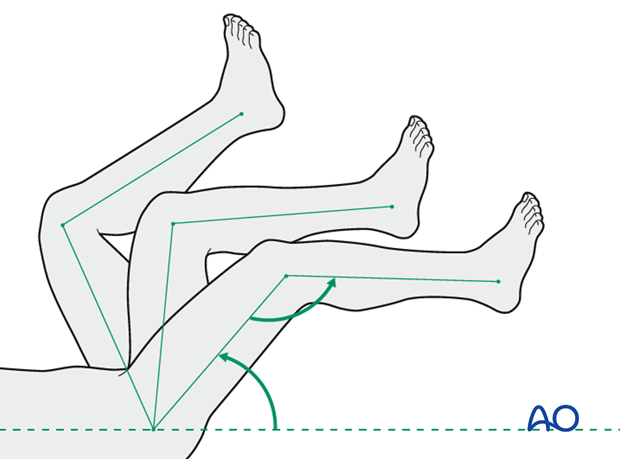
Active and assisted motion of all joints (hip, knee, ankle, toes) may begin as soon as the patient is comfortable. Attempt to preserve passive dorsiflexion range of motion.
Weight bearing
Limited weight-bearing (15 kg maximum), with crutches, may begin as tolerated, but full weight bearing should be avoided until fracture healing is more advanced (10-12 weeks).
Follow up
Follow-up is recommended after 2, 6 and 12 weeks, and every 6-12 weeks thereafter until radiographic healing and function are established. Depending on the consolidation, weight bearing can be increased after 6-8 weeks with full weight bearing when the fracture has healed by x-ray.
Implant removal
Implant removal may be necessary in cases of soft-tissue irritation by the implants. The best time for implant removal is after complete bone remodeling, usually at least 24 months after surgery. This is to reduce the risk of refracture.
