Hemiarthroplasty
1. Principles
Introduction
Hemiarthroplasty is indicated in all cases where a stable osteosynthesis is not achievable especially in situations with poor bone quality like severe osteoporosis. In the elderly, the indication might be extended to head-splitting fractures and situations with a probably ischemic humeral head (eg, a displaced anatomical neck fracture with no capsular attachment remaining).
Hemiarthroplasty for these fractures is challenging because both tuberosities must be isolated, and the metaphyseal involvement may compromise proper seating of the arthroplasty. The goal is to restore humeral length, and obtain healing of both tuberosities in their anatomical locations below the humeral head.
Emerging technology
The reverse shoulder prosthesis may have a role for arthroplasty in elderly patients with comminuted proximal humerus fractures. Tuberosity healing is less predictable in the elderly. Their function may be improved by using this type of prosthesis.
Keys to successful hemiarthroplasties
- Correct determination of the surgical landmarks
- Proper determination of prosthesis size and version
- Proper height of the prosthesis with correct soft-tissue tensions
- Anatomical reduction of the tuberosities
- Stable fixation of the tuberosities (with cables or other stout sutures) to promote their union to the proximal humerus
- Autologous bone grafting underneath the tuberosities
Teaching video
AO teaching video: Shoulder arthroplasty
2. Patient preparation and approach
Patient preparation
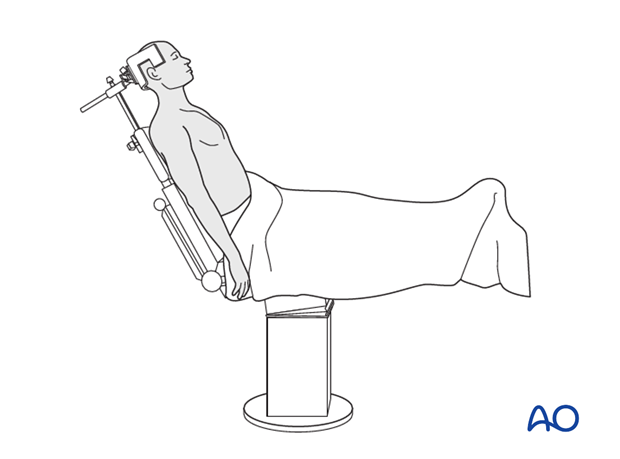
It is recommended to perform this procedure with the patient in a beach chair position.
Alternatively the patient may be positioned supine if the procedure is converted from ORIF.
Approach
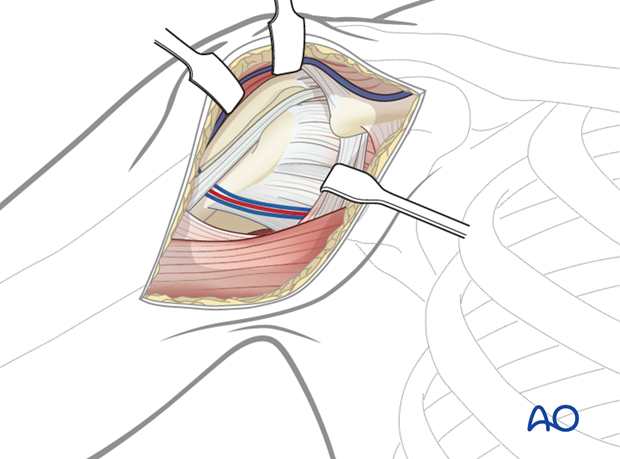
For this procedure the deltopectoral approach is normally used.
3. Evaluation of the fracture
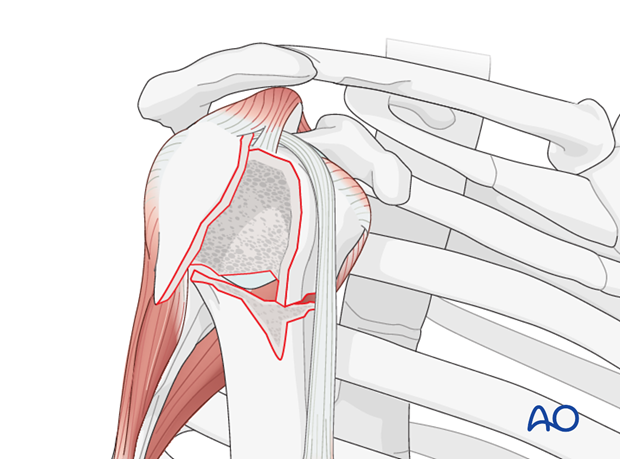
It is crucial to evaluate the fracture. Identify the fracture lines, the long head of the biceps and the condition of the rotator cuff.
4. Suture insertion
Place rotator cuff sutures
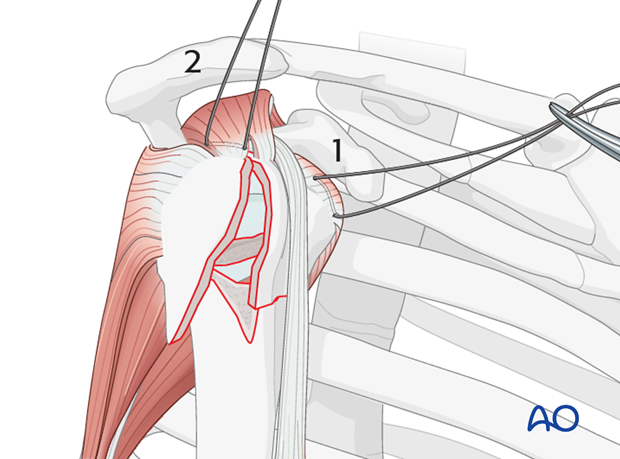
Insert sutures into the subscapularis tendon (1) and the supraspinatus tendon (2). Place these sutures just superficial to the tendon’s bony insertions. These provide anchors for reduction, and temporary fixation of the greater and lesser tuberosities.
5. Tenotomy of the long head of the bicipital tendon
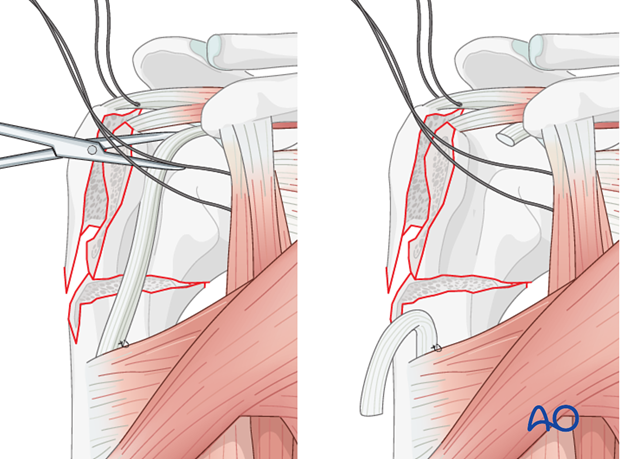
Temporarily attach the bicipital tendon to the superior border of the major pectoralis. Perform a tenotomy of the long head of the bicipital tendon close to the rotator interval.
Pearl: move the stump of the bicipital tendon out of the surgical field.
6. Retrieval of the humeral head
Extend the exposure
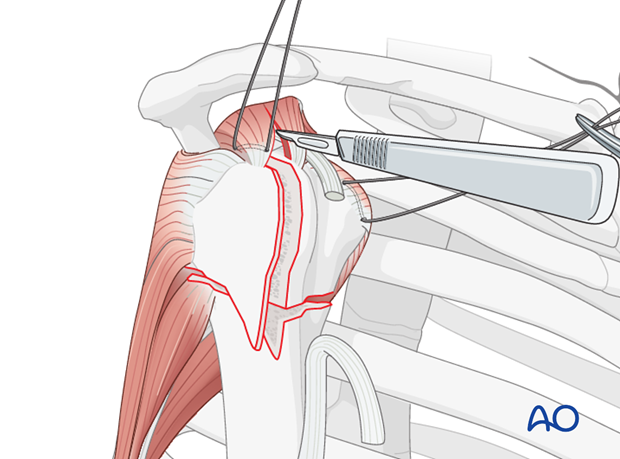
In order to retrieve the humeral head it is necessary to achieve a proper exposure. To do this, divide the soft tissues over the fracture, and extend this incision along supraspinatus muscle fibers as shown.
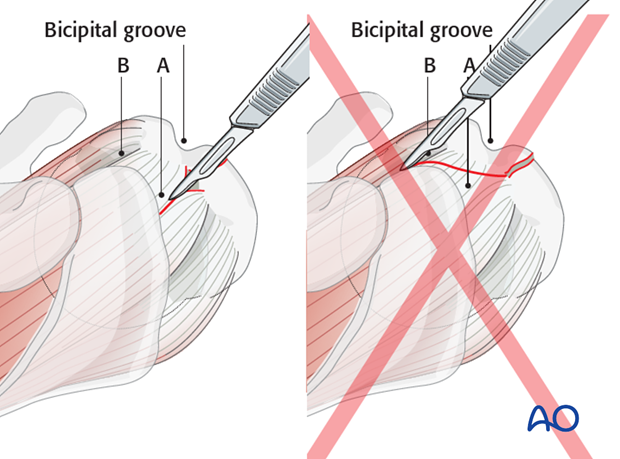
Note: If a cranial extension is needed, it should be carried into the supraspinatus tendon (A) and not into the rotator interval (B). This is because the typical “intertuberosity” fracture line of a four-part fracture is actually lateral to the bicipital groove, and thus through the greater tuberosity.
Retrieve the humeral head
Any remaining medial capsular attachment to the head should be carefully released with special attention not to damage the axillary nerve medial to the proximal humerus.
Be sure that all loose small fragments are removed.
Keep the humeral head for later measurements and bone grafting.
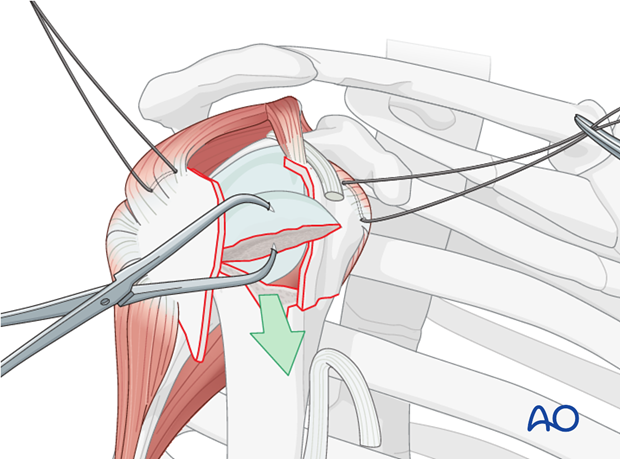
Osteotomy of lesser tuberosity
In 3-part fractures with the lesser tuberosity attached to the humeral head, the lesser tuberosity has to be osteotomized in order to retrieve the humeral head.
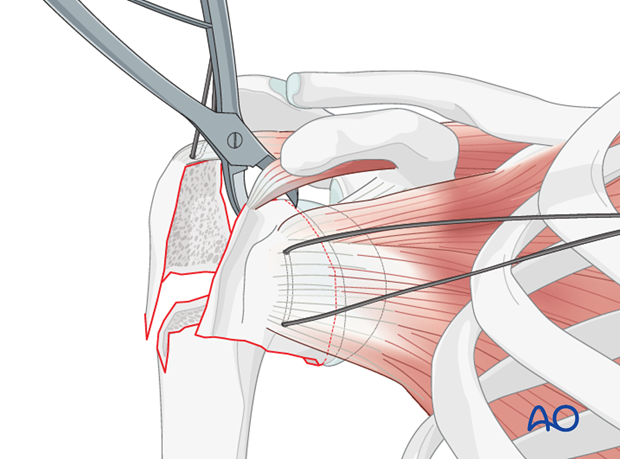
Illustration shows the correct location of the osteotomy.
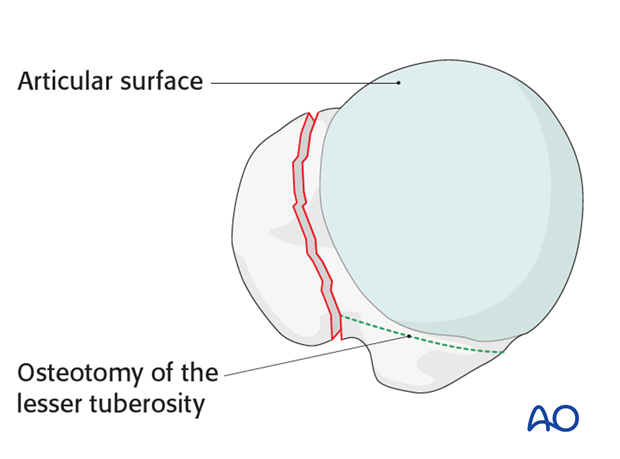
Inspect the glenoid fossa
Resect the tendon of long head of the biceps at its labral origin and retrieve the intermediate tendon.
Inspect the glenoid fossa in order to rule out any injury.
If there is a glenoid fracture, osteosynthesis should be performed now.
Remove any bony fragments.
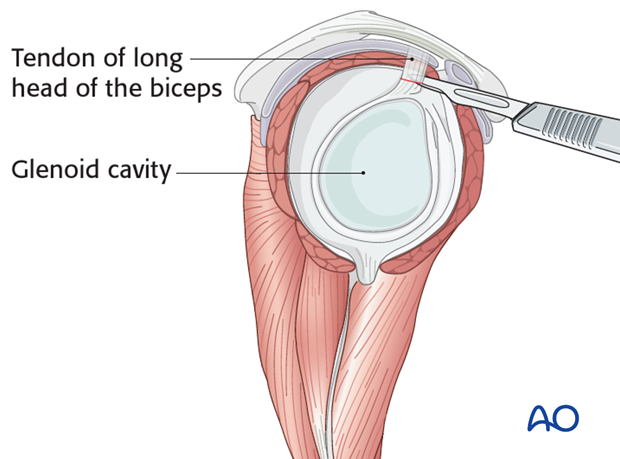
7. Suture insertion into the infraspinatus tendon
Insert a suture into the infraspinatus tendon.
To protect its distal periosteal sleeve, the greater tuberosity is pushed gently into the shoulder cavity instead of being retracted laterally.
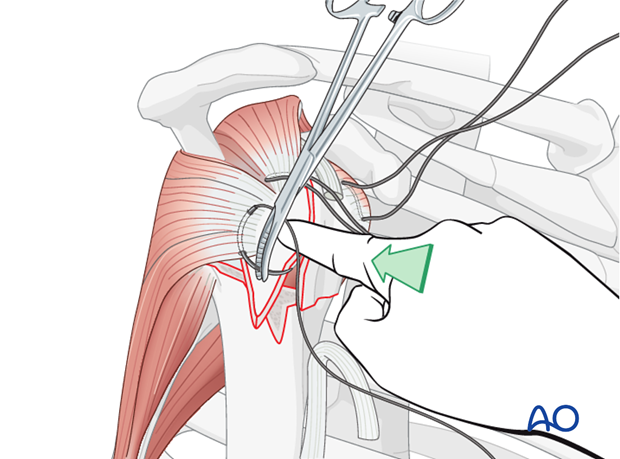
Pitfall: use of forceps or clamps in osteoporotic bone
Grabbing bone fragments with a forceps or clamp will typically increase comminution of osteoporotic bone. This should be avoided by using sutures as “handles” for manipulation and reduction.
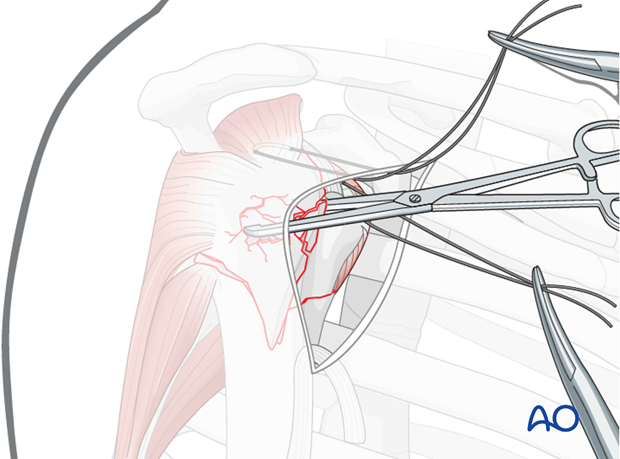
8. Measurement of the humeral head
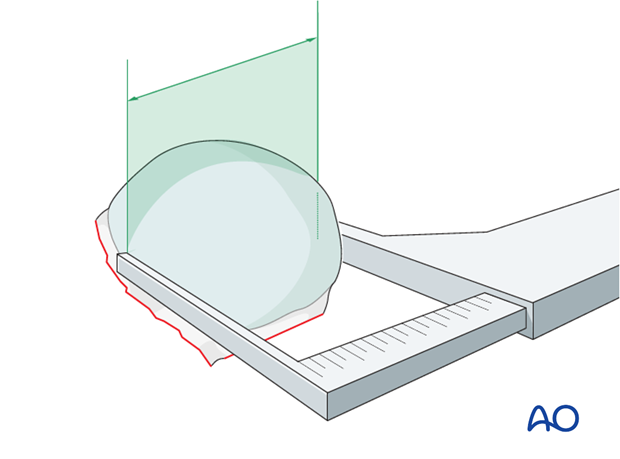
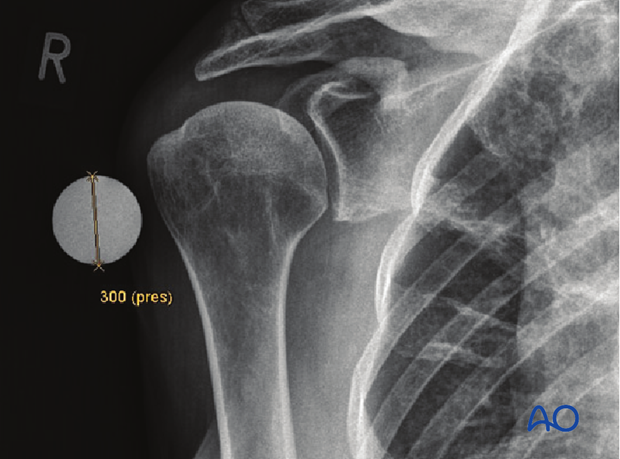
The correct prosthesis head size can be measured on the retrieved humeral head. In cases of comminution an x-ray of the contralateral humeral head will be used to determine the appropriate size.
Note: The humeral head is not spherical. Measure the smallest diameter.
Note: If an x-ray is used to determine the size of the humeral head use a marker ball in order to compensate for any radiological magnification.
The correct size of the humeral head can also be assessed by direct comparison with a trial head.
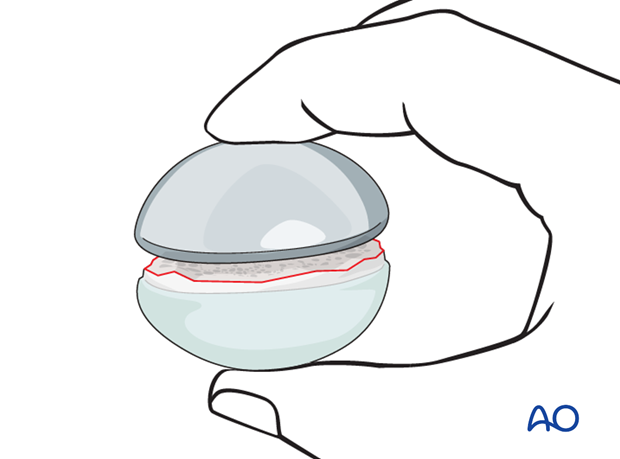
Determine the posteromedial metaphyseal extension
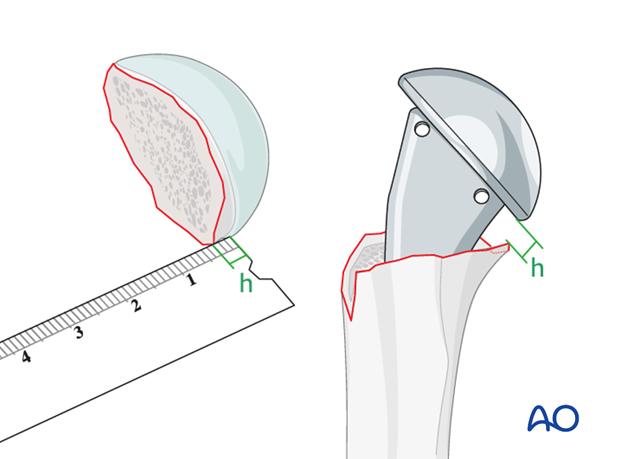
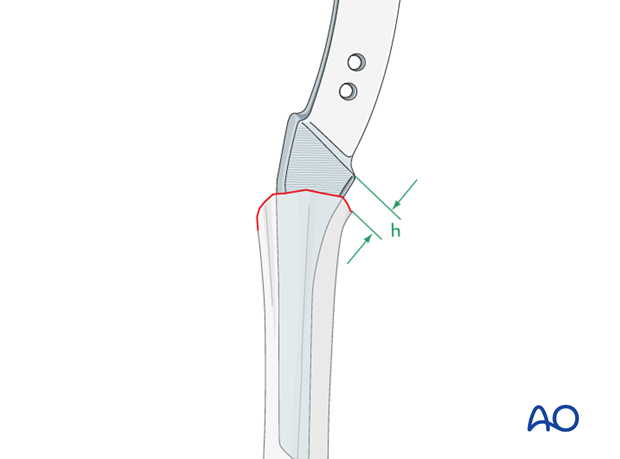
The posteromedial metaphyseal extension (h) determines the implantation height of the prosthesis. It can be measured easily with a ruler.
9. Preparation of the greater tuberosity
In general, the reattachment of the tuberosities can be performed with sutures or cables. We will demonstrate the use of cables through the holes in the prosthesis.
Passing the cables is easier if two 2.0 mm drill holes are first placed through the greater tuberosity. Pass the cables with a wire or cable passer, if needed.
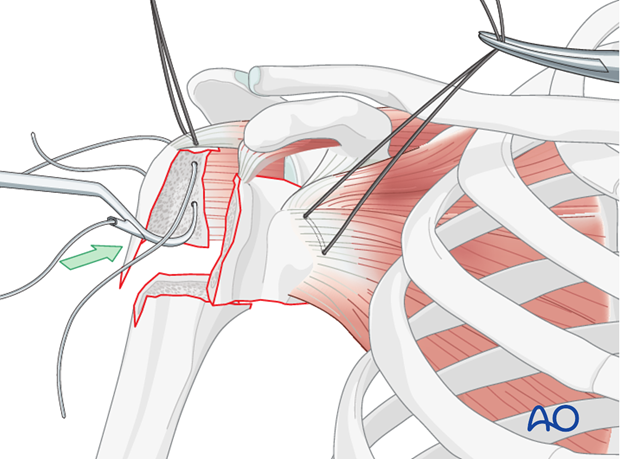
Pearl: use a passing instrument
Pass the cables through the bone with an appropriate instrument. A standard catheter 14G can be bent in a hockey-stick shape and used as a cable passer.
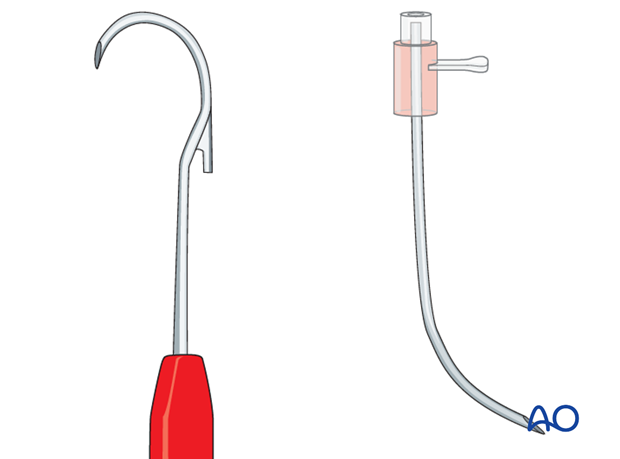
10. Preparation of the humeral shaft
Open the humeral shaft
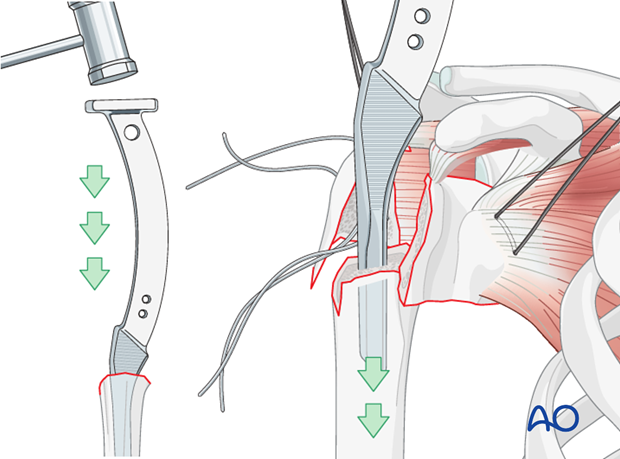
Expose the humeral shaft by extending and adducting the shoulder. Open the medullary canal and gently enlarge the humeral canal with rasps of increasing sizes.
Correct rasp size
Insert rasps of increasing size until the end of the rasp protrudes above the bone an amount equal to the previously measured posteromedial metaphyseal extension (h). If the rasp fits snugly in this position, the optimal size has been found. If not, increase the rasp size and progress until you reach the appropriate height. Be careful not to exert too high of a force as the shaft is at risk of fracturing.
Size of the humeral shaft component
The correct size of the humeral shaft component equals the last rasp size used.
Pearl: cancellous bone removal
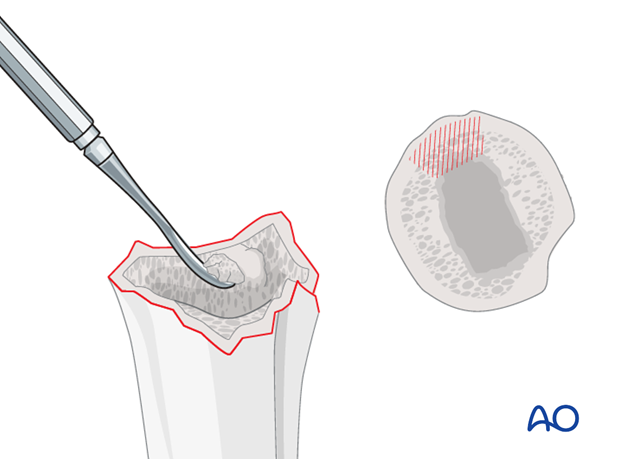
In order to insert the maximal size of suitable rasps, it is often helpful to remove some of the medial cancellous bone as illustrated. Use a curette or rongeur.
Determine humeral head retroversion
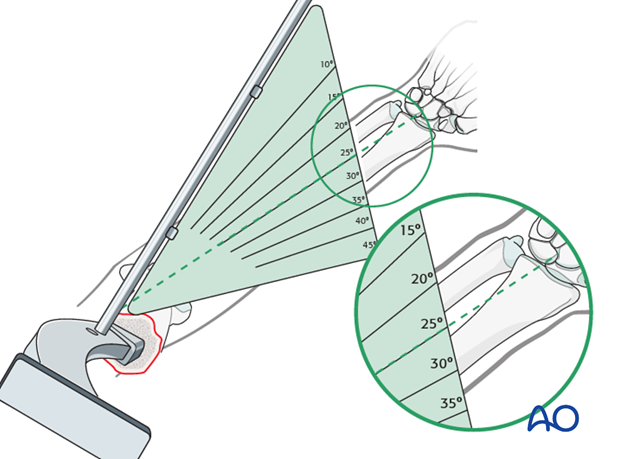
The humeral head should be retroverted approximately 25° relative to the distal humeral epicondylar axis. As illustrated, the retroversion guide shows the perpendicular to the humeral head axis. The forearm is perpendicular to the epicondylar axis. The angle between the guide and the forearm equals the retroversion of the humeral head.
The humeral head retroversion can additionally be checked using the distance between the deepest point of the bicipital groove and the centerline of the rasps or prosthesis. This distance should be approximately 8 mm.
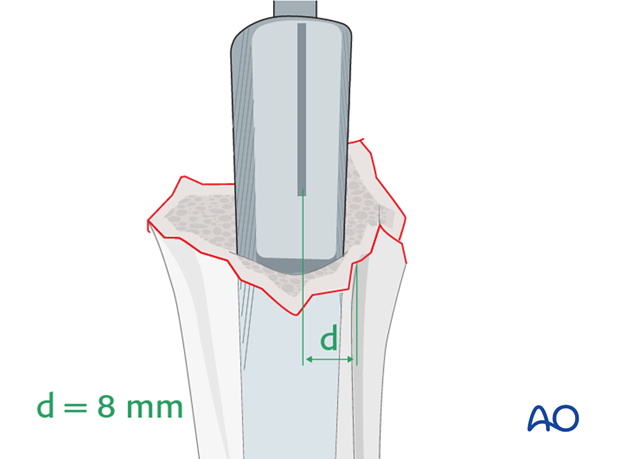
Pearl: Prosthesis with pronounced calcar design
If a prosthesis with a pronounced calcar design is used, this type of prosthesis will center itself if the maximal stem size is used.
This technique acknowledges the patients individual retroversion.
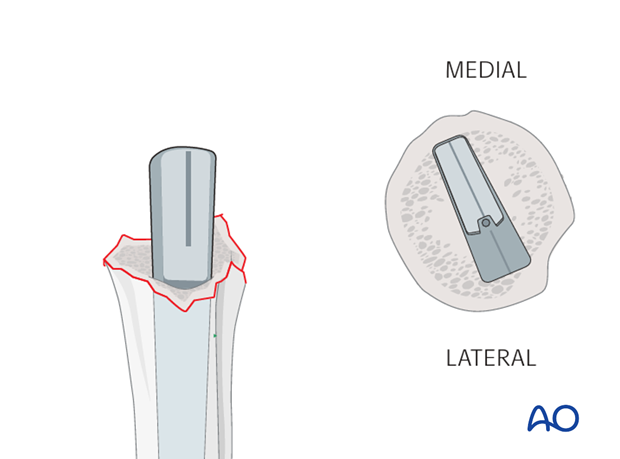
11. Implantation of prosthesis
Insert the prosthesis, respecting the proper insertion height (posteromedial metaphyseal extension), and the retroversion.
For detailed surgical steps please refer to the technical guide of the specific prosthesis chosen.
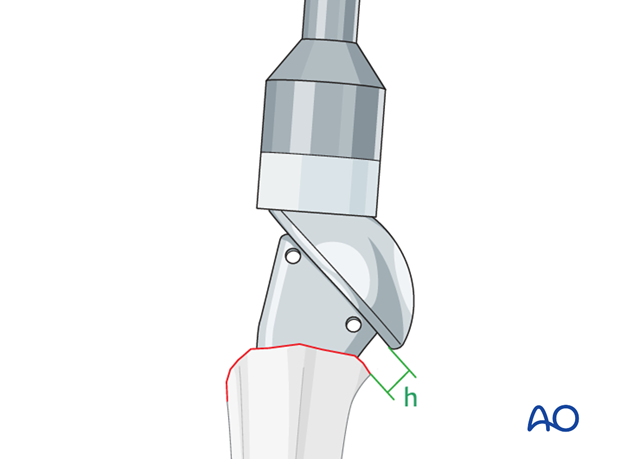
Depending on the prosthesis type and the remaining bony situation, bone cement may be necessary to fix the implant. Certainly it is wise to use cement if the prosthesis does not fit securely in the humerus.
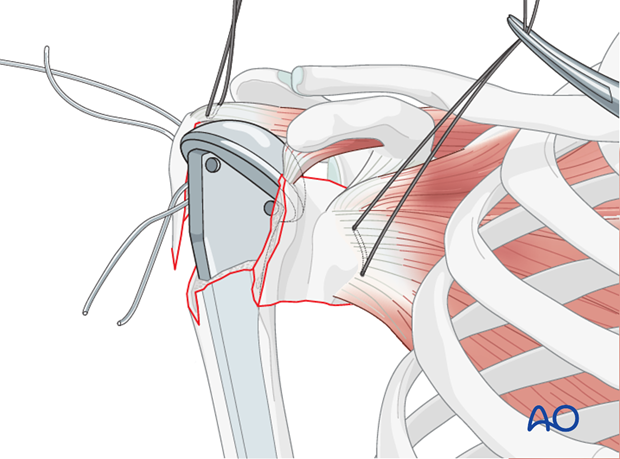
12. Fixation of the tuberosities
Insert cables
Pass the tuberosity cables through the corresponding holes in the prosthesis.
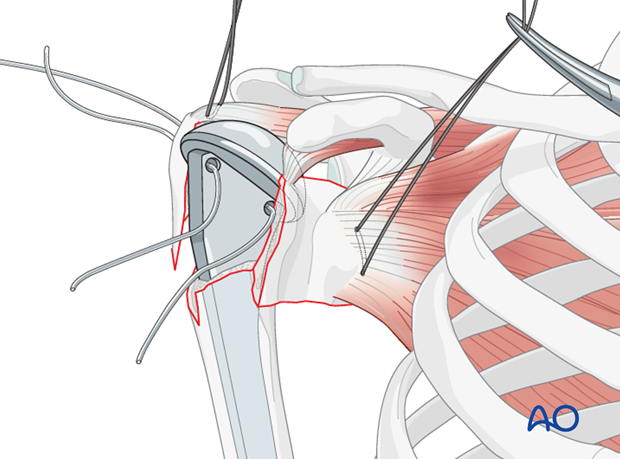
Fix the lesser tuberosity
Drill two 2.0 mm holes through the lesser tuberosity and pass the cables through them. An appropriate passing device is used, if necessary.
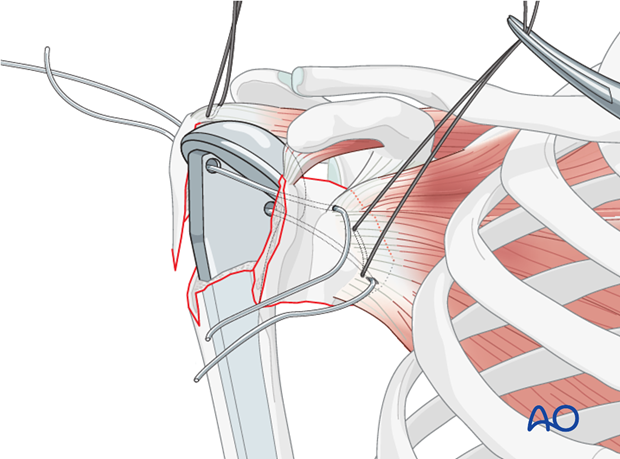
Glenohumeral reduction and reduction of the tuberosities
Reduce the glenohumeral joint and preliminarily reduce the tuberosities under the flange of the prosthetic humeral head.
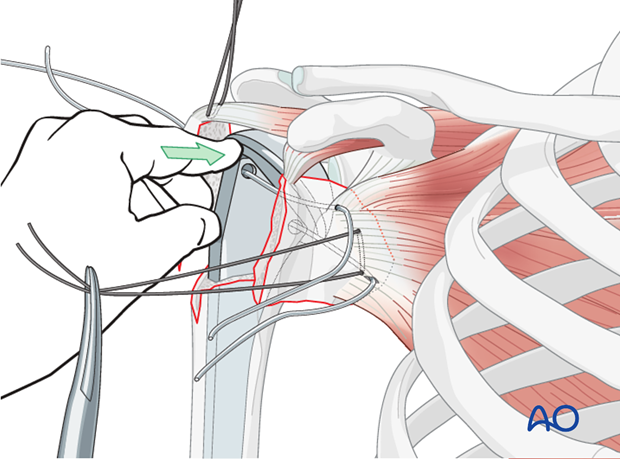
Bone grafting
Retrieve cancellous bone from the humeral head and pack it beneath the tuberosities. This will increase the primary stability of the tuberosities, particularly in osteoporotic bone.

Final reduction of the tuberosities
By pulling the stay sutures inserted through the subscapularis and the infraspinatus tendons, the tuberosities are reduced beneath the humeral head.
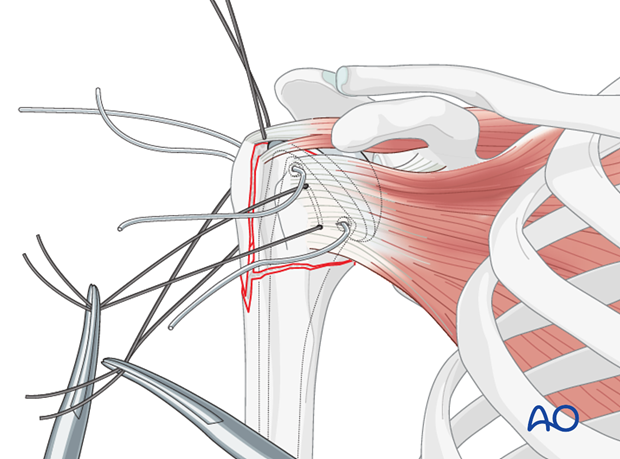
Then tighten the stay sutures and tie them securely.
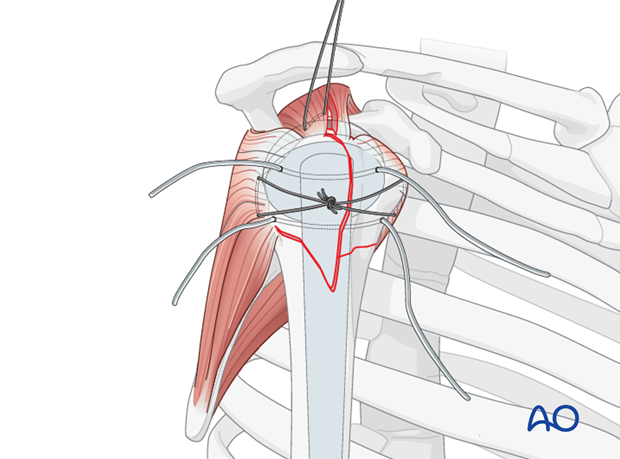
Confirmation of reduction
After preliminary fixation of the reduced tuberosities, the reduction has to be confirmed by visual, tactile, and x-ray control.
Visual control
There should be no gap and no step-off between the tuberosities underneath the humeral head prosthesis. The tuberosities must be under the humeral head.
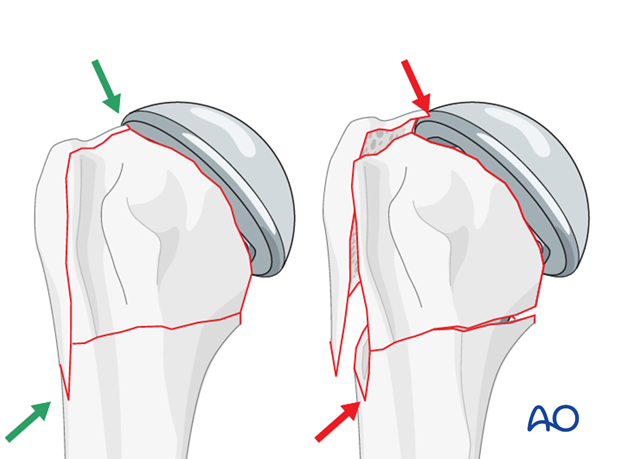
The inferior spike of the greater tuberosity should fit snugly into the fracture gap. This would be revealed by visual control.
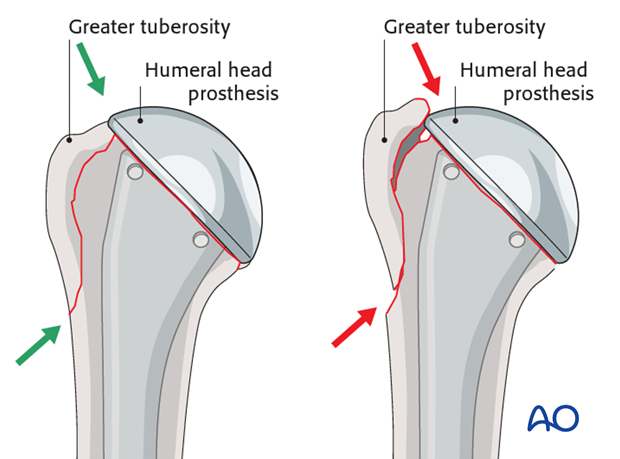
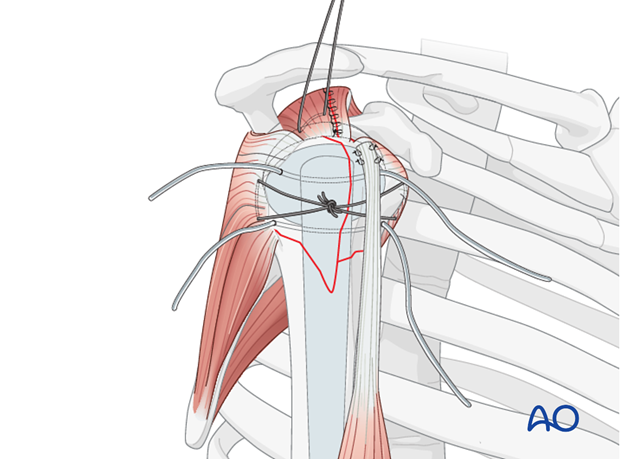
Close the supraspinatus split
Close the supraspinatus split with a running suture.
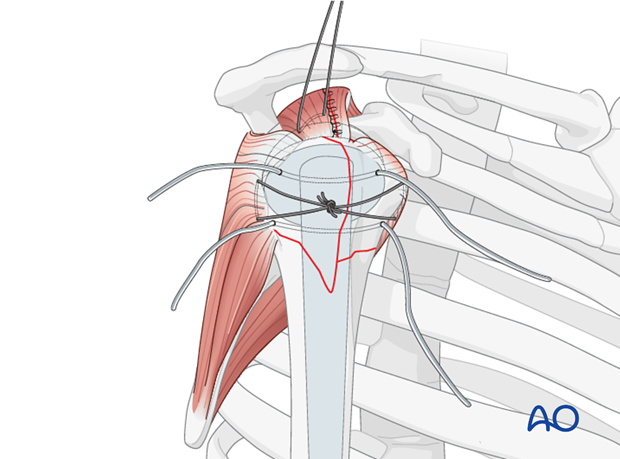
13. Tenodesis of the long head of the bicipital tendon
Place the bicipital tendon into the bicipital groove and preliminarily fix it with sutures.
14. Finalizing the osteosynthesis
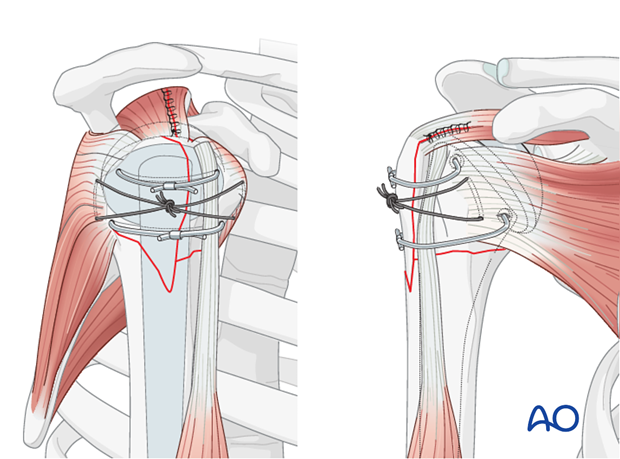
Tighten cables
Tighten the two tuberosity cables and fix them appropriately over the bicipital tendon.
Check the final result by image intensification.
This illustration shows the completed osteosynthesis.
15. Rehabilitation
Overview of rehabilitation
The shoulder is perhaps the most challenging joint to rehabilitate both postoperatively and after conservative treatment. Early passive motion according to pain tolerance can usually be started after the first postoperative day - even following major reconstruction or prosthetic replacement. The program of rehabilitation has to be adjusted to the ability and expectations of the patient and the quality and stability of the repair. Poor purchase of screws in osteoporotic bone, concern about soft-tissue healing (eg tendons or ligaments) or other special conditions (eg percutaneous cannulated screw fixation without tension-absorbing sutures) may enforce delay in beginning passive motion, often performed by a physiotherapist.
The full exercise program progresses to protected active and then self-assisted exercises. The stretching and strengthening phases follow. The ultimate goal is to regain strength and full function.
Postoperative physiotherapy must be carefully supervised. Some surgeons choose to manage their patient’s rehabilitation without a separate therapist, but still recognize the importance of carefully instructing and monitoring their patient’s recovery.
Activities of daily living (ADL) can generally be resumed while avoiding certain stresses on the shoulder. Mild pain and some restriction of movement should not interfere with this. The more severe the initial displacement of a fracture, and the older the patient, the greater will be the likelihood of some residual loss of motion.
Progress of physiotherapy and callus formation should be monitored regularly. If weakness is greater than expected or fails to improve, the possibility of a nerve injury or a rotator cuff tear must be considered.
With regard to loss of motion, closed manipulation of the joint under anesthesia, may be indicated, once healing is sufficiently advanced. However, the danger of fixation loosening, or of a new fracture, especially in elderly patients, should be kept in mind. Arthroscopic lysis of adhesions or even open release and manipulation may be considered under certain circumstances, especially in younger individuals.
Special considerations for humeral head replacement
Following osteosynthesis of the tuberosities in combination with a hemiarthroplasty or a reverse shoulder arthroplasty rehabilitation must take into account the suture fixation of the tuberosities. It is recommended to place the arm in a neutral position on an abduction pillow for 6 weeks to ensure uneventful healing of the tuberosities. During this time, active assisted motion and therapy on a continuous passive motion (CPM) chair is helpful to prevent shoulder stiffness.
After removal of the abduction pillow, active motion over the horizontal plane is allowed and trained.
Shoulder rehabilitation protocol
Generally, shoulder rehabilitation protocols can be divided into three phases. Gentle range of motion can often begin early without stressing fixation or soft-tissue repair. Gentle assisted motion can frequently begin within a few weeks, the exact time and restriction depends on the injury and the patient. Resistance exercises to build strength and endurance should be delayed until bone and soft-tissue healing is secure. The schedule may need to be adjusted for each patient.
An example of a dedicated rehabilitation program for fractures in combination with reverse shoulder arthroplasty is shown below. This protocol addresses the fixed tuberosities which have to be protected for uneventful healing. This protocol can be modified according to the individual needs and expectations.
Phase 1 (approximately first 6 weeks)
Bandage
- Immobilization on a shoulder abduction pillow in neutral position of rotation
Range of motion
- Passive motion within the pain free interval for abduction, adduction and flexion
- No internal or external rotation
- No retroflexion
- Glenohumeral motion up to 90°
- ADL for eating and writing allowed
Physiotherapy
- Passive motion up to 90°
- Preservation and training of scapula mobility (manual therapy and proprioceptive neuromuscular facilitation stretching)
- Relaxation/stretching of neck muscles
- Training of elbow and hand functions
- Specific stabilization therapy for the glenohumeral joint
- Isometric exercises in all directions
- Treatment of scars after proper wound healing
- CPM up to 90° of abduction
Massage
- Neck
- Shoulder girdle
- Thoracic spine
Lymph drainage
- During hospitalization
Ice/warmth
- Ice/cold air for pain reduction
Training therapy
- Training of the contralateral arm (overflow cardiovascular training)
Phase 2 (approximately week 7-11)
Bandage
- No longer required
Range of motion
- Assisted/active motion within the pain free interval, also beyond 90°
- Careful rotation
Physiotherapy
- Free motion of shoulder girdle (scapula, clavicle, cervicothoracic junction, cervical and thoracic spine) with specific mobilization and decontraction techniques (manual therapy)
- Strengthening exercises especially for ADL
- Eccentric muscle activity
Massage
- As required
Lymph drainage
- As required
Ice/warmth
- As required
Training therapy
- Mobilization bath, wound permitting
- Training of hand and forearm muscles
- Set for shoulder therapy
- 3D movement pattern with pulling device
Phase 3 (after week 11)
Range of motion
- No restrictions on glenohumeral movement
- Muscle growth for shoulder girdle and all arm muscles
Physiotherapy
- All physiotherapeutic techniques allowed, active and against resistance
- Increasing eccentric muscle activity
Training therapy
- Handcycling
- Training for specific ADL and sports
- Machine training
- Free weight training
