Total hip arthroplasty
1. General considerations
Introduction
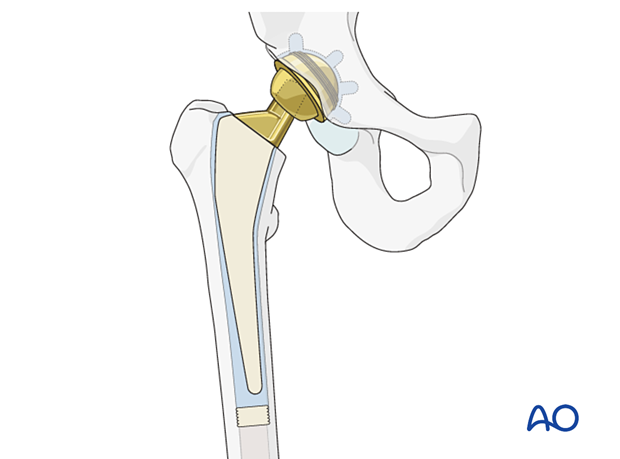
With total hip arthroplasty, the acetabulum is replaced in addition to the femoral head and neck. The acetabular component is chosen based upon the patient’s anatomy, with the aid of preoperative x-rays and intraoperative trials.
While the external diameter of the acetabular component is definitively selected intraoperatively, its internal diameter, the same as that of the matching femoral head component, is a feature of the chosen prosthetic system.
The acetabular prosthesis must be fixed to the pelvis. This can be either uncemented (with bony ingrowth) or cemented.
Hemiarthroplasty vs total hip arthroplasty
The surgeon is faced with several choices for arthroplasty for a femoral neck fracture.
The first is whether to fix the fracture or to perform an arthroplasty.
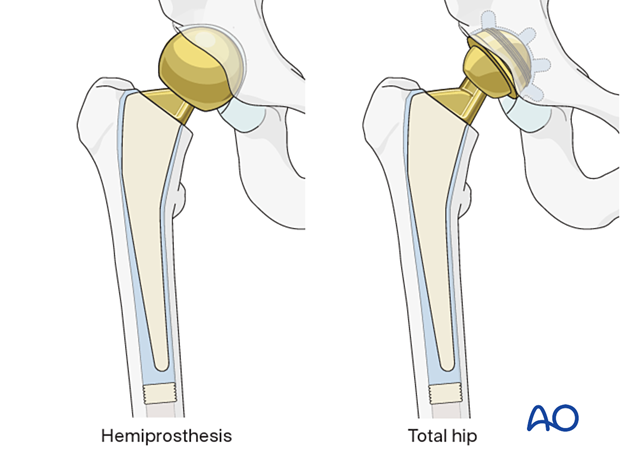
If arthroplasty is chosen, the next issue is what kind of arthroplasty. The two major types are hemiarthroplasty (replacement of the femoral head and neck) or total hip arthroplasty, in which both the femoral head and neck and the acetabular surface are replaced.
Hemiarthroplasty is a less complicated operation and provides generally satisfactory results for less active elderly patients. Hemiarthroplasty is cheaper and has a lower risk of dislocation than total hip arthroplasty but may lead to acetabular pain and erosion, requiring revision surgery at a later date.
Reported results of total hip arthroplasty for femoral neck fractures are improving, so that total hip arthroplasty is increasingly favored for displaced femoral neck fractures, particularly for more active elderly patients. In patients with preexisting osteoarthritis, total hip arthroplasty is also indicated. Total hip arthroplasties performed for femoral neck fractures should only be performed by surgeons that are competent in doing the procedure.
For a comparison between total hip arthroplasty and hemiarthroplasty, see, eg, Ekhtiari et al 2020, Tang et al 2020.
Primary indication for total hip arthroplasty
The primary indication for total hip arthroplasty is a patient with preexistent osteoarthritis or inflammatory arthritis of the hip joint and a femoral neck fracture.
Conversion of a modular hemiprosthesis to total hip prosthesis
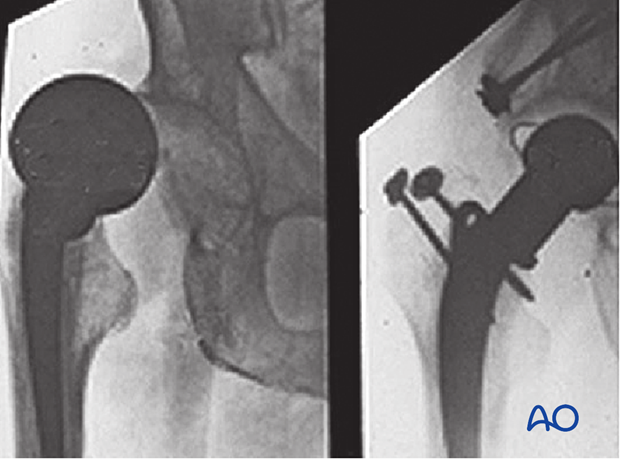
Dislocation of hip arthroplasty for femoral neck fractures is a significant and occasional complication.
These x-rays show a dislocated hemiarthroplasty (left) and its salvage by conversion to a hip replacement (right). In this case, the original femoral stem was retained, but the femoral head component was removed. The acetabular component (with supporting bone graft) was inserted before the new head and liner were attached.
Type of prosthesis
The acetabular cup can be applied either cemented or cementless.
The femoral prosthesis consists of the stem, cemented or cementless, and a modular head that fits in the acetabular cup.

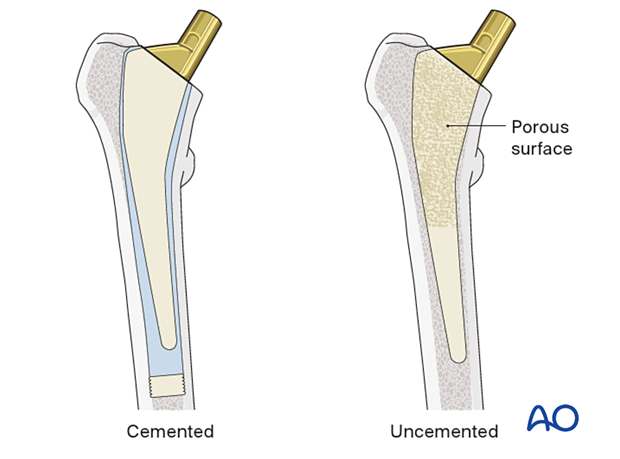
Cemented or uncemented prosthesis
The proximal femoral prosthesis is inserted into the femur after cutting the femoral neck and preparing the medullary canal.
Cemented stem insertion involves the use of a femoral plug, vacuum mixing technique, and pressurized injection of cement.
Uncemented stems have a surface that promotes bony on- or ingrowth.
The published literature suggests superior outcomes with cemented stems in the geriatric hip fracture population, as cementless stems have higher revision rates for periprosthetic fracture, stem subsidence, and dislocation (Barenius et al 2018, Tanzer et al 2018, Tanzer et al 2020, Veldman et al 2017).
2. Preoperative planning
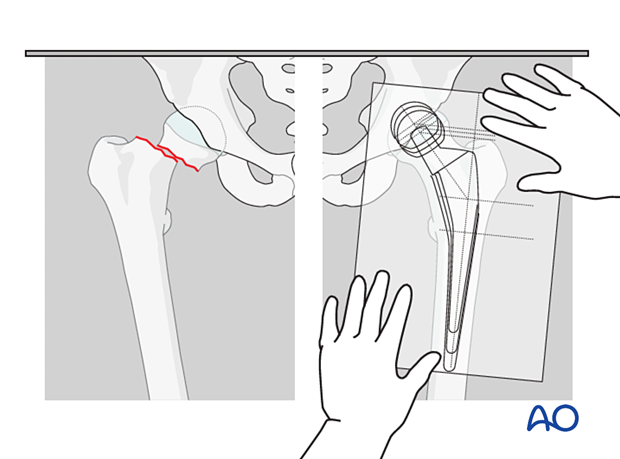
Whatever arthroplasty is chosen, the procedure should be carefully planned in sufficient detail.
Select the prosthesis with the aid of radiographic templates (or electronic planning software with digital x-rays) and appropriate x-rays of the normal and injured hip.
In addition to the selected prosthesis, possible alternatives should be available in the operating room.
3. Patient preparation and approaches
Patient positioning
Depending on the approach, the patient may be placed in the following positions:
- Supine on a conventional or radiolucent table
- Lateral decubitus position on a conventional table
Anterior, anterolateral, and lateral approaches
Hip arthroplasty can be performed through several different incisions. There is no convincing evidence that one is better. Thus, the choice is up to the surgeon:
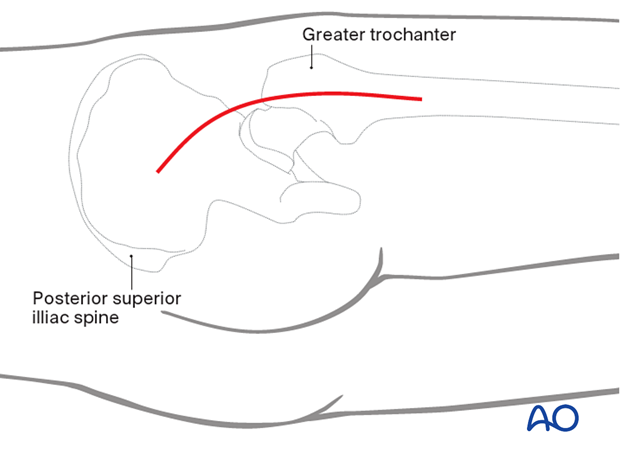
Posterior approach
A posterior approach, with the patient in the lateral decubitus position, is also commonly used. Dislocation may be more frequent with a posterior approach. Proper positioning of the prosthesis and appropriate repair of the posterior capsule improves stability.
4. Removal of the femoral head
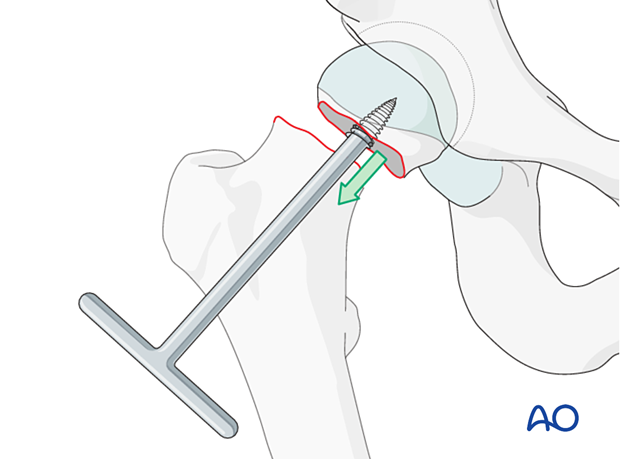
Begin the operation with adequate exposure of the fracture site through a sufficient capsular incision.
Remove the femoral head. Use a “corkscrew” (threaded handle), as illustrated. Divide the ligamentum teres as necessary.
An additional osteotomy of the femoral neck is usually required to fit the broaches and final femoral prosthesis.
5. Placement of the acetabular component
Reaming
Remove the acetabular cartilage with a reamer. Orient this anatomically, perpendicular to the plane of the bony acetabulum (approximately in 15° to 20° of anteversion and 45° of hip abduction). Ream until cancellous bone is exposed and the desired fit is achieved, but without removing the inner table of the innominate bone.
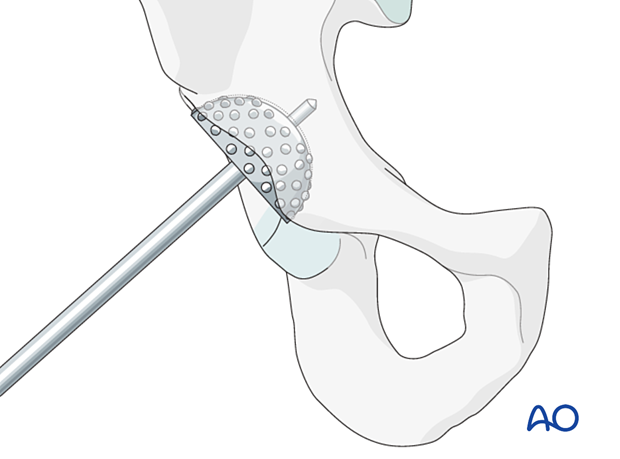
Anchorage holes (cemented cup)
For better anchorage of the cement and cup, drill several holes with a flexible drill with a diameter of about 6 mm in multiple locations, as illustrated.
With a corresponding punch, the cancellous bone in the drilled holes may be impacted.
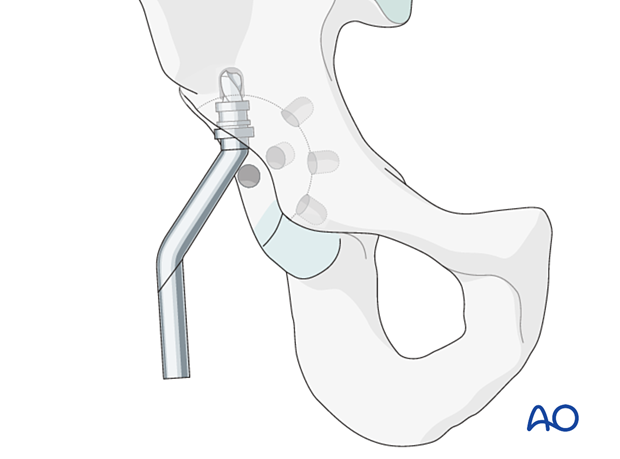
Choosing the right size for the acetabular prosthesis
The cup should fill as much of the available space in the acetabulum as possible, extending only slightly beyond the bone.
Choose an acetabular prosthesis that needs as little surrounding cement as possible. If an uncemented cup has been selected, the cup size should be slightly bigger than the last reamer size to achieve a press-fit.
Confirm the correct size with a trial prosthesis, as shown in the photograph.
Orientation of acetabular component
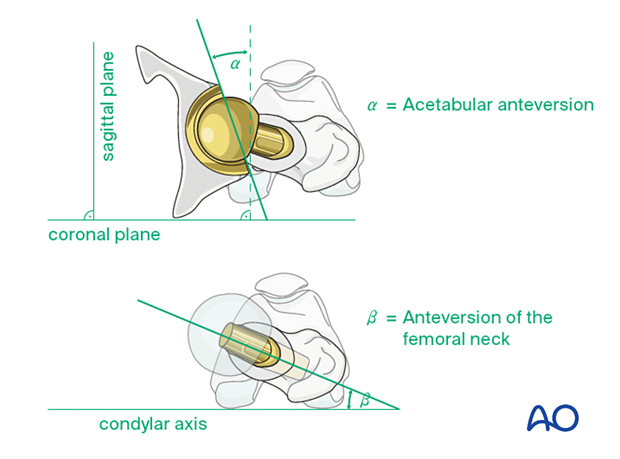
The normal acetabulum faces anteriorly, approximately 15°. It is also oriented obliquely (abducted, from a horizontal position) so that the superior part of the femoral head has adequate coverage by the acetabulum.
The illustrations demonstrate the anterior rotation (acetabular anteversion = α) ...
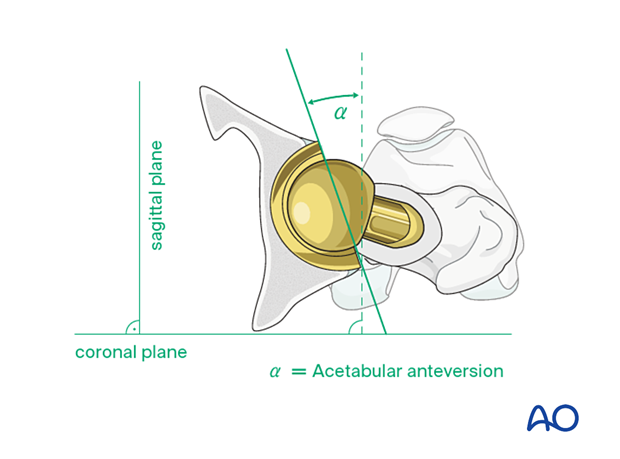
... and also abduction (= A, approximately 45°). Both anteversion and abduction must be set correctly during placement of the acetabular prosthesis.
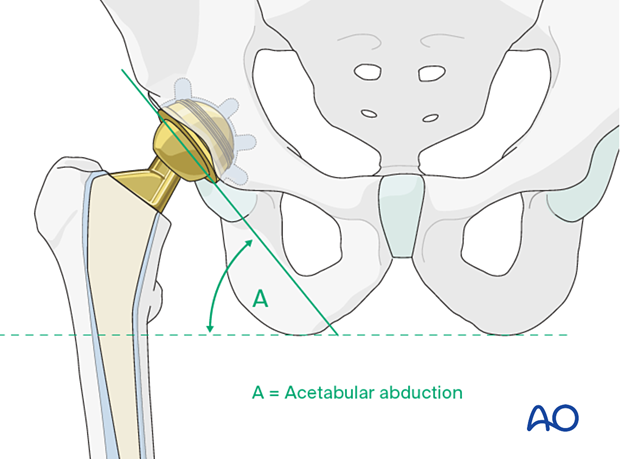
Placement of prosthesis (cemented cup)
It is important that the acetabular prosthesis is oriented correctly, usually in the same way as the patient’s acetabulum. It should not be directed posteriorly (retroverted) nor too anteriorly (excessive anteversion).
Apply the cement in a putty-like solid state by hand and push it into the drill holes.
Under firm pressure, insert the acetabular prosthesis in an anatomical position and allow the cement to harden.
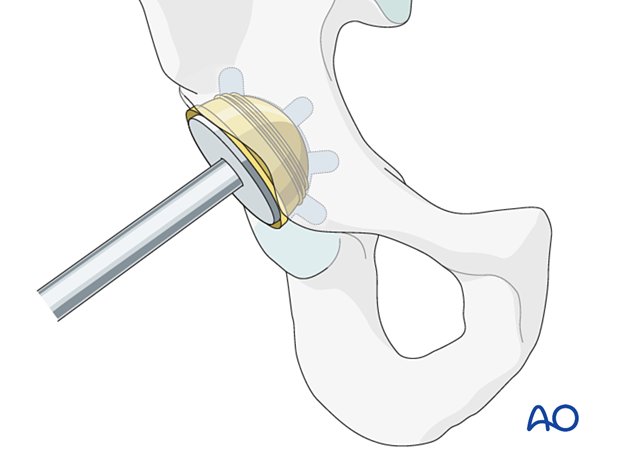
Placement of prosthesis (cementless cup)
If a cementless cup has been selected, orient the cup correctly and insert the cup with hammer blows to the appropriate handle to achieve press-fit.
Additionally, fix the cup to the acetabulum with two to three screws if extra purchase is desired.
Insert a polyethylene liner into the cup.

6. Preparation for stem insertion
Osteotomy of the femoral neck
Choose the correct level for the definitive osteotomy, which can affect the height of the definitive prosthesis. The goal should be to ensure that the definitive implants provide equal leg lengths and proper soft-tissue tension.
The orientation of the osteotomy depends on the chosen prosthesis. It begins in the fossa below the greater trochanter and ends in the calcar region. If the prosthesis has a medial flange, the osteotomy must match where the flange will sit.
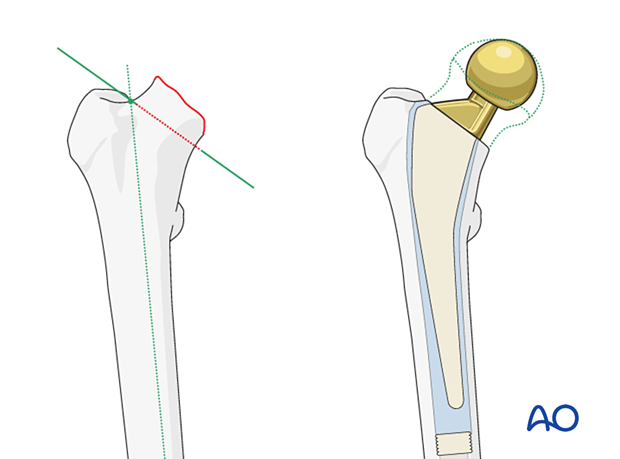
Pitfall: short femoral neck
Ensure correct prosthesis rotation
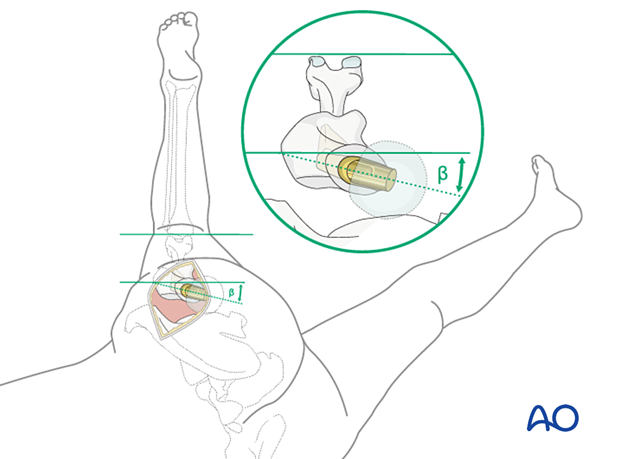
The prosthesis must be correctly aligned in the femoral axial plane. The neck of the implanted femoral component should usually be coaxial with the native femoral neck, as in the illustration. “β” indicates the angle of anteversion of the femoral neck and the prosthesis. Avoid excessive anterior rotation (anteversion) or posterior rotation (retroversion), as the former predisposes to anterior dislocation and the latter predisposes to posterior dislocation of the prosthesis.
Correct rotational alignment is achieved by maintaining the desired anteversion while preparing the femoral medullary canal with broaches.
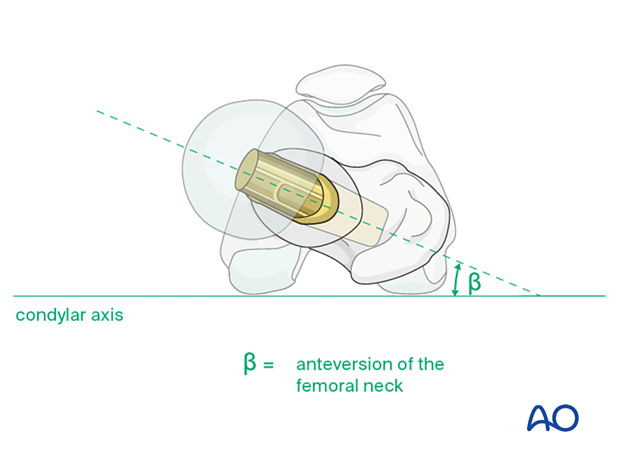
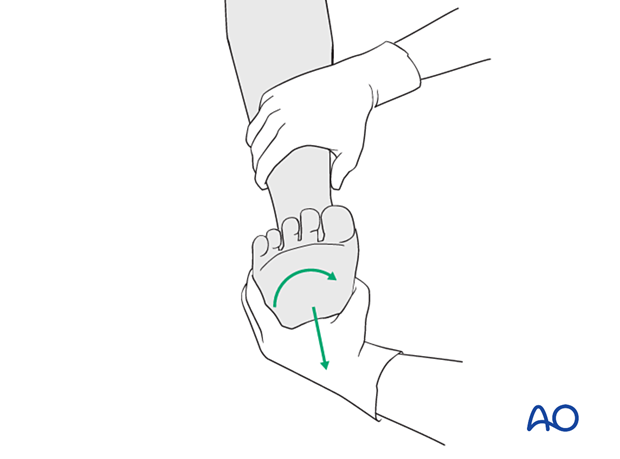
To ensure correct prosthesis rotation, the leg is in full external rotation, and the knee is flexed to 90° (figure-of-four position). External rotation of the prosthesis (away from the plane of the tibia) increases anteversion. The correct position is approximately 15° externally rotated relative to the axis of knee flexion.
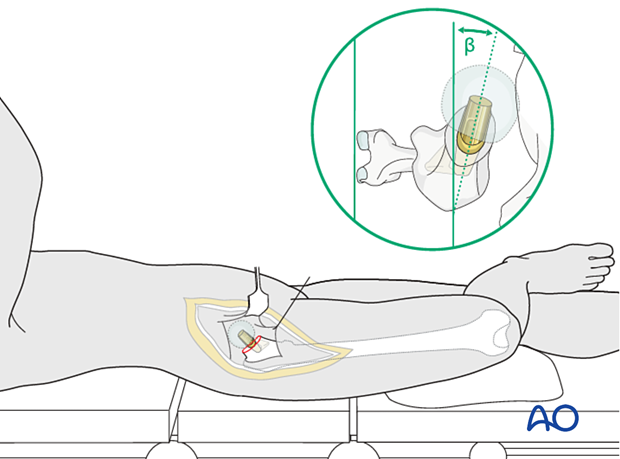
Exposure of the proximal femur is accomplished by carefully placing the involved limb in an externally rotated and flexed position with the lower leg hanging over the edge of the operating table. To maintain sterility, the lower leg is inserted into an envelope or pocket made from a sterile sheet. The assistant holds the patient’s leg perpendicular to the table surface, which is thus the plane of the knee axis. Proper anteversion is achieved by externally rotating the femoral prosthesis, so its neck is aimed approximately 15° anteriorly to the knee axis (or table surface).
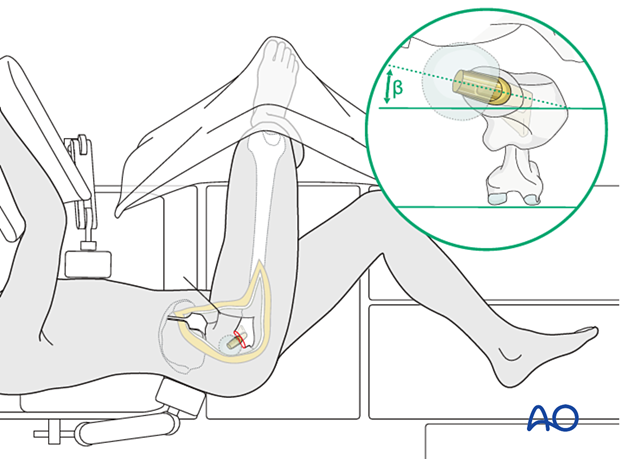
With this approach, the hip is accessed through a posterior capsulotomy, through which the femoral head is removed. Internal rotation of the lower extremity delivers the femoral neck for osteotomy and femoral canal preparation. The correct rotational orientation of the prosthesis requires reference to the femoral coronal plane, shown by flexing the knee to 90°. An assistant holds the leg internally rotated so that the tibia is perpendicular to the table surface. The anteversion angle of the femoral neck and prosthesis (β = approximately 15°) is then estimated as illustrated.
Medullary preparation
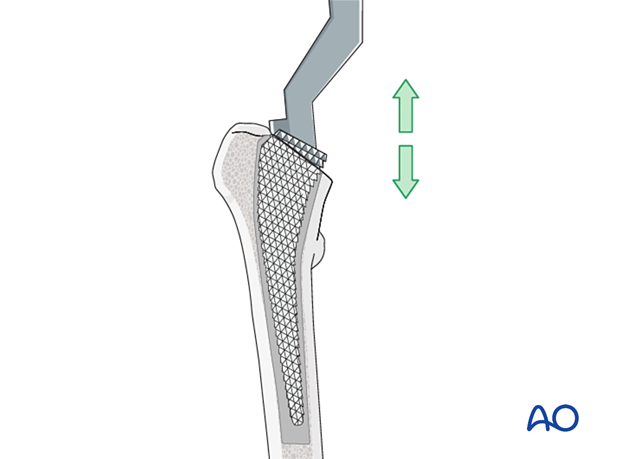
Insert the femoral canal finder into the femoral canal and open it wide enough to insert the smallest broach. A lateral starting point helps avoid varus malposition.
Start removing intramedullary cancellous bone with a series of broaches. Rotate the first broach to match the femoral neck anteversion (approximately 15°). Broach until the prosthesis fits appropriately within the medullary canal.
Although the size of the femoral stem is estimated with preoperative planning, it should be confirmed definitively by the fit of the broach within the medullary canal.
Choice of the right stem size
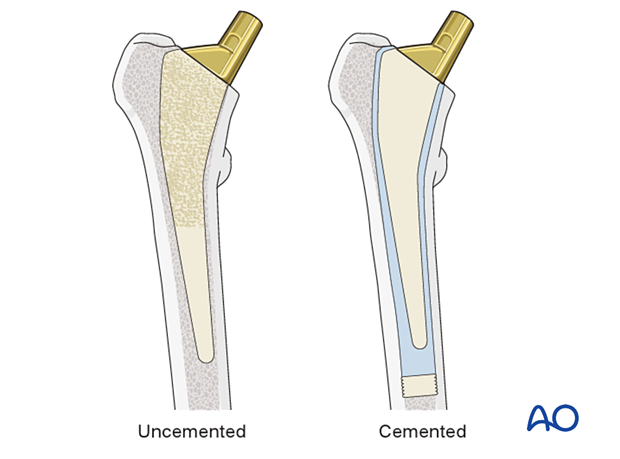
If an uncemented implant is used, the prosthesis stem should snugly fill the prepared medullary cavity.
If cement is used, the stem size should be somewhat smaller than the prepared medullary cavity to allow for an appropriate layer of bone cement.
7. Insertion and assembly of the femoral component
Introduction and correct positioning of the prosthesis in the frontal plane
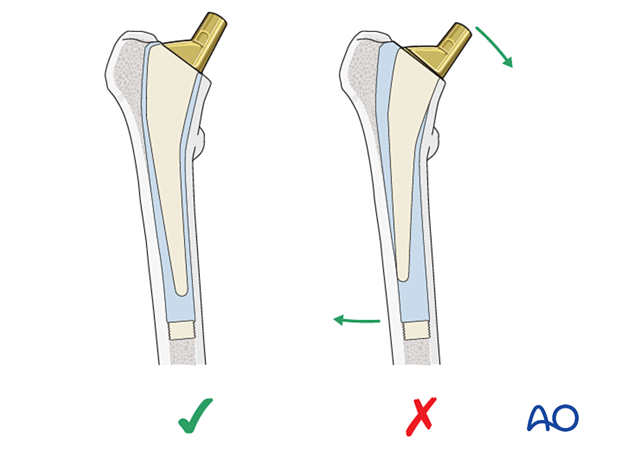
When introducing the prosthesis into the prepared femoral medullary canal, the goal is to get the stem inserted into neutral alignment down the proximal femoral canal. Because both the femur and the prosthesis can be eccentrically loaded upon implantation, bending forces can act on the prosthetic neck, often forcing the prosthetic stem into varus. The prosthesis – cemented or uncemented – should be inserted to avoid varus orientation. Try to avoid excessive compensation of putting the stem in varus as it may lead to valgus alignment.
This illustration shows a cemented femoral stem with correct alignment (left). Varus alignment (as shown in the right illustration) tends to loosen cemented stems due to excessive loading stresses.
Cementing technique (for cemented stems)
Since new (third generation) cementing techniques have been introduced, the long-term results of the cemented prosthesis have been considerably improved.
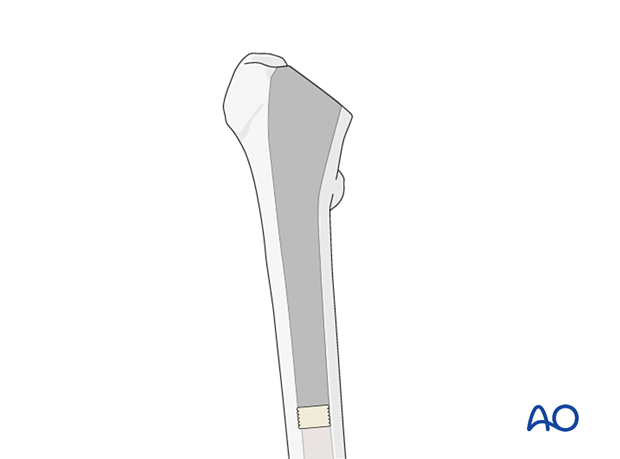
A cement restrictor placed a centimeter or so below the prosthesis allows the cement to be pressurized so that it flows into the cancellous bone rather than into the distal femur.
Before inserting cement, clean the canal with irrigation and an appropriate brush. Place a temporary dry sponge in the canal, which should be removed just before the cement is inserted.
By mixing the cement liquid and powder in a low-pressure vacuum container, air bubbles are avoided, providing improved cement biomechanical characteristics.
Cementing of the medullary canal
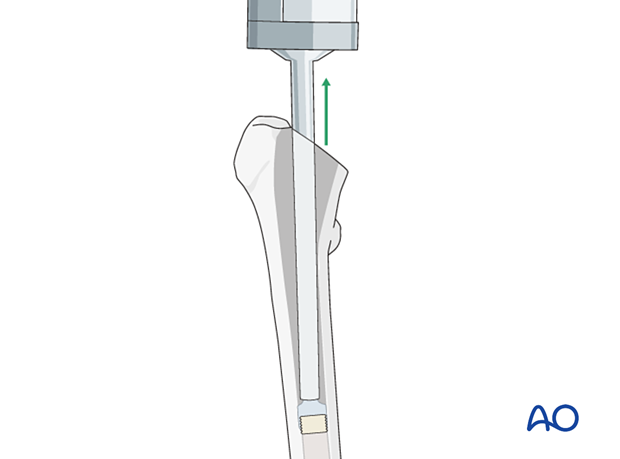
Fill the prepared medullary cavity from bottom to top with a cement gun, as illustrated. Withdraw the cement gun as the medullary canal fills. Avoid mixing blood or air with the cement.
Pressurizing the cement before prosthesis insertion improves its penetration into the surrounding bone.
Prosthesis insertion
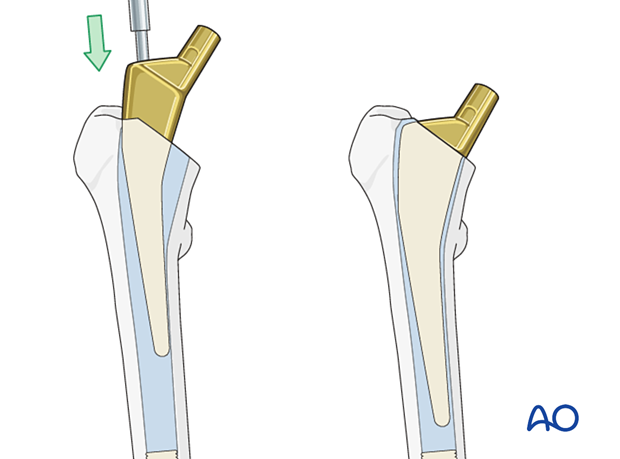
Before the cement hardens, insert the prosthesis with correct rotation (anteversion) and coronal alignment. It must be placed to the appropriate, predetermined depth. Once the stem is seated, allow the cement to set undisturbed. Trim off any excess cement, and carefully remove all cement fragments from the hip joint and surrounding wound.
Assembly of the prosthesis
Use a trial femoral head prosthesis on the definitive stem to confirm appropriate neck length. The latter affects leg length, soft-tissue tension, and hip stability.
With the hip reduced, confirm the range of motion and stability.
Select definitive implant considering:
- Does the hip sublux/dislocate with mild adduction, internal rotation and flexion? Hyperextension?
- Is the selected prosthetic neck length and offset consistent with contralateral preoperative templating? (Has the axis of rotation of the femoral head been restored?)
- Is the component anteversion appropriate?
- Can the posterior capsular repair and short external rotators return to the appropriate insertion position on the proximal femur?
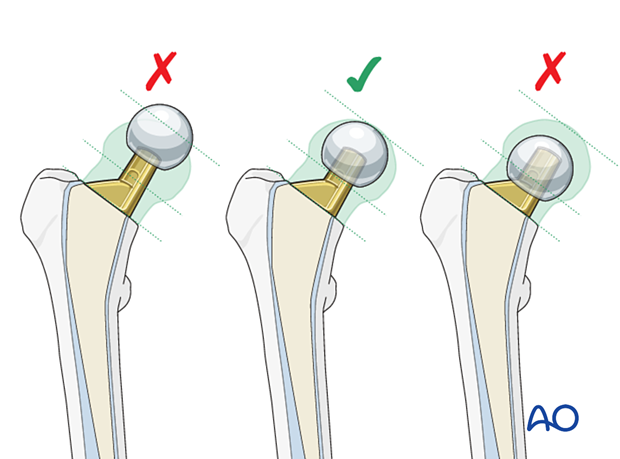
Once determined, attach the definitive femoral head to the stem.
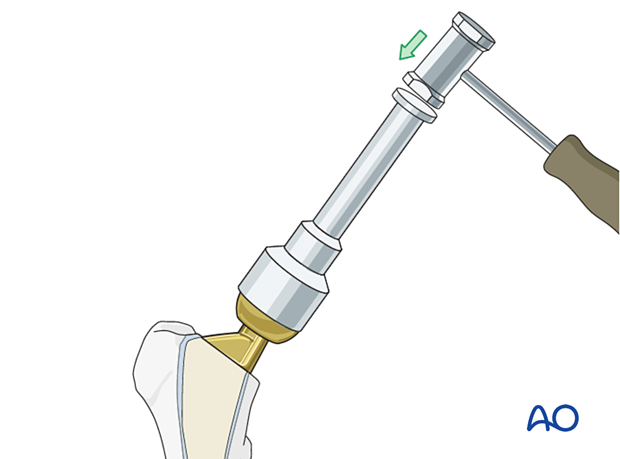
8. Reduction of the hip
If used, make sure that cement debris is removed first, and that soft tissues are retracted.
Once the prosthetic components are in place and stable, the hip is gently reduced.
Place the leg in normal extension. With gentle traction and internal rotation, the hip joint can usually be reduced.
Pitfall: decreased joint stability
Checking stability and soft-tissue tension
After reduction, check stability and soft-tissue tension.

9. Final assessment
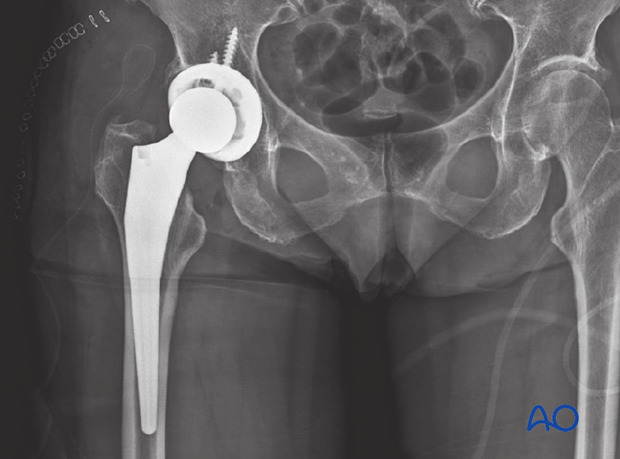
Obtain AP pelvis and AP and lateral hip x-rays to confirm correct implant position.
10. Aftercare
Dislocation precautions
Prosthetic dislocations, occurring 2–6% or more in recent reports, are serious complications that compromise medical and functional outcomes. Properly positioned prostheses and appropriate soft-tissue tension (when closing) reduce the dislocation risk.
To reduce the risk of prosthetic hip dislocation during the first 6 postoperative weeks, patients may require certain leg positions and activity restrictions. The surgeon may apply the following restrictions as necessary.
- Position to avoid after the posterior approach: Combined adduction across the midline, internal rotation, and hip flexion of more than 80°–90°
- Position to avoid after the anterior approach: Combined adduction past midline, external rotation, and hyperextension
Low seats and toilets, flexing the hip when arising, sitting with legs crossed, as well as squatting and kneeling may also be avoided initially, as should pivoting on the affected leg. The patient and caregivers may be encouraged to use additional support when rising from a sitting position.
Dislocation precautions can gradually be relaxed after 6 weeks, once the soft tissues have healed.
Postoperative mobilization
Immediate weight bearing as tolerated with walking aids is encouraged (cemented prosthesis). The patient should begin ambulating with a walker (walking frame) and be instructed in safe transfers and gait. If this progresses satisfactorily, the use of crutches may be possible.
With an uncemented prosthesis, some surgeons prefer restricted weight bearing for 6–12 weeks to allow for bony ingrowth into the prosthesis.
Depending on the approach, limited range-of-motion exercises may be appropriate.

Pain control
To facilitate rehabilitation and prevent delirium, it is important to control the postoperative pain properly, eg, with a specific nerve block.
VTE prophylaxis
Patients with lower extremity fractures requiring treatment require deep vein prophylaxis.
The type and duration depend on VTE risk stratification.
Follow-up
Follow-up assessment for wound healing, neurologic status, function, and patient education should occur within 10–14 days.
Depending on the first follow-up assessment, repeat clinical evaluation, and an AP pelvis, and AP and lateral hip x-rays should be obtained 6–12 weeks after surgery.
Longer follow-up, at one year, is indicated to assess loosening or wear.
Prognosis of proximal femoral fractures in elderly patients
For prognosis in elderly patients, see the corresponding additional material.
