Hemiarthroplasty with reconstruction of greater trochanter
1. General considerations
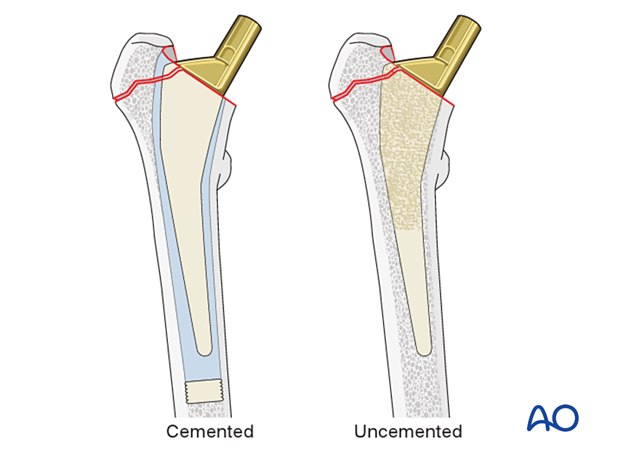
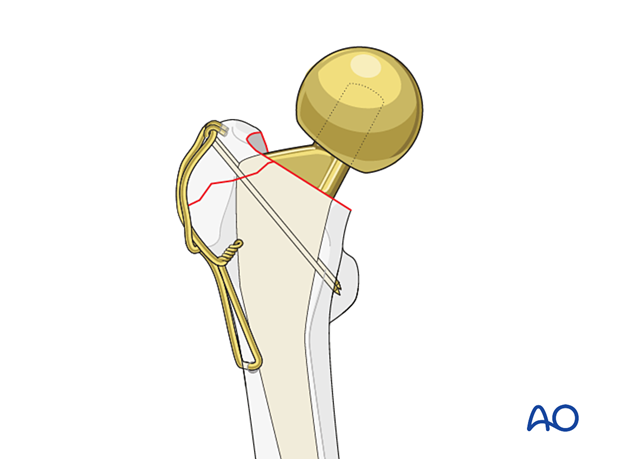
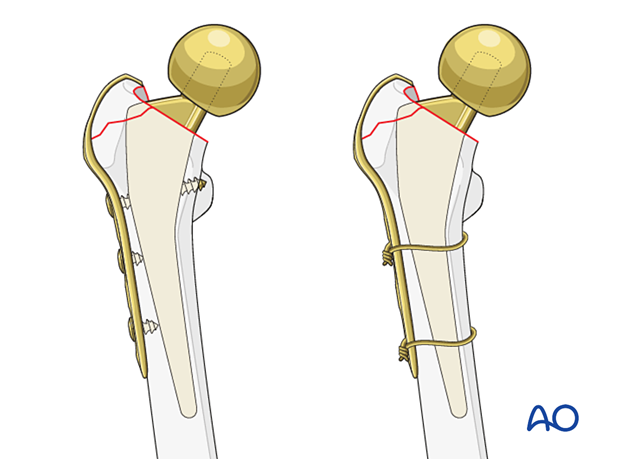
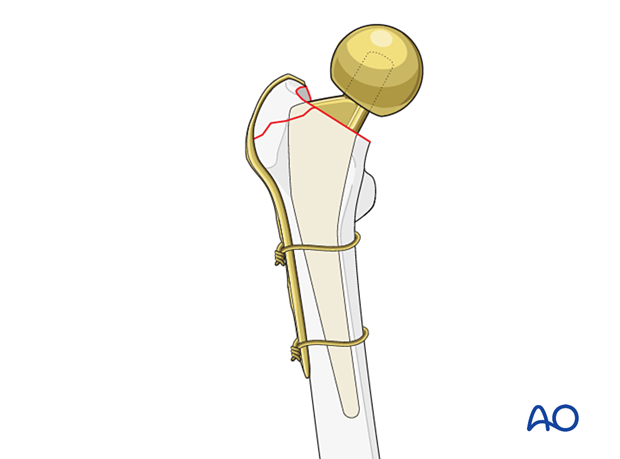
In combined femoral neck and trochanteric fractures, the treatment is mainly the same as for hemiarthroplasty of isolated femoral neck fractures. Additionally, the trochanteric and femoral neck bone stock needs to be reconstructed and stabilized to support the prosthesis and allow for proper functioning of the hip abductors. This may be achieved with tension band wiring or hook plating.
If there is a simple fracture pattern in the trochanteric region, the reconstruction of the greater trochanter may be performed after insertion of the prosthesis.
In complex fracture patterns, reconstruction of the proximal femur may be performed preliminarily to identify optimal prosthesis positioning.
Treatment of this fracture combination is challenging and needs experience in proximal femoral reconstruction. There is a high risk of causing hip instability and incorrect limb length.
Type of prosthesis for hemiarthroplasty
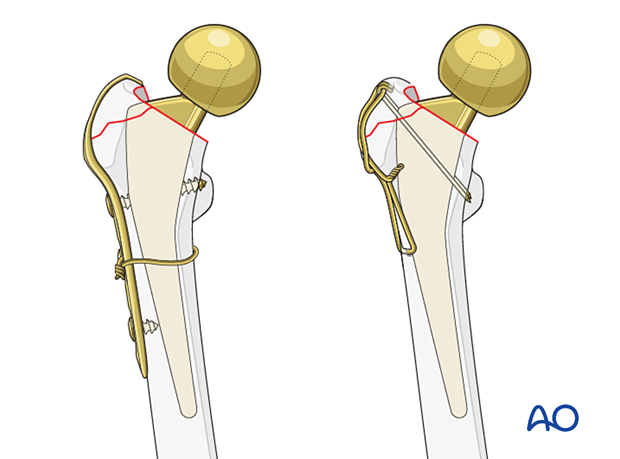
The original proximal femoral hemiarthroplasty prostheses were made of a single casting (unipolar) where the femoral stem was attached to the femoral neck and head.
More modern hemiarthroplasties are modular, allowing different combinations of stem, neck length, and head. These provide a better-fitting prosthesis for most patients, so leg length and femoral offset may be equalized, and hip muscle tension can be adjusted for better function and reduced risk of dislocation.
So-called bicentric or bipolar prostheses have a smaller inner ball that articulates within a larger head component that fits within the acetabulum. Although this articulation has been thought to reduce the wear of the acetabular articular surface, reported results with this type of prosthesis are no better than nonarticulated (unipolar) prostheses.
Cemented or uncemented prosthesis
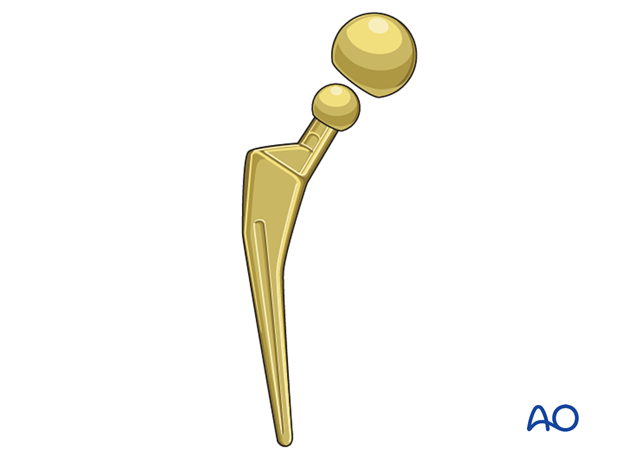
The proximal femoral prosthesis is inserted into the femur after cutting the femoral neck and preparing the medullary canal.
Cemented stem insertion involves the use of a femoral plug, vacuum mixing technique, and pressurized injection of cement.
Uncemented stems have a surface that promotes bony on- or ingrowth.
The published literature suggests superior outcomes with cemented stems in the geriatric hip fracture population, as cementless stems have higher revision rates for periprosthetic fracture, stem subsidence, and dislocation (Barenius et al 2018, Tanzer et al 2018, Tanzer et al 2020, Veldman et al 2017).
Stabilization of the greater trochanter
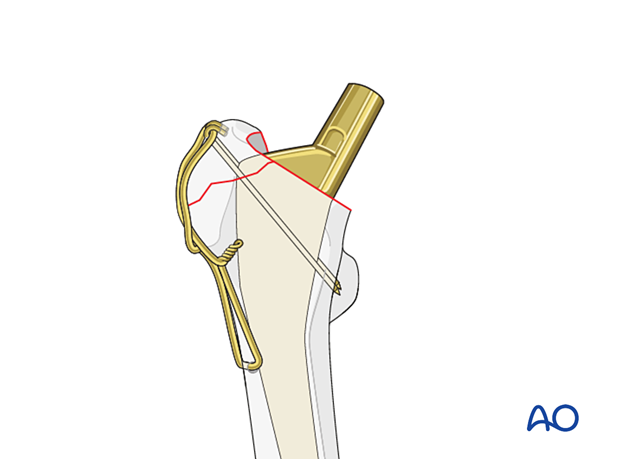
Tension band fixation can involve the use of K-wires and a figure-of-eight wire.
For hook plate fixation, attachment to the proximal femur can be obtained using screws and/or cables.
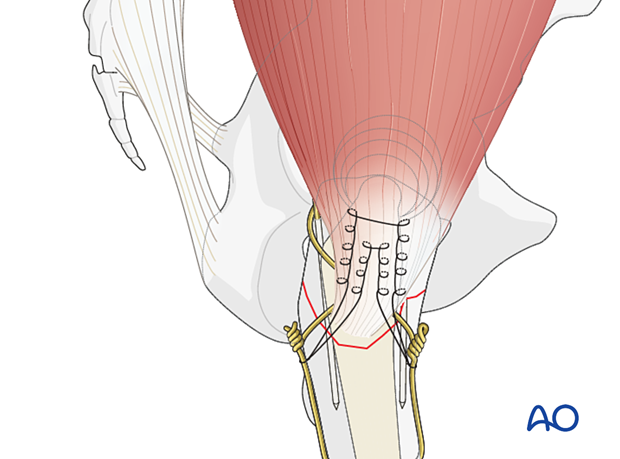
Option: tendon sutures
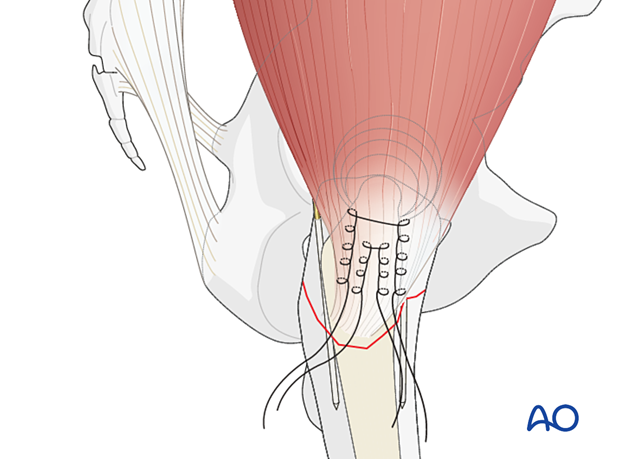
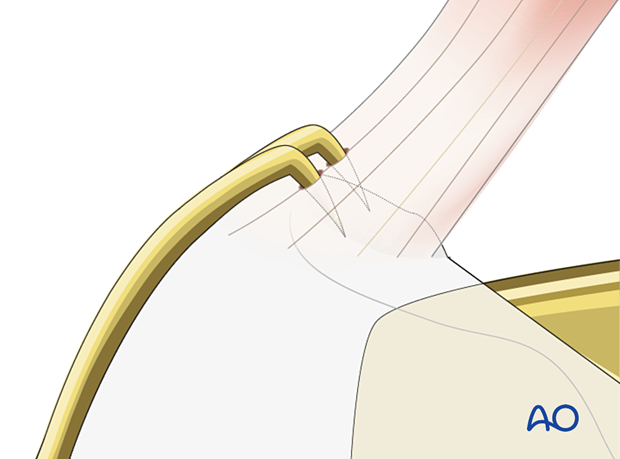
Sutures stitched in a Krakow fashion into the gluteus medius tendon may be used to augment the reduction of the greater trochanter fragment/s and enhance the fixation of the abductor mechanism to the tension band construct.
2. Preoperative planning
The procedure should be carefully planned in sufficient detail.
To understand the fracture pattern involving the pertrochanteric and femoral neck regions, a preoperative CT scan is recommended.
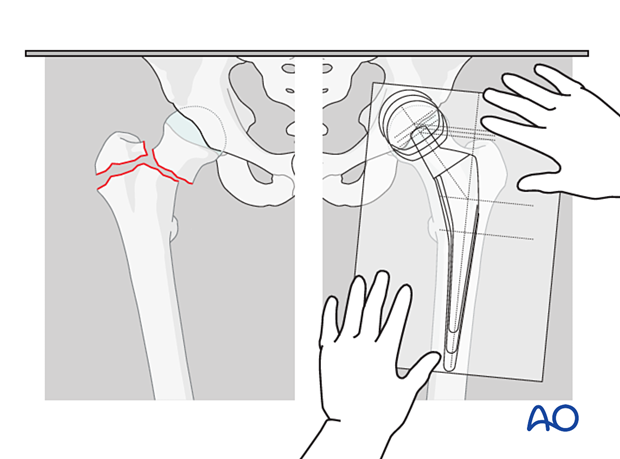
Select the prosthesis with the aid of radiographic templates (or electronic planning software with digital x-rays) and appropriate x-rays of the normal and injured hip.
In addition to the selected prosthesis, possible alternatives should be available in the operating room.
Preliminary reconstruction of the proximal femur prior to hip prosthesis preparation and implantation may be necessary. In this case, plan the surgical steps appropriately.
3. Patient preparation and approaches
Patient positioning
Depending on the approach, the patient may be placed in the following positions:
- Supine on a conventional or radiolucent table
- Lateral decubitus position on a conventional table
Anterior, anterolateral, and lateral approaches
Hip arthroplasty can be performed through several different incisions. There is no convincing evidence that one is better. Thus, the choice is up to the surgeon:
- Direct anterior approach (modified Smith-Petersen)
- Anterolateral approach (Watson-Jones)
- Direct lateral approach
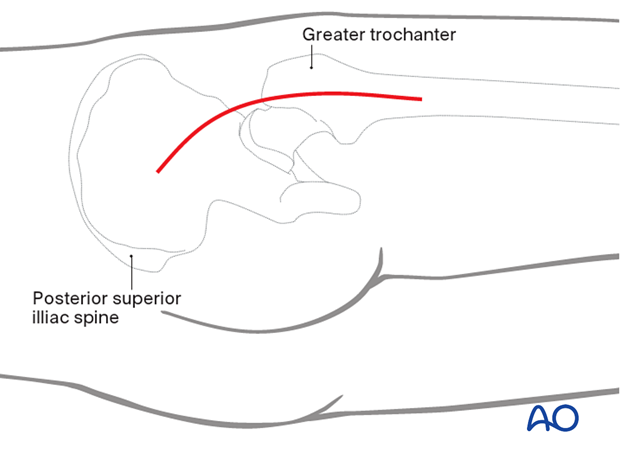
For the reconstruction of the greater trochanter, the incision typically needs to be extended distally to reduce and fix the fracture fragments.
Posterior approach
A posterior approach, with the patient in a lateral decubitus position, may also be used. This allows for both the reconstruction of the greater trochanter and the insertion of the hemiprosthesis.
Dislocation may be more frequent with a posterior approach. Proper positioning of the prosthesis and appropriate repair of the posterior capsule improves stability.
Option: Vastus lateralis origin release or split
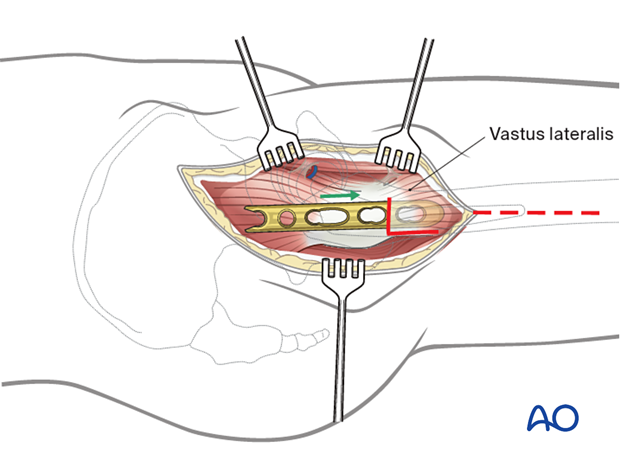
To apply a plate to the lateral aspect of the femur, the vastus lateralis fascia needs to be incised longitudinally. The origin of the muscle can be released. This can be repaired after stabilization is obtained.
4. Removal of the femoral head
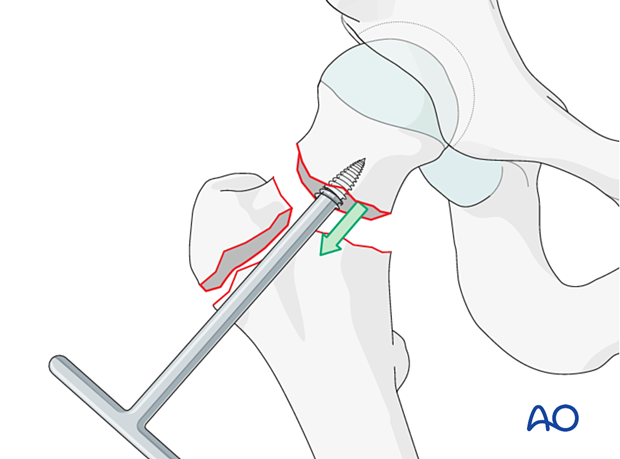
Begin the operation with adequate exposure of the fracture site through a sufficient capsular incision. For a hemiarthroplasty procedure, the acetabular labrum and capsule should be preserved, as preservation facilitates hip stability postoperatively. Mobilize the proximal femur and perform a conservative femoral neck osteotomy to improve exposure to remove the femoral head.
Remove the femoral head. Use a “corkscrew” (threaded handle), as illustrated. Divide the ligamentum teres as necessary.
An additional osteotomy of the femoral neck is usually required to fit the broaches and final femoral prosthesis.
Inspect the acetabulum and remove any small bone fragments in the joint. If arthrosis of the acetabulum is observed, consider conversion to total hip arthroplasty.
5. Determining the size of the femoral head component
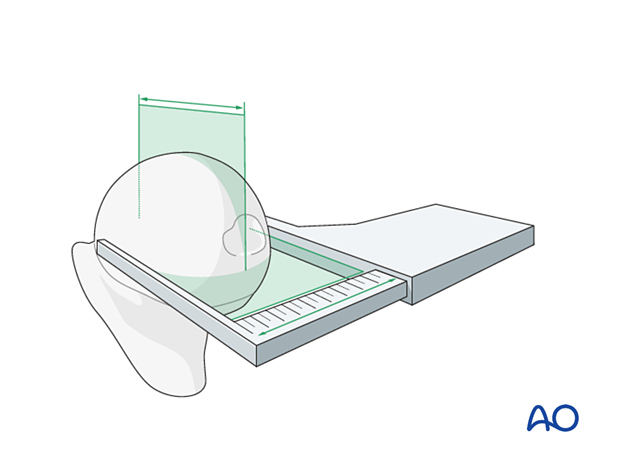
Measure the removed femoral head to determine the outer diameter of the bipolar or unipolar femoral head component.
Confirm the chosen size by manually testing the fit of a trial uni-/bipolar head prosthesis within the acetabulum.
6. Preparation for stem insertion
Osteotomy of the femoral neck
Choose the correct level for the definitive osteotomy, which can affect the height of the definitive prosthesis. The goal should be to ensure that the definitive stem maintains equal leg lengths and proper soft-tissue tension.
The orientation of the osteotomy depends on the chosen prosthesis. It begins in the fossa below the greater trochanter and ends in the calcar region. If the prosthesis has a medial flange, the osteotomy must match where the flange will sit.
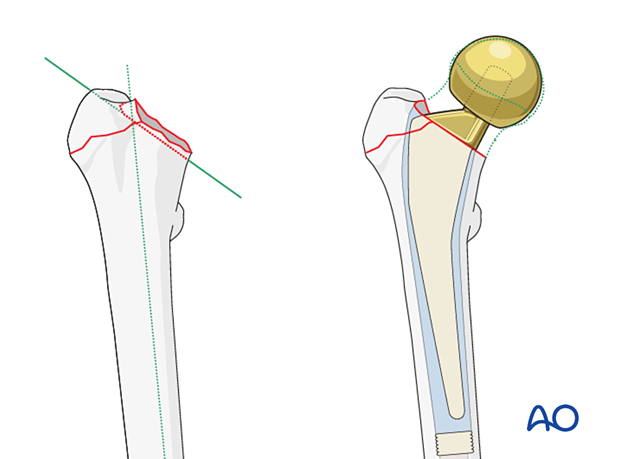
Pitfall: short femoral neck
Ensure correct prosthesis rotation
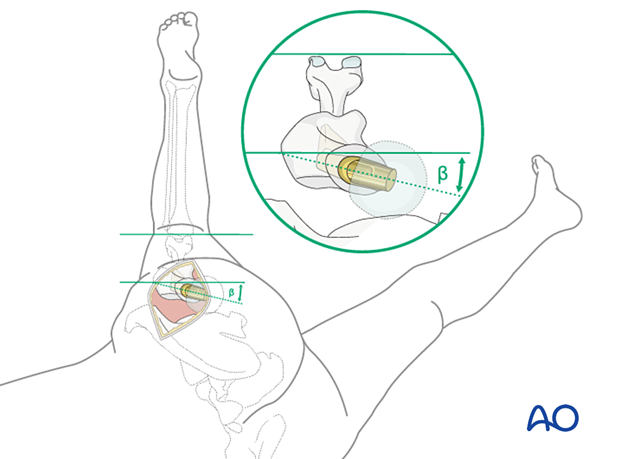
The prosthesis must be correctly aligned in the femoral axial plane. The neck of the implanted femoral component should usually be coaxial with the native femoral neck, as in the illustration. “β” indicates the angle of anteversion of the femoral neck and the prosthesis. Avoid excessive anterior rotation (anteversion) or posterior rotation (retroversion), as the former predisposes to anterior dislocation and the latter predisposes to posterior dislocation of the prosthesis.
Correct rotational alignment is achieved by maintaining the desired anteversion while preparing the femoral medullary canal with broaches.
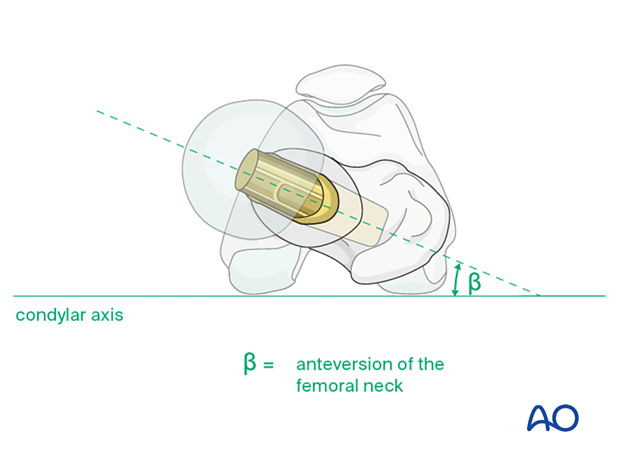
To ensure correct prosthesis rotation, the leg is in full external rotation, and the knee is flexed to 90° (figure-of-four position). External rotation of the prosthesis (away from the plane of the tibia) increases anteversion. The correct position is approximately 15° externally rotated relative to the axis of knee flexion.
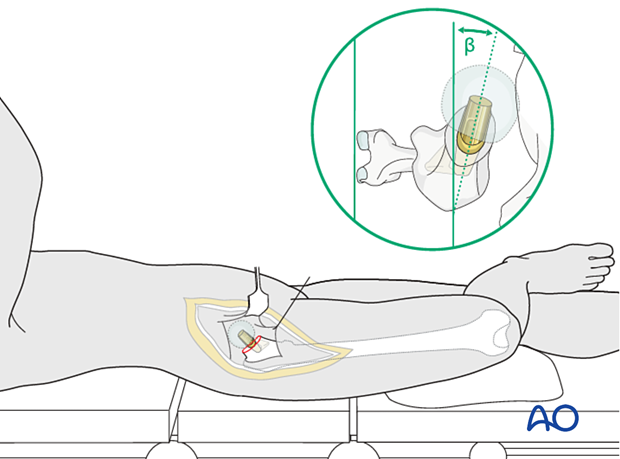
Exposure of the proximal femur is accomplished by carefully placing the involved limb in an externally rotated and flexed position with the lower leg hanging over the edge of the operating table. To maintain sterility, the lower leg is inserted into an envelope or pocket made from a sterile sheet. The assistant holds the patient’s leg perpendicular to the table surface, which is thus the plane of the knee axis. Proper anteversion is achieved by externally rotating the femoral prosthesis, so its neck is aimed approximately 15° anteriorly to the knee axis (or table surface).
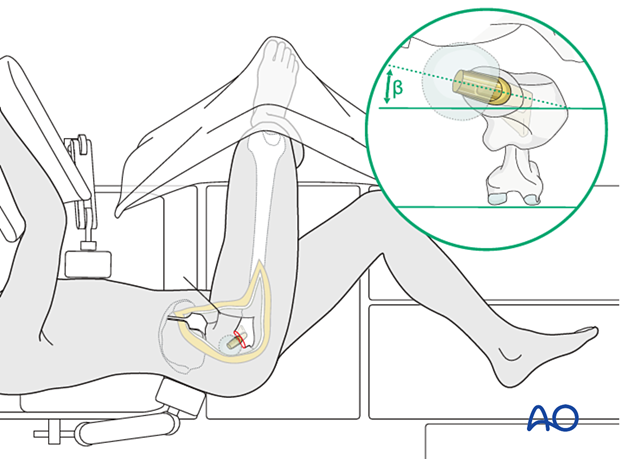
With this approach, the hip is accessed through a posterior capsulotomy, through which the femoral head is removed. Internal rotation of the lower extremity delivers the femoral neck for osteotomy and femoral canal preparation. The correct rotational orientation of the prosthesis requires reference to the femoral coronal plane, shown by flexing the knee to 90°. An assistant holds the leg internally rotated so that the tibia is perpendicular to the table surface. The anteversion angle of the femoral neck and prosthesis (β = approximately 15°) is then estimated as illustrated.
Medullary preparation
Insert the femoral canal finder into the femoral canal and open it wide enough to insert the smallest broach.
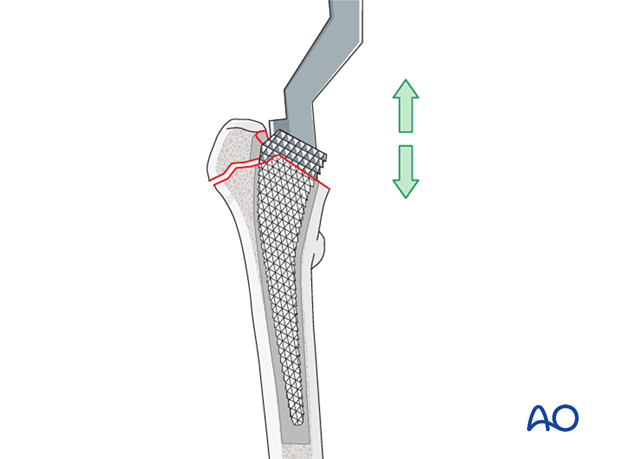
Start removing intramedullary cancellous bone with a series of broaches. Rotate the first broach to match the femoral neck anteversion (approximately 15°). Broach until the prosthesis fits appropriately within the medullary canal. It is sometimes necessary to resect corticocancellous bone from the medial aspect of the trochanteric fragment to allow definitive reduction.
Although the size of the femoral stem is estimated with preoperative planning, it should be confirmed definitively by the fit of the broach within the medullary canal.
Choice of the right stem size
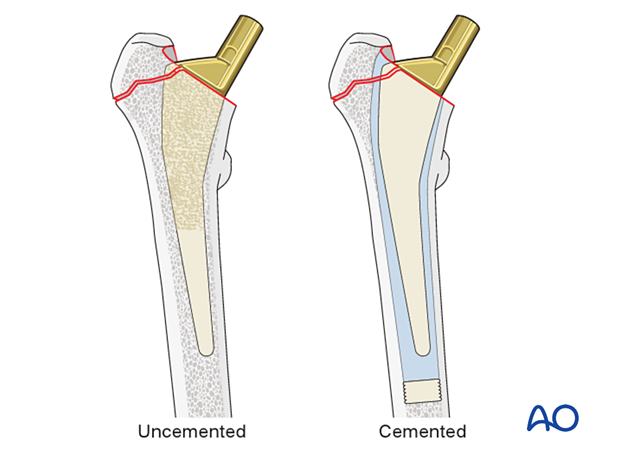
If an uncemented implant is used, the prosthesis stem should snugly fill the prepared medullary cavity.
If cement is used, the stem size should be somewhat smaller than the prepared medullary cavity to allow for an appropriate layer of bone cement.
7. Insertion and assembly of the prosthesis
Introduction and correct positioning of the prosthesis in the frontal plane
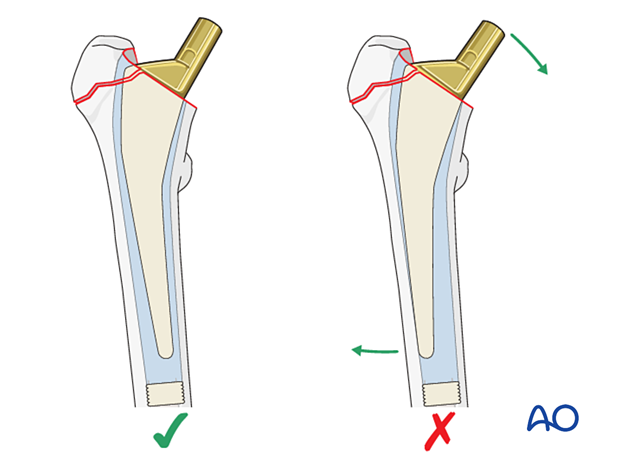
When introducing the prosthesis into the prepared femoral medullary canal, the goal is to get the stem inserted into neutral alignment down the proximal femoral canal. Because both the femur and the prosthesis can be eccentrically loaded upon implantation, bending forces can act on the prosthetic neck, often forcing the prosthetic stem into varus. The prosthesis – cemented or uncemented – should be inserted to avoid varus orientation. Try to avoid excessive compensation of putting the stem in varus as it may lead to valgus alignment.
This illustration shows a cemented femoral stem with correct alignment (left). Varus alignment (as shown in the right illustration) tends to loosen cemented stems due to excessive loading stresses.
Cementing technique (for cemented stems)
Since new (third generation) cementing techniques have been introduced, the long-term results of the cemented prosthesis have been considerably improved.
A cement restrictor placed a centimeter or so below the prosthesis allows the cement to be pressurized so that it flows into the cancellous bone rather than into the distal femur.
Before inserting cement, clean the canal with irrigation and an appropriate brush. Place a temporary dry sponge in the canal, which should be removed just before the cement is inserted.
By mixing the cement liquid and powder in a low-pressure vacuum container, air bubbles are avoided, providing improved cement biomechanical characteristics.
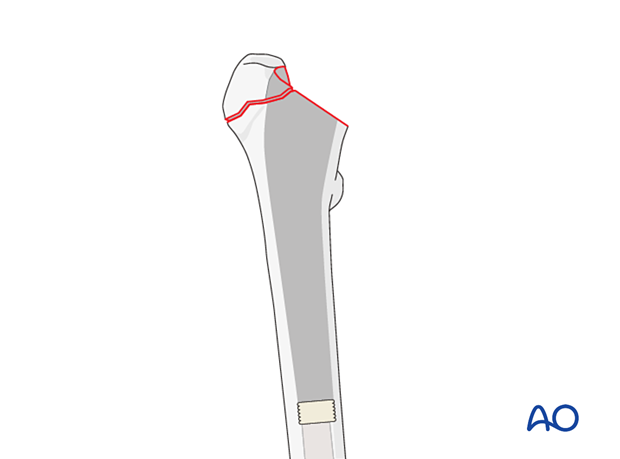
Cementing of the medullary canal
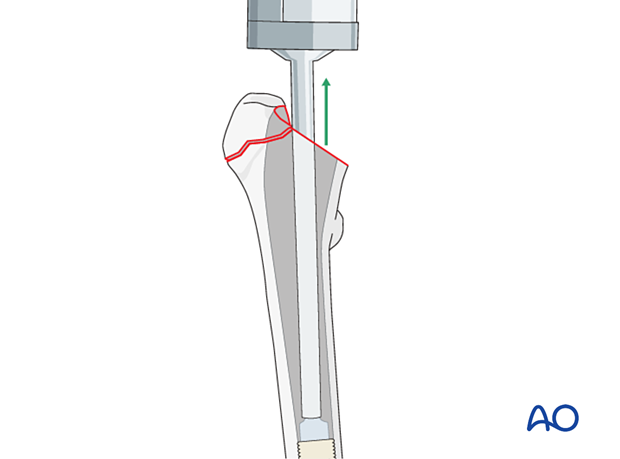
Fill the prepared medullary cavity from bottom to top with a cement gun, as illustrated. Withdraw the cement gun as the medullary canal fills. Avoid mixing blood or air with the cement.
Pressurizing the cement before prosthesis insertion improves its penetration into the surrounding bone.
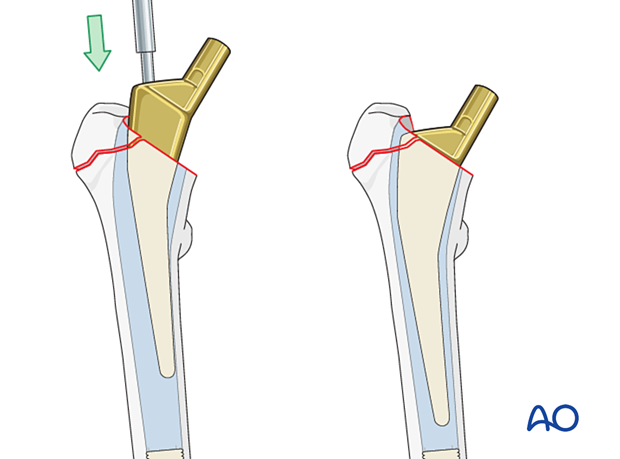
Prosthesis insertion
Before the cement hardens, insert the prosthesis with correct rotation (anteversion) and coronal alignment. It must be placed to the appropriate, predetermined depth. Once the stem is seated, allow the cement to set undisturbed. Trim off any excess cement, and carefully remove all cement fragments from the hip joint and surrounding wound.
Assembly of the bipolar or unipolar prosthesis
Use a trial bipolar or unipolar head prosthesis on the definitive stem to confirm appropriate diameter and neck length. The latter affects leg length, soft-tissue tension, and hip stability.
With the hip reduced, confirm the range of motion and stability.
Select definitive implant considering:
- Does the hip sublux/dislocate with mild adduction, internal rotation and flexion? Hyperextension?
- Is the selected prosthetic neck length and offset consistent with contralateral preoperative templating? (Has the axis of rotation of the femoral head been restored?)
- Is the component anteversion appropriate?
- Can the posterior capsular repair and short external rotators return to the appropriate insertion position on the proximal femur?
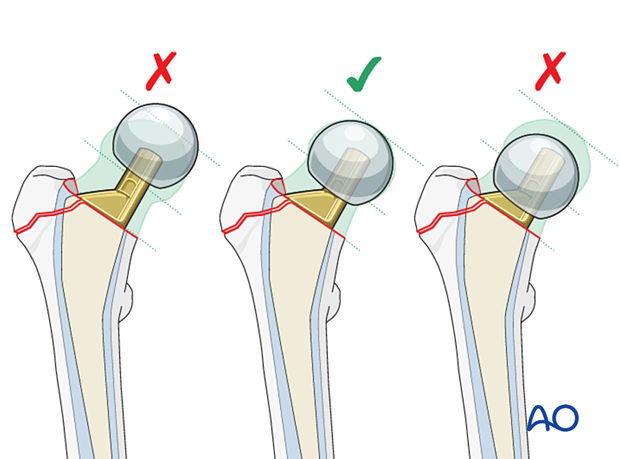
Once determined, attach the definitive femoral head to the stem and reduce the hip.
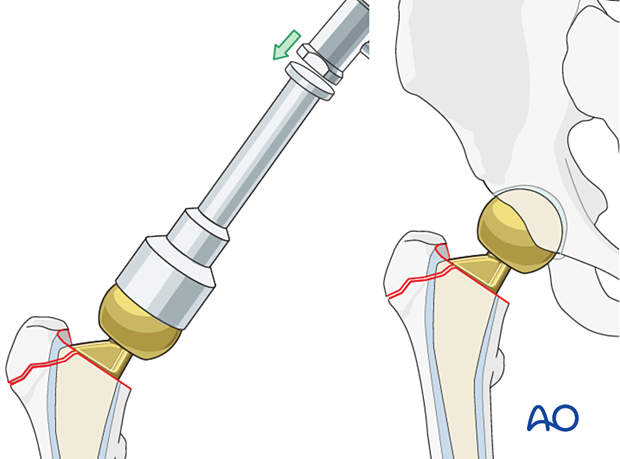
8. Reduction of the greater trochanter fragments
Reduction of simple trochanteric fractures
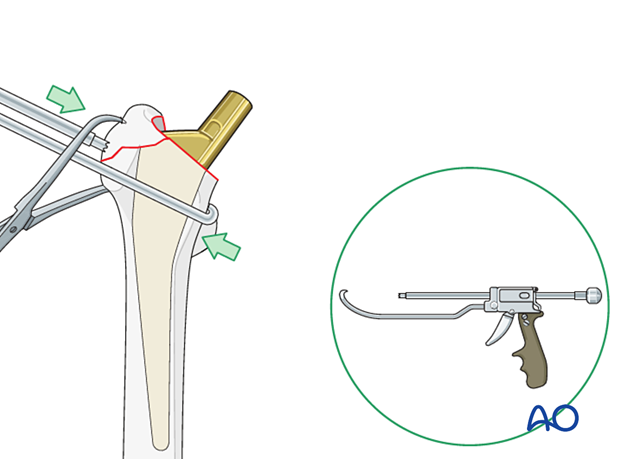
Definitive reduction is typically carried out after insertion of the prosthesis using a combination of direct and indirect methods. Hip abduction will help take tension off the fracture fragments.
The collinear reduction forceps can be helpful in facilitating reduction. It is applied from the direct lateral incision with proximal extension.
Option: tendon sutures as a reduction aid
Stitch strong nonbioabsorbable sutures in a Krackow fashion into the gluteus medius tendon.
At the end of the procedure, the sutures can be anchored either under the loop of the cerclage wire, below or into the plate, into the vastus lateralis origin, or into the proximal femur.
9. Tension band wiring of the greater trochanter
K-wire insertion
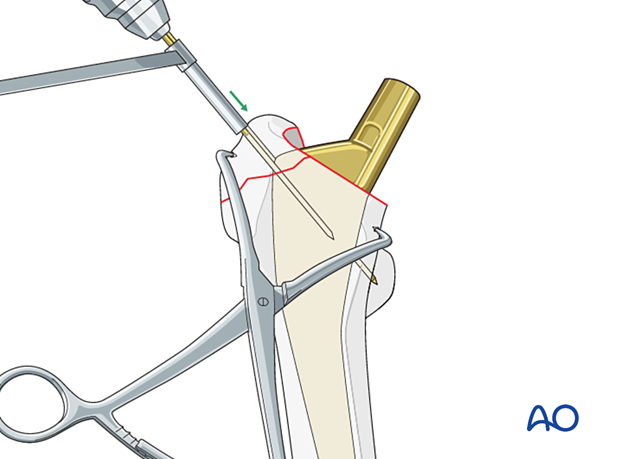
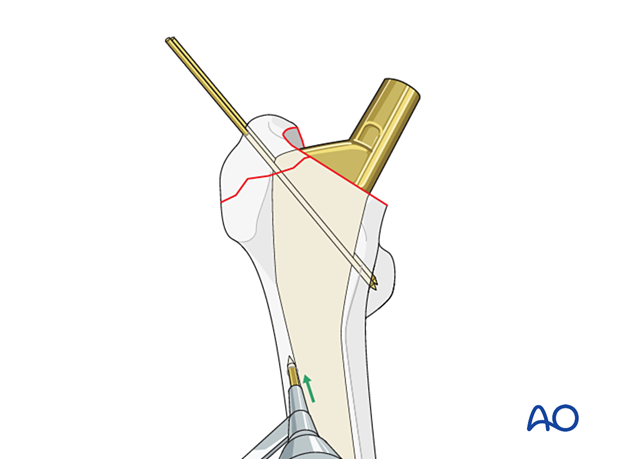
Drill two parallel 2.0 mm K-wires from the greater trochanteric fragment to the medial cortex on the level of the lesser trochanter. The posterior K-wire may engage in the lesser trochanter.
Wire positioning
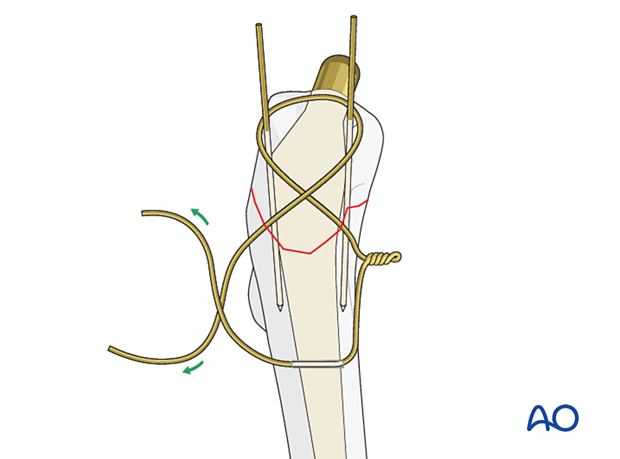
Create a hole in the lateral aspect of the intact femoral diaphysis by drilling the anterior and posterior cortex separately.
Pass an 18-gauge wire through the hole and bring it proximally in a figure-of-eight fashion around the origin of the K-wires and through the gluteus medius tendon.
Wire tensioning
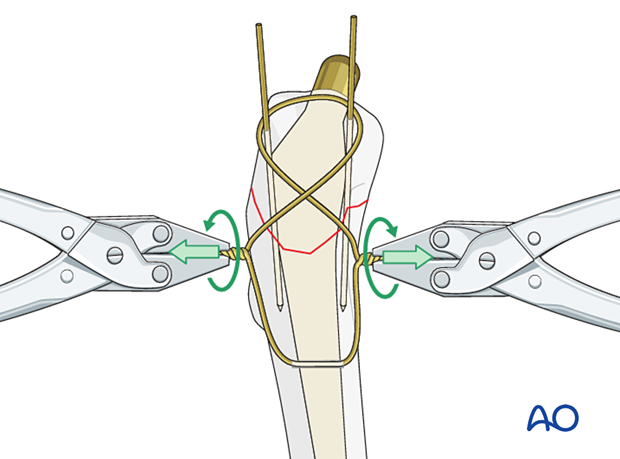
Tension the wire on both sides of the figure-of-eight in a helical manner for a minimum of four rotations.
Bend the ends of the wire and impact into the cortex of the femur so that they are not prominent.
Bending the K-wires
Bend the K-wires as much as possible with a drill sleeve. If necessary, increase the bend with pliers close to the bone.
Cut the K-wires to create a sharp tip about 5 mm from the bending point.
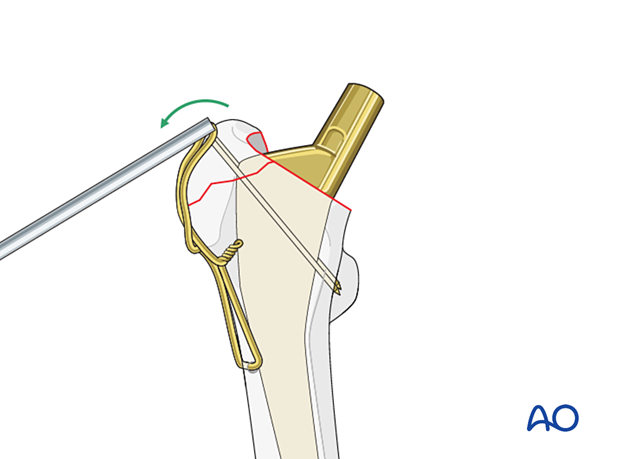
Turn the ends of the K-wires to capture the figure-of-eight wire, and then impact the K-wires firmly, so their sharp tips can be impacted into the cortex of the greater trochanter.
Option: tendon-suture fixation
After finishing the tension-band wiring, secure the ends of the tendon suture under the loop of the wire.

10. Hook plating of the greater trochanter
Introduction
The hook plate is applied after insertion of the arthroplasty prosthesis. This allows for proper stem positioning as the tip of the hooks can deflect the position of the broaches and definitive stem. Fixation of the hook plate to the proximal femur can be achieved with screws, cables, or a combination of both.
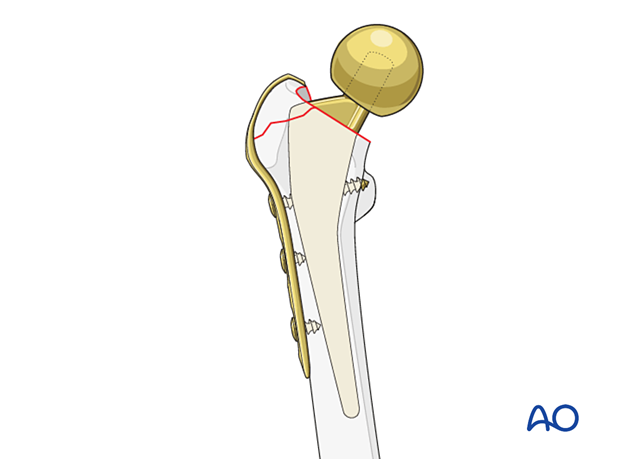
Plate application
Apply the plate on the lateral side of the femur into the proximal segment through the abductor tendon.
Place and impact the hook through a split of the gluteus medius into the tip of the greater trochanter.
Distal stabilization is carried out either in neutralization or compression mode, depending on the fracture morphology.
If there is no room for bicortical screw fixation, trans- or unicortical locking or cortical screws may be used.
If needed, cerclage may be added after prosthesis insertion.
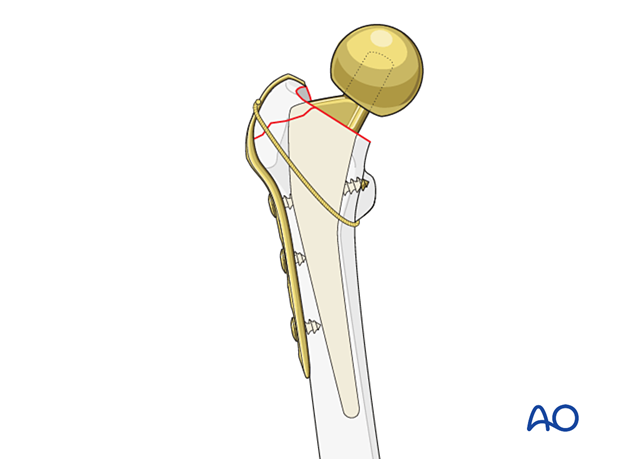
The hook plate may be fixed to the femur with cables.
11. Final assessment
Upon completion of prosthesis implantation and fracture fixation, confirm the stability of the hip joint and fracture stabilization by moving the hip through its full range of motion.
Obtain AP pelvis and AP and lateral hip x-rays to confirm correct implant position.
12. Aftercare
Dislocation precautions
Prosthetic dislocations, occurring 2–6% or more in recent reports, are serious complications that compromise medical and functional outcomes. Properly positioned prostheses and appropriate soft-tissue tension (when closing) reduce the dislocation risk.
To reduce the risk of prosthetic hip dislocation during the first 6 postoperative weeks, patients may require certain leg positions and activity restrictions. The surgeon may apply the following restrictions as necessary.
- Position to avoid after the posterior approach: Combined adduction across the midline, internal rotation, and hip flexion of more than 80°–90°
- Position to avoid after the anterior approach: Combined adduction past midline, external rotation, and hyperextension
Low seats and toilets, flexing the hip when arising, sitting with legs crossed, as well as squatting and kneeling may also be avoided initially, as should pivoting on the affected leg. The patient and caregivers may be encouraged to use additional support when rising from a sitting position.
Dislocation precautions can gradually be relaxed after 6 weeks, once the soft tissues have healed.
Patient mobilization
Weight-of-the-leg weight bearing with no active hip abduction is encouraged immediately and should continue until the greater trochanter fracture has healed (approximately 6–8 weeks postoperatively). The patient can begin ambulating with a walker (walking frame) and be instructed in safe transfers and gait. If this progresses satisfactorily, the use of crutches may be possible.
Depending on the approach, limited range-of-motion exercises may be appropriate.

Pain control
To facilitate rehabilitation and prevent delirium, it is important to control the postoperative pain properly, eg, with a specific nerve block.
VTE prophylaxis
Patients with lower extremity fractures requiring treatment require deep vein prophylaxis.
The type and duration depend on VTE risk stratification.
Follow-up
Follow-up assessment for wound healing, neurologic status, function, and patient education should occur within 10–14 days.
At 3–6 weeks, check the position of the fracture with appropriate x-rays.
Recheck 6 weeks later for progressive fracture union.
Longer follow-up, at 6 months and 1 year, is indicated to assess loosening or wear.
Prognosis of proximal femoral fractures in elderly patients
For prognosis in elderly patients, see the corresponding additional material.
