Temporary joint-bridging triangular external fixation
1. Principles of joint-bridging triangular external fixation
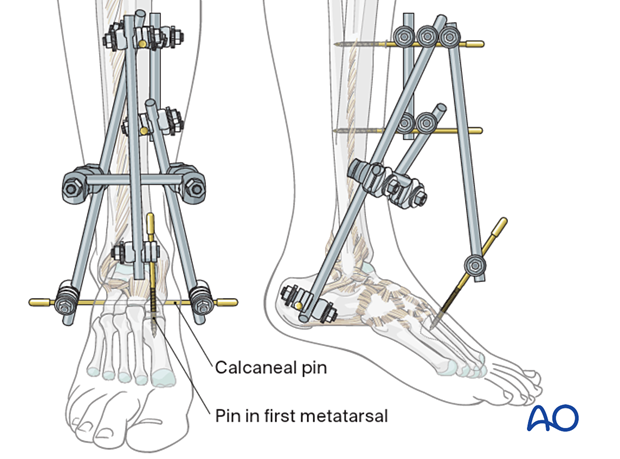
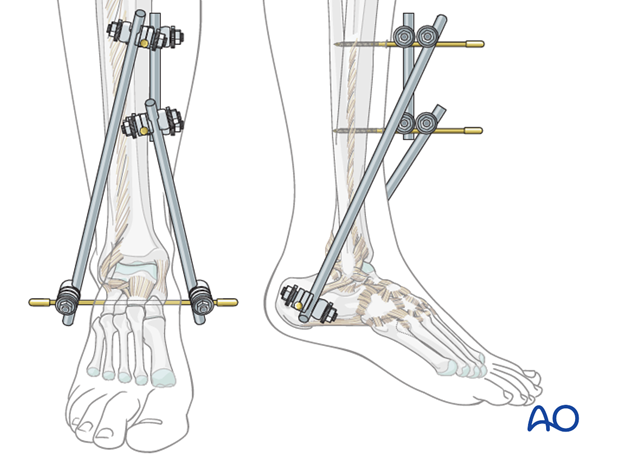
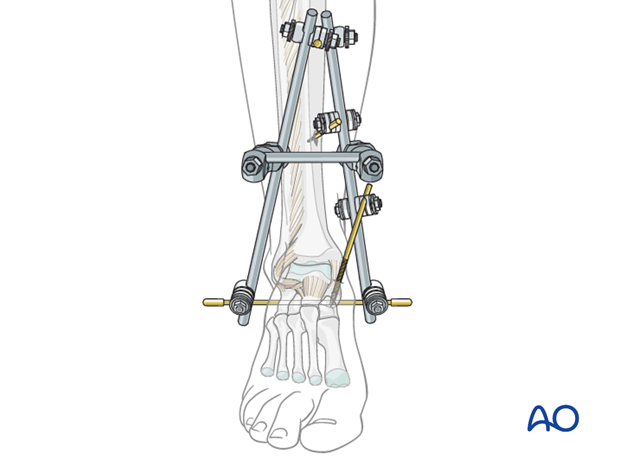
A joint-bridging triangular external fixator consists of a Steinmann pin running through the calcaneal tuberosity. A rod is fixed to each end of the pin and connected to the partial frame on the tibial crest.
This triangular frame is extended into the foot to stabilize soft tissues, to fix the foot in a neutral position and to reduce the risk of secondary equinus deformity.
A joint-bridging frame is usually used for temporary stabilization but may be used for definitive treatment if necessary.
Details of external fixation are described in the basic technique for application of modular external fixator.
Specific considerations for joint-bridging triangular fixation and the distal tibia are given below.
Teaching video
AO teaching video: Ankle-bridging delta frame
2. Patient preparation
This procedure is normally performed with the patient in a supine position.

3. Safe zones for pin placement
For safe pin placement make use of the safe zones and be familiar with the anatomy of the lower leg and the foot.

4. Pin insertion (tibial shaft)
Choice of tibial pin placement
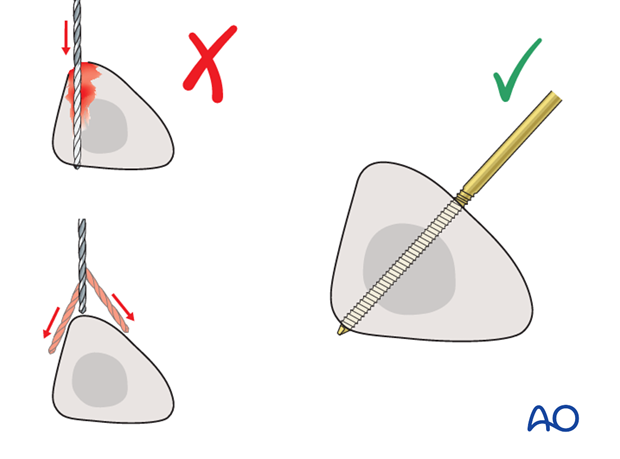
Drilling a hole in the thick tibial crest may be associated with excessive heat generation and there is a risk the drill bit may slip medially or laterally damaging the soft tissues. As the anteromedial tibial wall provides adequate thickness for the placement of pins, this trajectory is preferable. A trajectory angle (relative to the sagittal plane) of 20-60° for the proximal fragment and of 30-90° for the distal fragment is recommended.
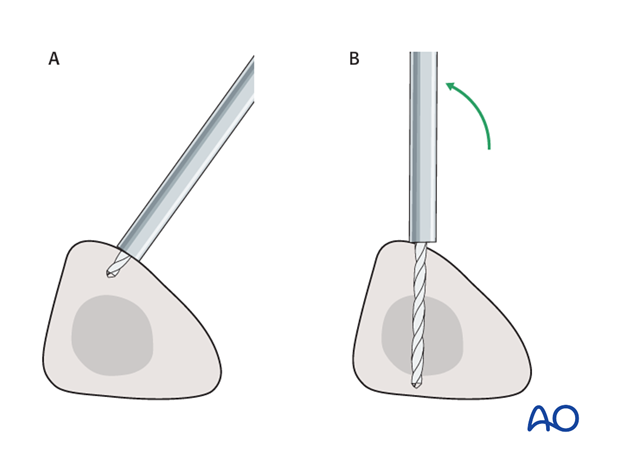
Alternatively, to avoid the frame catching on the opposite leg, the pins may be placed more anteriorly. The drill bit is started with the tip just medial to the anterior crest, and with the drill bit perpendicular to the anteromedial surface (A). As the drill bit starts to penetrate the surface, the drill is gradually moved more anteriorly until the drill bit is in the desired plane (B). This should prevent the tip from sliding down the medial or lateral surface.
5. Frame construction (triangular external fixation)
Construction of tibial frame and insertion of Steinmann pin
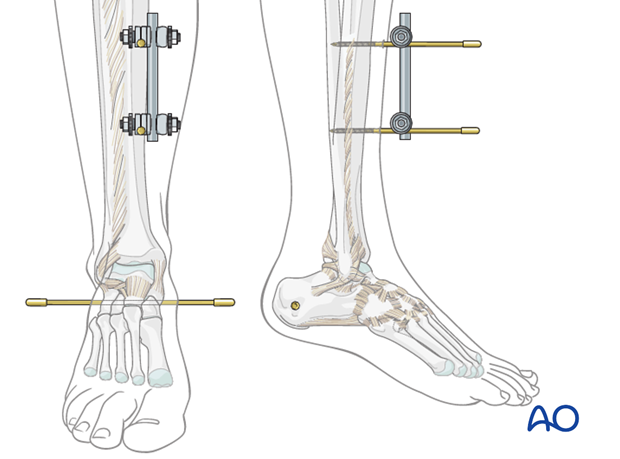
Insert two pins in the sagittal plane and slightly medial to the anterior tibial crest at an adequate distance above the fracture zone. Connect them with a short rod and tighten the rod-to-pin clamps. Placement more proximally gives room for later definitive open fixation and avoids damaged soft tissue in the fracture zone. Place the pins far enough apart to ensure adequate stability.
Then insert a Steinmann pin, or a threaded pin, from medial to lateral through the calcaneal tuberosity. Take care to avoid damage to the posterior tibial neurovascular bundle.
Tibiocalcaneal connection
Connect each end of the calcaneal pin to one of the tibial pins with a rod using rod-to-pin clamps applied loosely enough to allow reduction of the fracture.
6. Reduction and fixation (triangular external fixation)
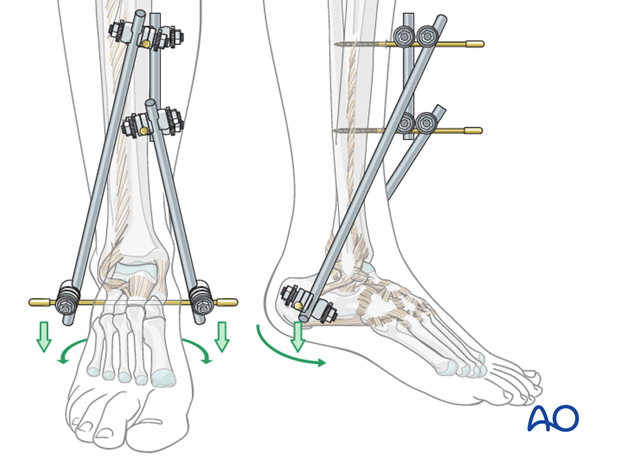
Reduction by manipulating the calcaneal pin
Reduce the fracture by manipulating the calcaneal pin. After checking correct reduction with image intensification, fix the reduced position by tightening all clamps.
Connecting the rods
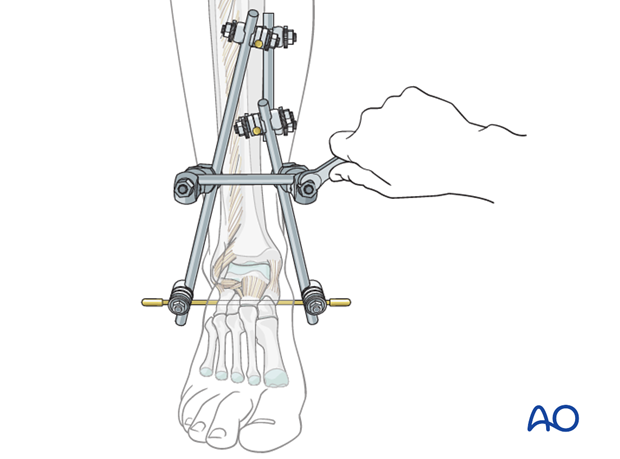
To stabilize the construct, the two tibiocalcaneal rods may be connected with a short rod using rod-to-rod clamps.
Pearl: A bent Steinmann pin can be used as an alternative to a straight rod if needed.
Tibiotarsal transfixation
To keep the midfoot in a neutral position, one or two small pins should be inserted
- In the first metatarsal or
- In the first and in the fifth metatarsal
and connected directly, or through a partial frame, with the tibial frame.

Fixation of a fibular fracture
Fixation of an associated fibular fracture adds stability and contributes to overall reconstruction. However, the possibility of additional soft-tissue injury must be considered before undertaking this step.
Alternative: Construct starting with a single tibial pin
To achieve a similar triangular construct, it is possible to start with one pin in the proximal third of the tibial crest instead of a partial frame.
Frame construction / reduction and fixation include the following steps:
- Insertion of the tibial pin
- Insertion of the calcaneal Steinmann pin
- Connecting the two pins medially and laterally with two rods
- Reduction by manipulating the calcaneal pin and fixation by tightening the clamps
- Insertion of a stabilizing pin in the tibia proximal to the fracture through a rod-to-pin clamp on the medial rod
- Tibiotarsal transfixation
7. Aftercare following joint-bridging external fixation
Ankle joint
External fixation of distal tibial fractures is often extended to include the foot, to avoid an equino-varus deformity. Otherwise consider a splint to support the foot and ankle.
Pin-site care
Proper pin insertion
To prevent postoperative complications, pin-insertion technique is more important than any pin-care protocol:
- Correct placement of pins (see safe zones) avoiding ligaments and tendons, e.g. tibia anterior
- Correct insertion of pins (e.g. trajectory, depth) avoiding heat necrosis
- Extending skin incisions to release soft-tissue tension around the pin insertion (see inspection and treatment of skin incisions)
Pin-site care
Various aftercare protocols to prevent pin tract infection have been established by experts worldwide. Therefore, no standard protocol for pin-site care can be stated here. Nevertheless, the following points are recommended:
- The aftercare should follow the same protocol until removal of the external fixator.
- The pin-insertion sites should be kept clean. Any crusts or exudates should be removed. The pins may be cleaned with saline and/or disinfectant solution/alcohol. The frequency of cleaning depends on the circumstances and varies from daily to weekly but should be done in moderation.
- No ointments or antibiotic solutions are recommended for routine pin-site care.
- Dressings are not usually necessary once wound drainage has ceased.
- Pin-insertion sites need not be protected for showering or bathing with clean water.
- The patient or the carer should learn and apply the cleaning routine.
Pin loosening or pin tract infection
In case of pin loosening or pin tract infection, the following steps need to be taken:
- Remove all involved pins and place new pins in a healthy location.
- Debride the pin sites in the operating theater, using curettage and irrigation.
- Take specimens for a microbiological study to guide appropriate antibiotic treatment if necessary.
Before changing to a definitive internal fixation an infected pin tract needs to heal. Otherwise infection will result.
Follow up
See patient 7-10 days after surgery for a wound check and for consideration to transition to definitive fixation to nail or plate internal fixation. X-rays are often taken to check the reduction.
