Traction
1. General considerations
In locations where there is no expertise or implants, traction can be used as an initial treatment until the pain is lessened. Because of extended healing times with such a fracture, external fixation is then applied after the pain is manageable to allow mobilization. External fixation would allow leg length, alignment, and rotation to be maintained.
This treatment would not occur where expertise is available but may be necessary in a small number of circumstances. Examples would be:
- War-torn countries
- Poor economic situations
- Political instability
External fixation would allow leg length, alignment, and rotation to be maintained.
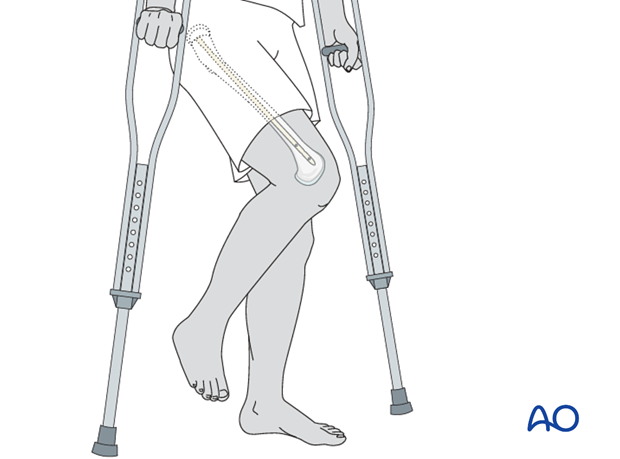
Nonoperative treatment means that the patient will be in some form of traction for at least 6-8 weeks, often 10-12 weeks.
Treatment by traction appears simpler than surgery. However, it requires great skill of application and constant monitoring throughout the whole treatment period.
The initial treatment is usually skin traction, later converted to skeletal traction.
Disadvantages of prolonged skin traction are:
- Loosening
- Constriction
- Friction
- Allergy
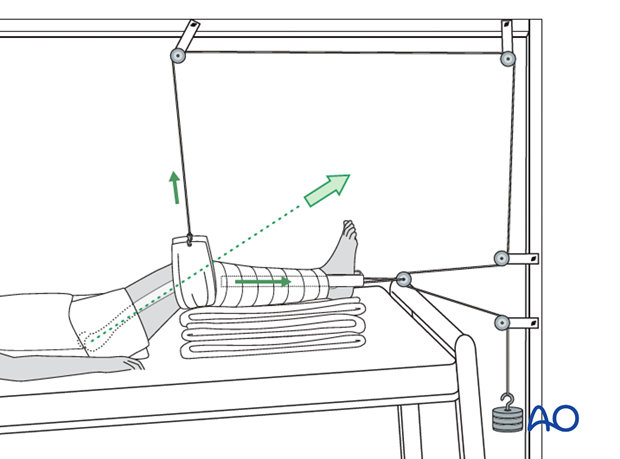
If skin traction is likely to be used for more than 24 hours, greater patient comfort and better control of the femoral fracture can be achieved by using Hamilton-Russell skin traction.
A padded sling is placed behind the slightly flexed knee and skin traction applied to the lower leg. The traction cord and pulley system are as illustrated.
The principle of the parallelogram of forces determines that the upward pull of the sling and the longitudinal pull of the skin traction create a resolution of force in the line of the femur, as illustrated.
This configuration of traction also allows control of rotation, by side-to-side adjustment of the pulley above the knee.
Complications of skeletal traction
Surgeons have moved away from skeletal traction because of multiple serious complications. These include:
- Pin tract infections
- Muscle wasting
- Prolonged bed immobilization with resultant bed sores
- Increased resource utilization (nursing care)
- Less than adequate fracture reduction
Pin tract infection - In case of pin loosening or pin tract infection, the following steps need to be taken:
- Remove all involved pins and place new pins in a healthy location.
- Debride the pin sites in the operating theater, using curettage and irrigation.
- Take specimens for a microbiological study to guide appropriate antibiotic treatment if necessary.
Muscle wasting - A patient in traction is immobilized and a patient must be educated with physiotherapy resources to consistently perform bed exercises for all muscle groups.
Prevention of bedsores - Nursing care is the hallmark of the prevention of bedsores, including regular skin checks and careful movement and attention to the posterior side of the body that is dependent.
Prolonged bed immobilization - A patient kept in bed for 12 weeks is a time consuming and expensive use of hospital resources and should only be used when there is no other option.
Poor fracture reduction - Traction provides length, but alignment and rotation are difficult to achieve accurately, often resulting in some malreduction of the femur. Late osteotomies may be needed to correct significant shortening, malalignment, or malrotation.
2. First aid
The ABC of primary care for the injured always takes precedence over the fracture treatment. Once the safety of the patient is established, attend to the femoral fracture.
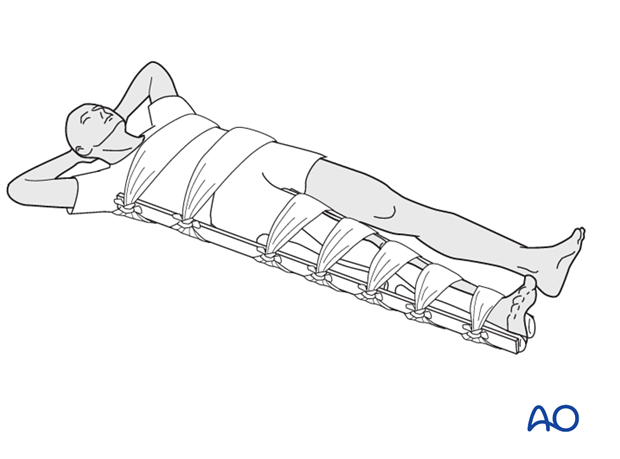
It is important in treating a femoral shaft fracture to splint the whole leg as soon as possible, and certainly before transporting the patient.
For that purpose, you need two firm boards or splints along the leg, suitably padded, one on the inner aspect of the leg and one along the leg and the body on the outer aspect.
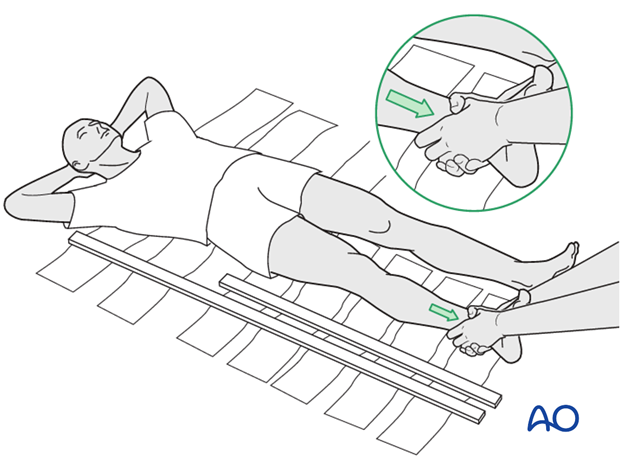
Any soft material such as clothing, blankets, etc. can be used as emergency padding.
The splints should then be kept in place by bandages around both splints and ...
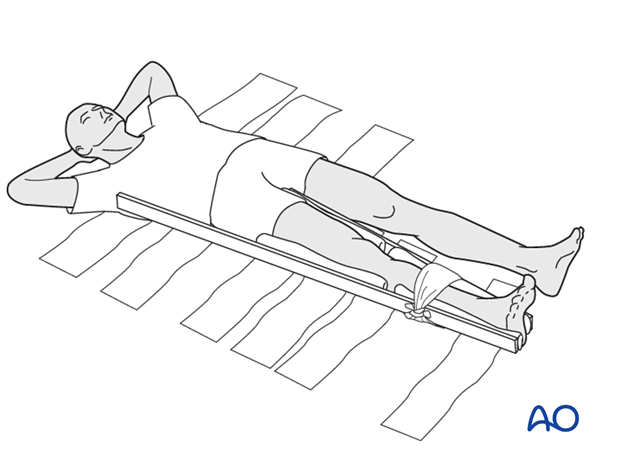
...the leg as well as the body.
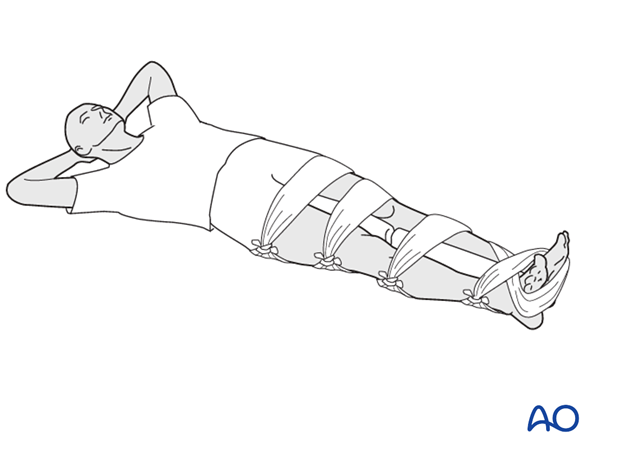
If no boards are available, some stabilization can be achieved by splinting the fractured leg to the uninjured leg, with padding in between.
Many ambulance services these days work with technically advanced light-weight traction splints.
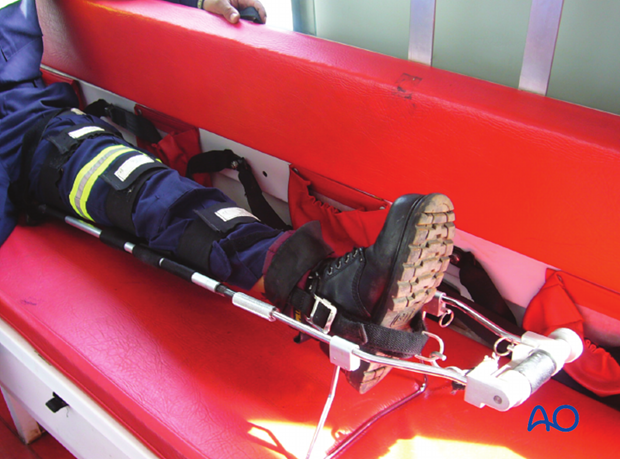
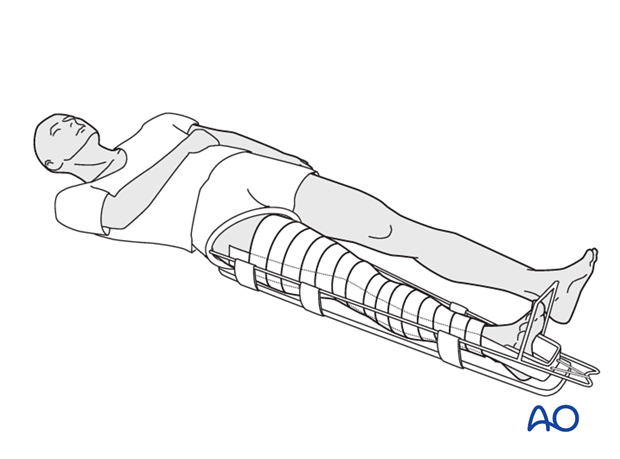
Another way of splinting is the use of skin traction in combination with a Thomas splint.
The Thomas splint affords excellent immobilization for transporting the patient. Unfortunately, the availability of the Thomas splint is somewhat limited.
Great care must be taken to avoid excessive pressure of the ring of the splint against the perineum, using suitable padding as necessary.
3. Skin traction
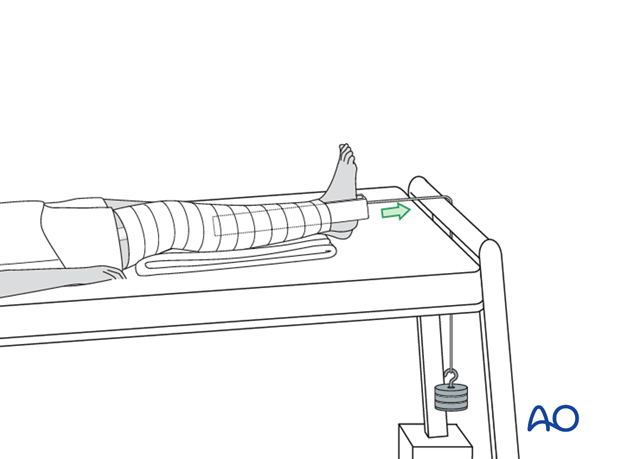
In the event that there is no Thomas splint available, skin traction over the end of the bed with 7 kg will be the initial treatment of a femoral fracture.
With the tilted bed the weight of the patient acts as counter traction.

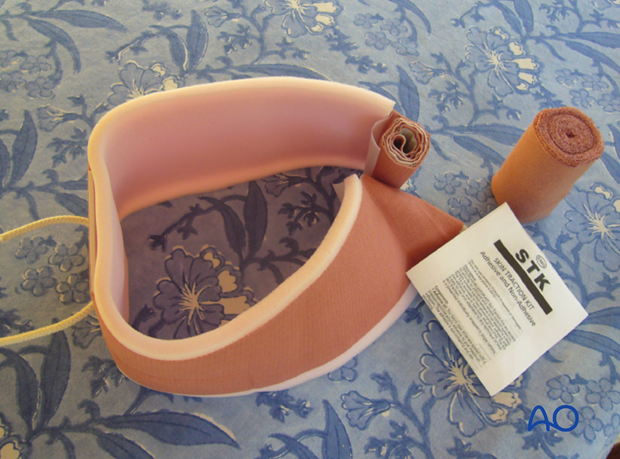
This photograph shows a commercially available skin traction kit.
Before the application of the adhesive traction strip, the skin is painted with friar’s balsam.
The strip is then applied below the level of the fracture on the medial and lateral aspects of the leg as shown, carefully avoiding any creases.
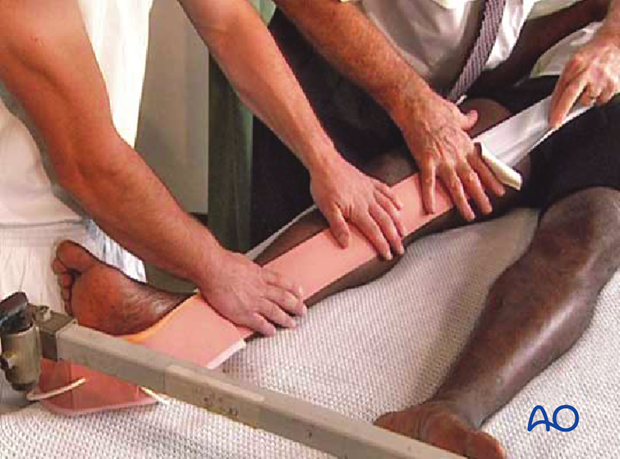
To prevent the development of blisters, the skin traction needs to be applied without folds or creases in the adhesive material and the covering bandage should be non-elastic.
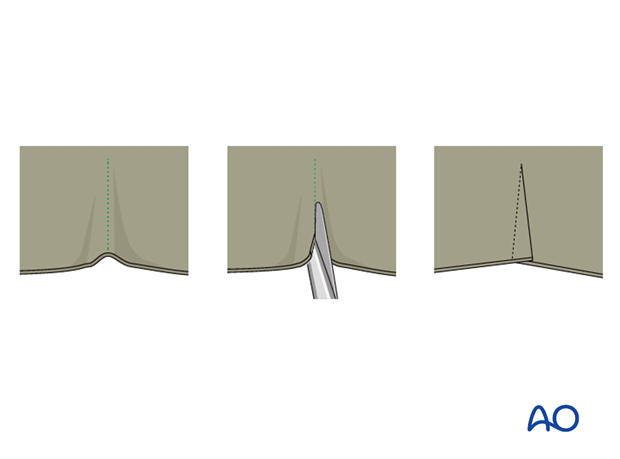
Should a crease be inevitable, due to the contour of the limb, the creased area should be lifted, partially slit transversally and the edges overlap.
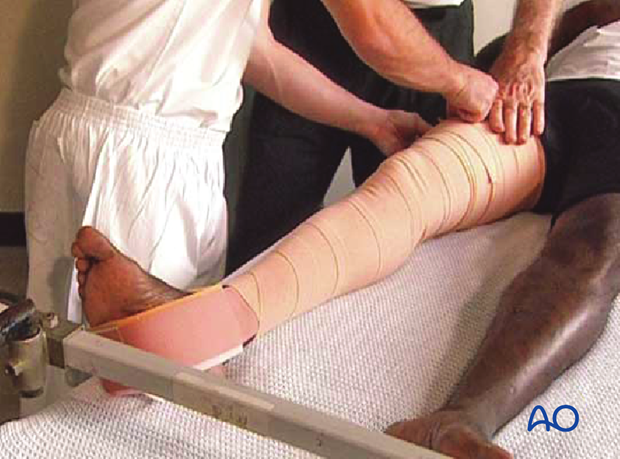
Once the adhesive strip is satisfactorily in place, ensuring that the padded lower section overlies the malleoli, a spiral inelastic bandage is carefully wrapped around the limb from just above the malleoli to the top of the strip.
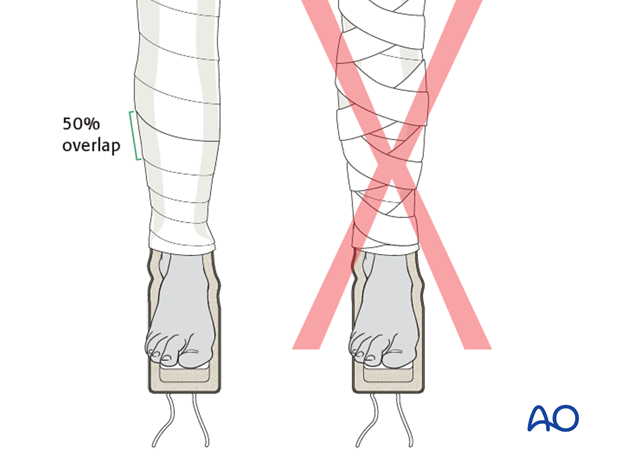
Apply the overlying bandages spirally overlapping by half.
The traction strip should be applied to the level of the fracture only, but not above.
4. Skeletal traction
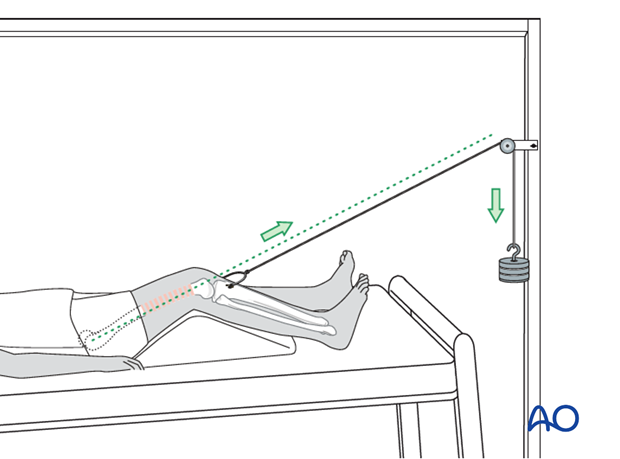
Skeletal traction via tibial pin (Perkin’s traction)
As soon as the decision is made that traction will be the definitive treatment, conversion to skeletal traction should be done.
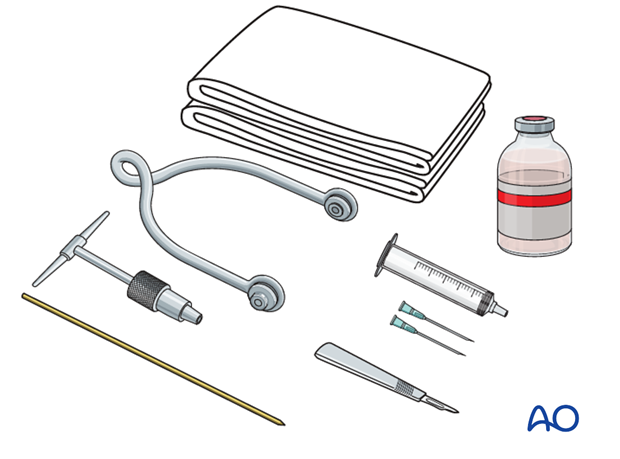
Preparation
Pack with:
- Sterile towels
- Disinfectant
- Syringe
- Needles
- Local anaesthetic
- Scalpel with pointed blade
- Sharp pointed Steinmann pin, or Denham pin
- Jacobs chuck with T-handle
- Stirrup
Anesthesia
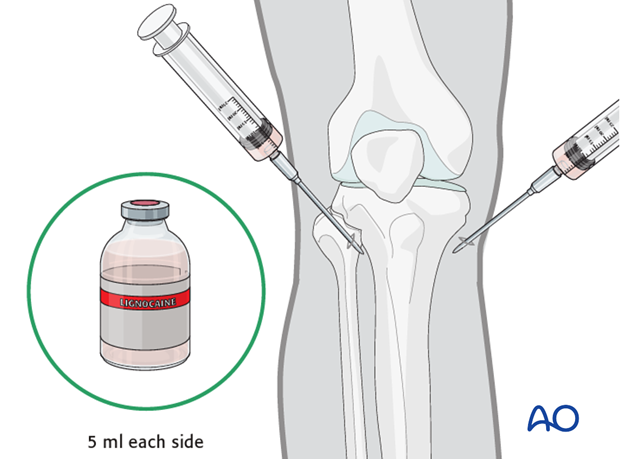
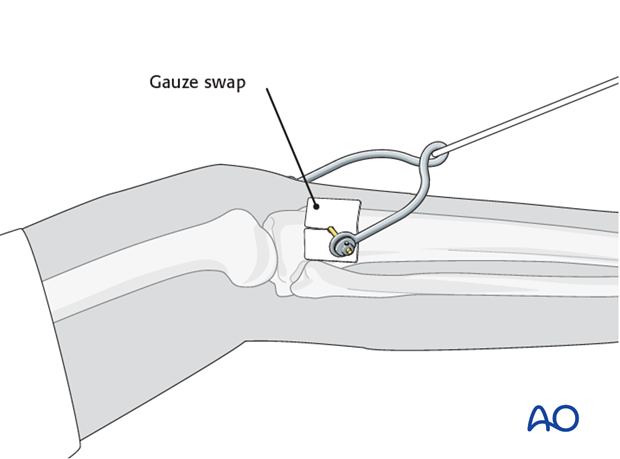
After painting the skin with antiseptic and draping with sterile towels, inject a bolus of local anaesthesia (5 ml of 2% lignocaine) on each side of the tibial tuberosity, into the lateral skin at the proposed site of pin insertion and medially at the anticipated exit point, infiltrating down to the periosteum.
Pin insertion
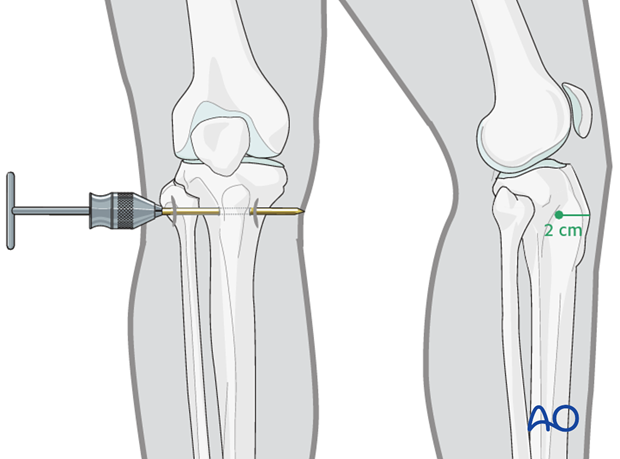
At the entry point, a stab incision is made through the skin with a pointed scalpel.
A Steinmann, or preferably a Denham pin, mounted in the T-handle, is inserted manually at a point about 2 cm dorsal to the tibial tuberosity.
As the pin is felt to penetrate the far cortex, check that the exit will coincide with the area of local anaesthetic infiltration. If not, inject additional local anaesthetic. Once the point of the pin clearly declares its exit site, make a small stab incision in the overlying skin.
Once the pin is in place, ensure that there is no tension on the skin at the entry and exit points. If there is, then a small relieving incision may be necessary.
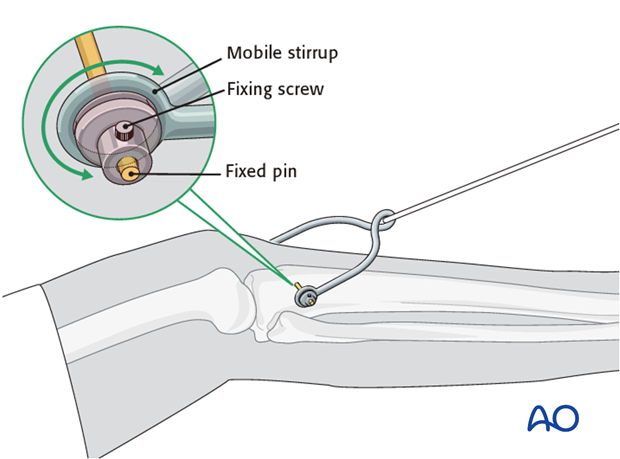
It is important that the stirrup be freely mobile around the traction pin, to prevent rotation of the pin within the bone. Rotating pins loosen quickly and significantly increase the risk of pin track infection.
Pin site care
Various aftercare protocols to prevent pin tract infection have been established by experts worldwide. Therefore, no standard protocol for pin-site care can be stated here. Nevertheless, the following points are recommended:
- The aftercare should follow the same protocol until removal of the traction.
- The pin-insertion sites should be kept clean. Any crusts or exudates should be removed. The pins may be cleaned with saline and/or disinfectant solution/alcohol. The frequency of cleaning depends on the circumstances and varies from daily to weekly but should be done in moderation.
- No ointments or antibiotic solutions are recommended for routine pin-site care.
- Dressings are not usually necessary once wound drainage has ceased.
- Pin-insertion sites need not be protected for showering or bathing with clean water.
- The patient or the carer should learn and apply the cleaning routine.
Reduction
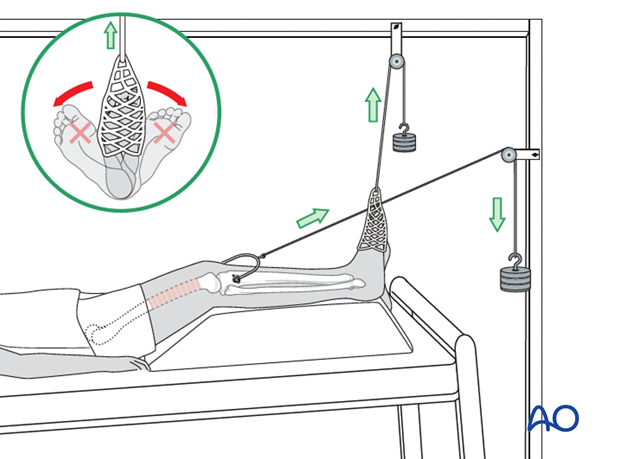
The pull on the femur (weight at the end of the traction) should be enough to correct length and to reduce the fracture.
For maintenance traction 10% of the patient’s body weight is usually enough.
The pull should always be in line with the femur. For that purpose, the height of the pulley on the Balkan beam must be adjustable.
The thigh needs to be supported on a firm triangular foam wedge, or by folded pillows, in order to prevent posterior sag at the fracture site.

Control of length and rotation
Length and rotation need to be checked daily.
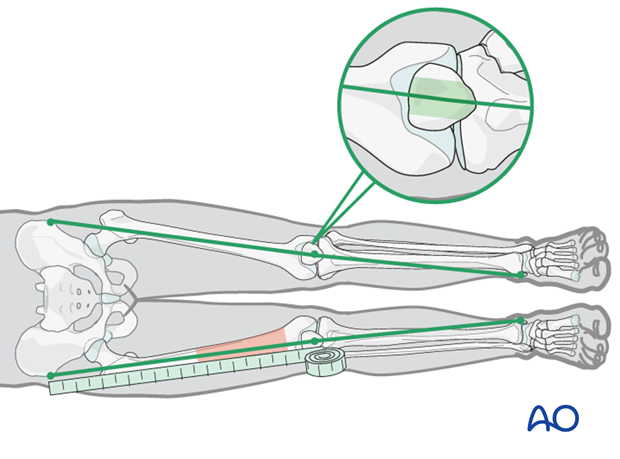
Length is measured by comparison to the uninjured leg. Both legs are brought into comparable positions and the distances from the anterior superior iliac spines, over the knee, to the medial malleoli, are measured and compared.
Adjustment, if required, is done by increasing, or decreasing, the traction weight. Control x-rays need to be taken weekly, if possible, for at least the first 4 weeks.
If the medial/lateral angulation at the fracture site is anatomical, this line will pass over the central third of the patella.
Rotation and maintenance of dorsiflexion in the ankle can be achieved by applying an adhesive sock to the forefoot with a cord over a pulley on the Balkan beam. This pulley should be adjustable from side to side to control rotation.
Distal femur fractures
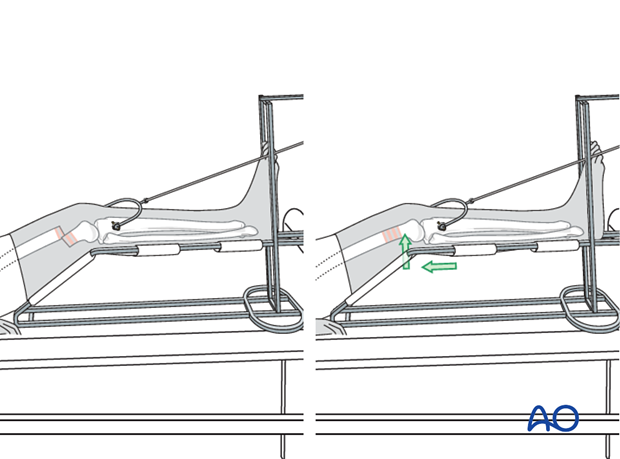
Fractures in the distal third of the femur can be controlled more easily by using a Braun frame.
This illustration shows the construction of a Braun-type frame, using metal bars (5 mm x 20 mm).
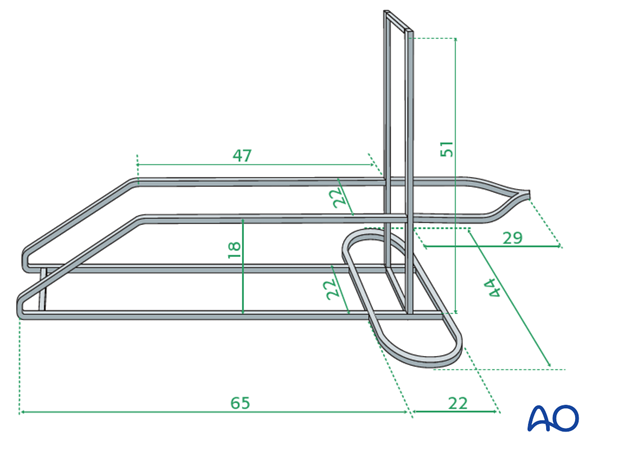
In order to prevent posterior displacement of the distal fragment, the angle of the padded frame is pushed proximally to support the distal fragment, with appropriate padding.
After 2-4 weeks of traction, the pain will most often subside and an external fixator may be implanted to allow for early patient mobilization.
If pain allows, joint mobilization may be started while in traction.
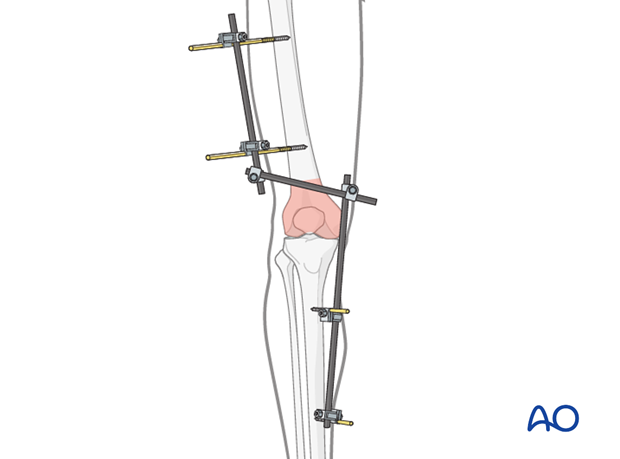
A joint-spanning external fixator is fixed to the femur and the tibia while the fracture zone is left virtually untouched (it is bridged). Provisional reduction is achieved with distraction.
Details of external fixation are described in detail in the basic technique for the application of a modular external fixator.
Specific considerations for the tibia and the femur are given below.
5. Pin insertion (tibia/femur)
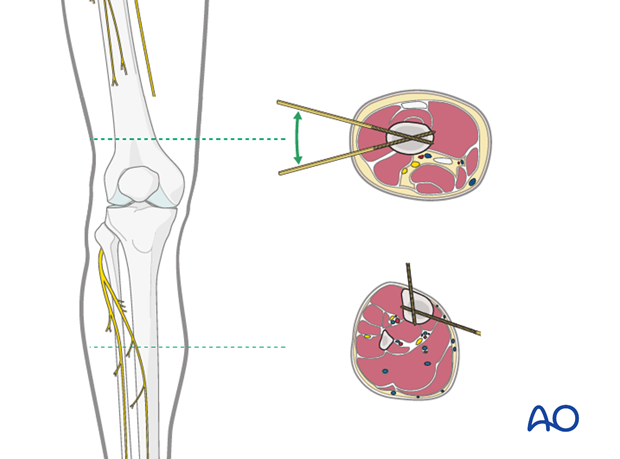
Safe zones for pin placement
For safe pin placement, make use of the safe zones and be familiar with the anatomy of the lower leg and the femur.
The safe zone for the femur is lateral. In temporary external fixation, the pins should be placed so that they do not interfere with planned later definitive fixation; this may mean placing femoral pins anteriorly or anterolaterally.
Note: It is not uncommon with external fixation in a trauma patient, where the fixator is on for a few weeks only, that pins are placed anteriorly rather than laterally on the femur.
Soft-tissue dissection
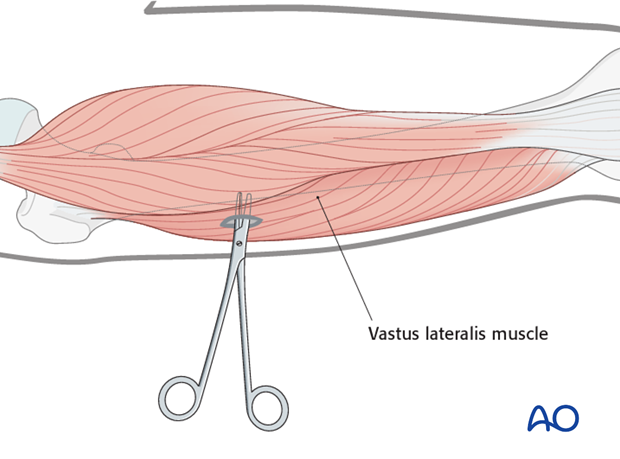
In the femur, blunt dissection of the soft tissues and the use of small Langenbeck retractors will minimize muscular damage.
Using a straight clamp, prepare a channel for the insertion of the pin.
Tibial pin placement
Drilling a hole in the thick tibial crest may be associated with excessive heat generation and there is a risk the drill bit may slip medially or laterally damaging the soft tissues. As the anteromedial tibial wall provides adequate thickness for the placement of pins, this trajectory is preferable. A trajectory angle (relative to the sagittal plane) of 20-60° for the proximal fragment and of 30-90° for the distal fragment is recommended.
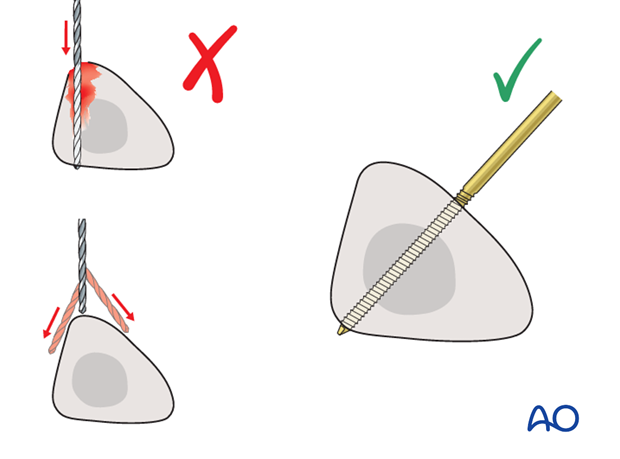
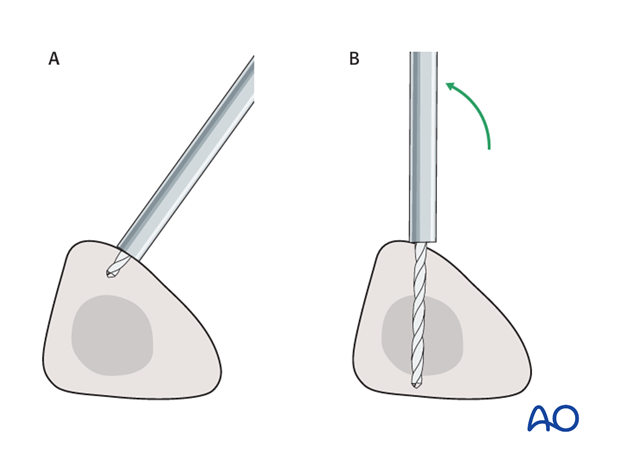
Alternatively, to avoid the frame catching on the opposite leg, the pins may be placed more anteriorly. The drill bit is started with the tip just medial to the anterior crest, and with the drill bit perpendicular to the anteromedial surface (A). As the drill bit starts to penetrate the surface, the drill is gradually moved more anteriorly until the drill bit is in the desired plane (B). This should prevent the tip from sliding down the medial or lateral surface.
6. Frame construction / reduction and fixation (tibia/femur)
Teaching video
AO teaching video: Femur--Tibia Articular Fracture Large External Fixator: Knee-bridging Modular Frame
Frame assembly
Pearl: Angle the rod over the tibia such that it is attached to the pins one on the lateral and one on the medial side. This results in a larger window over the condyle which can be beneficial for later (minimally invasive) surgery if it is necessary to maintain the external fixator during definitive osteosynthesis.
Reduction and fixation
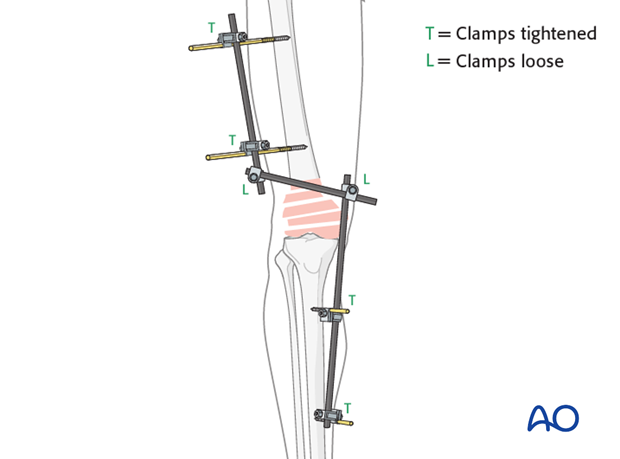
Restore length with a bolster behind the knee to give slight flexion.
It should be understood that a perfect reduction will not be obtained.
Having obtained a reduction and fixed the clamps in place, the distal blood supply needs to carefully be checked, if necessary, with the use of a Doppler.
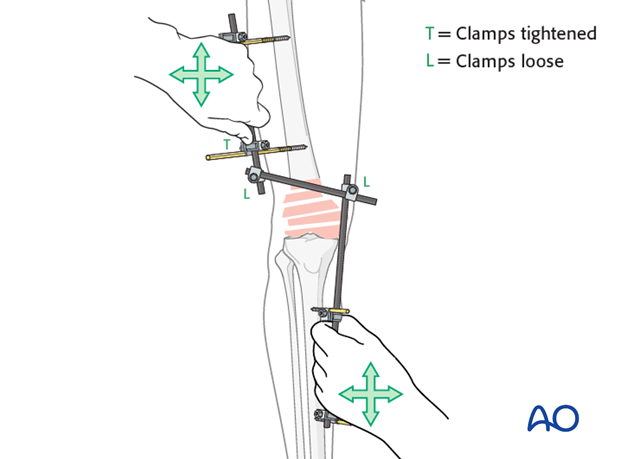
A second bar spanning the joint can be helpful for more stability at the fracture site.

Care must be taken that the fracture is not too distracted since the pull of the gastrocnemius muscle would hyperextend the condylar block.
Insufficient distraction leads to insufficient reduction.
7. Aftercare following external fixation
Thromboembolic prophylaxis
Thrombo-prophylaxis should be given according to local treatment guidelines.
Pin-site care
Proper pin insertionTo prevent postoperative complications, pin-insertion technique is important. Pin care protocol includes:
- Correct placement of pins (see safe zones) avoiding ligaments and tendons, eg tibia anterior
- Correct insertion of pins (eg trajectory, depth) avoiding heat necrosis
- Extending skin incisions to release soft-tissue tension around the pin insertion (see inspection and treatment of skin incisions)
Local aftercare protocols to prevent pin tract infection are generally in place. The following points are recommended:
- The pin-insertion sites should be kept clean. Any crusts or exudates should be removed. The pins should be cleaned using regular water and soap (by taking a normal shower). The frequency of cleaning depends on the circumstances and varies from daily to weekly but should be done in moderation.
- No ointments or antibiotic solutions are recommended for routine pin-site care.
- Dressings are not usually necessary once wound drainage has ceased.
In case of pin loosening or pin tract infection, the following steps need to be taken:
- Remove all involved pins and place new pins in a healthy location.
- Debride the pin sites in the operating theater, using curettage and irrigation.
- Take specimens for a microbiological study to guide appropriate antibiotic treatment if necessary.
Before changing to a definitive internal fixation an infected pin tract needs to heal. Otherwise, infection will result.
Follow up
See patient 7-10 days after surgery for a wound check. X-rays are taken to check the reduction.
The external fixator is left in place (typically 8-10 weeks) until the fracture is healed with ligamentotaxis. Serial X-rays would assist in this treatment type. Once bony union has occurred, knee mobilization would take place with vigorous physiotherapy.
