ORIF - Plate and screw fixation
1. General considerations
Soft-tissue injury
All heel fractures have a spectrum of soft-tissue injury. Rest, ice and elevation will help in resolving the soft-tissue injury, and prepare the foot for definitive care regardless of fracture type and treatment type. Non-weightbearing is essential until the final treatment plan has been executed. Compartment syndroms occur. Their incidence and indications for treatment are currently not clear. If missed, late reconstruction is successful.
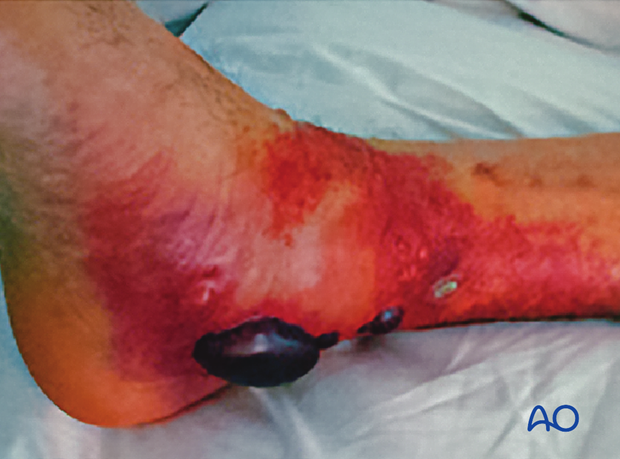
The amount of swelling is a good indicator of the degree of soft-tissue injury. As the swelling recedes, the skin begins to wrinkle both on the lateral and medial side. The wrinkling of the skin is a good indicator when surgery can be undertaken. Usually, one has to delay between 8-14 days before surgery can be undertaken without dire consequences. The maximum one can delay is about 3 weeks. After 3 weeks, the fracture becomes increasingly more difficult because of fracture healing.
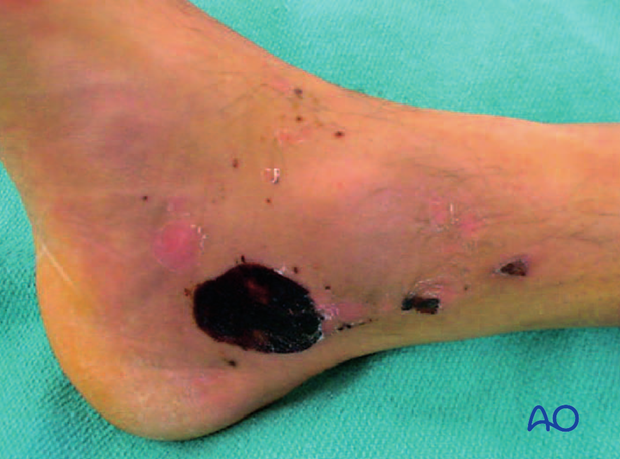
Open fractures
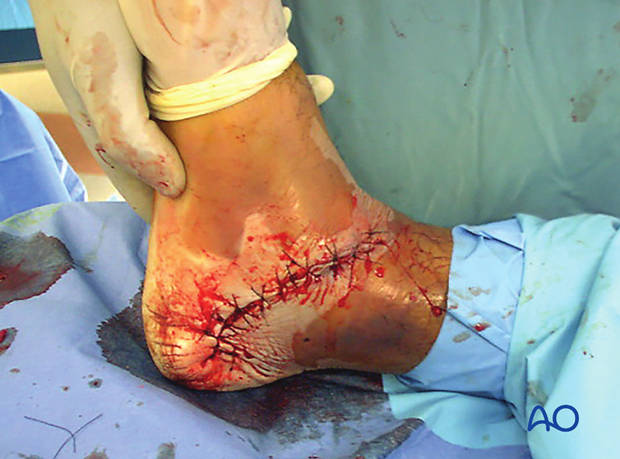
These injuries are surgical emergencies requiring urgent debridement and reduction of bony fragments. The soft-tissue injury for the open wound is usually on the medial side. Often, temporizing percutaneous wire fixation is used to hold reductions while the soft tissues are healing before definitive bony reconstruction.
This image shows a severe medial soft-tissue wound which could be closed at 3 days.
Teaching video
AO teaching video: ORIF of comminuted calcaneal fractures
2. Case presentation
Presentation
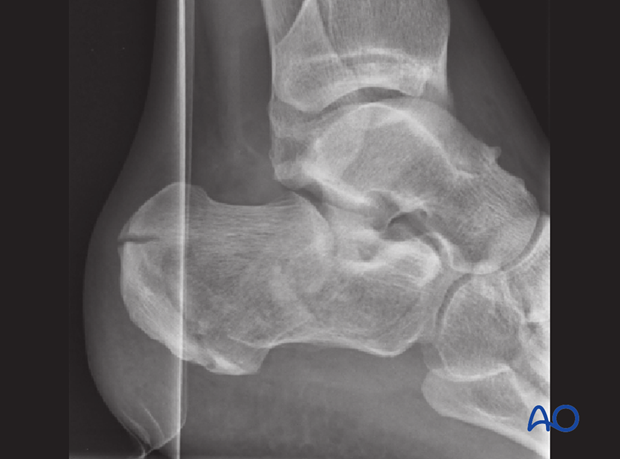
This case shows a 24-year old man with an AO 83-C2 fracture, Sanders type 2, tongue-type fracture that is displaced.
The Böhler’s angle on the lateral x-ray is 8 degrees.
He has no medical contraindications for surgery.
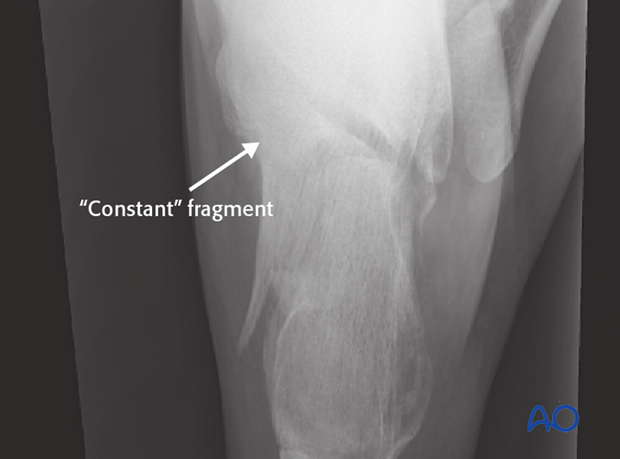
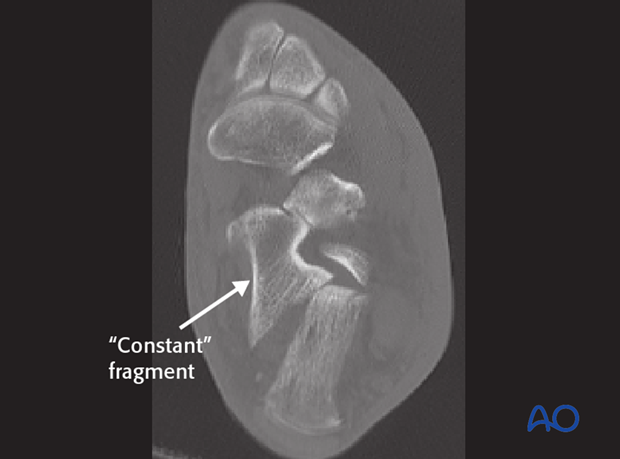
„Constant fragment“
The axial view shows the large “constant” sustentacular fragment. The fracture splits the middle of the posterior facet, and it is displaced. The “constant” fragment is the stable medial calcaneal building block which allows lag fixation.
This image shows no varus or valgus of the hindfoot.
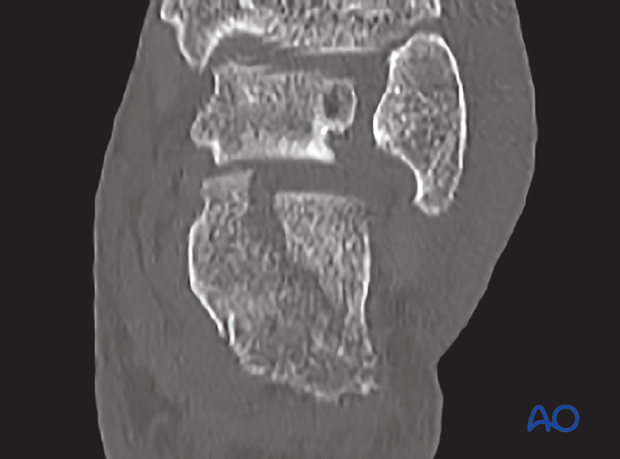
CT investigation: coronal view
The CT demonstrates the split which extends into the posterior facet, which is displaced. The coronal view shows the loss of height and provides information about comminution.
CT investigation: axial view
The axial view demonstrates the “constant” fragment and shows the intraarticular incongruency of the posterior facet. This view allows assessment of the anteromedial (sustentaculum tali) fragment, its integrity and its dimension.
This fracture is a Sanders type 2 fracture which is on the simple end of the calcaneal fracture spectrum.
Reduction
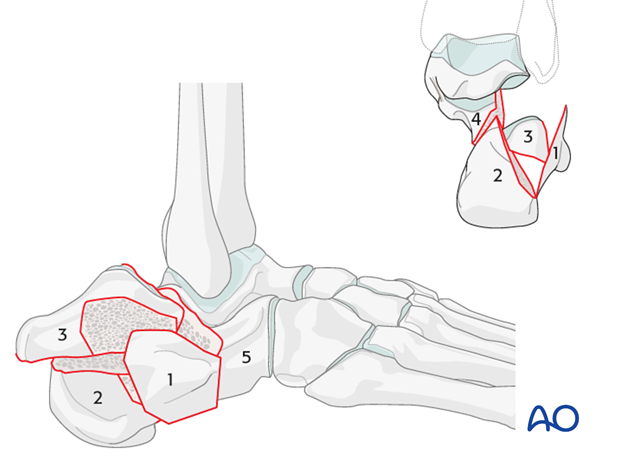
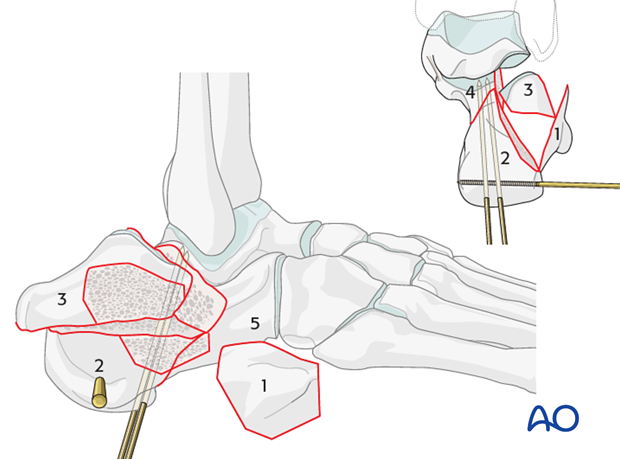
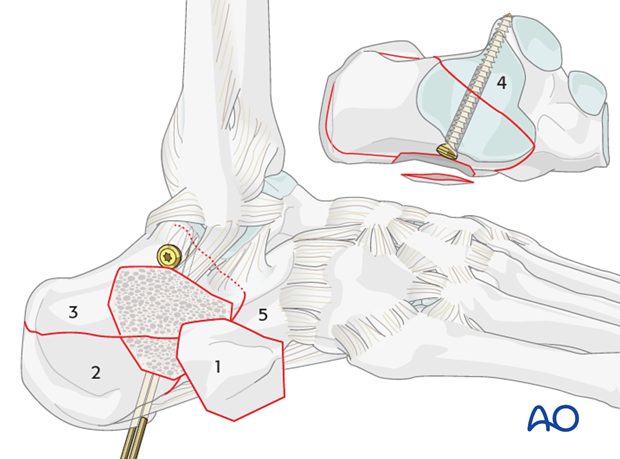
The drawing demonstrates typical positions of the five standard fragments that need reduction.
The surgical tactic that will be used identifies a step-by-step process for the reduction maneuver. Generally, one begins by identifying the “constant” fragment, i.e. the sustentacular fragment (4), which remains attached to the talus and does not displace. The reconstruction of the os calcis builds on this stable fragment and therefore one begins the reconstruction anteriorly and medially with this fragment and works simultaneously on the posterior (2) and lateral (3) articular fragments. To achieve this, it is often necessary to apply traction to fragement 2 which helps to restore the three dimensional shape of the os calcis.
Once these are in place, one closes the lateral wall like a door, which is the final step of the reconstruction. Fragments are maintained temporarily with K-wires. The final step is the fixation.
3. Approach
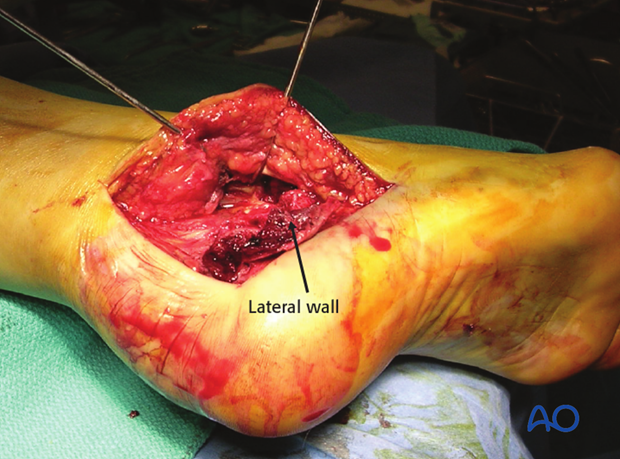
The fracture is approached through the standard extended lateral approach.
Usually, there is a small lateral wall fragment which should be preserved and reflected plantarwards.
4. Reduction
Joystick placement
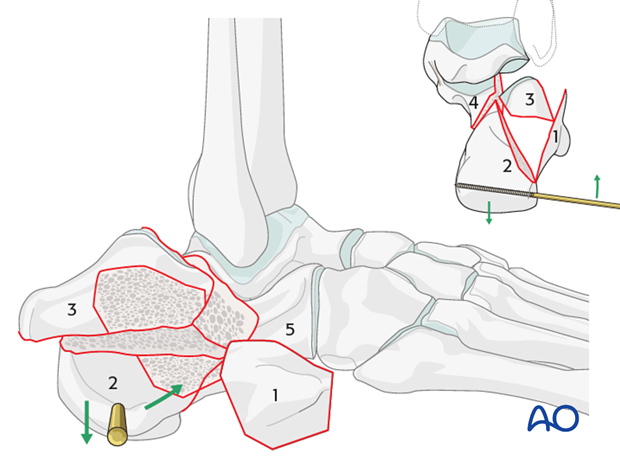
Once the lateral extended approach is completed and the hematoma is removed, the fracture lines are visualized and identified. Next, a Schanz screw is inserted into the posterior (or tuberosity) fragment (2) from lateral to medial, going through both cortices. It will serve as a joystick to aid in the reduction.
Reduction of the tuberosity fragment
The next step is the reduction of the tuberosity fragment (2) to the “constant” medial sustentacular fragment (4). Once the fragment is reduced, it is held in position with 2 K-wires which are introduced in an anteroposterior superior direction from the posterior inferior aspect of the tuberosity. They are directed superiorly and anteriorly into the “constant” medial fragment (4).
Elevation of the lateral articular surface
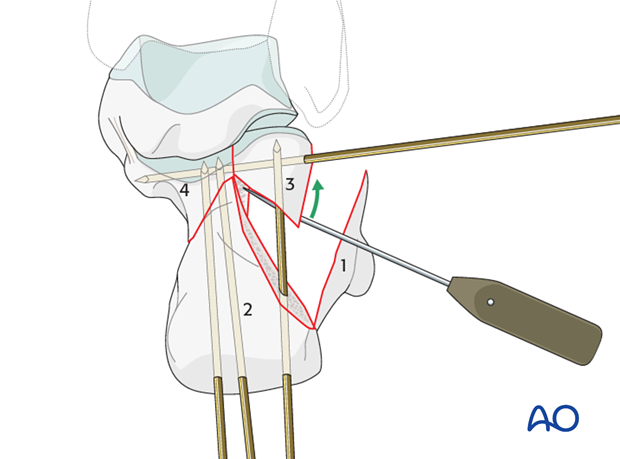
With the tuberosity (2) reduced to the “constant” piece (4), while ensuring that there is no varus of the hindfoot, one reduces now the lateral articular piece (3). It needs to be elevated in order to successfully reconstruct the articular surface, the posterior facet.
Preliminary fixation
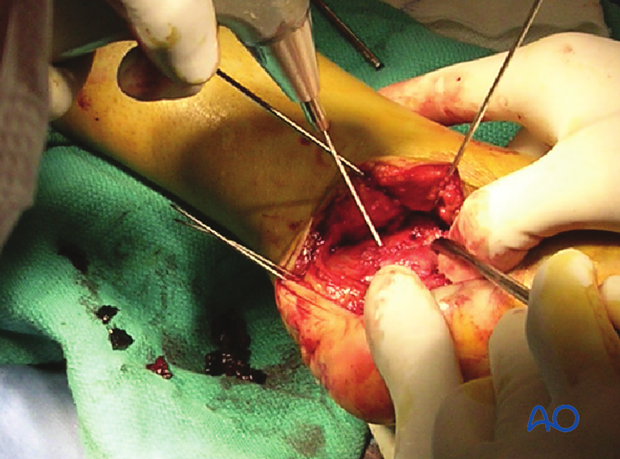
Once reduced, it is supported with K-wires, which are introduced from the lateral side into the “constant” medial fragment. In inserting the K-wires, one should keep in mind that they should not occupy the place judged best for the insertion of the subchondral lag screw(s) which will stabilize the articular surface.
While the reduction and fixation proceeds, one must be careful at every step to make certain that the hindfoot remains in neutral, or in slight valgus, in the axial view. Varus of the hindfoot must be avoided.
5. Physiologic valgus
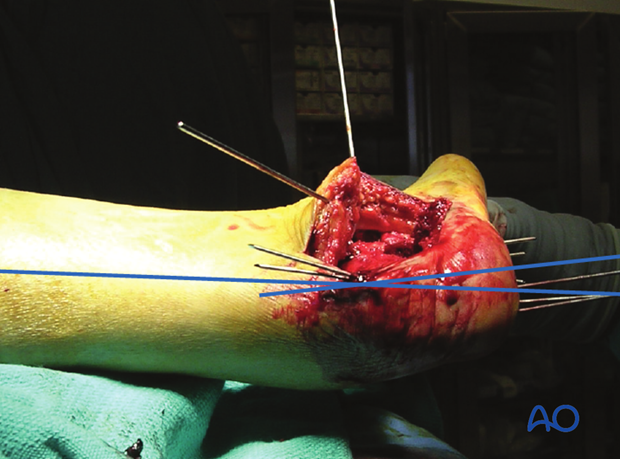
With the patient in the lateral position, and working from the lateral side, there is a tendency for the hindfoot to fall into varus. Throughout the surgical maneuvers, the surgeon must check continuously that the hindfoot remains in valgus.
By continuously checking and using K-wires as reduction tools and temporary fixation, physiologic valgus is maintained until the final reduction and fixation is obtained.
6. Fixation
Subchondral lag screw
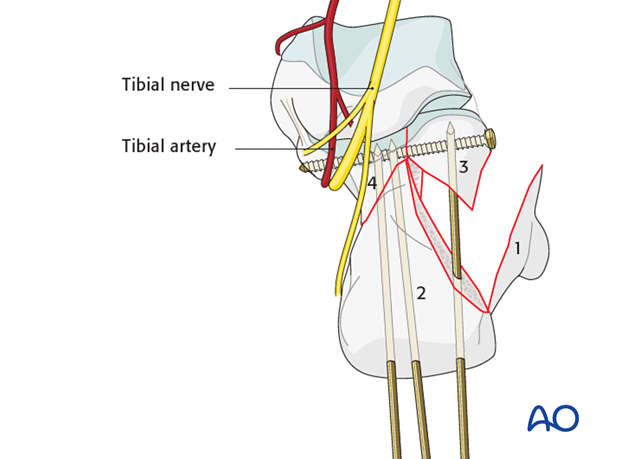
Once the reduction of the articular surface is achieved, it is maintained with a subchondral lag screw which runs from lateral anteromedially into the “constant” medial subchondral fragment.
Thus, when drilling the hole for the lag screw, the drill bit must be directed carefully in these three directions:
a) Lateral to medial
b) Posterior to anterior
c) Cephalad to caudad
In this way, the threaded portions of the screw will be directed into the strong medial sustentacular cortical bone.
The surgeon must use caution while inserting the lag screw.
On the medial side is the neurovascular bundle which ends up frequently at the tip of the subchondral lag screw. If one allows the drill bit, or the screw, to protrude too far medially, one can damage the neurovascular bundle or FHL tendon.
Bone deficiency
The articular surface of the os calcis is impacted by the talus into the underlying cancellous bone. Once the articular fragments are disimpacted and elevated, varying degrees of void result.
Studies show that bone graft is not necessary, yet some surgeons fill the void with bone substitute materials, and other surgeons choose to ignore the void and use locking plate fixation to maintain reductions.
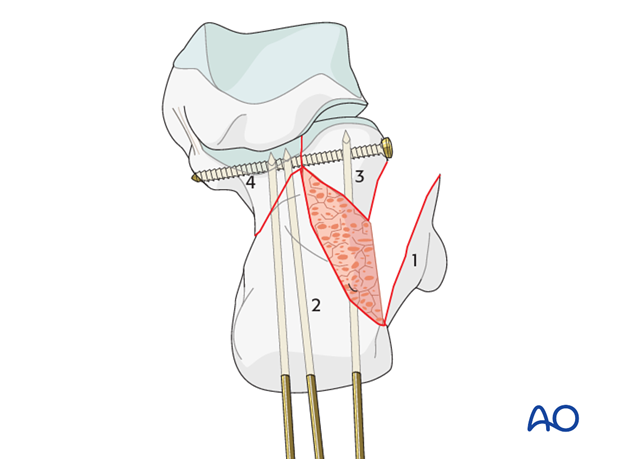
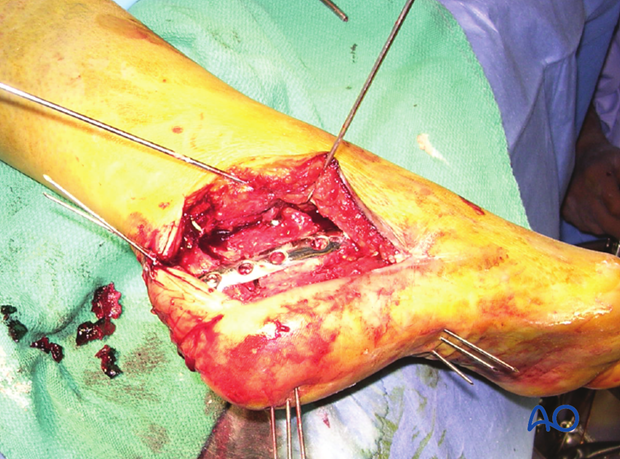
Plate choice
The choice of the lateral plate is dependent upon the severity of calcaneal fracture type and the bone quality. Simple fracture patterns in good bone require simple lateral plating while complex fracture patterns with comminuted pieces may require adaptable plates or locking plates.
This image shows a simple fracture reduced with multiple K-wires and lag screw in place, beneath the subchondral joint.
A one-third tubular plate may be all that is required for a simple fracture in good bone.
Bone substitute
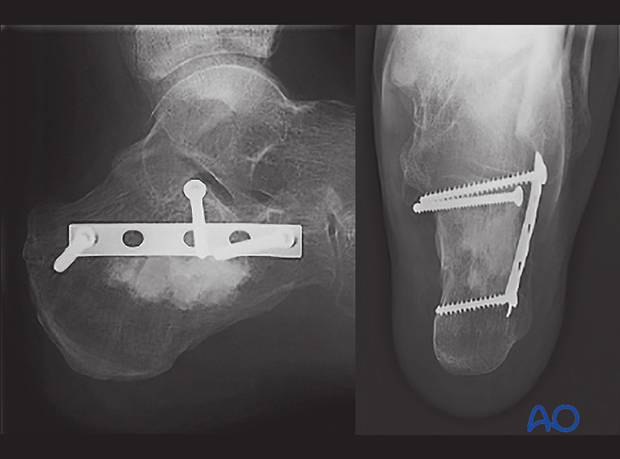
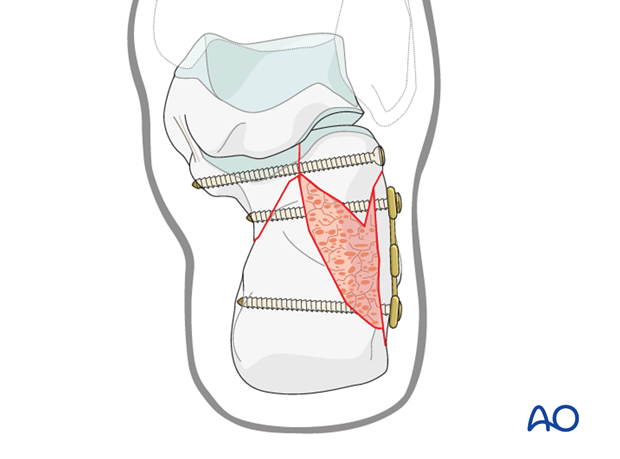
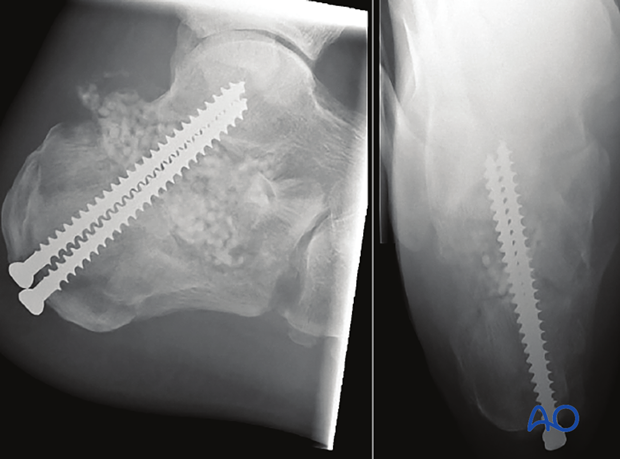
These images show postoperative x-rays with calcium sulfate bone substitute filling the large void which is commonplace after fracture reduction. This void is approximately 8-10 cubic centimeters. This bone substitute will be bioabsorbed over time.
In the early phase (0-2 weeks) it may act to support bony anatomy before early soft callus replaces the filled void.
This drawing shows a similar situation, albeit fixation with a different calcaneal plate.
Lateral plate placement
The distal corner of the soft-tissue incision for the lateral extended calcaneal approach is vulnerable to wound breakdown. Most calcaneal plates have at least some of their fixation points at this crucial apical wound.
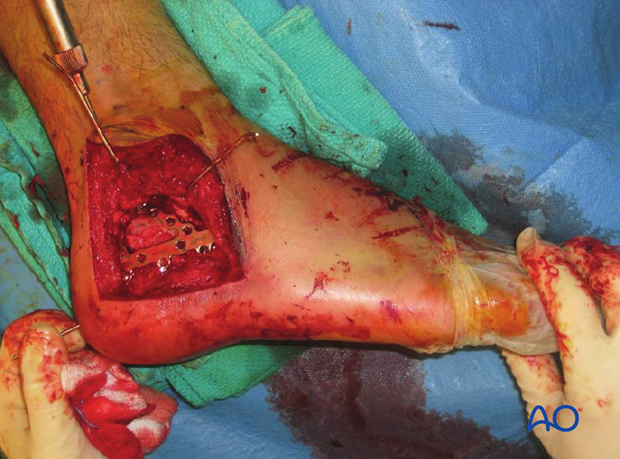
This image shows the typical problem at the distal corner of the lateral extended calcaneal approach where a screw and plate are right beneath where the wound typically breaks down. This calcaneal incision has between 5 and 15 % incidence of wound breakdown regardless of where hardware is placed.
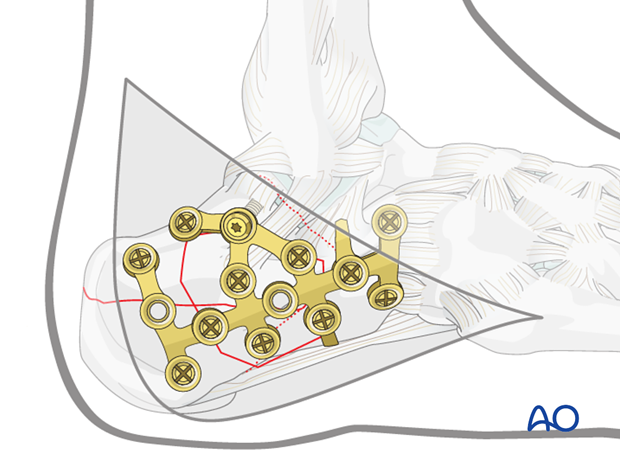
Fixation in extremely comminuted calcaneal fractures
This is extremely difficult surgery. Decision making is controversial. Some surgeons favor primary fusion while others favor primary ORIF with later reconstruction, if required.
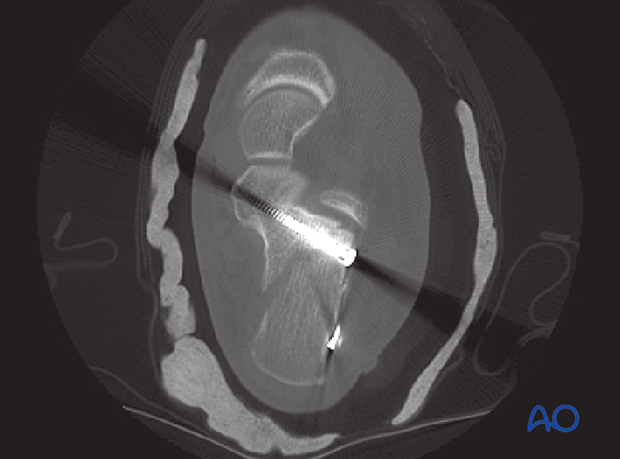
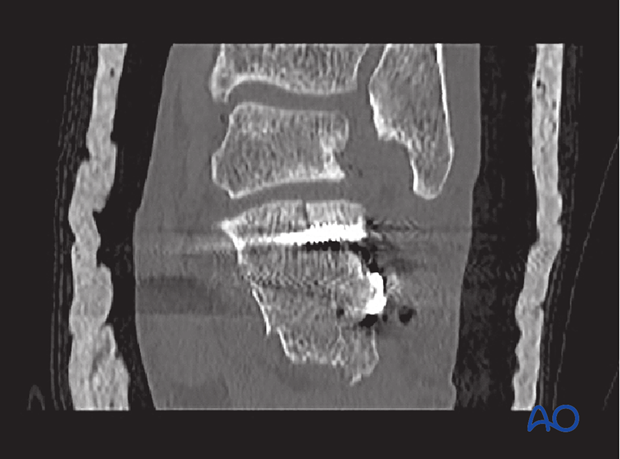
Postoperative CT scans
This case shows final CT scans postoperatively with axial and coronal slices. The axial shows the lag screw going deeply into the sustentaculum tali, parallel to the subchondral surface, with the surface reduced. There is no varus malalignment.
The coronal view shows the joint surface to be reduced, height restored and surgical hardware is not into the joint. The cast is for temporary postoperative splinting.
7. Wound closure
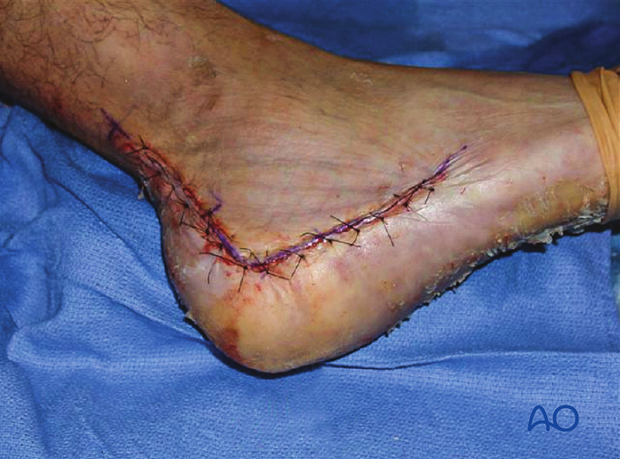
Two-level closure over a hemovac drain is standard. An absorbable stitch is used for apposition of subcutaneous tissue. Soft-tissue closure should be carefully performed so that there is advancement of the flap. There should be no excessive tension on the distal corner of the incision.
An interrupted Allgöwer-Donati stitch is used to close the skin.
Skin should be apposed and not strangulated.
8. Aftertreatment
Initially, the patient’s foot and ankle are kept in a well-padded posterior splint that maintains the foot in a neutral position. Surgical drains are removed 2 days after surgery.
The leg should be elevated through the first number of weeks. The ankle and subtalar joint are put through range-of-motion exercises as soon as possible, usually by 2-5 days.
Weight bearing is delayed until 8-12 weeks, depending upon the degree of comminution and the adequacy of the fixation.
Radiography including lateral and axial views is obtained at 6,12 and 26 weeks.
