ORIF through modified Stoppa approach
1. General considerations
Sequence of the treatment
For ORIF of T-shape fractures with an anterior approach (eg modified Stoppa approach), the following surgical sequence is common:
- Joint distraction and removal of incarcerated fragments
- Reduction of femoral head dislocation if not achieved closed on admission
- Reduction of the anterior column
- Assessment of reduction (the anterior column reduction can be direct with this approach unlike with a Kocher-Langenbeck, but the posterior reduction is indirect)
- Fixation of the anterior column
- Reduction and fixation of the posterior column
Planning/templating
Preoperative templating is essential for understanding the complexity of an acetabular fracture.
When using implants on the innominate bone, it is important to know the best starting points for obtaining optimal screw anchorage (see General stabilization principles and screw directions).
Patient positioning
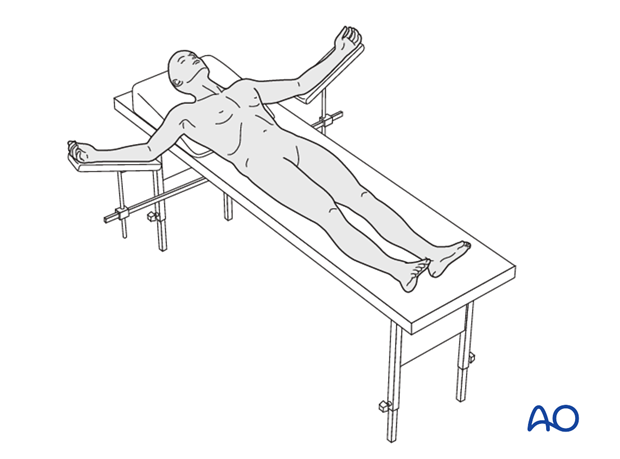
This procedure is normally performed with the patient in a supine position.
Indirect visualization
Unusually for a significant joint, articular reduction of acetabular fractures is indirect. The articular surface of the hip joint is not seen directly. Reduction must be assessed by the appearance of the extraarticular fracture lines and intraoperative fluoroscopic assessment. Some fracture lines are palpated manually but not seen directly such as transverse fracture lines on the quadrilateral plate.
Quality of reduction
Posttraumatic arthrosis is directly related to the quality of reduction - the better the reduction, the greater the chance of a good or excellent result.
2. Joint distraction
Traction can be applied in several ways with:
- The use of a fracture table that allows longitudinal and lateral traction
- The intermittent help of an assistant (may be unreliable in long procedures)
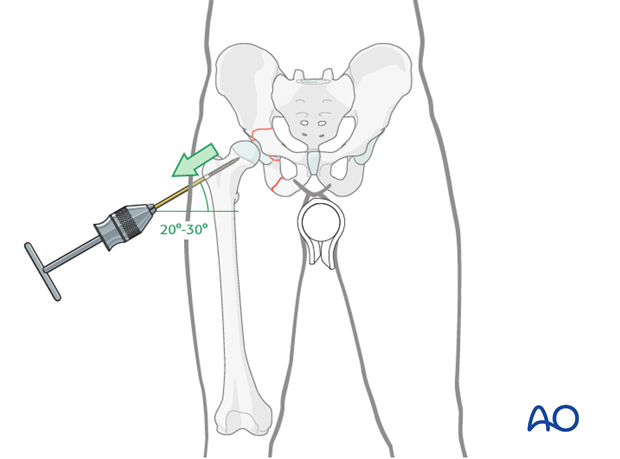
Apply longitudinal traction to the lower limb, and lateral traction through the greater trochanter.
Both these forces should be combined until the best effect is obtained.
In some surgeon’s experience, the use of a traction table post or other traction frame is helpful during this operation.
Note
Excessive traction may limit fracture fragment mobility and interfere with reduction.
Teaching video
AO teaching video: Use of the distractor on the pelvis
3. Cleaning of the fracture site
Fracture sites are prepared by preliminarily increasing the displacement and then removing early callus and granulation tissue.
Joint distraction is extremely useful to facilitate this debridement.
4. Anterior column: reduction
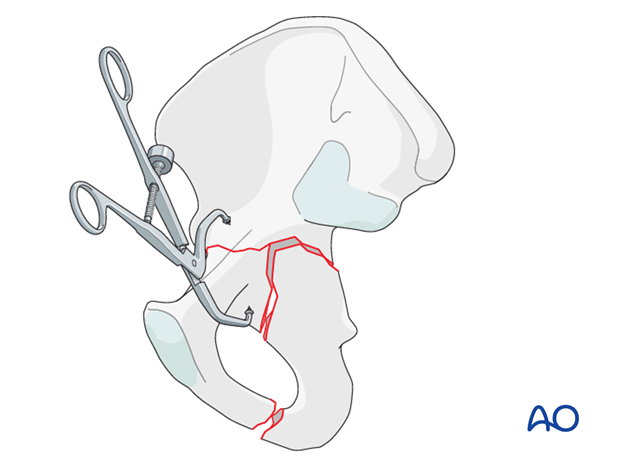
Reduction clamps can be placed from the supraacetabular surface to the area of the iliopectineal surface on the inner table of the pelvis in similar positions to those used on the outside of the pelvis through an extended iliofemoral approach.
The illustration shows placement of a pointed reduction forceps.
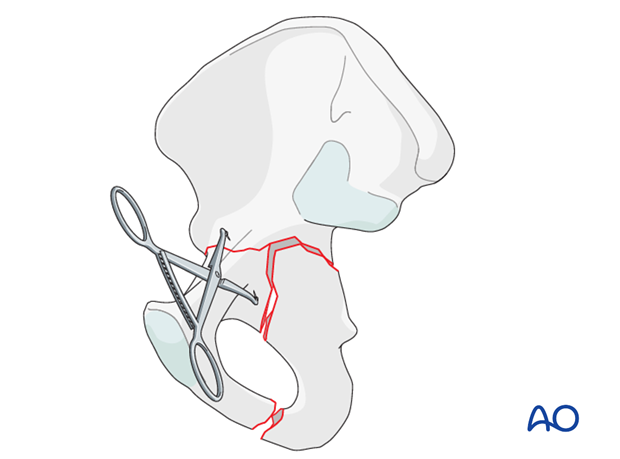
Alternative for anterior column reduction is the oblique pelvic reduction (quadrangular) clamp.
5. Anterior column: fixation
Principles
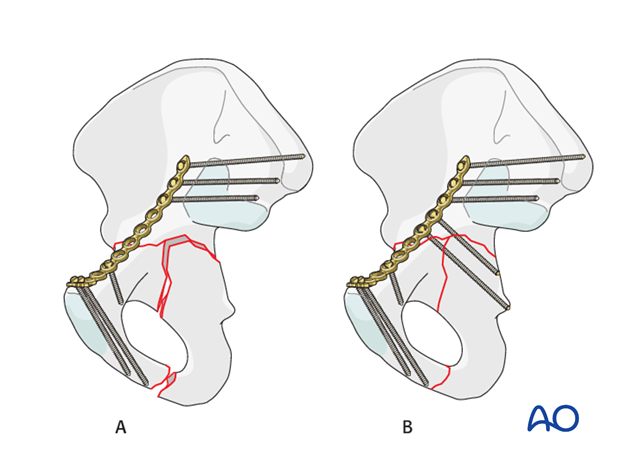
A contoured pelvic brim plate is used through the Stoppa approach. This plate can be contoured to extend across the low anterior column to the pubis, as required by the specific fracture.
After reduction and fixation of the anterior column (A), the posterior column will be reduced onto the stable anterior column and fixation of the posterior column occurs through the pelvic brim buttress plate (B).
Contouring and applying a pelvic brim plate
The plate must be long enough to provide adequate fixation of both posterior and anterior injuries. This typically requires extension to the pubic body.
The use of a malleable template aids plate contouring.
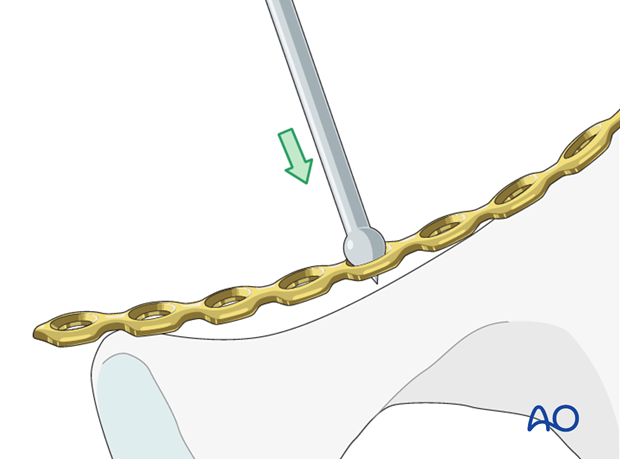
Because the primary purpose of this plate is to buttress the anterior column, posterior contouring is most critical. For this reason, plate fixation normally starts posteriorly and proceeds anteriorly. Final adjustment of the plate profile can be achieved in situ, due to plate malleability.
Tools for in situ plate contouring include the ball spike for pushing, ...
... and large and small fragment screwdrivers for torsional adjustment.
Apply the plate along the pelvic brim spanning from the innominate bone adjacent to the SI joint to the pubis.
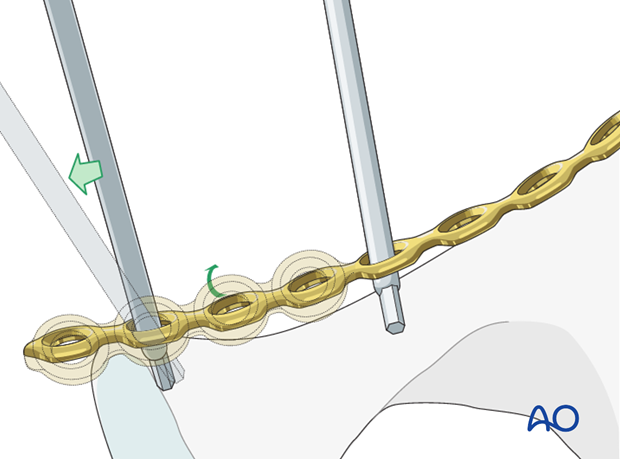
Plate fixation of the anterior column
The cranial most screws are placed parallel to the SI joint, anchoring the plate to the sciatic buttress. This provides assistance with the reduction (as previously described) as well as definitive buttress stabilization of the anterior column.
Screws can be placed through the plate into the reduced anterior column fragment, depending on the fracture morphology.
At this point, it is critical to ensure that no screws cross into the posterior column fracture or fragment. This would block the reduction of the posterior column fragments.
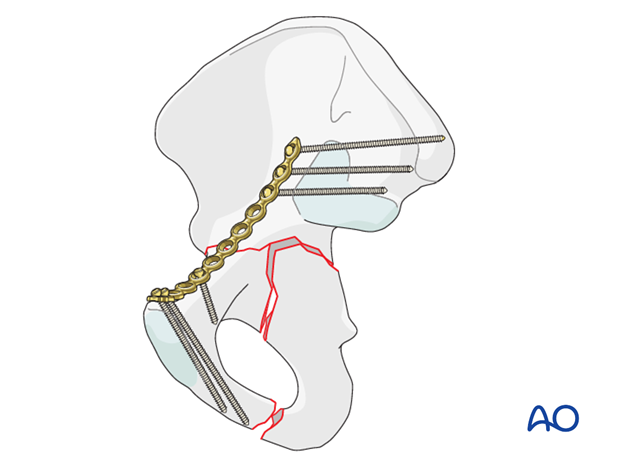
6. Posterior column: reduction
Fracture reduction
Reduction is normally achieved by ligamentotaxis with distal and lateral traction through the femur. This can be augmented by placement of a small bone hook in the lesser sciatic notch. The hook can be used to laterally and anteriorly reduce the posterior column.
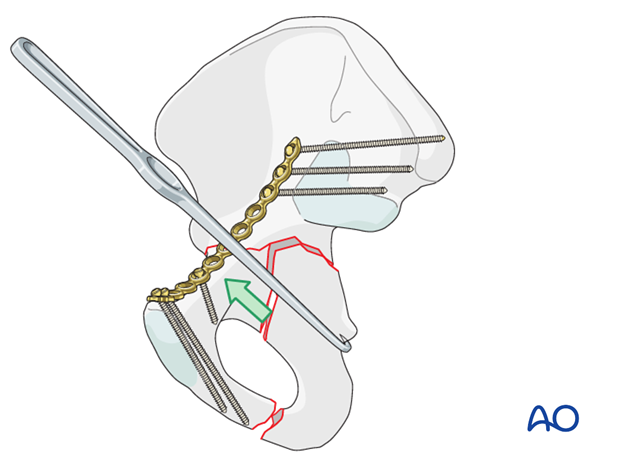
Offset quadrangular clamp
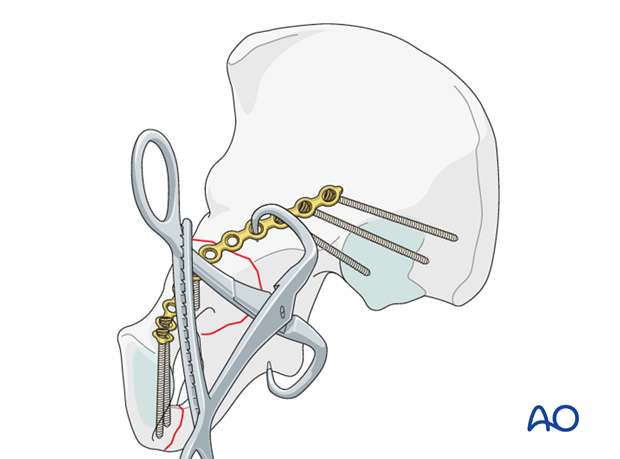
The most common reduction maneuver of the posterior column is the use of the quadrangular clamp applied through the second window.
This clamp is applied with the short arm over the pelvic brim, and the second deep arm applied to the displaced posterior column along the quadrilateral surface.
The vessels are displaced medially to allow clamp placement. Care must be taken to avoid excessive pressure on the vessels by the clamp or force of retraction.
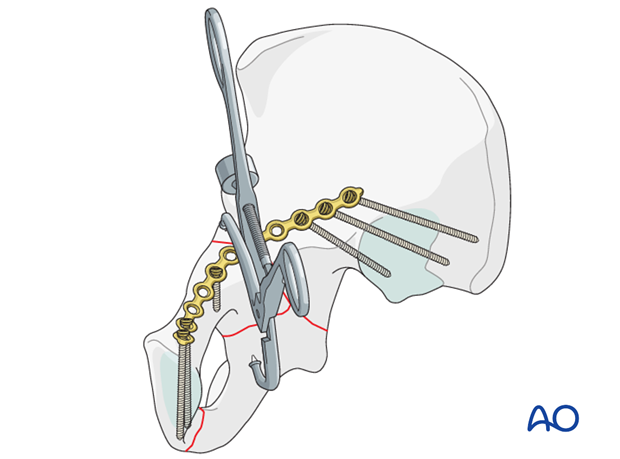
Alternatively, a collinear clamp may be used. In this case a small first window needs to be made for access to the superacetabular surface.
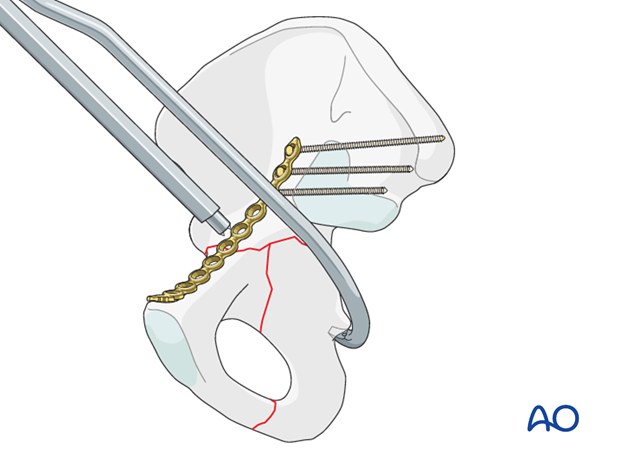
Use of pointed reduction forceps
The most direct technique uses pointed reduction forceps (or Weber clamp) which spans from the pelvic brim to the quadrilateral surface portion of the posterior column.
7. Posterior column: fixation
Anterior to posterior screw fixation
Posterior column fixation relies primarily on screws placed from the anterior column directed posteriorly.
The posterior column fixation is placed through the pelvic brim plate. The most posterior screw (ca 80 mm) is directed toward the ischial spine. It is usually possible to place a second screw (ca 100 mm) in the next anterior plate hole, directed toward the ischial tuberosity.
It may be necessary to place a screw outside of the plate instead. This screw typically starts just lateral to the pelvic brim plate at the level of the angle of the sciatic notch.
Regardless of configuration, it is important that at least two screws be used for the posterior column fixation. A single screw does not provide sufficient torsional stability.

Fluoroscopic navigation of the posterior column screw placement
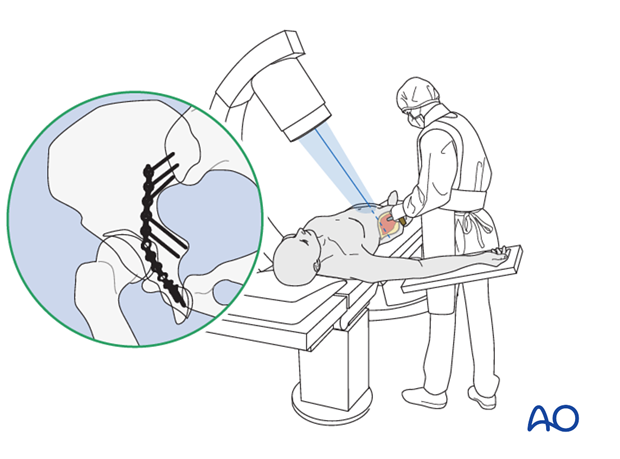
The iliac oblique view can be used to position the anterior to posterior screws. With the C-arm rolled away from the surgeon 45°, the posterior column is well visualized and the access unobstructed.
The drill can be advanced down the posterior column under fluoroscopic guidance, ensuring an extraarticular position as shown in the image. The screw can then be placed in the same tract.
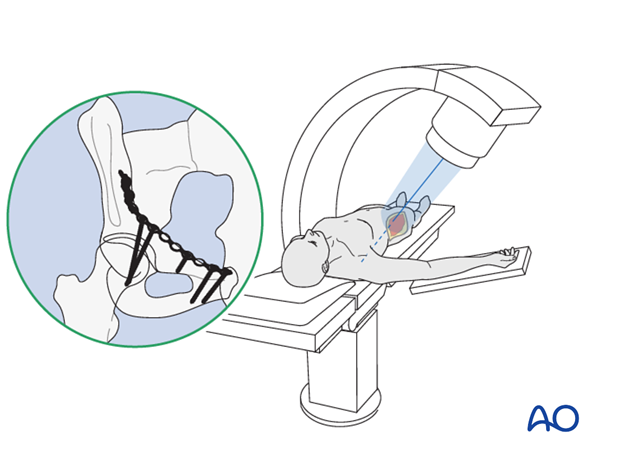
The obturator oblique view can be used to confirm appropriate placement. The projection of the screw should aim at the ischium. The most common mistake is to drive the screw in the direction of the posterior wall.
Screws that penetrate the posterior column cortex may injure the sciatic nerve.
Because this view is obtained with the C-arm rolled in the direction of the surgeon, access to the acetabulum is obstructed. This view is therefore used as confirmation and difficult to use for real time navigation.
8. Final radiographic assessment
Once all fixation is in place, confirm the appropriate appearance of AP, obturator oblique and iliac oblique views and check the location of any screw that is placed near the hip joint.
Postoperatively, obtain formal high-quality radiographs of AP and both oblique views.
9. Postoperative care
During the first 24-48 hours, antibiotics are administered intravenously, according to hospital prophylaxis protocol. In order to avoid heterotopic ossification in high-risk patients, the use of indomethacin or single low dose radiation should be considered. Every patient needs DVT treatment. There is no universal protocol, but 6 weeks of anticoagulation is a common strategy.
Wound drains are rarely used. Local protocols should be followed if used, aiming to remove the drain as soon as possible and balancing output with infection risk.
Specialized therapy input is essential.
Follow up
X-rays are taken for immediate postoperative control, and at 8 weeks prior to full weight bearing.
Postoperative CT scans are used routinely in some units, and only obtained if there are concerns regarding the quality of reduction or intraarticular hardware in others.
With satisfactory healing, sutures are removed around 10-14 days after surgery.
Mobilization
Early mobilization should be stressed and patients encouraged to sit up within the first 24-48 hours following surgery.
Mobilization touch weight bearing for 8 weeks is advised.
Weight bearing
The patient should remain on crutches touch weight bearing (up to 20 kg) for 8 weeks. This is preferable to complete non-weight bearing because forces across the hip joint are higher when the leg is held off the floor. Weight bearing can be progressively increased to full weight after 8 weeks.
With osteoporotic bone or comminuted fractures, delay until 12 weeks may be considered.
Implant removal
Generally, implants are left in situ indefinitely. For acute infections with stable fixation, implants should usually be retained until the fracture is healed. Typically, by then a treated acute infection has become quiescent. Should it recur, hardware removal may help prevent further recurrences. Remember that a recurrent infection may involve the hip joint, which must be assessed in such patients with arthrocentesis. For patients with a history of wound infection who become candidates for total hip replacement, a two-stage reconstruction may be appropriate.
Sciatic nerve palsy
Posterior hip dislocation associated with posterior wall, posterior column, transverse, and T-shaped fractures can be associated with sciatic nerve palsy. At the time of surgical exploration, it is very rare to find a completely disrupted nerve and there are no treatment options beyond fracture reduction, hip stabilization and hemostasis. Neurologic recovery may take up to 2 years. Peroneal division involvement is more common than tibial. Sensory recovery precedes motor recovery and it is not unusual to see clinical improvement in the setting of grossly abnormal electrodiagnostic findings.
