Obliteration
1. Introduction
Fractures of the floor of the sinus that involve the frontal recess and interfere with the drainage apparatus may render the sinus non functional. In this situation, frontal sinus obliteration may be required. This involves exposure of the entire sinus, fastidious removal of all sinus mucosa and obliteration of the sinus cavity with autologous tissue.
2. Approach
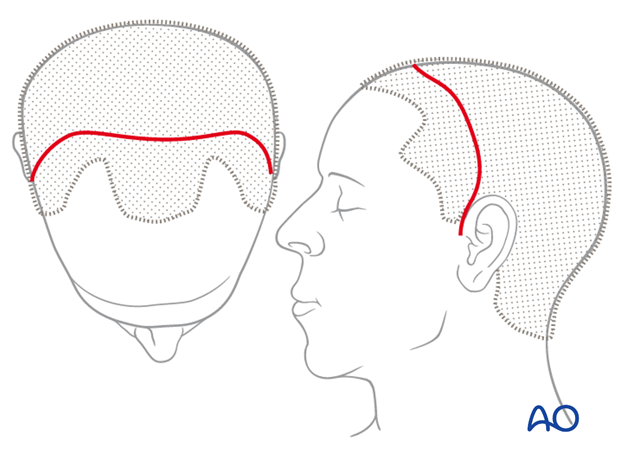
For this procedure the coronal approach is normally used. However, if present, lacerations can be used to directly access fracture sites for fracture managment.
3. Choice of tissue
Many different autologous materials have been used for sinus obliteration. These include:
- Fascia
- Abdominal fat
- Muscle
- Pericranium
- Spontaneous osteoneogenesis
- Bone
Fascia
Regardless of what other material will be used to fill the sinus, fascia will generally be the graft of choice for plugging the recess. Some surgeons add additional fascia to fill the sinus.
Abdominal fat
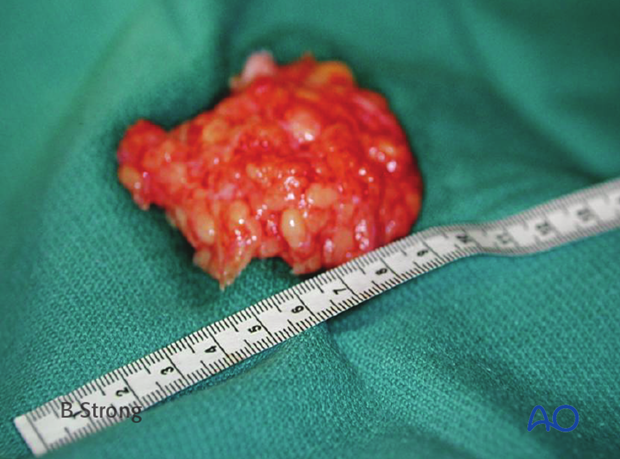
Abdominal fat is readily available and the graft harvest results in low morbidity. This material has a long and successful track record in the otolaryngology literature.
Muscle
Nonvascularized muscle can also be used successfully to obliterate the sinus cavity. The morbidity of harvesting muscle is often greater than abdominal fat.
Pericranium
A pericranial flap can be used to obliterate small to medium size sinuses.
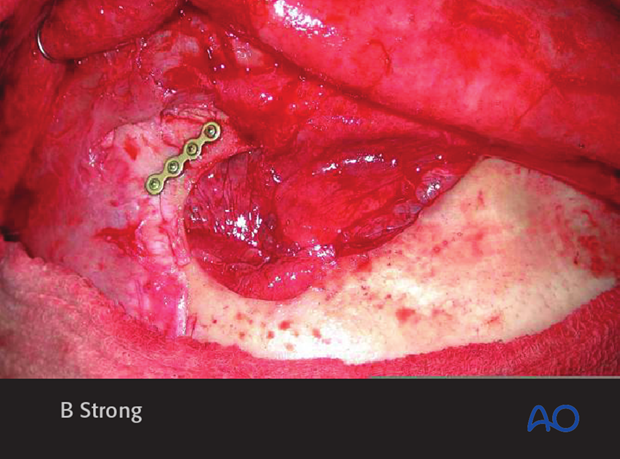
It has the advantage of being a vascularized flap. When using an osteoplastic bone flap, the bone flap may compress the blood supply to the pericranial flap thereby devascularizing it.
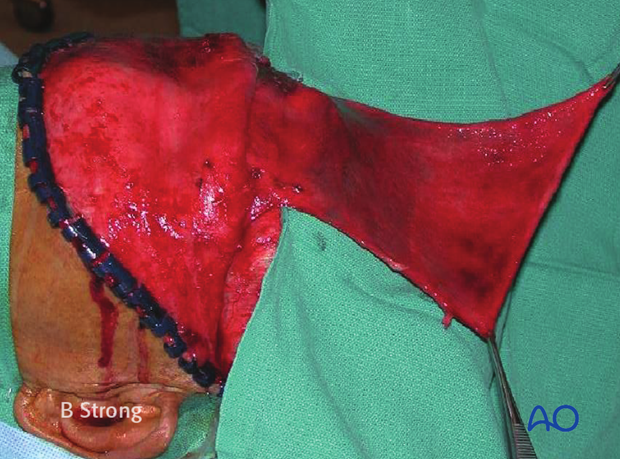
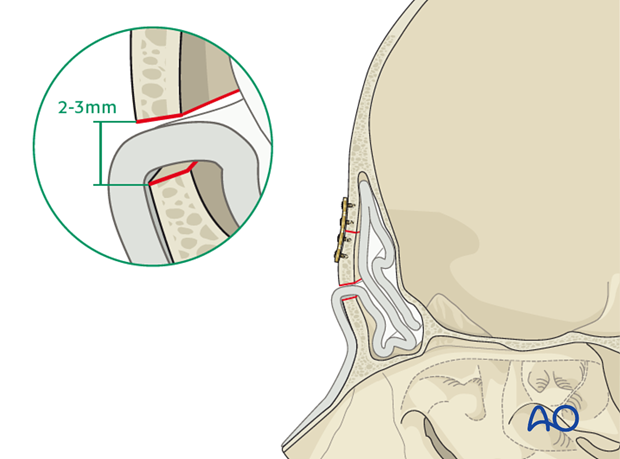
The pericranial flap must be inserted over the orbital rims and into the sinus. The reduced anterior table bone fragments must not strangulate the flap as it enters the sinus. A small bone defect (2-3 mm) must be generated to allow passage of the flap into the sinus.
Spontaneous osteoneogenesis
The mucosa is stripped, the recess is plugged, and the sinus is left empty.
Bone
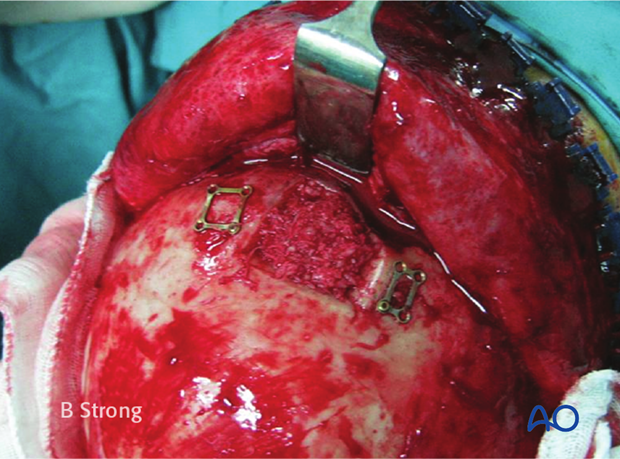
Cortical and cancellous bone can be harvested from the previously exposed skull (coronal approach) with minimal morbidity.
Large sinuses can be more challenging to fill with bone.
4. Exposure
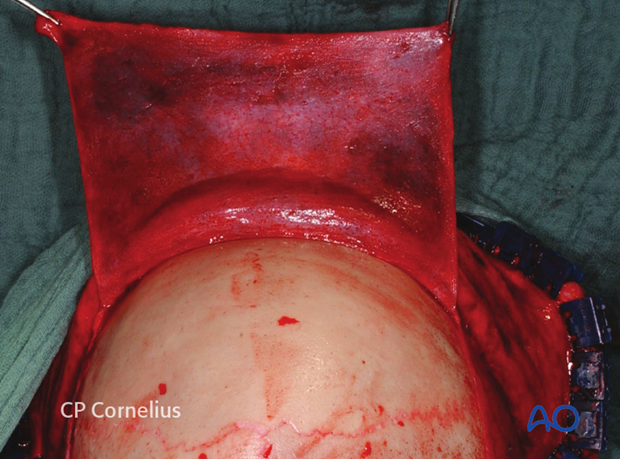
While elevating the coronal flap, it is important to maintain the integrity of the pericranial flap whenever possible. This flap may be used for obliteration of the sinus when the posterior table is intact. It is however most critical to maintain the pericranial flap integrity when posterior table fractures are present and there is greater probability of a dural tear. In these cases the pericranial flap will be used to repair the dura and reline the anterior cranial fossa.
Pearl: identification of explanted bone fragments
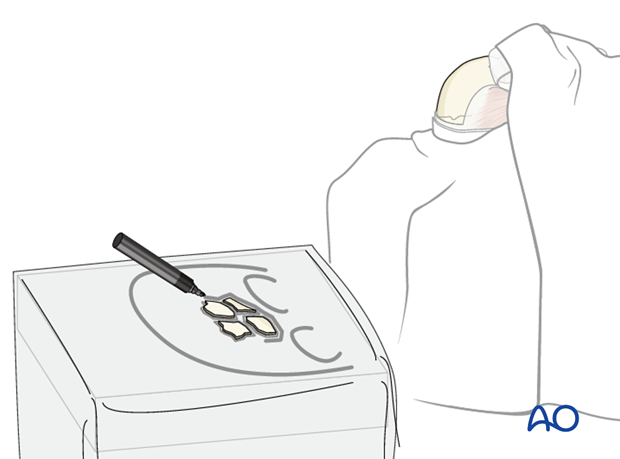
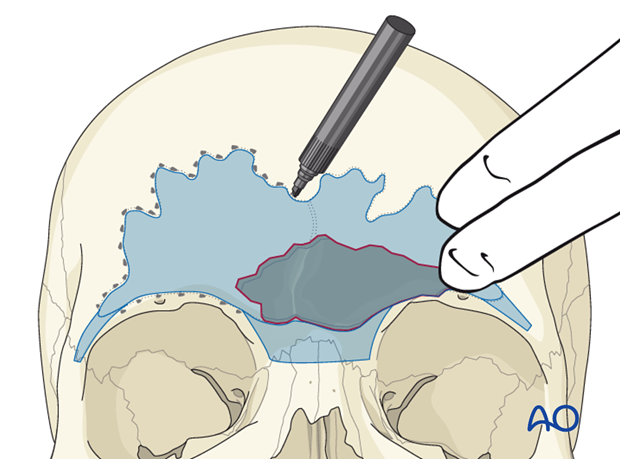
Final orientation of any removed bone fragments can be challenging. Placing the explanted segments on a rough sketch of the skull made with a sterile pen will maintain orientation until re-implantation. Outline each segment and the overall shape of the defect.
The bone fragments should be kept moist until they are re-placed.
5. Defining the sinus margin
The margins of the frontal sinus are irregular and may not be visible through the fracture.
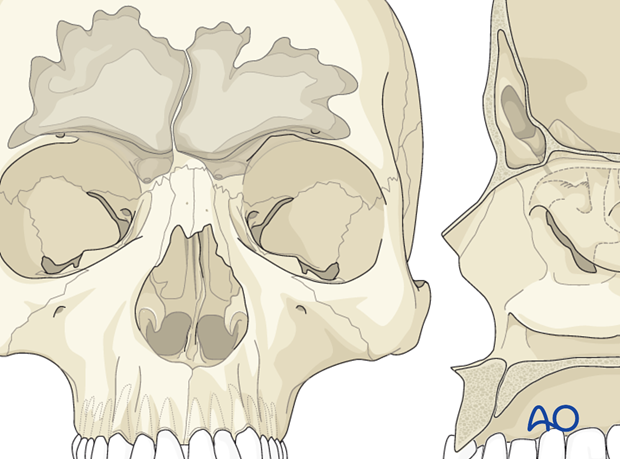
It is however critical to determine the precise margins of the sinus to allow for an accurate osteotomy and complete exposure of the sinus. There are several ways to accomplish this:
- Bayonet forceps
- Transillumination
- 6-foot (1.83 m) Caldwell x-ray with coin reference
- Intraoperative navigation
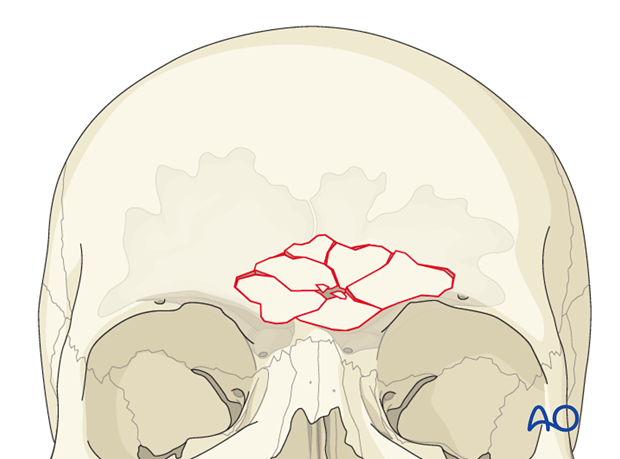
Bayonet forceps
One tine of the bayonet forceps (or bipolar cautery) can be inserted into the defect. The other tine spans the anterior table. The internal tine is then “walked” around the periphery of the sinus. The external tine is then used to guide markings which will outline the periphery of the sinus on the outer table bone. The outline can be marked with ink or electrocautery (the electrocautery should be placed at a low setting to coagulate overlying blood and avoid excessive bone injury).
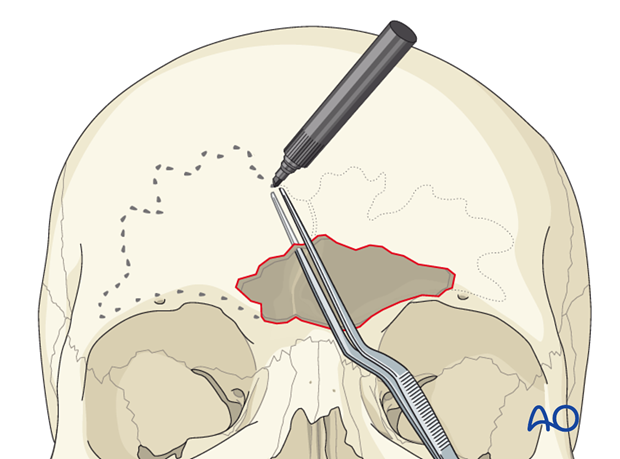
Transillumination
Alternatively, a light source (such as an endoscope) can be inserted through the anterior table bone defect. The light will transilluminate the sinus and delineate its margins.
Beware of pitfalls such as soft-tissue and blood present in the sinus.

6-foot (1.83 m) Caldwell x-ray with coin reference
A 6-foot (1.83 m) Caldwell x-ray with (anterior-posterior Caldwell x-ray with the patient placed 6 feet from the x-ray tube) can be used to delineate the margins of the sinus. The 6-foot penny Caldwell generates a “life-size” representation of the sinus cavity. It is imperative that the orientation (ie, right and left) is clearly documented on the x-ray.
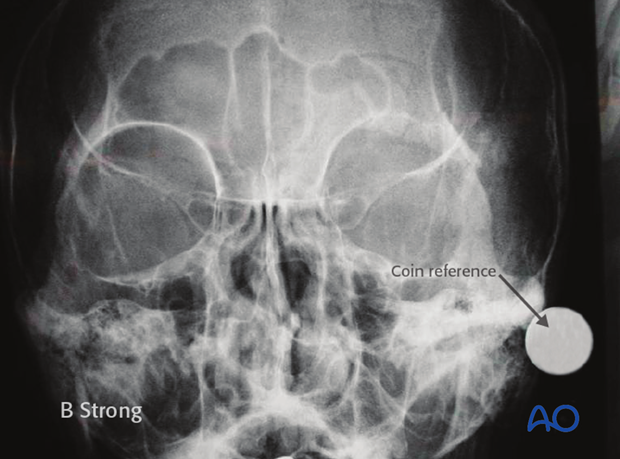
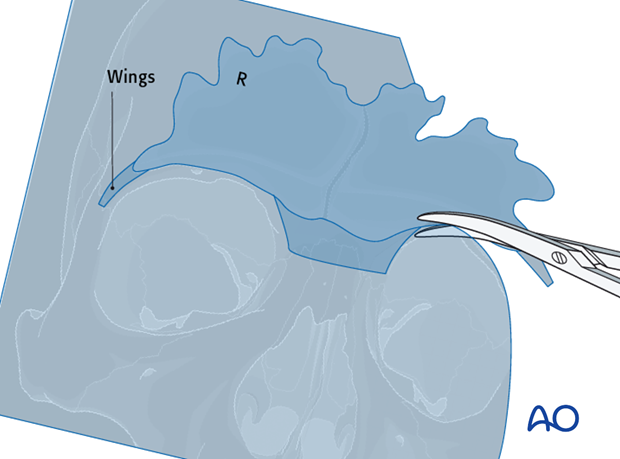
Scissors are then used to cut along the margins of the sinus. Lateral “wings” that project along the orbital rims are also cut out to help with orientation. A second copy of the sinus template is generated from the first in case one is contaminated during the procedure. An “R” is scratched into the right side of both templates to record orientation. Both copies are sterilized and brought onto the surgical field.
The template is then placed over the sinus using the orbital rim “wings” to help with orientation. The template is held in place. The sinus periphery can then be outlined using ink or electrocautery as previously described.
Intraoperative navigation
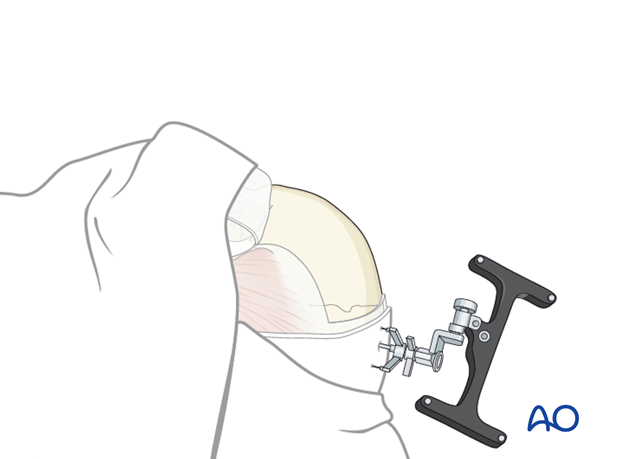
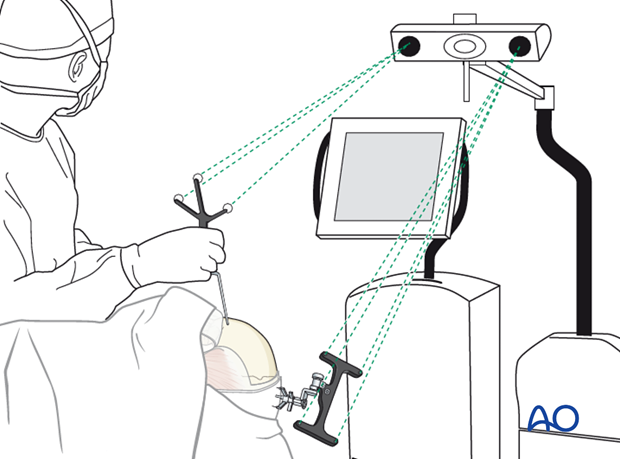
Intraoperative navigation can be used to outline the periphery of the sinuses using the preoperative CT scan. A reference array must be fixed to the skull (or Mayfield head holder) to allow for accurate navigation.
The navigation system is used to guide the probe along the periphery of the sinus.
Ink or electrocautery can be used to mark the outline.
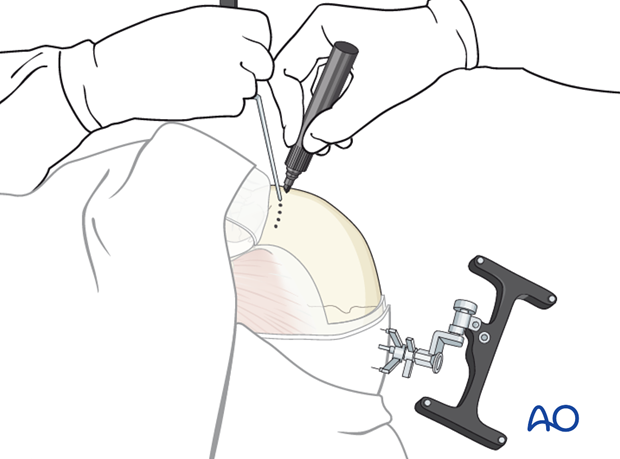
6. Osteotomy
Plate application
After the proposed osteotomy has been marked at the periphery of the sinus, thin plates are applied spanning the sinus margin. An adequate number of plates should be applied to provide stability when the anterior table segment is osteotomized. The plates should be pre-applied prior to the osteotomy. This allows for accurate repositioning of the anterior table bone.
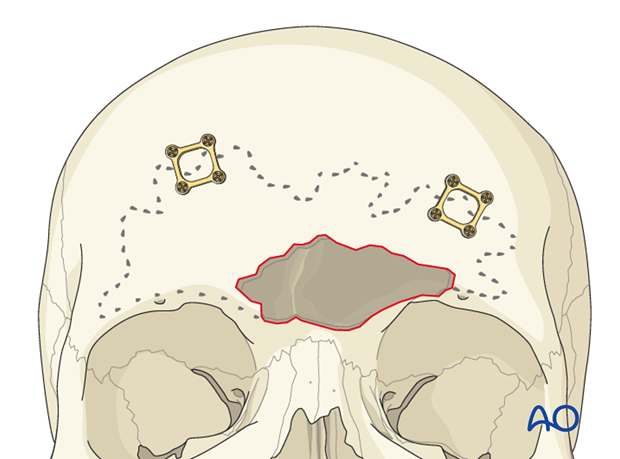
Each plate should be rotated away from the proposed osteotomy line. This can be accomplished by removal all but one screw located on stable bone outside the sinus. The plate can then be rotated away from the sinus.
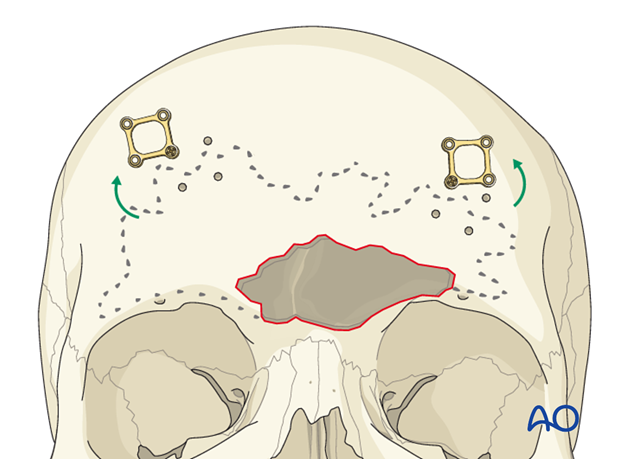
Perforating the anterior table
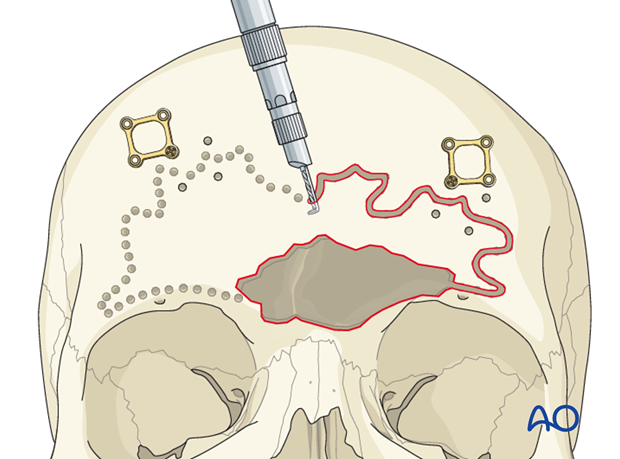
A sagittal saw can be used to perform the osteotomy. However, a side-cutting burr (as illustrated) is more controlled and accurate. The bit is used to drill sequential holes along the superior border of the sinus. Individual holes are separated by several millimeters.
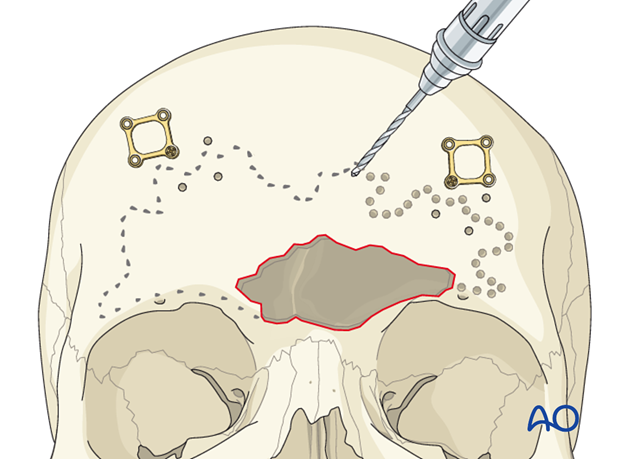
The handpiece should be angled approximately 45° towards the sinus and away from the cranial vault to avoid violation of the posterior table.

Completion of superior osteotomy
The holes are then connected to create a single osteotomy on the superior margin of the sinus.
Osteotomizing the orbital rims/glabella
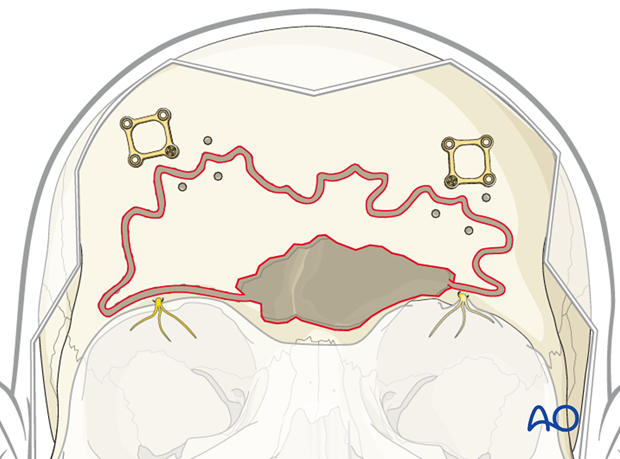
Next, the drill is used to osteotomize the orbital rims and glabella in a similar fashion. Care should be taken to protect the orbital contents and supratrochlear/supraorbital neurovascular pedicles.
Intersinus septum osteotomy
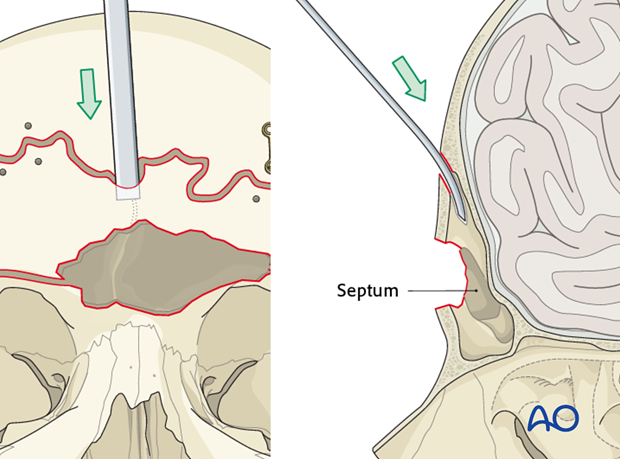
If the intersinus septum is intact, it may be necessary to insert a curved osteotome through the superior osteotomy site and fracture the intersinus septum just deep to the anterior table bone. Care must be used to avoid injuring the posterior table.
Bone removal
A curved osteotome is then inserted through the superior osteotomy to cantilever the anterior table and generate a controlled fracture of any remaining attached bone. A clamp should be used to control the anterior bone fragment as the osteotomy fracture is completed.

7. Mucosa removal
The sinus cavity is then suctioned free of any blood or mucous. An elevator and/or forceps are used to remove the sinus mucosa.
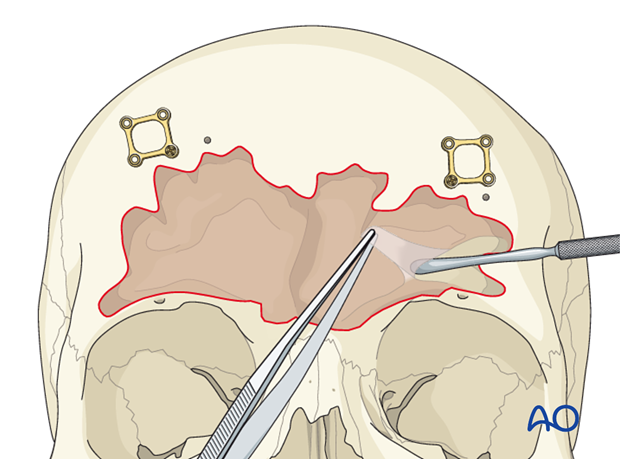
Diamond burrs of various sizes (1-6 mm) are then used to meticulously remove the sinus mucosa and a thin layer of bone from the entire sinus surface. All septations are drilled down to generate a single smooth sinus cavity.
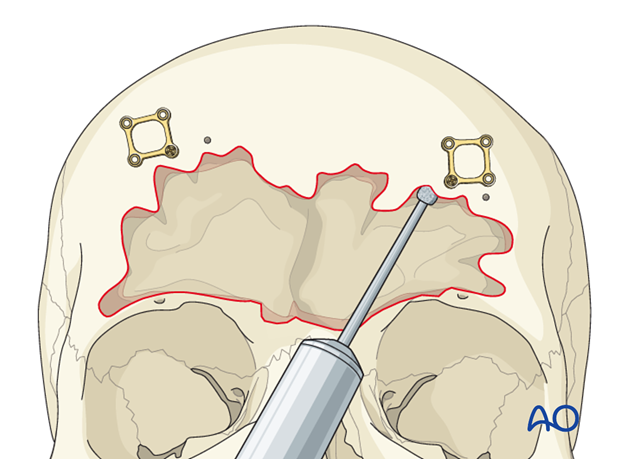
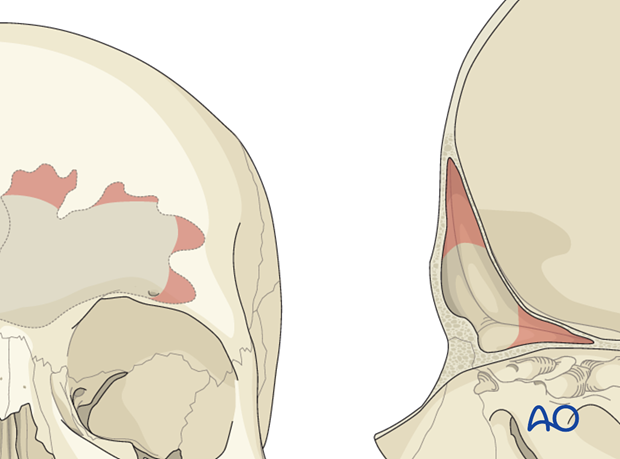
Particular attention must be paid to the scalloped areas at the periphery of the sinus. In the supraorbital region this can be challenging. Extra time should be spent to assure that mucosa is removed from this area.
Rarely, a small amount of bone from the orbital roof may be removed to gain access to the deepest portions of the sinus.
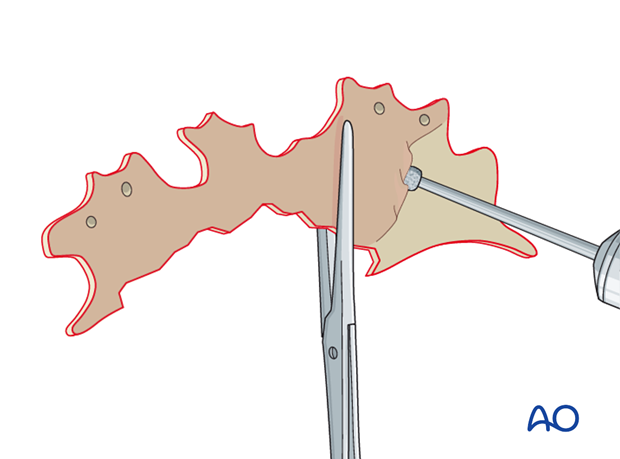
A clamp is used to stabilize the free anterior bone segment(s) that were previously removed. A large diamond burr is then used to remove the mucosa from the inner surface.
8. Closure of the outflow tract
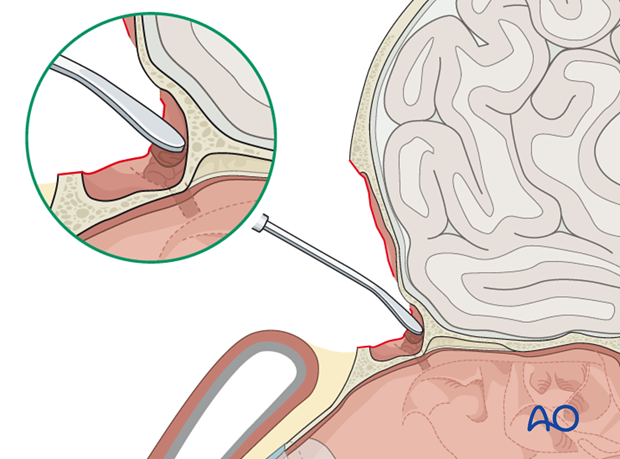
An elevator is then used to circumferentially elevate the mucosa in the frontal recess bilaterally. The mucosa is then inverted and pushed inferiorly to obstruct the outflow tract. Free fascia is used for obliteration of the outflow tract.
Alternatively, a sharp 1-2 cm straight osteotome can be used to harvest a thin layer of outer layer calvarial bone. If the graft can be harvested from a region with Intact periosteum, this will help maintain the integrity of the graft.
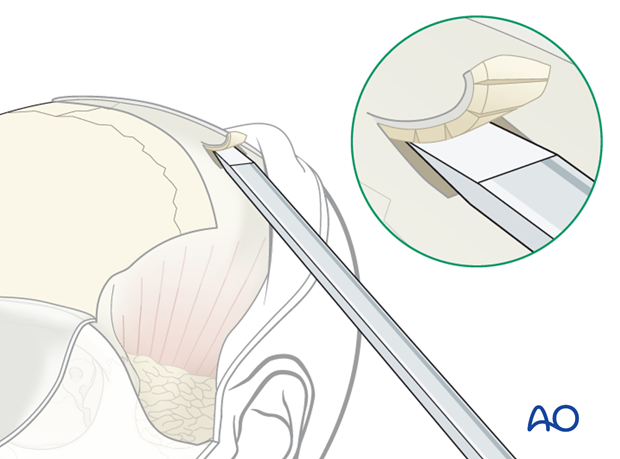
Each bone graft is trimmed to fit into the frontal sinus infundibulum using a fine bone rongeur. The graft is then wedged into place to obstruct the sinus outflow tract.
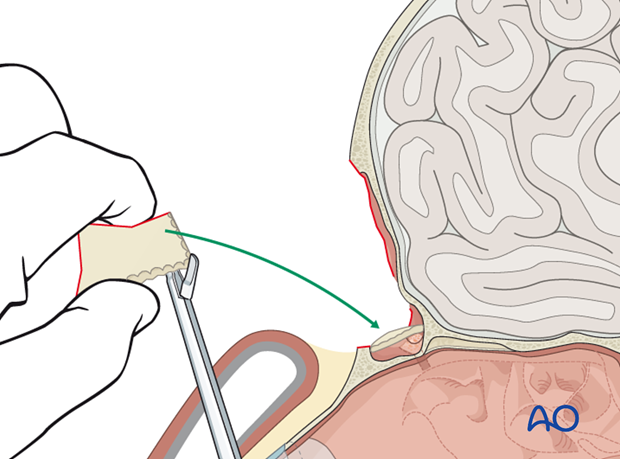
9. Sinus obliteration
Harvesting fat
Fat can be readily harvested from the abdomen. An incision can be placed around the umbilicus (better cosmesis) or in the left lower quadrant.
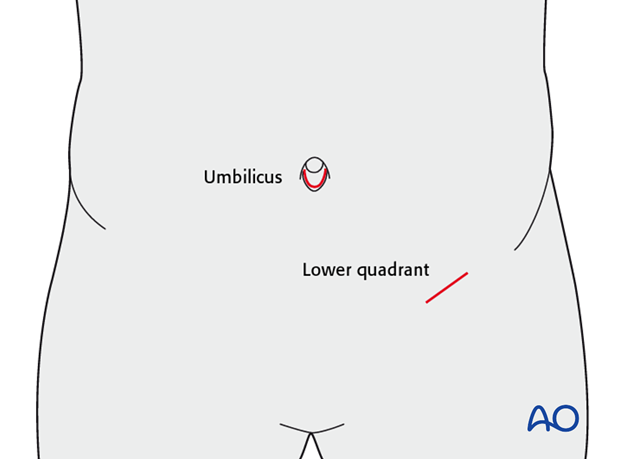
To maintain maximum graft viability, one adequately sized piece should be obtained without the use of electrocautery.

The fat graft is then placed in the sinus cavity and ...
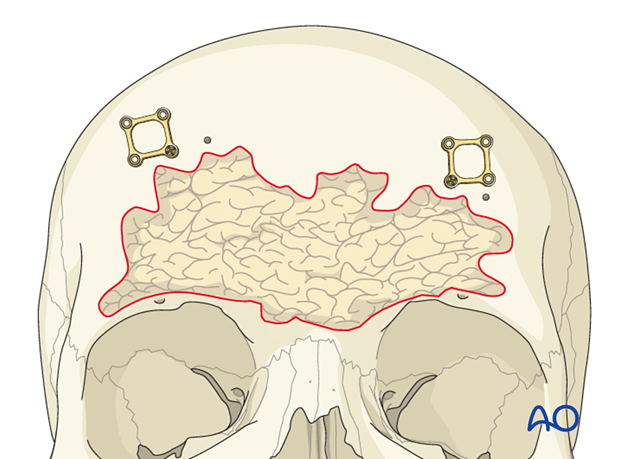
... distributed to fill the entire defect.
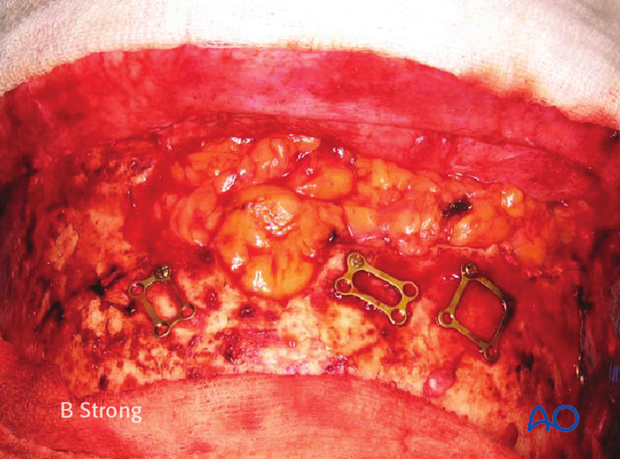
The anterior surface should be trimmed so that the fat does not extrude from the osteotomy gap.
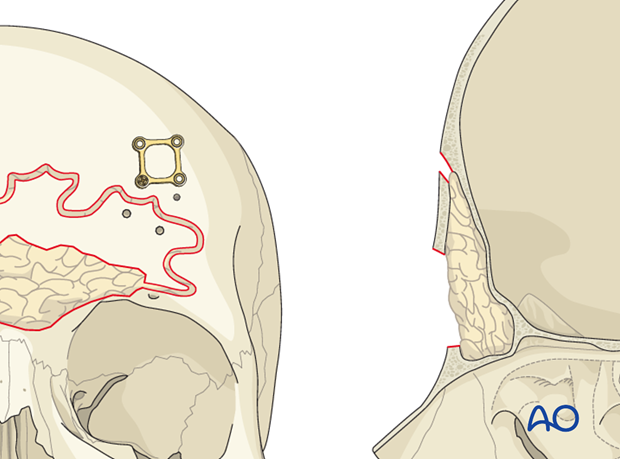
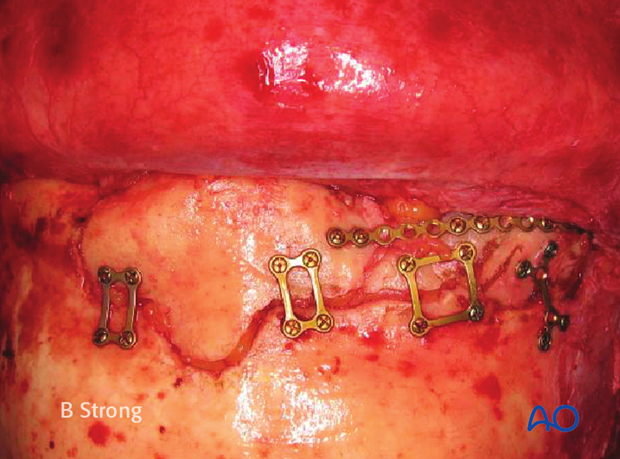
The anterior table bone fragments are then repositioned and the pre-applied plates are rotated back into position to fixate the fragments. Replace any remaining fragments and fix them with small plates.
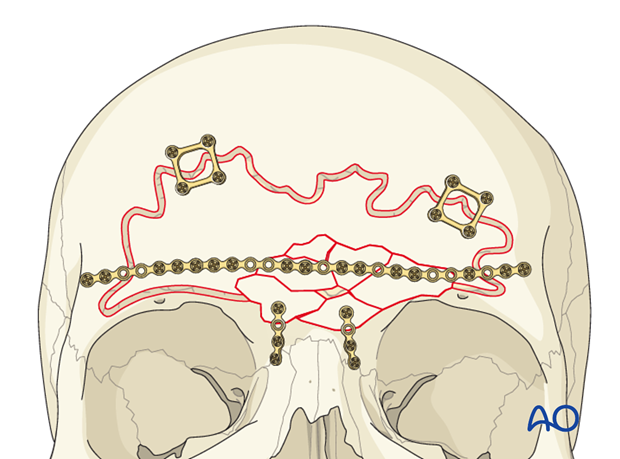
This clinical photograph shows the fixation.
10. Aftercare following management of frontal sinus fractures
Evaluation of the patient’s vision
Evaluation of the patient’s vision is performed as soon as they are awakened from anesthesia and then at regular intervals until they are discharged from the hospital.
A swinging flashlight test may serve in the unconscious and/or noncooperative patient; alternatively electrophysiological examination has to be performed but is dependent on the appropriate equipment visual evoked potential (VEP).
Postoperative positioning
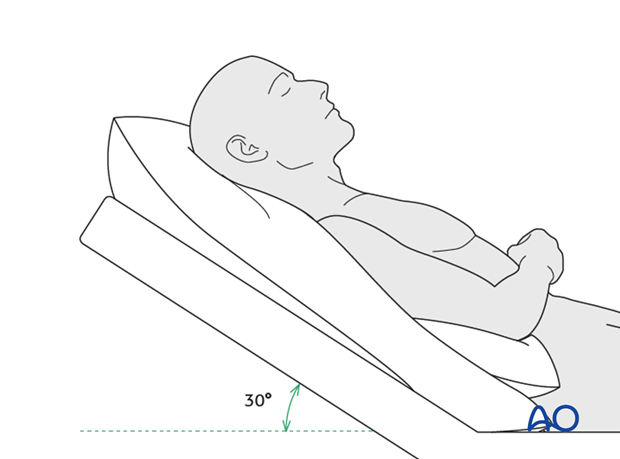
Keeping the patient’s head in a raised position both preoperatively and postoperatively may significantly improve edema and pain.
Nose-blowing
Nose-blowing should be avoided for at least 3 weeks following frontal sinus and skull base repair.
Medication
The use of the following perioperative medication is controversial. There is little evidence to make strong recommendations for postoperative care.
- No aspirin for 7 days (nonsteroidal antiinflammatory drugs (NSAIDs) use is controversial)
- Analgesia as necessary
- Antibiotics (many surgeons use perioperative antibiotics. There is no clear advantage of any one antibiotic, and the recommended duration of treatment is debatable.)
- Nasal decongestant may be helpful for symptomatic improvement in some patients.
- Steroids, in cases of severe orbital trauma, may help with postoperative edema. Some surgeons have noted increased complications with perioperative steroids.
- Ophthalmic ointment should follow local and approved protocol. This is not generally required in case of periorbital edema. Some surgeons prefer it. Some ointments have been found to cause significant conjunctival irritation.
Ophthalmological examination
Postoperative examination by an ophthalmologist may be requested. The following signs and symptoms are usually evaluated:
- Vision
- Extraocular motion (motility)
- Diplopia
- Globe position
- Visual field test
- Lid position
- If the patient complains of epiphora (tear overflow), the lacrimal duct must be checked
- If the patient complains of eye pain, evaluate for corneal abrasion
Note: In case of postoperative diplopia, ophthalmological assessment is needed to identify the cause. Hess-chart testing should be performed if diplopia persists.
Postoperative imaging
Postoperative imaging has to be performed within the first days after surgery. 3-D imaging (CT, cone beam) is recommended to assess complex fracture reductions. In centers where intraoperative imaging is available postoperative imaging can be performed at a delayed time.
For skull base and frontal sinus fractures postoperative imaging should be performed when indicated. If the frontal sinus is preserved, perform a follow up scan in 3-6 months to ensure that it is aerated.
Wound care
The scalp can generally be washed at 5 days postoperatively.
Suture removal from scalp is performed at 7-10 days postoperatively.
Avoid sun exposure and tanning to skin incisions for several months.
Diet
Diet depends on the fracture pattern and patients condition but there are usually no limitations.
Clinical follow-up
Patients should be counseled that frontal sinusitis, mucocele formation, or any other signs of intracranial infection can occur years after the injury. The symptoms should be discussed with the patient including
- Headache
- Erythema
- Mucopurulent nasal drainage
- Frontal bone deformity
- Orbital edema/displacement
Clinical follow-up depends on the complexity of the surgery, and the patient’s postoperative course.
- Other issues to consider are:
- Cranial vault contour deformity
- Sensory nerve compromise
- Problems of scar formation
- Alopecia
- Postoperative headache
- Anosmia
- Dizziness
- Vomiting
- Meningitis (can occur years after injury)
- Mucocele formation (can occur years after injury)
Implant removal
Implant removal is rarely required. It is possible that this may be requested by patients if the implant becomes palpable or visible. In some countries it will be more commonly requested. There have been cases where patients have complained of cold sensitivity in areas of plate placement. It is controversial whether this cold sensitivity is a result of the plate, a result of nerve injury from the original trauma, or from nerve injury due to trauma of the surgery. Issues of cold sensitivity generally improve or resolve with time without removal of the hardware.
Special considerations
Travel in pressurized aircraft is permitted 4 – 6 weeks postoperatively. Mild pain on descent may be noticed. However, flying in non-pressurized aircraft should be avoided for a minimum of 12 weeks.
No scuba diving should be permitted for at least 12 weeks. Additionally, the patient should be warned of long term potential risks.


