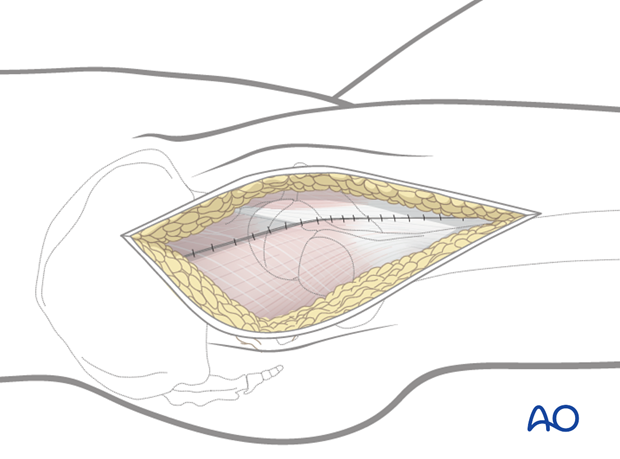
Pediatric surgical hip dislocation
1. Introduction
Surgical hip dislocation is indicated in children for many conditions of the femoral head and femoral head/neck junction, including fractures.
These include:
- Femoro-acetabular impingement
- Slipped capital femoral epiphysis (SCFE)
- Perthes’ disease with subluxation, or hinging
- Acetabular and femoral head fractures, including osteochondral lesions
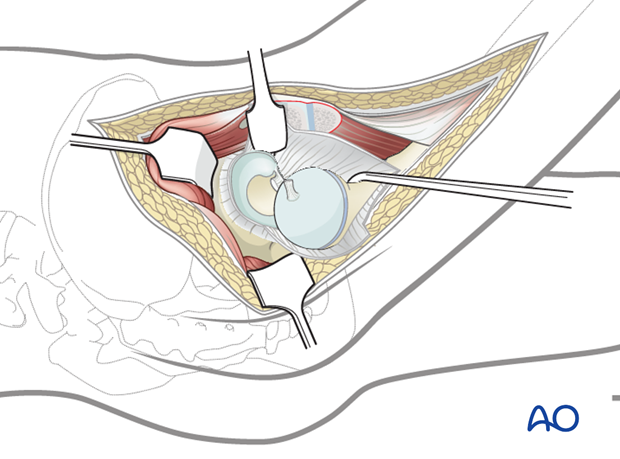
Surgical hip dislocation provides full visualization of the complete femoral head and acetabulum.
2. Prerequisites for a safe surgical hip dislocation
- Detailed knowledge of the vascularity and anatomy of the proximal femur
- Advanced skills in pediatric hip surgery
- Detailed knowledge of the key steps of the surgical approach, including development of retinacular flaps
- Appropriate instruments
- Correct patient positioning, including OR table with appropriate support to position the patient safely
3. Vascular anatomy
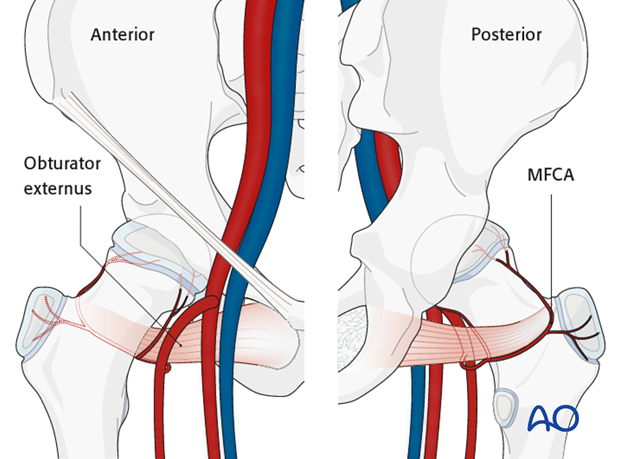
The deep branch of the medial femoral circumflex artery provides the main relevant blood supply to the femoral head.
The medial femoral circumflex artery originates from the deep femoral artery (profunda femoris), courses between the iliopsoas and pectineus muscles, and runs posteriorly between the femur and the pelvis.
During its course, a small branch supplies the inferior retinaculum (ligament of Weitbrecht).
The main branch of the medial femoral circumflex artery is related to the inferior border of the obturator externus muscle and passes posterior to the femur, towards the intertrochanteric crest.
It then crosses posterior to the obturator externus and anterior to the triceps coxae (obturator internus and the superior and inferior gemelli).
Before crossing the triceps coxae, a small branch passes to the greater trochanter.
The vessel enters the joint capsule between the gemellus superior and the piriformis muscles.
Note: The approach must always be cranial to the piriformis muscle. This anatomical detail is crucial when starting to prepare the capsule.
After perforating the capsule, the vessel passes along the superior retinaculum and splits into 3-4 branches.
Provided the obturator externus muscle remains intact, it will protect the medial femoral circumflex artery.
4. Surgical anatomy of a right hip
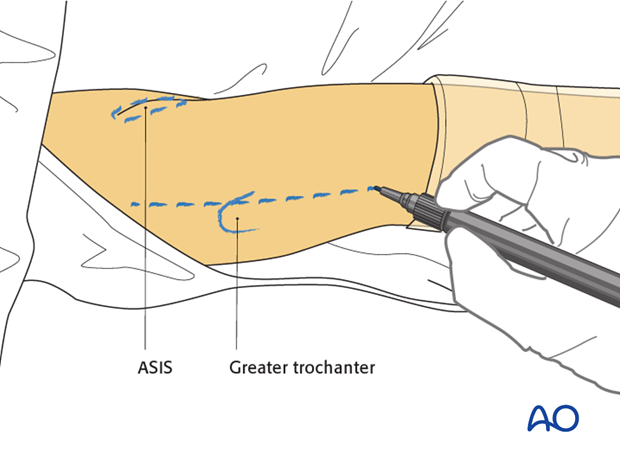
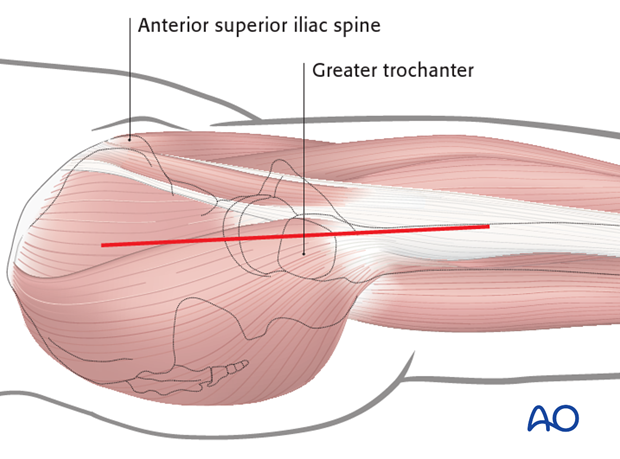
The greater trochanter and anterior superior iliac spine (ASIS) are palpated and outlined with a sterile marking pen.
5. Skin incision
The incision is started a few centimeters proximal to the anterior superior iliac spine (ASIS) and continues along the axis of the femur immediately anterior to the palpable greater trochanter.
The length of the incision will depend on the body mass of the patient and should extend equally inferior and superior to the greater trochanter as shown.
Dissection continues to the fascia lata distally and to the fascia over the gluteus maximus proximally.
6. Gibson interval
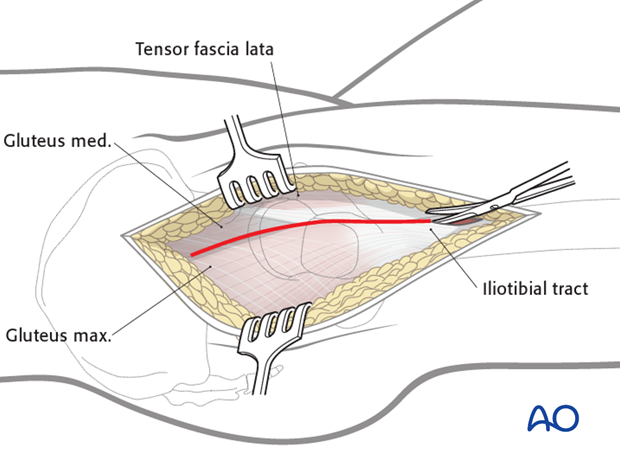
The fascia lata is incised longitudinally and proximally from the most distal extent of the wound up to the greater trochanter.
The incision is continued along the anterior border of the gluteus maximus (Gibson approach).
The gluteus medius is visible proximal to the greater trochanter.
It is important to note that the gluteus maximus and tensor fascia lata have a combined fascial covering.
Dividing the fibers of the gluteus medius should be avoided and the interval between gluteus maximus and medius is best identified from within the incision made in the fascia lata.
Pearl: The assistant positioned next to the surgeon flexes the knee and extends the hip relaxing the gluteus maximus and its fascia. This improves the exposure of the posterior border of the gluteus medius.
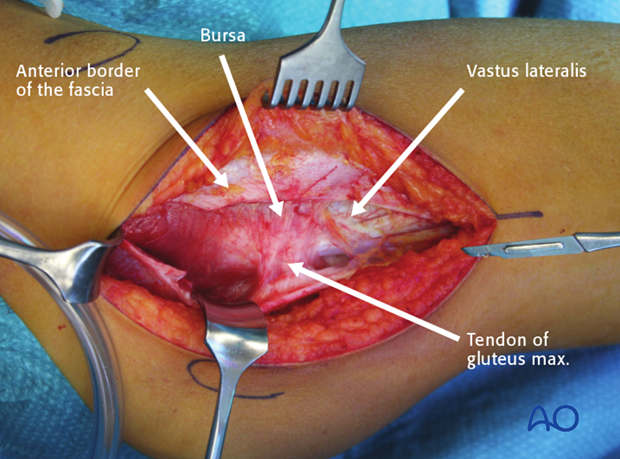
Once the fascia is completely opened, the following landmarks are readily identifiable:
- Greater trochanter
- Vastus lateralis
- Gluteus medius
- Anterior border of the gluteus maximus
Note: At this stage, the trochanteric bursa and the loose areolar tissue overlying the short external rotators are still intact.
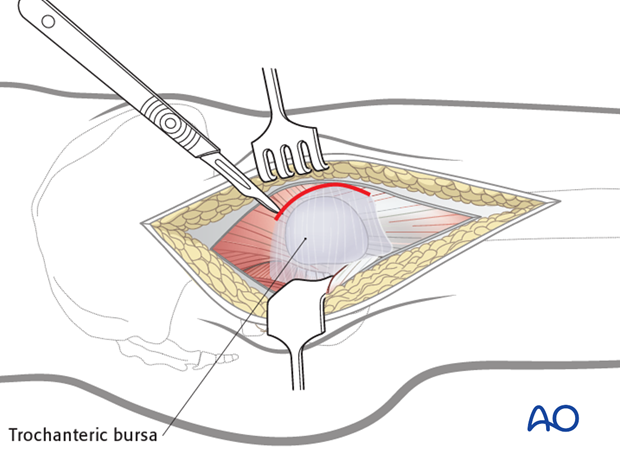
It is recommended that a flap of trochanteric bursa and the attached tissue is prepared with an anterior incision and retracted posteriorly to expose the short external rotators.
This flap is repositioned and repaired when the wound is closed preventing adhesions between the greater trochanter and the fascia lata.
The posterior border of the gluteus medius is identified and retracted anteriorly. There are some anatomical variations in the extent to which the piriformis tendon is overlapped by the gluteus medius.
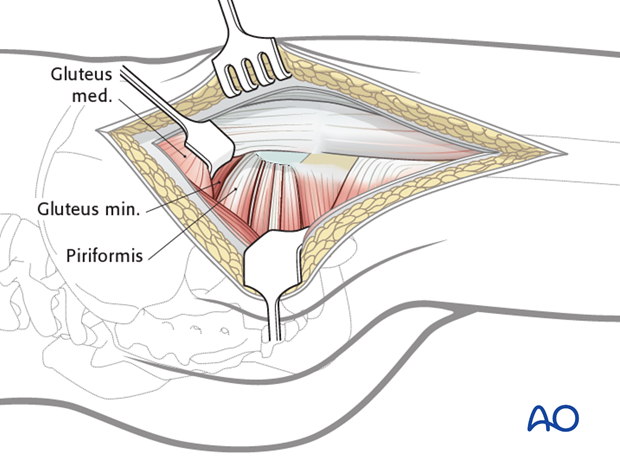
Identification of the piriformis tendon is crucial at this stage.
Note: In some cases, identification of the piriformis tendon can be difficult if it is integrated into the posterior border of the gluteus medius.
Once the piriformis tendon is visible, the interval between the piriformis tendon and the posterior border of the gluteus minimus is identified. The interval between the gluteus minimus and the piriformis tendon is sharply dissected over a distance of 1-2 cm.
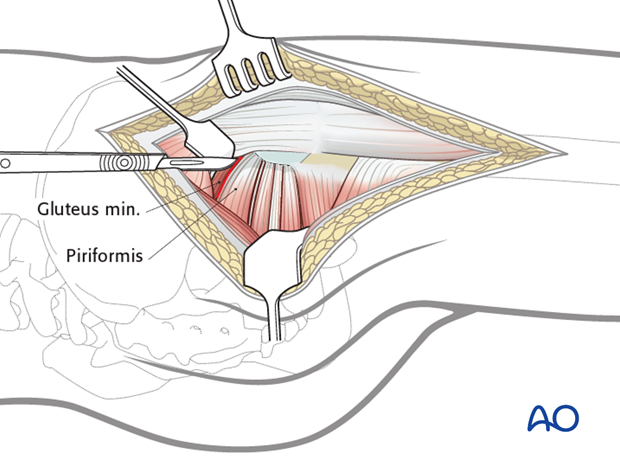
7. Trochanteric-flip osteotomy
To identify the distal starting point of the trochanteric-flip osteotomy, the vastus lateralis is elevated from the proximal femur up to its insertion at the greater trochanter.
The proximal end of the trochanteric-flip osteotomy should leave a 5 mm cuff of the posterior border of the gluteus medius attached to the portion of the trochanter that will remain on the shaft.
The trochanteric fragment should be approximately 1.5 cm thick (a thinner fragment can break and is difficult to reattach, a thicker fragment risks encroaching into the piriformis fossa leading to vascular damage).
The risk of injury to the medial femoral circumflex artery can be reduced by following this recommendation.
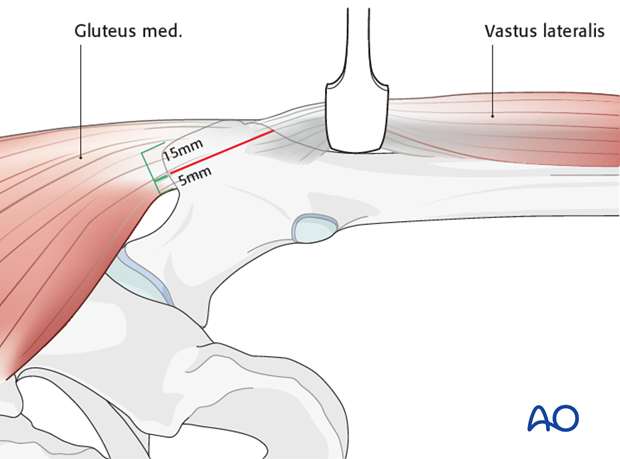
The osteotomy line is marked with electrocautery and the hip is internally rotated as much as possible to facilitate the performance of the osteotomy.
The index finger is placed on the anterior aspect of the greater trochanter to guide the osteotomy plane.
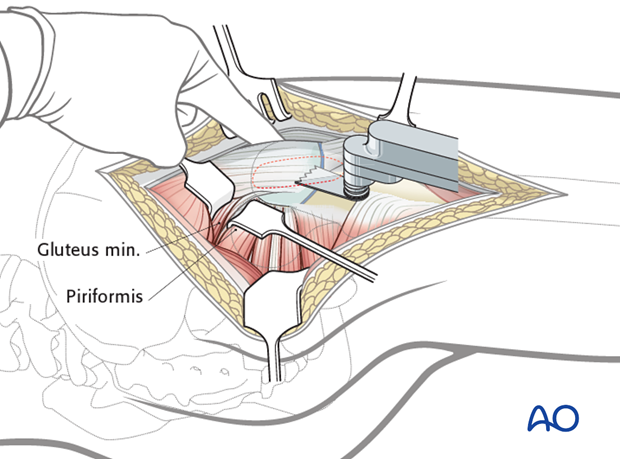
Once the cut is completed, the trochanter can be moved in continuity with anterior soft-tissue structures and the gluteus medius.
An osteotome is initially used to lift the fragment, and the remaining anterior periosteum and the remaining part of the gluteus medius are cut using an inside-out technique.
The osteotome is then replaced by a Hohmann retractor, the tip of which is inserted around the anterior aspect of the femur as shown in the illustration.
A smooth retractor holds the gluteus minimus in a posterior direction, allowing the insertion of the tendon at the greater trochanter to be seen clearly.
The gluteus minimus is sharply dissected from the capsule and detached from the intertrochanteric region, followed by dissection of the proximal part of the vastus lateralis from the femur.
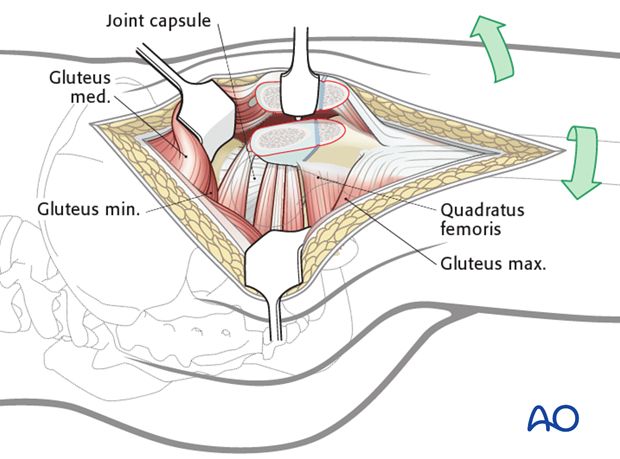
8. Alternative technique for trochanteric-flip osteotomy
A step osteotomy, using osteotomes is recommended in adolescents and/or obese children as this results in more stable reattachment of the greater trochanter.
Note: Care must be taken to ensure the correct orientation of the step (see illustration).
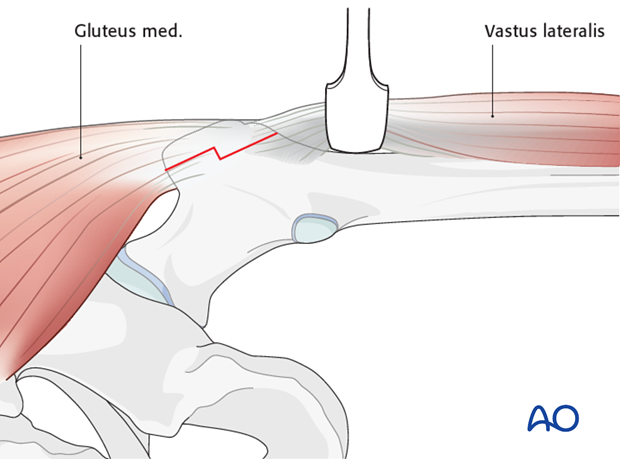
At this stage, the capsule is exposed and ready for capsulotomy. The hip should be flexed to relax the anterior structures.
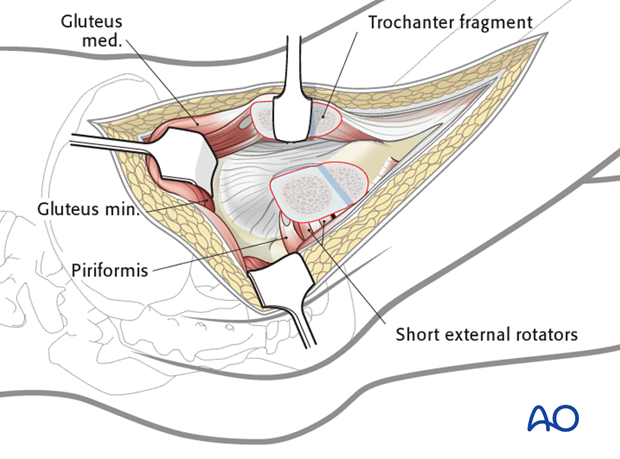
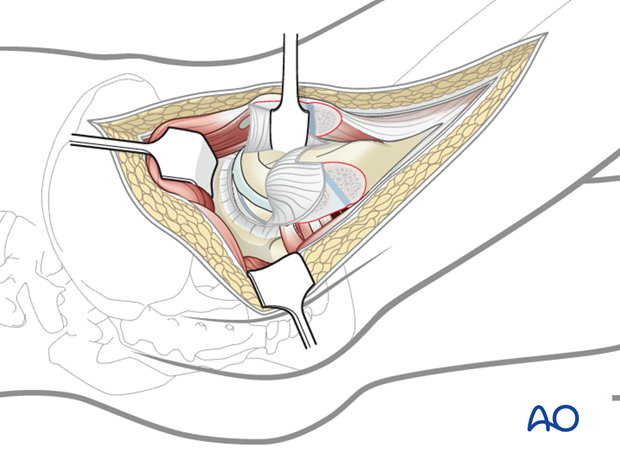
9. Z-shaped capsular incision
Starting from the trochanteric physis at the anterior edge of the trochanteric osteotomy, a longitudinal incision is made towards the acetabulum (1).
Care must be taken not to cut into the labrum.
The second cut runs along the distal anterior insertion of the capsule around the calcar (2).
The third cut runs parallel to the edge of the acetabulum in a posterior direction (3).
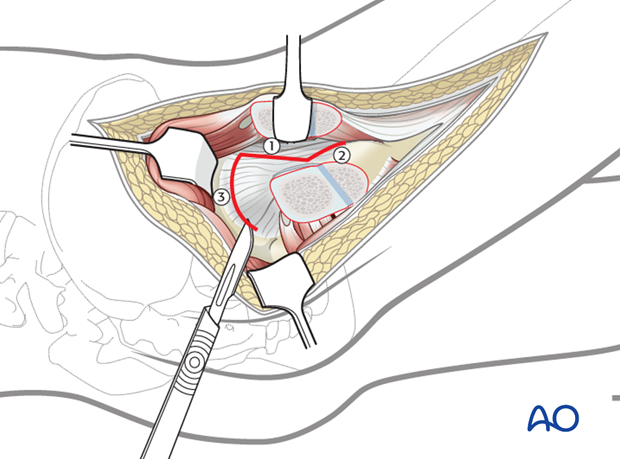
After opening the capsule, the following structures can be seen:
- Anterior and lateral aspect of the femoral head
- Acetabular labrum
- Distal attachment of the capsule
10. Dislocation
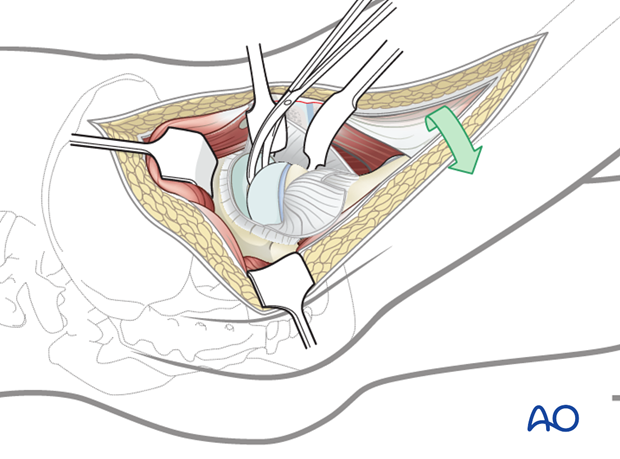
The assistant in front of the patient performs continuous traction on the flexed knee.
The femoral head can be subluxed with progressive flexion of the hip and progressive external rotation of the femur.
An initial inspection of the hip joint and associated pathology should be made at this point.
Complete dislocation may not be necessary if a free fragment can be seen and removed or stabilized.
If the fragment is sufficiently large for reattachment and the extent of damage of the femoral head can be seen in the subluxed position, complete dislocation may not be necessary and this reduces morbidity.
If complete dislocation is necessary, obstetric scissors should be used to cut the ligamentum teres.
11. Controlled dislocation
After cutting the ligament, the lower leg, with the knee flexed, is placed in a sterile bag and a large bone hook is placed around the calcar. Controlled pushing on the leg and manipulation with the bone hook, allows safe dislocation of the hip.
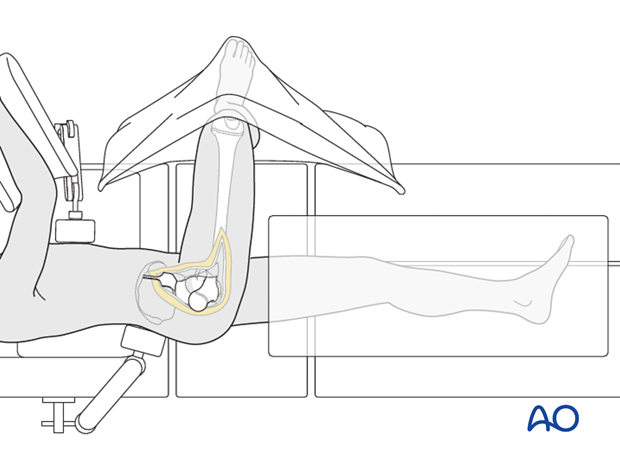
There is free surgical access to the entire femoral head in the dislocated position.

12. Reduction of the femoral head
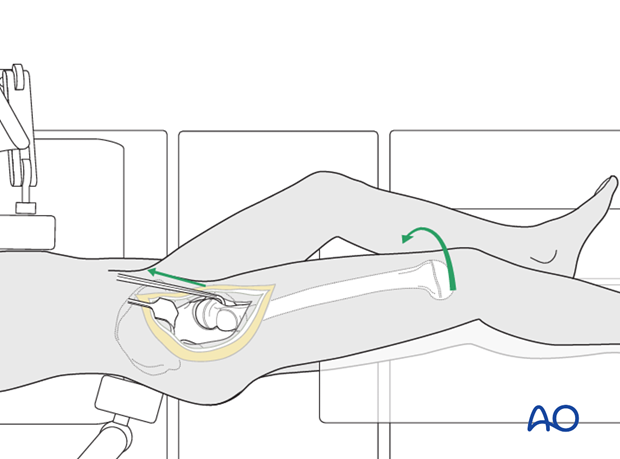
The leg is removed from the bag and the femoral head is reduced by a controlled maneuver.
The bone hook is repositioned around the calcar and the femur is maneuvered the same way as for the dislocation. Simultaneously, the assistant gently pulls and internally rotates the leg.
Note: These two maneuvers must be synchronized.
Final reduction is achieved by extension of the hip.
13. Closure of the capsule
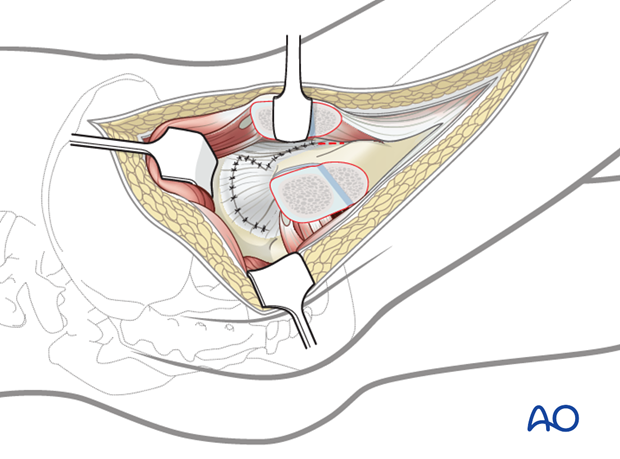
The capsule is closed loosely with 2/0 absorbable sutures. Care must be taken to ensure that the sutures remain extraarticular, lest they damage the cartilage during motion (see illustration).
Note: Loose closure of the capsule is preferred as it reduces the risk of a tension hemarthrosis.
14. Reduction and fixation of the trochanteric flip
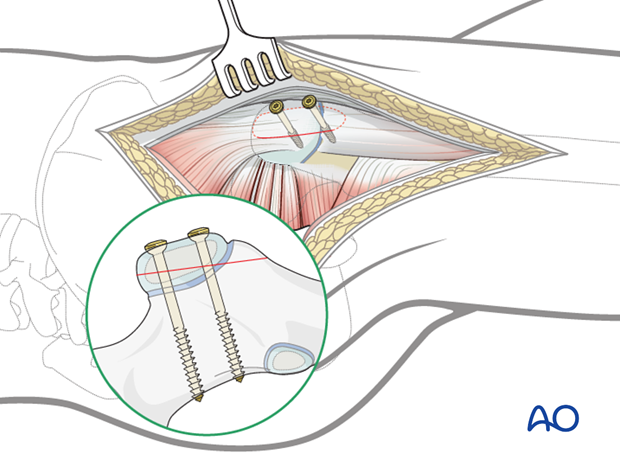
The trochanteric fragment is held with a sharp bone clamp or, in smaller patients, with a towel clip. The assistant brings the extended leg into 20-30° of abduction. This relaxes the gluteal muscles and facilitates reduction of the trochanter. The trochanteric fragment is temporarily fixed with a 2.0 mm smooth K-wire, which is inserted by tapping the wire into the femur.
The greater trochanteric fragment can be fixed with two 3.5 mm cortex screws. It is recommended that these screws are inserted perpendicular to the osteotomy plane and reach the contralateral cortex of the femur. The distal screw should be tightened first. The temporary K-wire is removed after insertion of the second screw.
15. Closure of the fascia
It is recommended to start proximally with a continuous suture of the fascia of gluteus maximus. This can be difficult as this fascia is very thin. The suture ends at the level of the tip of the greater trochanter. From here a second continuous suture, that continues to the distal end of the fascial incision, is inserted to close the remainder of the incision.
Pearl: Before the fascia is closed, it is recommended to repair the layers of the trochanteric bursa to prevent adhesion between the trochanter and the fascia.
Subcutaneous suture and closure of the skin are performed according to the surgeon's preference.
