Lag screw with protection plate
1. Principles
Indications
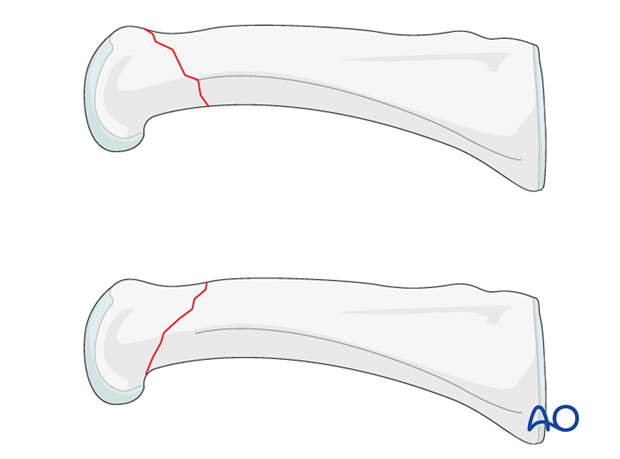
Fractures of the distal metaphysis can be transverse, oblique, or comminuted.
Always confirm the fracture configuration with views in both planes.
Irreducible and unstable fractures require ORIF.
Other indications for ORIF are open fractures, or soft-tissue lacerations.
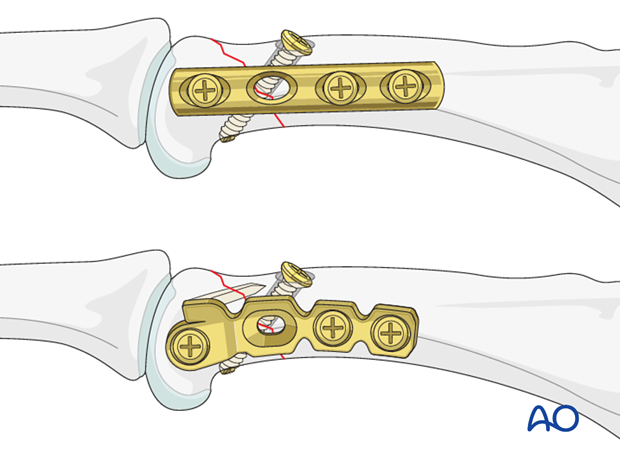
Lag screw with protection plate
In short oblique fractures, only one lag screw can be inserted. This is insufficient to produce enough stability. The lag screw must be protected by a plate.
For fractures of the condylar metaphysis, a minicondylar plate is preferred, because of the angular stability that it provides, although any conventional plate can also be used for protection: these have the advantage of being less bulky. This reduces the risk of compromising the gliding of the extensor tendons.
Reduction principles
Indirect reduction is achieved by traction and manipulation.
Sometimes indirect reduction may be prevented by interposition of the lateral band.
If the fracture is irreducible, ORIF is indicated.

2. Approach
For this procedure a midaxial approach to the proximal phalanx is normally used.

3. Reduction
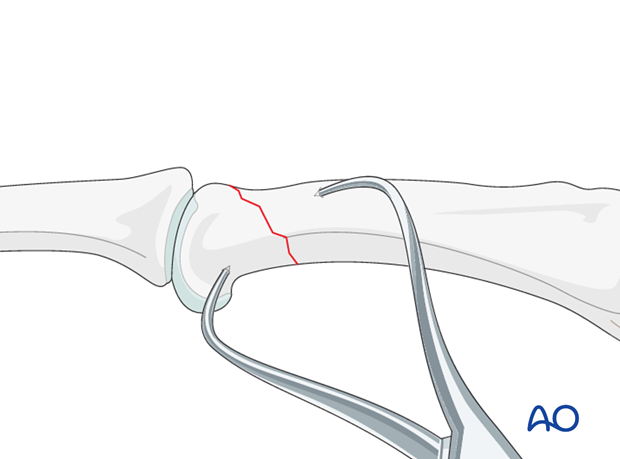
Indirect reduction by traction
Reduction can be achieved by traction and flexion exerted by the surgeon,...
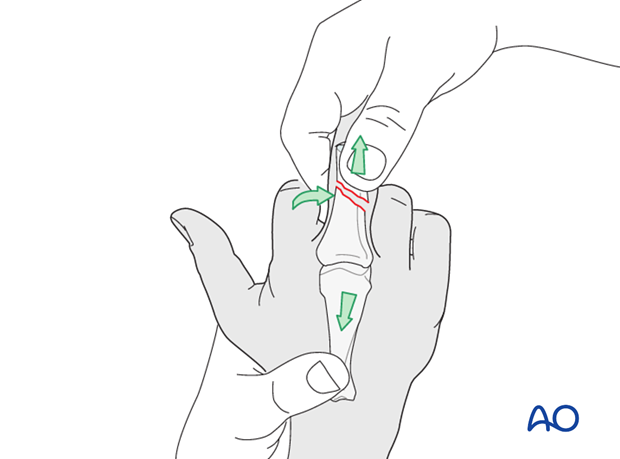
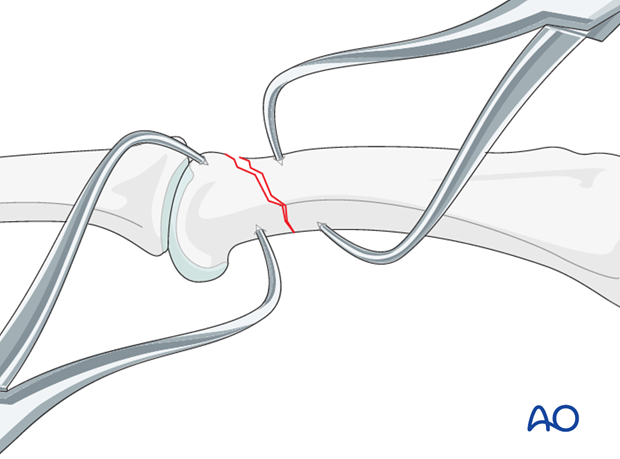
... or by two pointed reduction forceps.
Confirm reduction using image intensification.
Direct reduction
Direct reduction is necessary when the fracture can not be reduced by traction and flexion, or is unstable.
When indirect reduction is not possible, this is usually due to interposition of parts of the extensor apparatus.
Use a pointed reduction forceps for direct reduction.
4. Lag screw insertion
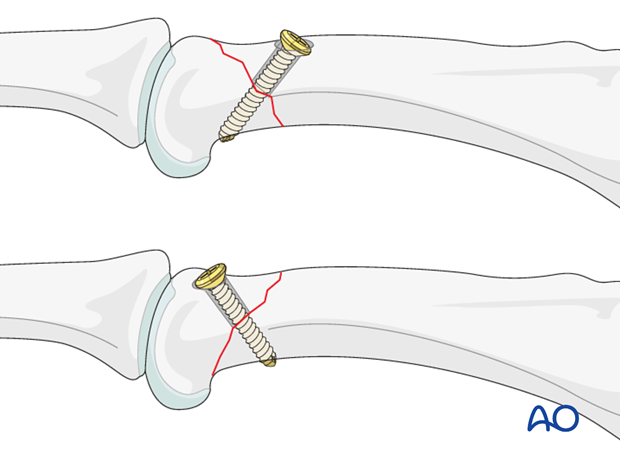
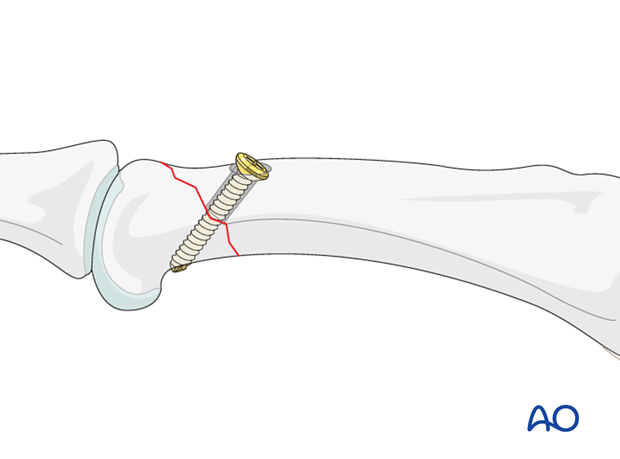
Planning lag screw position
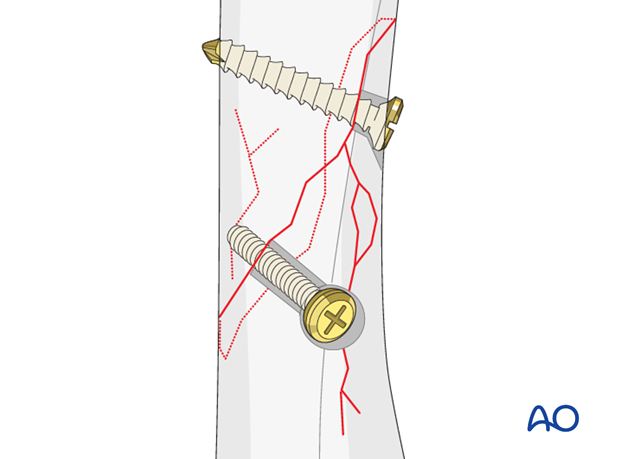
The lag screw should be inserted as perpendicularly to the fracture line as possible and from the dorsal surface. The direction of the obliquity of the fracture plane dictates the exact position of the lag screw.
Drilling for lag screws
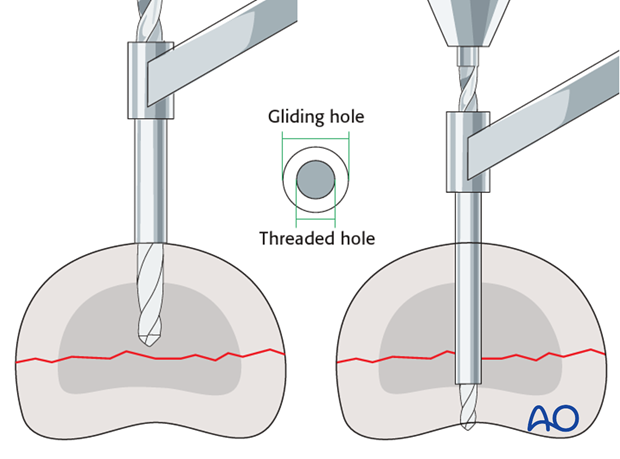
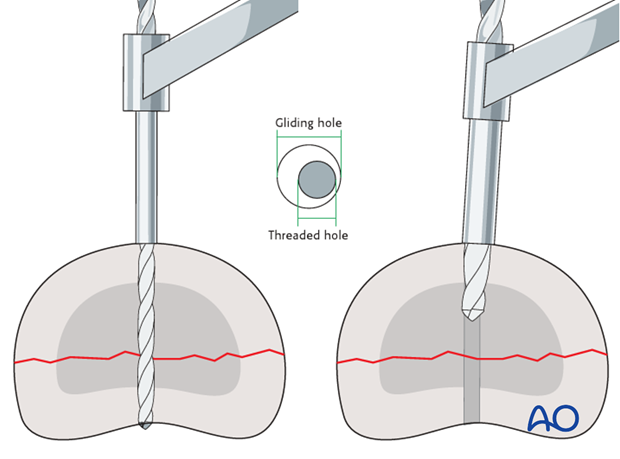
There are two options to prepare the gliding hole and the threaded hole:
1) Gliding hole first
Drill the gliding hole in the near cortex. Ensure perfect fracture reduction and then insert a drill guide. Drill the threaded hole in the far (trans) cortex through the drill guide.
This method ensures that the threaded hole is perfectly in line with the gliding hole.
This is the preferred method
2) Thread hole first
Drill a hole through both cortices, using the drill for the thread hole. Then use the corresponding larger drill bit to overdrill the near cortex to create the gliding hole.
This technique is useful for small fragments. The disadvantage, however, is that the holes may not be centered in relation to each other.
Pearl
If the near cortex is tapped prior to overdrilling for the gliding hole, eccentric passage of the second drill is less likely. This can be achieved by inserting the chosen self-tapping screw through the near (cis) cortex and then removing it. The drill will now follow exactly the threaded axis.
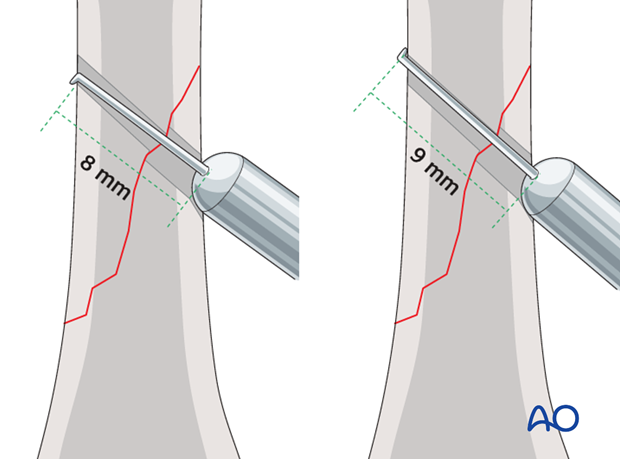
Pitfall: Oblique measurement
When measuring for screw length in oblique drill holes, the measurement to the acute angle is different from the measurement to the obtuse angle. This problem increases with the degree of obliquity.
Always measure both angles and use the longer measurement. However, keep in mind that too long a screw can protrude to the extent that it puts the soft tissues at risk.
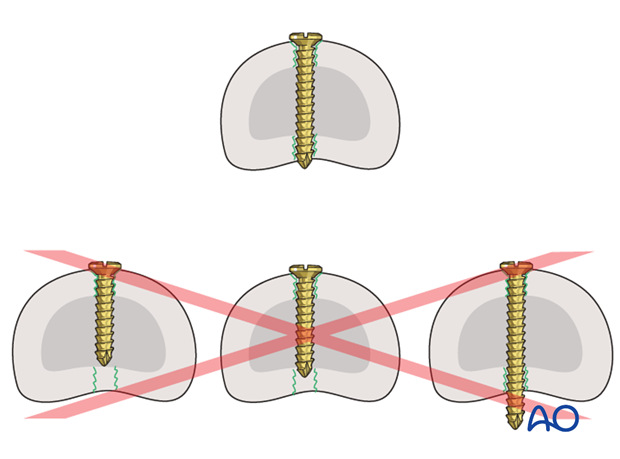
Screw length pitfalls
Ensure that a screw of the correct length is used.
- Too short screws do not have enough threads to engage the cortex properly. This problem increases when self-tapping screws are used due to the geometry of their tip.
- Too long screws endanger the soft tissues, especially tendons and neurovascular structures. With self-tapping screws, the cutting flutes are especially dangerous, and great care has to be taken that the flutes do not protrude beyond the cortical surface.
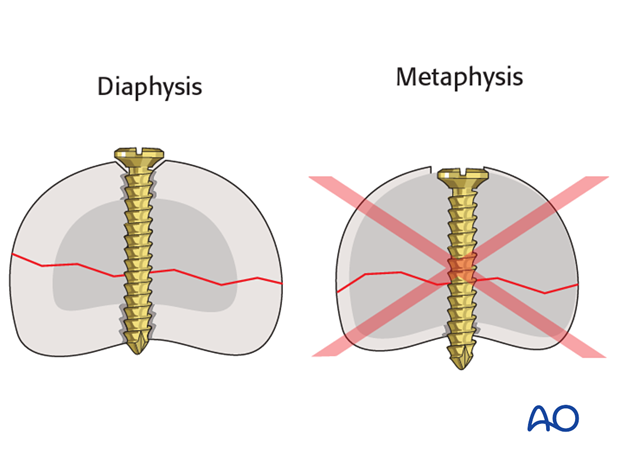
Countersinking in diaphyseal bone
There are two important reasons for countersinking:
- The risk of soft-tissue irritation is greatly reduced by ensuring that the the screw head protrudes only minimally from the bone surface.
- Countersinking ensures that the screw head has a maximal contact area with the bone, distributing the forces from the screw head more widely and more biodynamically than an unsunk head.
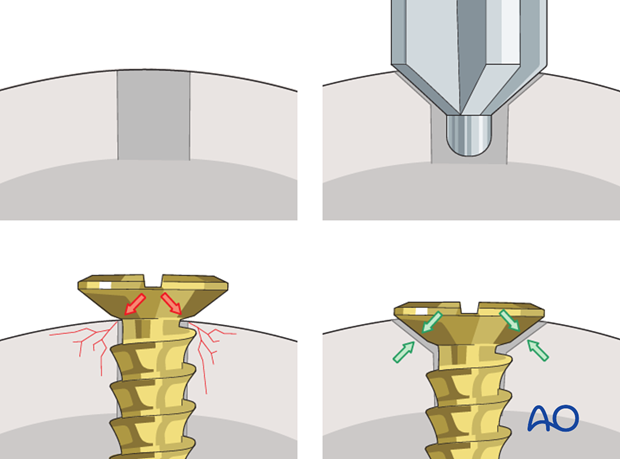
Pitfall: breaking the cortex in diaphyseal bone
Do not advance the countersink too deeply into the cortex: the cortical thickness will determine the depth of countersinking. Excess penetration risks break-through of the screw head when tightened and loss of fixation. Countersinking is, therefore, done by hand and not with a power tool.
No countersinking in the metaphysis
Do not countersink the screws in the metaphysis as its cortex is very thin.
If countersinking is attempted, all purchase and compression may be lost due to screw-head breakthrough.
Insert lag screw
Insert the lag screw and tighten it to compress the fracture. The pointed reduction forceps can now be removed.
5. Plate preparation
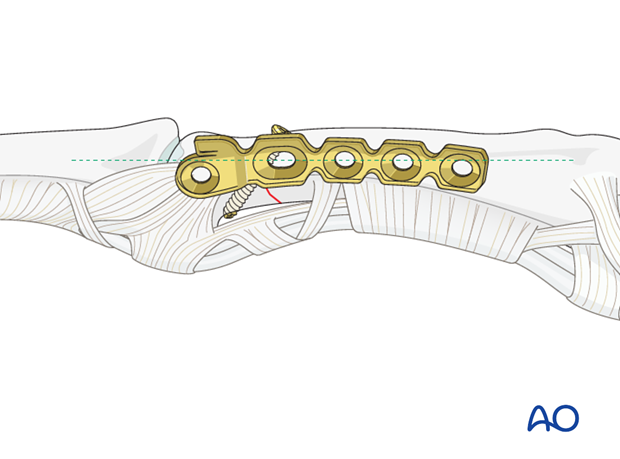
Planning plate position
It is wise to use magnifying loupes for this step.
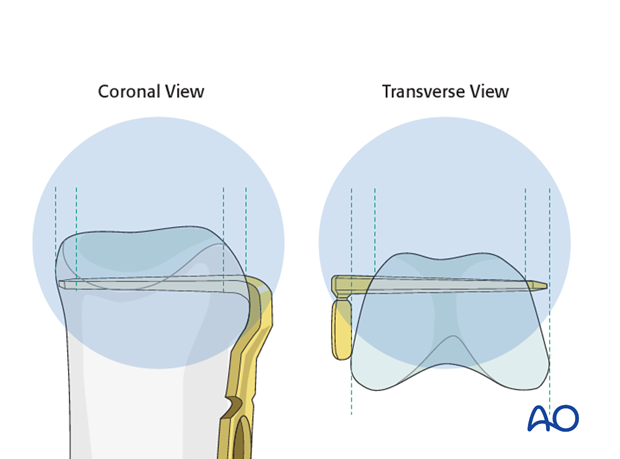
Plan the blade position as dorsal as possible, in order not to injure the collateral ligament.
Make sure that the plate will be perfectly aligned with the long axis of the proximal phalanx in the lateral view.
Corresponding flare
The position of the plate should be distal enough to ensure that the metaphyseal flare fits to the shape of the shoulder of the plate.
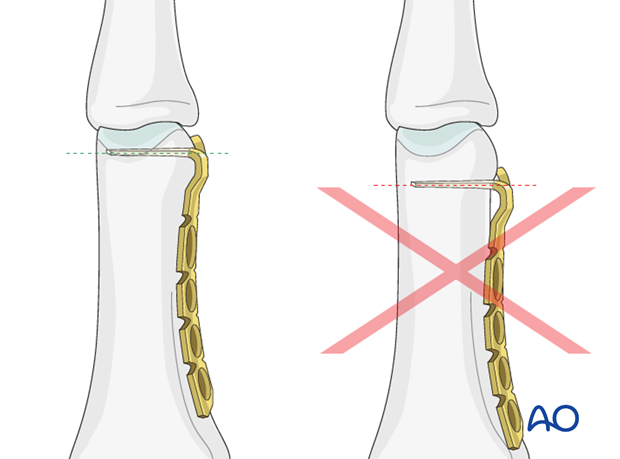
The minicondylar blade plates are available in two forms. One fits on the ulnar aspect of the bone, and the other on the radial aspect. It is a common mistake to choose the wrong one. The correct implant will have the blade dorsal and the distal screw hole palmar.
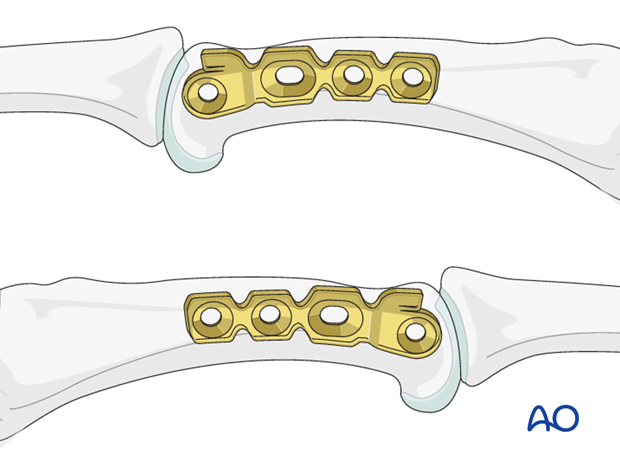
Trim the plate
Adapt the plate length to fit the length of the proximal phalanx. Avoid sharp edges which may be injurious to the tendons. There should be at least 3 plate holes distal to the fracture available for fixation in the diaphysis. At least two screws need to be inserted into the diaphysis.
Prepare the blade
Measure the length of the drill hole.
Cut the blade to the determined length, so that it just fills the drill hole.
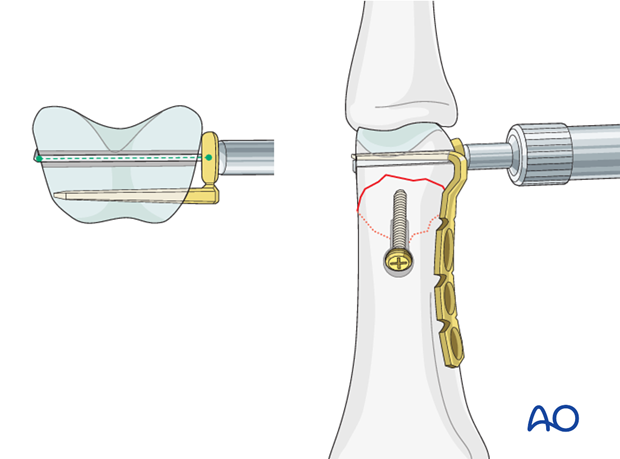
Pearl: Cut the blade transversely
If you cut the blade on the flat, it will compress and widen very slightly as it is cut. This makes its maximal width very slightly larger than 1.5 mm. It may not fit in the 1.5 mm hole that you have drilled.
Therefore, cut the blade on edge (to deform it through its narrower dimension) to the correct length. The resultant tip is somewhat arrow-shaped.
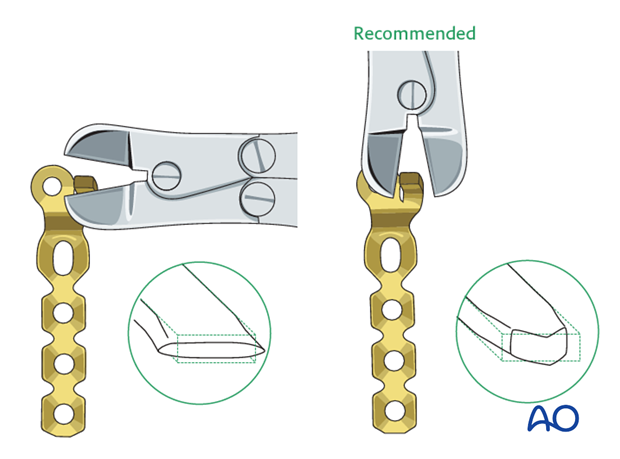
Pitfall: avoid dangerous edge
If you are using a dedicated minicondylar plate cutter which trims the plate by a shearing action, be very careful not to create a sharp dorsal edge that will endanger the extensor apparatus. Correct cutting will produce the sharp edge on the bone side of the plate.
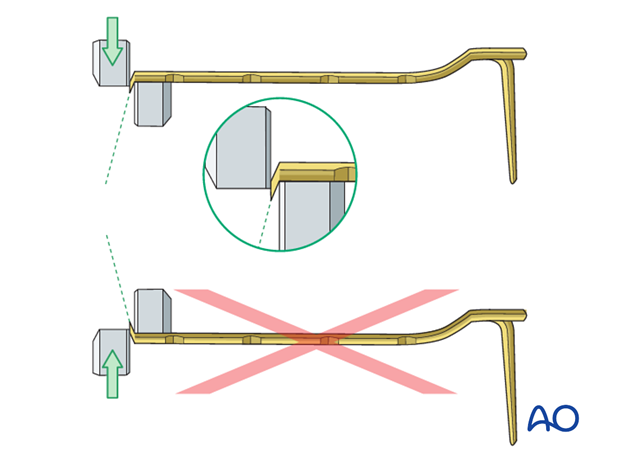
Pitfall: Protrusion of the blade
Avoid protrusion of the blade through the opposite cortex, as friction during movement and eventual ligament injury may result.
Due to the fact that the phalanx is wider on the palmar side that on the dorsal side, an AP or PA x-ray view may suggest that the blade is fully contained within the bone, whereas in transverse section, it actually protrudes.
Contouring of the plate
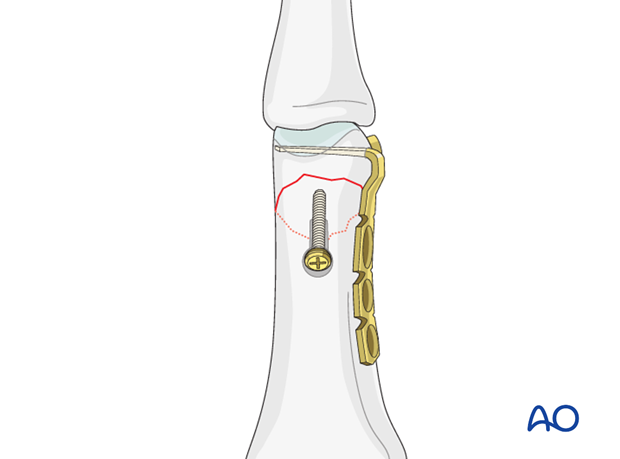
Twist and bend the plate to follow exactly the shape of the phalangeal diaphysis.
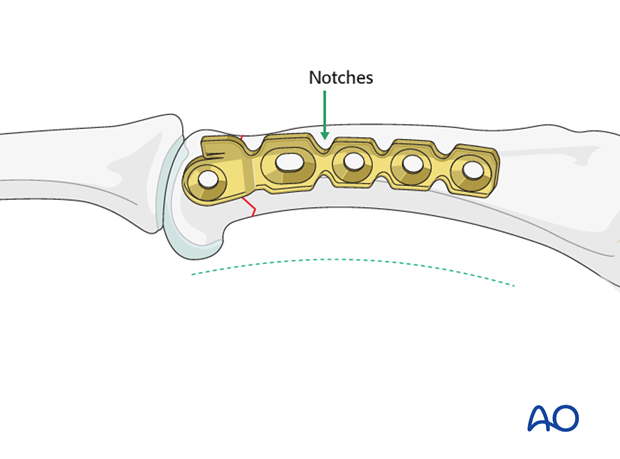
As the minicondylar plate has notches (like a reconstruction plate), it can also be curved on the flat to fit the curve of the phalanx.
Note
It is worth investing time in the precise contouring of the plate to the phalanx. Any imperfection in contouring will result in fracture displacement when the diaphyseal screws are tightened.
6. Drilling
Determine location of drill hole
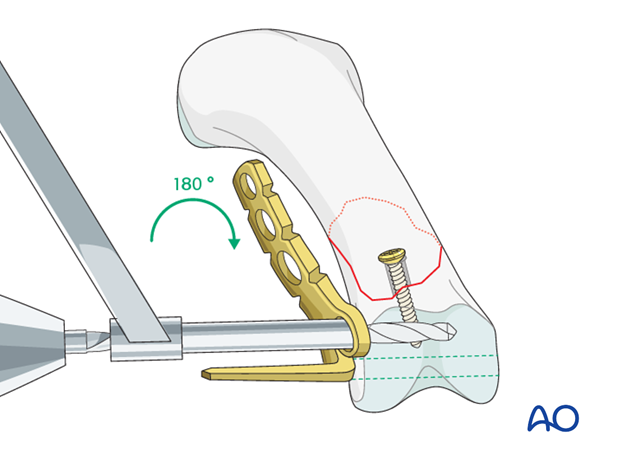
In order to determine the position of the first drill hole (for the blade), it can be very helpful to turn the plate over and use it as a template.
Direct reduction
Drill a 1.5 mm transverse hole through the condylar metaphysis of the proximal phalanx adjacent to the subchondral bone, to create a track for the blade.
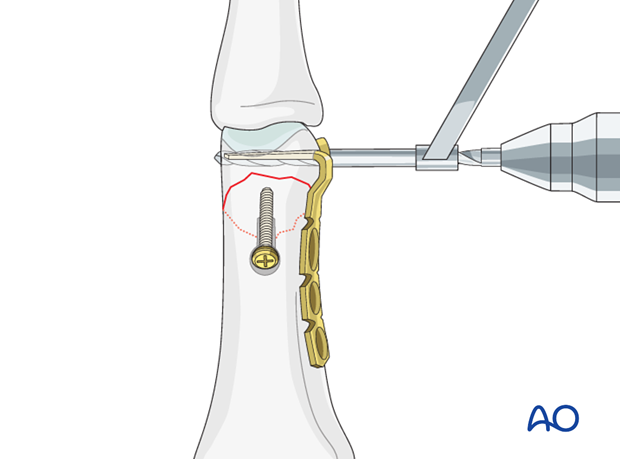
This drill hole needs to be sufficiently dorsal to leave enough space for the plate’s most distal hole, adjacent to the blade.
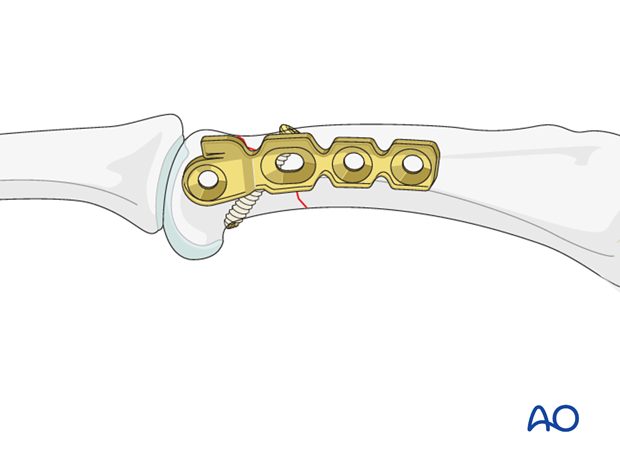
7. Plate application
Apply plate
Introduce the blade into the drill hole. Gently push with the thumb until the plate is fully seated.
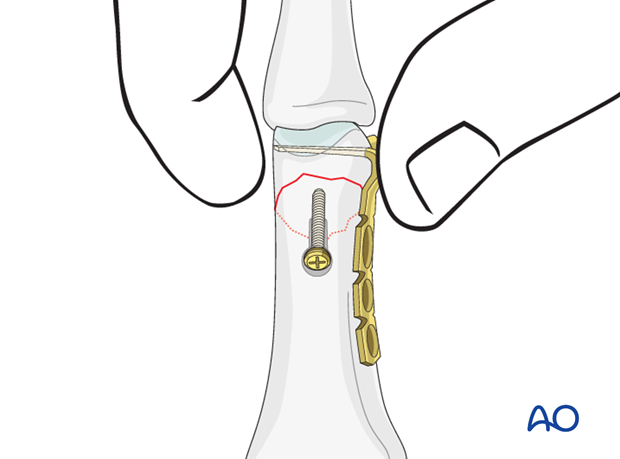
Align the plate with the diaphysis
Before inserting distal screw adjacent to the blade, ensure that the plate is in line with the phalangeal diaphysis in the lateral view by rotating it around the long axis of the blade.
Insert distal screw
The distal screw, adjacent to the blade, is then inserted in a neutral position.
The screw should just engage the far cortex.
Note
Be careful to avoid screw protrusion, as ligament injury may result from friction during movement.
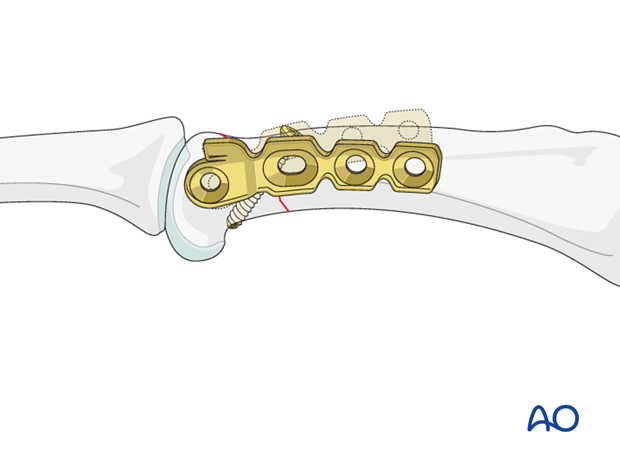
Drill neutral proximal hole
Use a 1.1 mm drill bit to prepare a neutral thread hole for the first screw at the proximal end of the plate.
To improve stability, drill this hole at a slightly divergent angle.
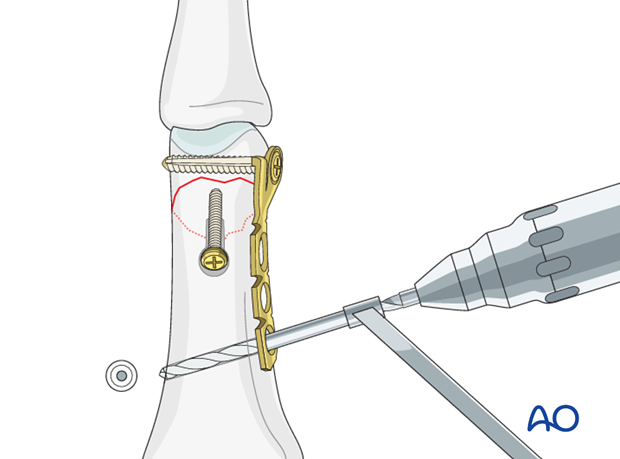
Insert remaining screws
Insert the proximal screw and tighten it.
Prepare for a second diaphyseal screw in a similar way to the first, and insert it.
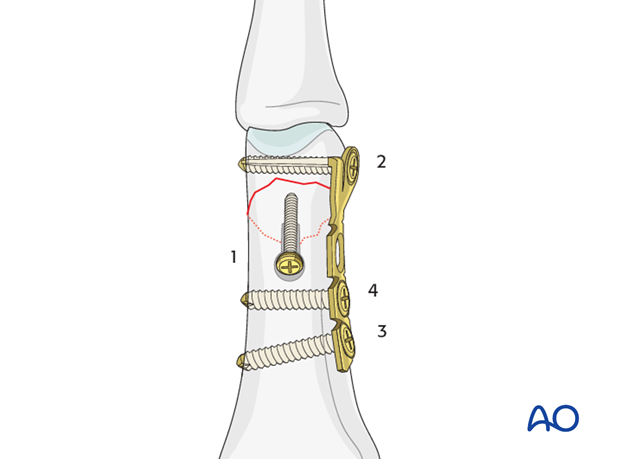
8. Aftertreatment
Postoperatively
Protect the digit with buddy strapping to the adjacent finger, to neutralize lateral forces on the finger.
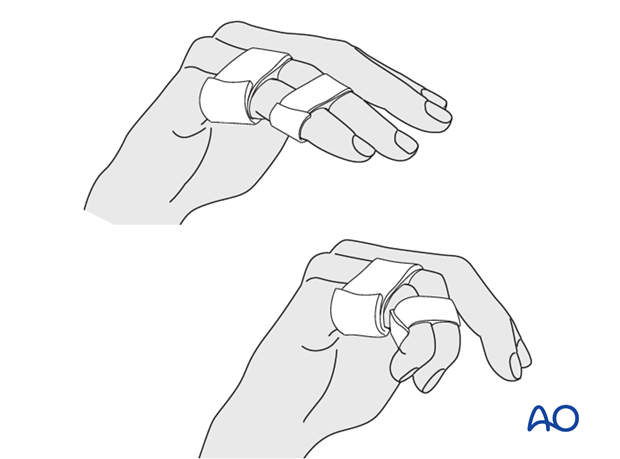
While the patient is in bed, use pillows to keep the hand elevated above the level of the heart to reduce swelling.
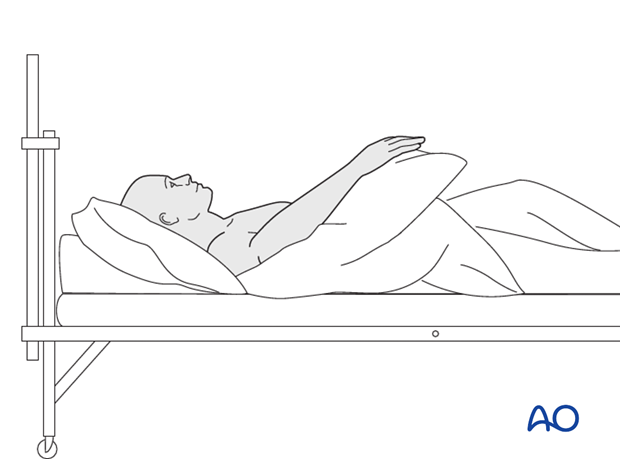
Functional exercises
The patient can begin active motion (flexion and extension) immediately after surgery.
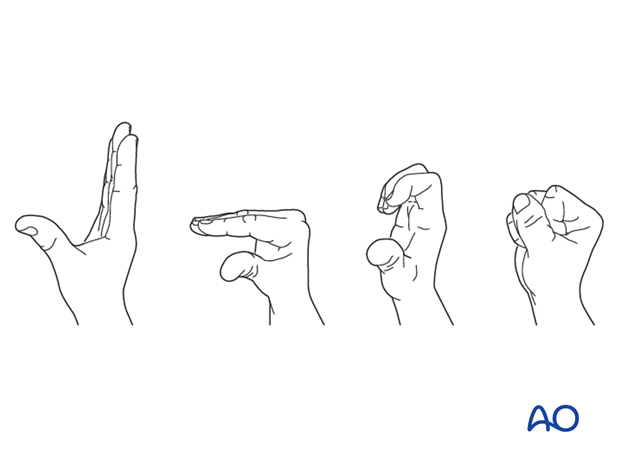
For ambulant patients, put the arm in a sling and elevate to heart level.
Instruct the patient to lift the hand regularly overhead, in order to mobilize the shoulder and elbow joints.

Follow-up
See the patient 5 days and 10 days after surgery.
Implant removal
The implants may need to be removed in cases of soft-tissue irritation.
In case of joint stiffness, or tendon adhesion’s restricting finger movement, tenolysis, or arthrolysis become necessary. In these circumstances, take the opportunity to remove the implants.
