ORIF - Screw or suture fixation
1. Principles
Shoulder pain and impingement are common with significant prominence of the greater tuberosity. Displacement of greater than 5 mm is currently recommended as the main indication for reduction and fixation.
The biceps tendon may be incarcerated in the fracture.
2. Patient preparation and approaches
Patient preparation
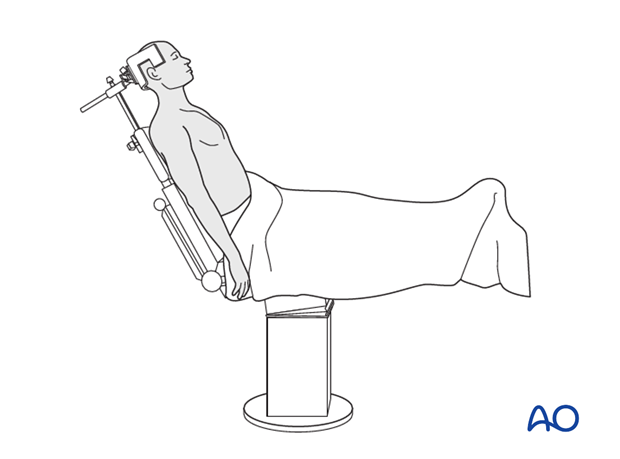
It is recommended to perform this procedure with the patient in a beach chair position (with the supine position as alternative).
Approaches
Choose the approach that is closest to the patient's tuberosity fracture:
3. Reduction and preliminary fixation of the greater tuberosity
Stay sutures
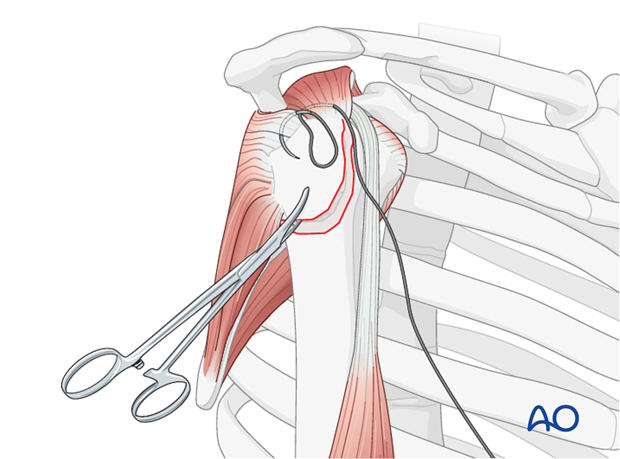
Insert stay sutures through the supraspinatus, and if necessary, the infraspinatus tendon.
Cleaning the fracture bed
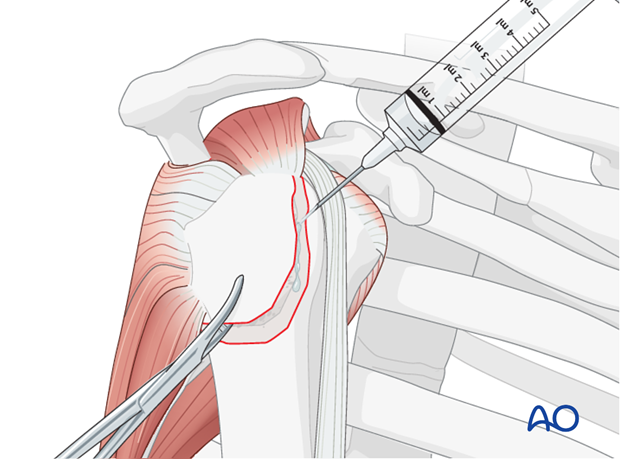
Clean the fracture bed and remove any hematoma. Prepare the margin of the fracture by removing or reflecting the periosteum, 2 or 3 mm back from the fracture line.
Reduction
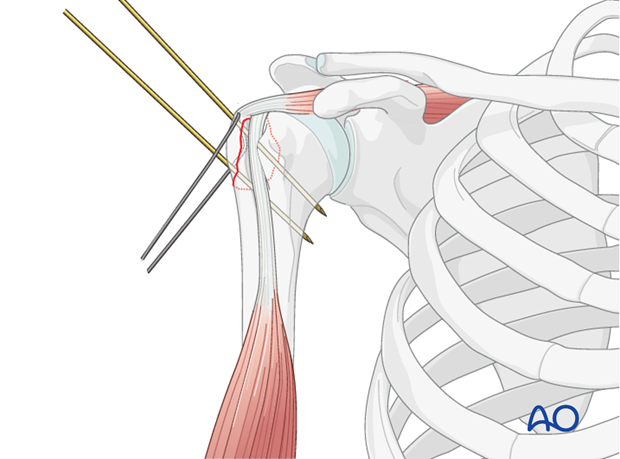
Reduce the greater tuberosity properly by pulling on the stay suture(s). Be careful not to fragment the tuberosity with bone holding clamps.
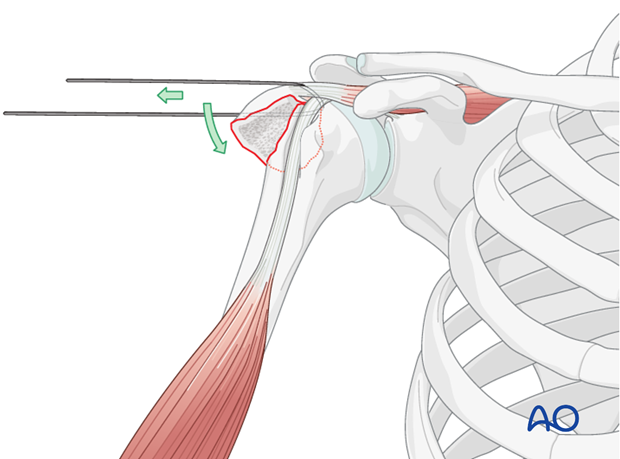
Once the fragment is at the correct level, rotate the arm so that the fragment can fit anatomically into the bony defect.
Preliminary fixation
Temporarily secure the reduction with 1 or 2 K-wires.
4. Fixation
General considerations
There are several techniques to fix the greater tuberosity. The choice depends on
- Size of the fragment
- Bone quality (osteoporosis)
- Degree of fragmentation
Techniques include:
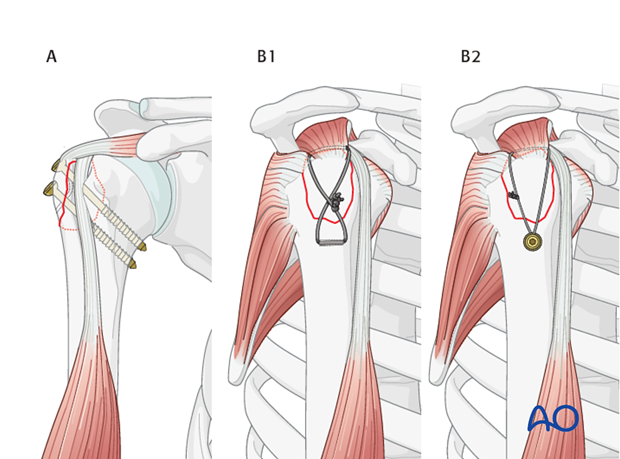
A) Screw fixation (cannulated or standard screws; with or without washers)
This is mainly indicated for single large fragment with good bone quality.
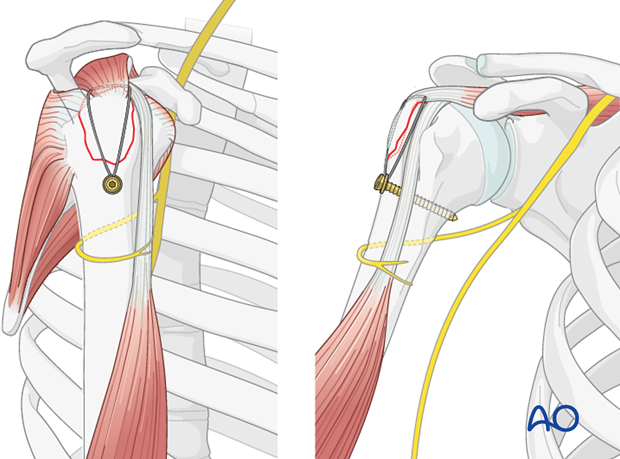
B) Neutralization sutures are more secure for patients with osteoporosis or comminution because they can be placed through tendon insertion sites, which may be stronger than the bone itself. The sutures can be placed in patterns that are optimal for stabilizing comminuted fractures.
Distal anchorage of neutralization sutures can be through an anterior to posterior drill hole in the humerus (B1), to screws (B2), through suture anchors, or through the lateral cortex of the humerus just distal to the fracture site. Combinations of these techniques are possible.
This form of fixation was referred to as a “Tension band suture fixation”. We now prefer the term “Neutralization sutures” because the tension band mechanism cannot be applied consistently to each component of the fracture fixation. An explanation of the limits of the Tension band mechanism/principle can be found here.
Lag screw
Insert a 3.5 mm lag screw. The lag screw should engage the medial cortex, distal to the articular surface. Cannulated screws may also be used.
Note: washers may make the screw heads more prominent and may result in shoulder impingement. Washers may be less problematic with more distally placed screws.
Check the fixation under image intensifier control.
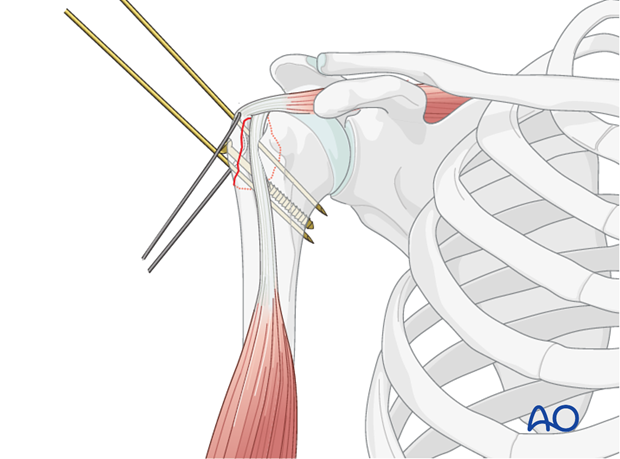
If possible, insert a second lag screw in order to achieve rotational stability.
Note: make sure to avoid the axillary nerve by placing the second screw rather proximal.
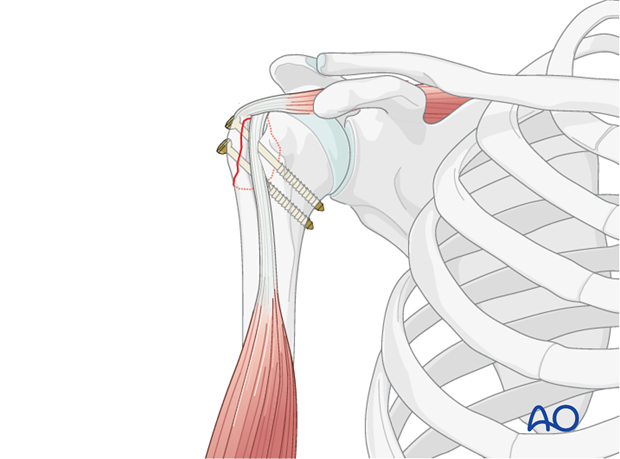
Once the lag screw(s) are inserted, the K-wire(s) used for temporary fixation, and any stay sutures, should be removed.
Neutralization suture
The most secure anchorage for a neutralization suture is in the rotator cuff tendon, just before it inserts into the bone. Pass the needle parallel to the bone, picking up a good bite of tendon. In osteoporotic patients, these sutures are stronger than when placed through the bone.
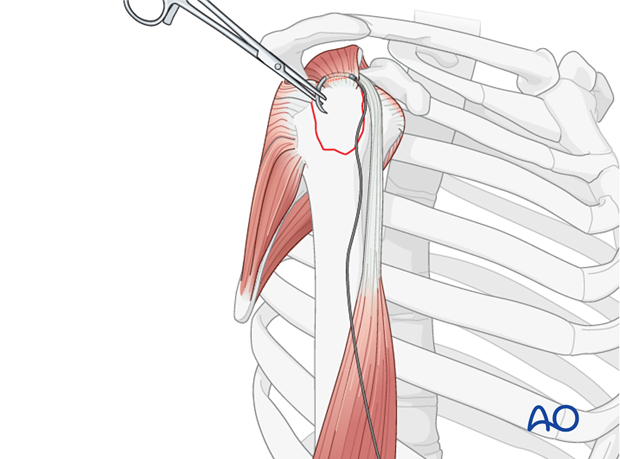
Distal anchorage – drill hole
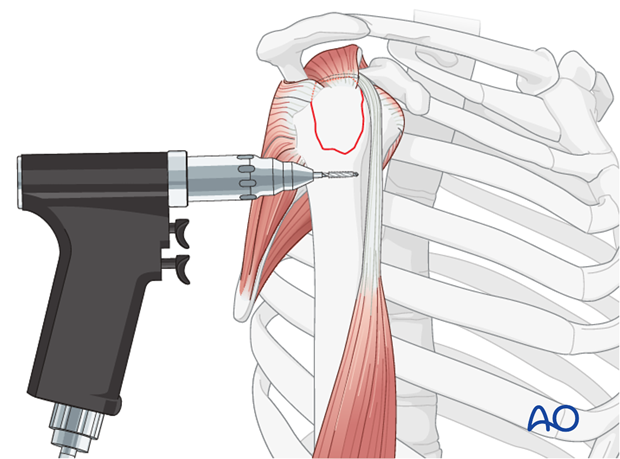
Distal anchorage can be done through a drill hole, typically horizontal.
Use a 2.0 mm drill bit to prepare the drill hole and a suture passer as needed.
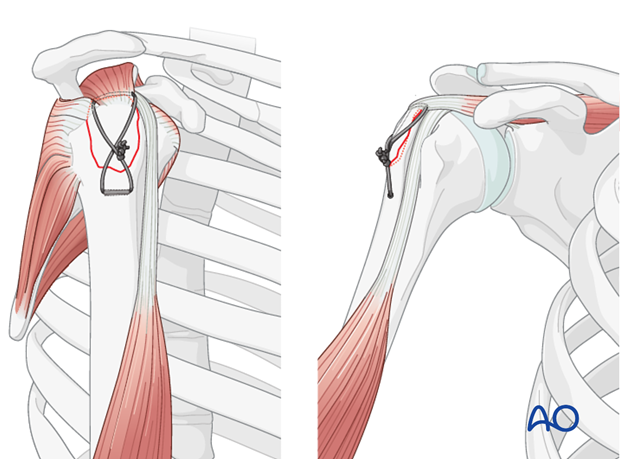
The suture is passed, shown here in a figure-of-eight fashion through the bore hole and tied securely. The suture should be passed to stabilized comminution as needed.
Distal anchorage - screw
Pass the suture through a washer and the washer over a cortex screw. The screw is then placed into the neck region.
Note: be aware of the axillary nerve when inserting the screw.
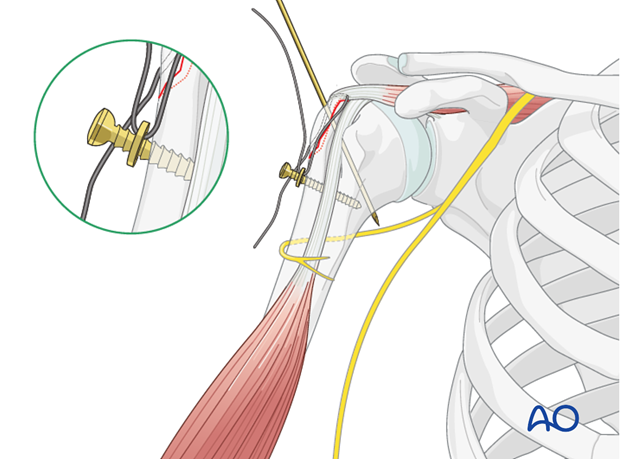
The suture is then tightened and tied.
Using a screw rather than a drill hole for anchoring has the advantage of less space and a smaller approach required.
Alternative: intraosseous sutures
Sutures can be placed through the rotator cuff tendon, and around a small tuberosity fragment, so the suture lies deep to the fragment and over it. Distal suture anchorage is here shown with monocortical drill holes, through the humeral cortex distal to the tuberosity fragment. Several such sutures should be placed to increase stability.
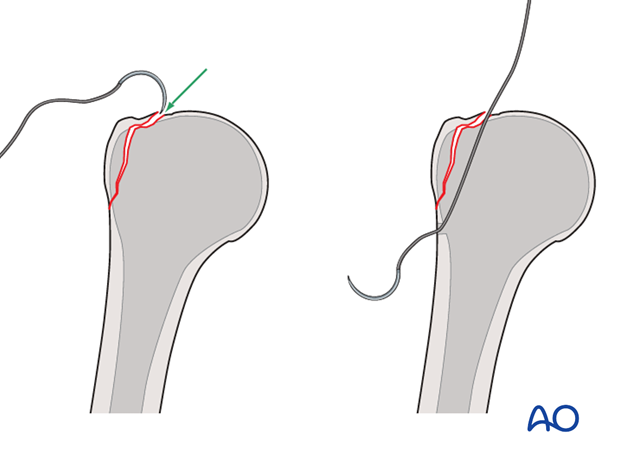
Once the sutures are placed, the tuberosity fragment is reduced and stabilized with K-wires.
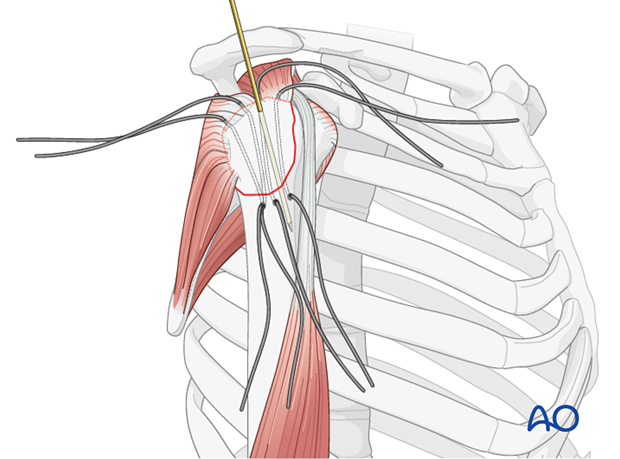
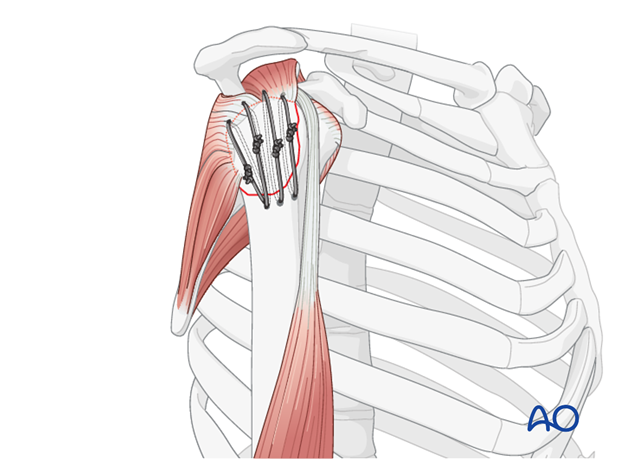
Then, the sutures are tied individually to secure the fragment.
Option: the sutures could be placed as mattress sutures through the tendon proximal to the tuberosity fragment.
Note the monocortical drill holes through which the sutures are anchored distally.
Neutralization suture with proximal suture anchors
Especially in osteoporotic bone and/or multifragmentary tuberosities, additional suture anchors are helpful. If suture anchors are used, they have to be inserted prior to reduction.
The suture anchor is placed directly into the margin of the fracture as close as possible to the articular cartilage.
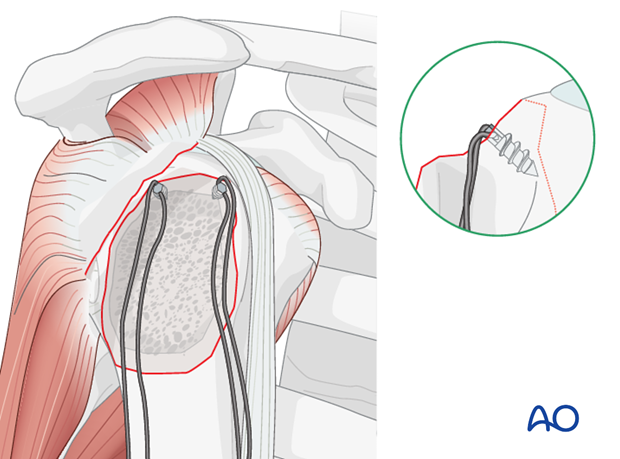
The sutures are then passed through the supraspinatus tendon, close to the medial insertion line of the supraspinatus.
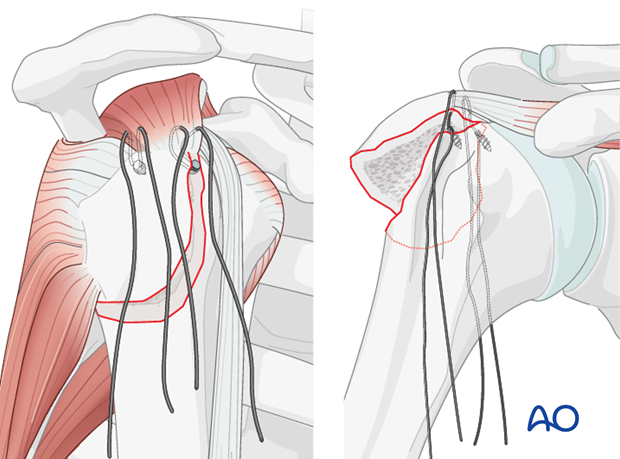
Reduce the greater tuberosity anatomically and secure it temporarily with one or two K-wires. Tighten and tie the sutures of the suture anchors.
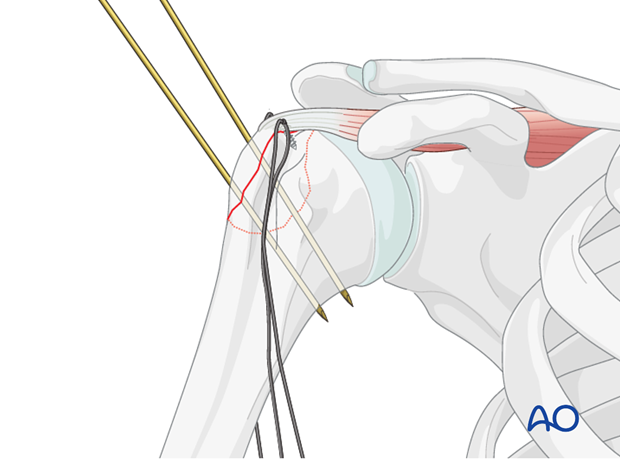
Distal fixation is illustrated here to a screw below the tuberosity fragment as shown previously.
Pass the sutures through the washer of a screw inserted in the metaphyseal region distal to the fragment greater tuberosity to anchor the neutralization suture. Tighten the suture to hold the tuberosity and fragment in place and to counteract the pull of the rotator cuff. Remove the inserted K-wires.
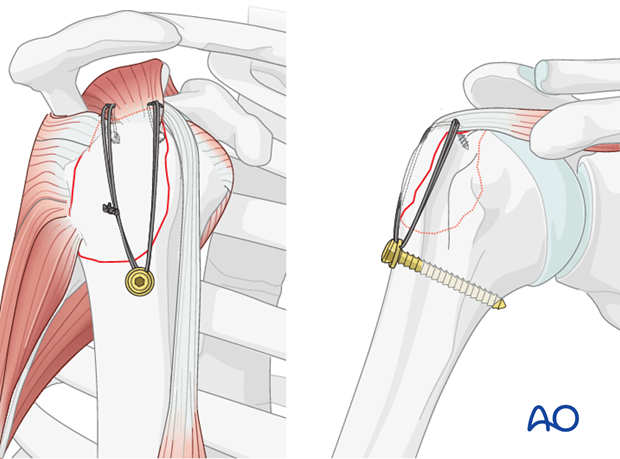
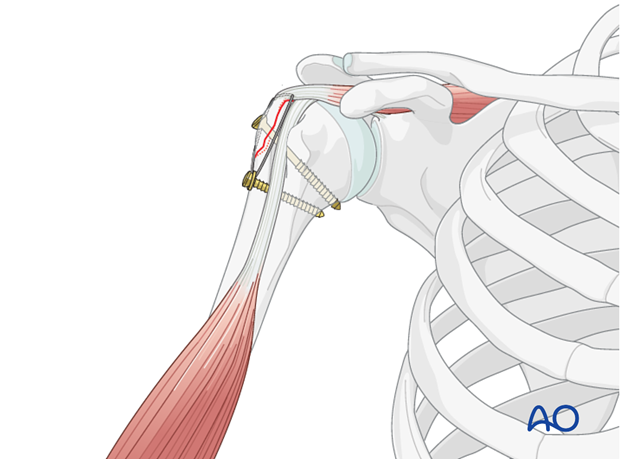
Combination of lag screw fixation and neutralization suturing
The beneficial effect of neutralization suturing can be combined with screw osteosynthesis.
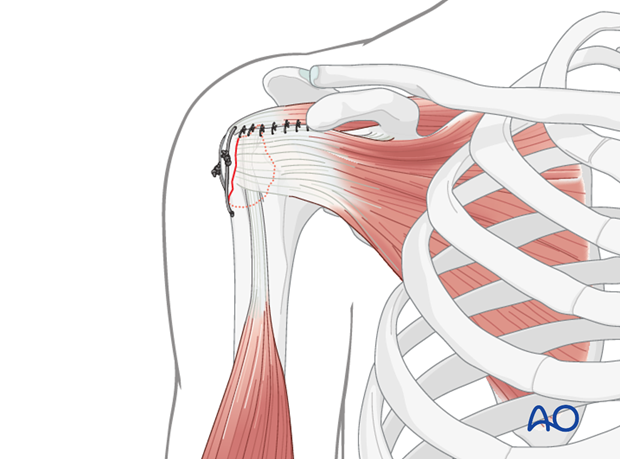
Repair of rotator cuff interval
Place several additional sutures or a running suture to close the lateral portion of the rotator cuff interval between the supraspinatus and subscapularis tendons. Any rotator cuff tear identified should also be repaired.
5. Final check of osteosynthesis
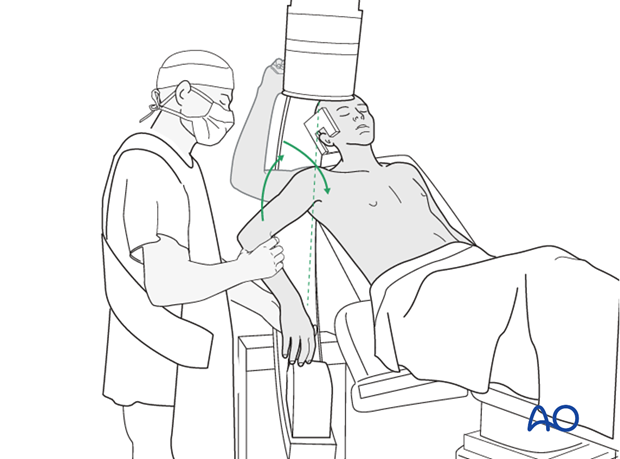
Using image intensification, carefully check for correct reduction and fixation (including proper implant position and length) at various arm positions. Ensure that screw tips are not intraarticular.
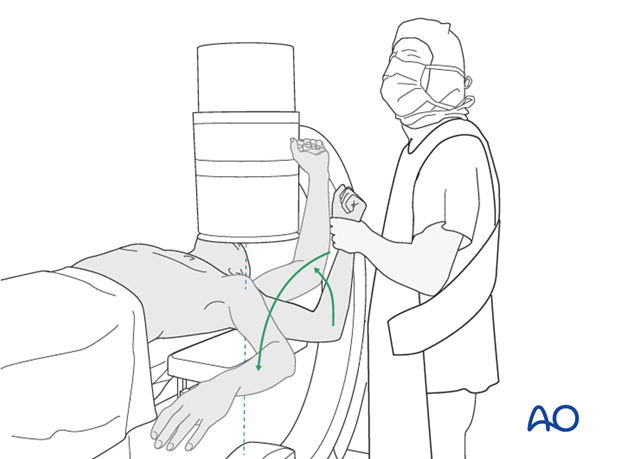
Also obtain an axial view.
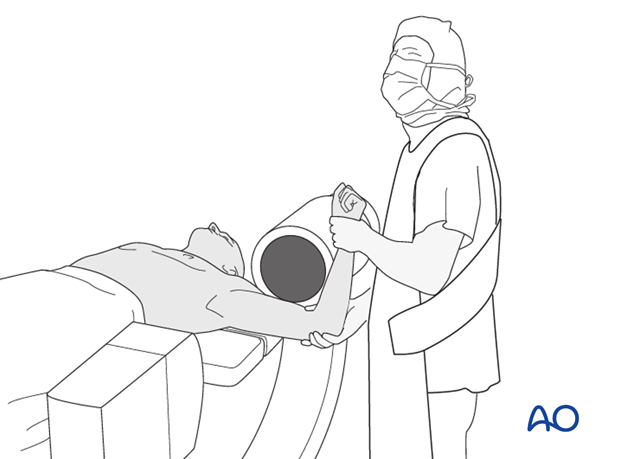
In the beach chair position, the C-arm must be directed appropriately for orthogonal views. Position arm as necessary to confirm that reduction is satisfactory, fixation is stable, and no screw is in the joint.
6. Overview of rehabilitation
The shoulder is perhaps the most challenging joint to rehabilitate both postoperatively and after conservative treatment. Early passive motion according to pain tolerance can usually be started after the first postoperative day - even following major reconstruction or prosthetic replacement. The program of rehabilitation has to be adjusted to the ability and expectations of the patient and the quality and stability of the repair. Poor purchase of screws in osteoporotic bone, concern about soft-tissue healing (eg tendons or ligaments) or other special conditions (eg percutaneous cannulated screw fixation without tension-absorbing sutures) may enforce delay in beginning passive motion, often performed by a physiotherapist.
The full exercise program progresses to protected active and then self-assisted exercises. The stretching and strengthening phases follow. The ultimate goal is to regain strength and full function.
Postoperative physiotherapy must be carefully supervised. Some surgeons choose to manage their patient’s rehabilitation without a separate therapist, but still recognize the importance of carefully instructing and monitoring their patient’s recovery.
Activities of daily living can generally be resumed while avoiding certain stresses on the shoulder. Mild pain and some restriction of movement should not interfere with this. The more severe the initial displacement of a fracture, and the older the patient, the greater will be the likelihood of some residual loss of motion.
Progress of physiotherapy and callus formation should be monitored regularly. If weakness is greater than expected or fails to improve, the possibility of a nerve injury or a rotator cuff tear must be considered.
With regard to loss of motion, closed manipulation of the joint under anesthesia, may be indicated, once healing is sufficiently advanced. However, the danger of fixation loosening, or of a new fracture, especially in elderly patients, should be kept in mind. Arthroscopic lysis of adhesions or even open release and manipulation may be considered under certain circumstances, especially in younger individuals.
Progressive exercises
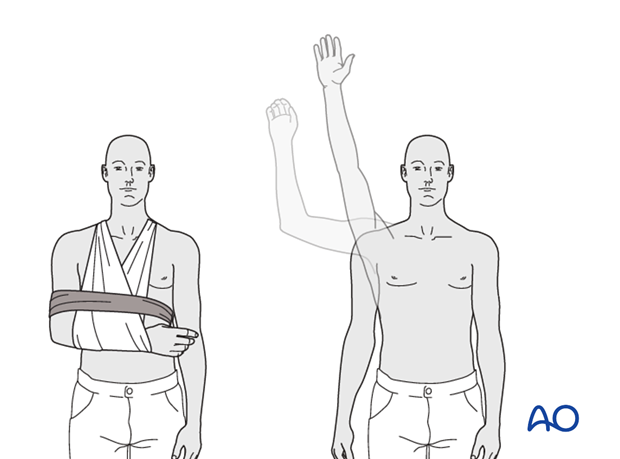
Mechanical support should be provided until the patient is sufficiently comfortable to begin shoulder use, and/or the fracture is sufficiently consolidated that displacement is unlikely.
Once these goals have been achieved, rehabilitative exercises can begin to restore range of motion, strength, and function.
The three phases of nonoperative treatment are thus:
- Immobilization
- Passive/assisted range of motion
- Progressive resistance exercises
Immobilization should be maintained as short as possible and as long as necessary. Usually, immobilization is recommended for 2-3 weeks, followed by gentle range of motion exercises. Resistance exercises can generally be started at 6 weeks. Isometric exercises may begin earlier, depending upon the injury and its repair. If greater or lesser tuberosity fractures have been repaired, it is important not to stress the rotator cuff muscles until the tendon insertions are securely healed.
Special considerations
Glenohumeral dislocation: Use of a sling or sling-and-swath device, at least intermittently, is more comfortable for patients who have had an associated glenohumeral dislocation. Particularly during sleep, this may help avoid a redislocation.
Weight bearing: Neither weight bearing nor heavy lifting are recommended for the injured limb until healing is secure.
Implant removal: Implant removal is generally not necessary unless loosening or impingement occurs. Implant removal can be combined with a shoulder arthrolysis, if necessary.
Shoulder rehabilitation protocol
Generally, shoulder rehabilitation protocols can be divided into three phases. Gentle range of motion can often begin early without stressing fixation or soft-tissue repair. Gentle assisted motion can frequently begin within a few weeks, the exact time and restriction depends on the injury and the patient. Resistance exercises to build strength and endurance should be delayed until bone and soft-tissue healing is secure. The schedule may need to be adjusted for each patient.
Phase 1 (approximately first 3 weeks)
- Immobilization and/or support for 2-3 weeks
- Pendulum exercises
- Gently assisted motion
- Avoid external rotation for first 6 weeks
Phase 2 (approximately weeks 3-9)
If there is clinical evidence of healing and fragments move as a unit, and no displacement is visible on the x-ray, then:
- Active-assisted forward flexion and abduction
- Gentle functional use week 3-6 (no abduction against resistance)
- Gradually reduce assistance during motion from week 6 on
Phase 3 (approximately after week 9)
- Add isotonic, concentric, and eccentric strengthening exercises
- If there is bone healing but joint stiffness, then add passive stretching by physiotherapist


