MIO - Plate fixation
1. Principles
Introduction
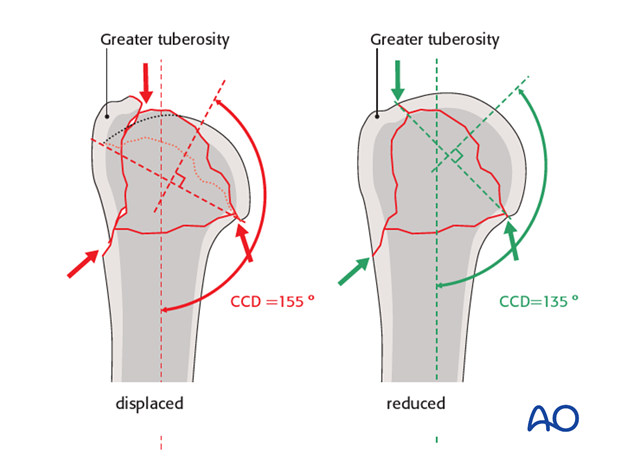
Restoration of normal anatomy, by elevation of the valgus impacted humeral head and correct repositioning of the greater tuberosity, while protecting bony blood supply are the keys to optimal results.
Risk of avascular necrosis
Even minimally displaced anatomic neck fractures have a significant risk of avascular necrosis (AVN) of the humeral head. This risk is increased with extensive surgical exposure for open reduction and plate fixation.
With the blood supply already at risk, closed reduction and minimal internal fixation through very limited approaches is advisable.
Proper reduction
Proper reduction of the major proximal humerus fragments is essential. In particular, the impacted humeral head must be elevated sufficiently, so that the tuberosities can be placed underneath it.
Neutralizing sutures in addition to plate and screws
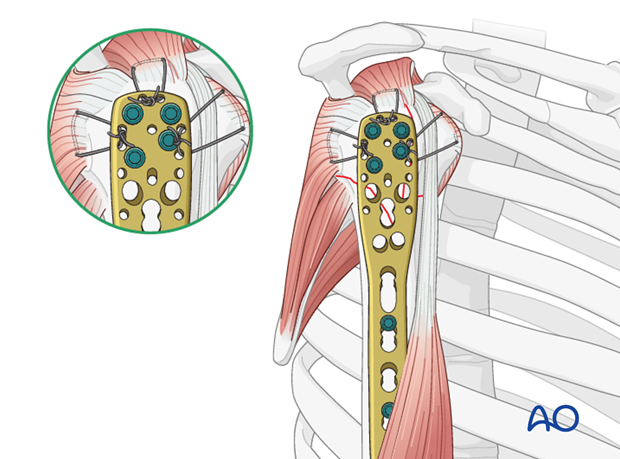
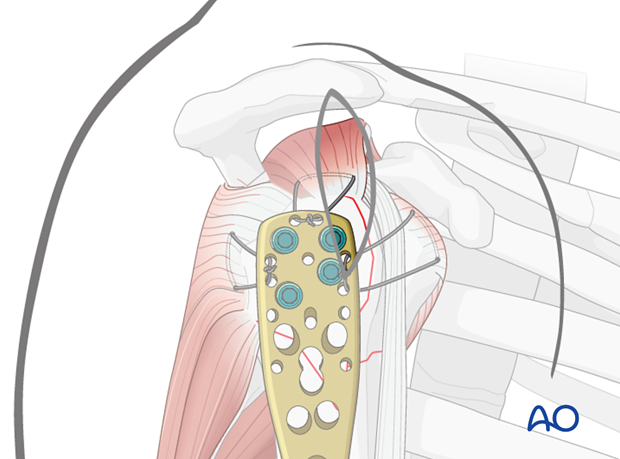
Sutures placed through the insertions of each rotator cuff tendon increase stability, and should be used as well as the plate and screws, particularly for more comminuted and/or osteoporotic fractures. With osteoporotic bone, the tendon insertion is often stronger than the bone itself, so that sutures placed through the insertional fibers of the tendon may hold better than screws or sutures placed through bone.
These additional sutures are typically the last step of fixation.
This form of fixation was referred to as a “Tension band suture fixation”. We now prefer the term “Neutralizing sutures” because the tension band mechanism cannot be applied consistently to each component of the fracture fixation. An explanation of the limits of the Tension band mechanism/principle can be found here.
Angular stable versus standard plates
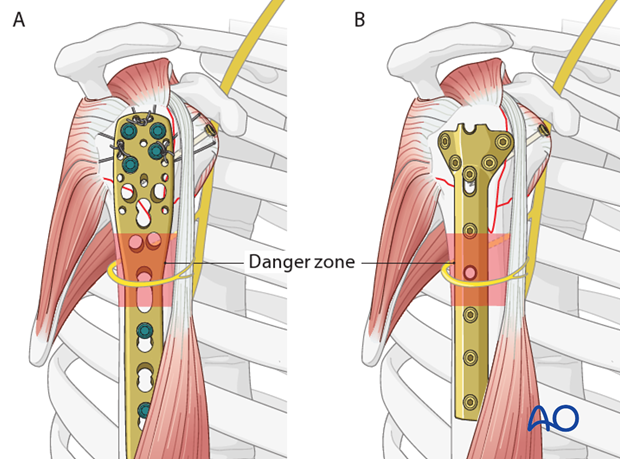
This section describes proximal humeral fracture fixation with an angular stable plate (A). Sometimes, these implants are not available. Standard plates provide an alternative option, for example the modified cloverleaf plate (B). Presently, the specific indications, advantages, and disadvantages of angular stable and standard plates are being clarified. There is some evidence that angular stable plate provide better outcomes. In addition to type and technique of fixation, the quality of reduction, the soft-tissue handling, and the characteristics of the injury and patient significantly influence the results. There is no evidence that the use of angular stable plates will overcome these other factors.
2. Patient preparation and approaches
Patient preparation
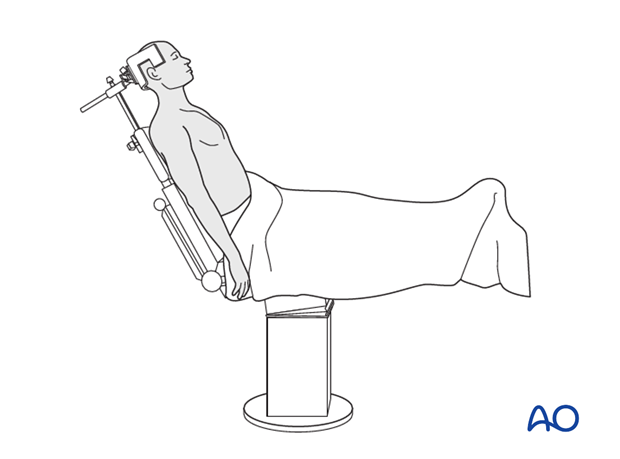
It is recommended to perform this procedure with the patient in a beach chair position.
Approaches
Choose the approach best suited for planned reduction maneuvers or tuberosity fracture location:
3. Reduction and temporary fixation
Manual reduction
These fractures produce separate fragments of the proximal humerus: an epiphyseal (humeral head) fragment and one or both tuberosities in addition to the shaft. Reduction involves repositioning the humeral head, and also restoring the tuberosities to their proper location.
The medial periosteum (medial hinge) is not ruptured. Much of the remaining periosteum (especially laterally) may also be intact
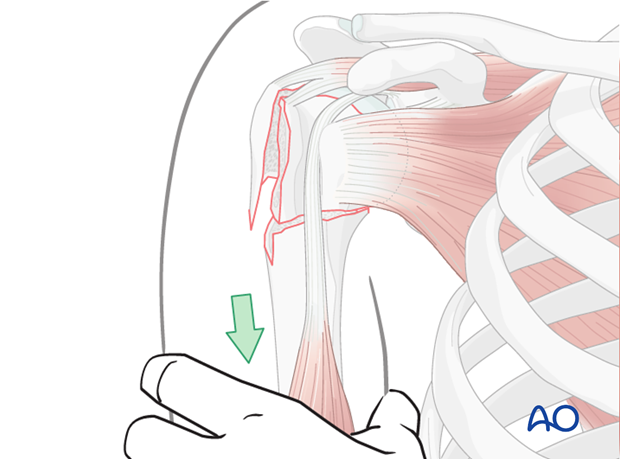
As a first step perform a closed reduction taking advantage of the intact soft-tissue sleeve (as with ligamentotaxis). Frequently, the displaced fragments will snap into position with this maneuver.
Varus forces to correct the valgus impaction, can be exerted by either the surgeon’s hand or a towel bump in the axilla as an additional maneuver.
Periosteal elevator and/or bone hook
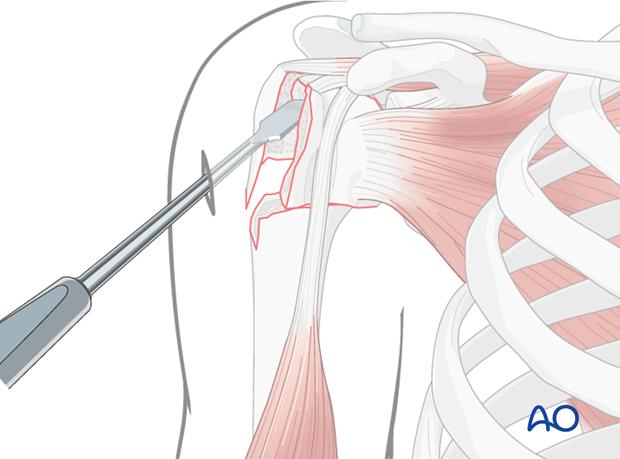
If closed reduction is unsuccessful, minimally invasive open reduction can be attempted through a small transdeltoid incision using appropriate instruments.
Periosteal elevators or punches can be used to disimpact and reposition fracture fragments.
If the reduction is not adequate, a similarly inserted bone hook may aid reduction of the tuberosities.
Protect the axillary nerve on the deep surface of the deltoid muscle, 6 cm below the acromion.
Adequate reduction
Adequate reduction has been achieved if the tuberosities come to lie laterally flush or slightly underneath the elevated humeral head.
Check reduction by image intensification.

Temporary fixation
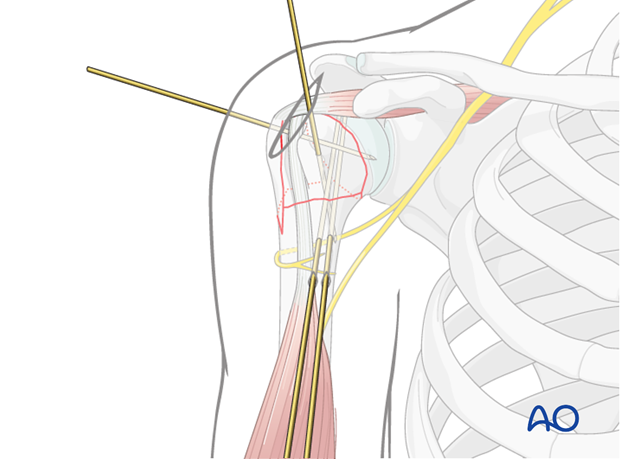
Temporarily fix the tuberosities with K-wires placed outside the intended plate location, as illustrated in this case for a 4-part fracture.
4. Plate position
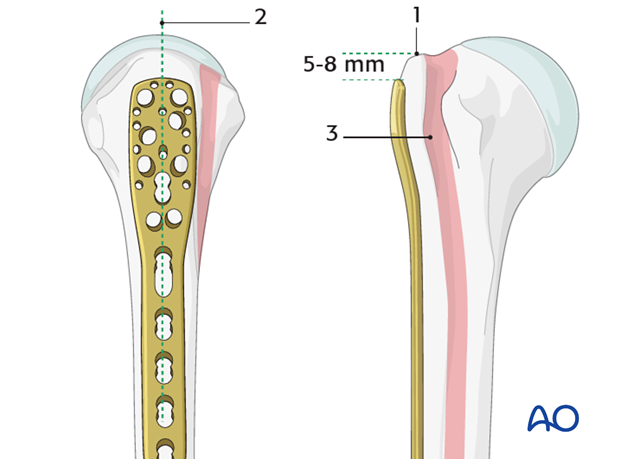
Correct plate position
The correct plate position is:
- about 5-8 mm distal to the top of the greater tuberosity
- aligned properly along the axis of the humeral shaft
- slightly posterior to the bicipital groove (2-4 mm)
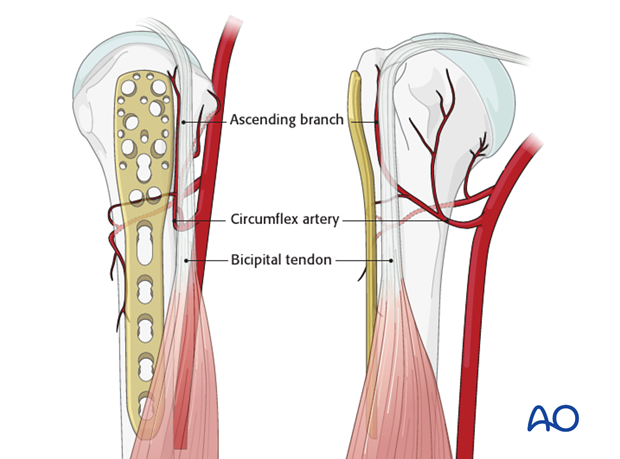
Pitfall 1: plate too close to the bicipital groove
The bicipital tendon and the ascending branch of the anterior humeral circumflex artery are at risk if the plate is positioned too close to the bicipital groove. (The illustration shows the plate in correct position, posterior to the bicipital groove).
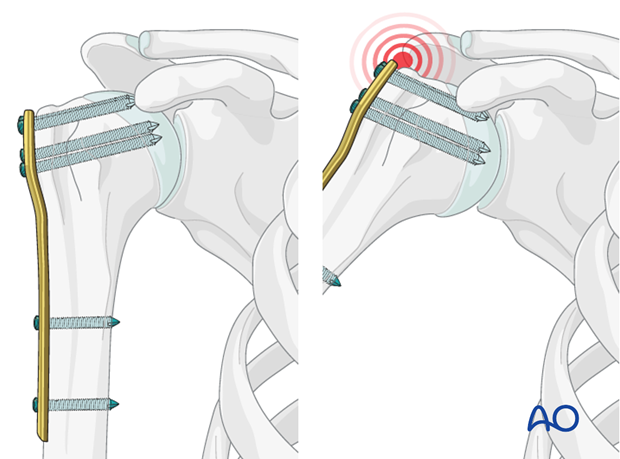
Pitfall 2: plate too proximal
A plate positioned too proximal carries two risks:
- The plate can impinge the acromion
- The most proximal screws might penetrate or fail to securely engage the humeral head
5. Plate fixation
Positioning wires (for plate location)
To ensure appropriate plate position, somewhat obscured by a small incision, it helps to place temporary K-wires that can be used for radiographically controlled guidance.
Insert 2 positioning K-wires, one at the lateral border the bicipital groove and the other at the tip of the greater tuberosity. (These positioning wires can be used for provisional tuberosity fixation.)
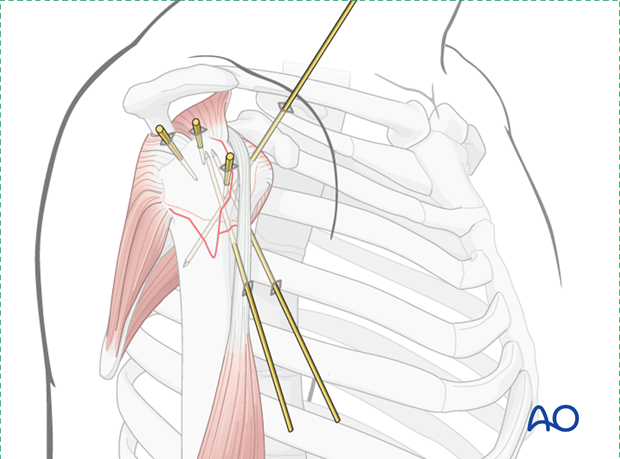
The anterior positioning K-wire sets the location for the anterior edge of the plate, 2-4 mm lateral to the bicipital groove.
The proximal positioning K-wire determines the proximal edge of the plate, 5-8 mm distal to the tip of the greater tuberosity.

Insert plate
Identify the axillary nerve by palpating on the undersurface of the deltoid muscle. This helps protect it during plate insertion.
Insert the plate, assembled on an aiming device, under the deltoid muscle, and slide it distally under the deltoid and along the humerus. Always keep the plate in contact with bone.
Pearl: suturing the deltoid muscle To prevent extending the deltoid muscle split and increasing risk of axillary nerve injury, place a suture at the distal end of the split.
Attach plate to humerus
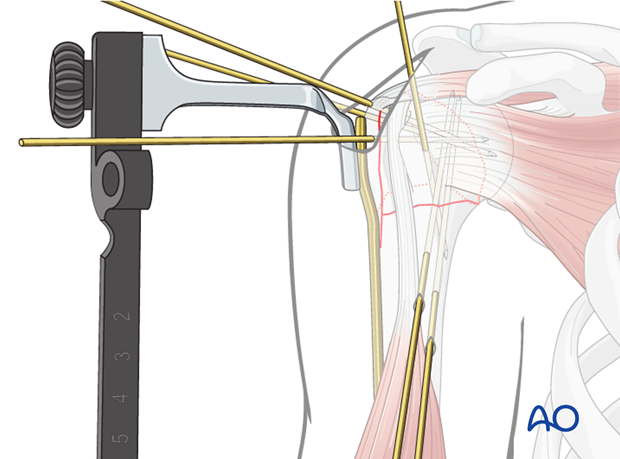
Position the plate in the planned and marked location on the proximal humerus. Fix it temporarily to the bone with K-wires. Proximally, two wires are placed through specific holes in the aiming device. Distally, use a percutaneously placed K-wire sleeve.
Confirm correct plate position with x-ray.
Fix plate to the humeral head
Drill holes
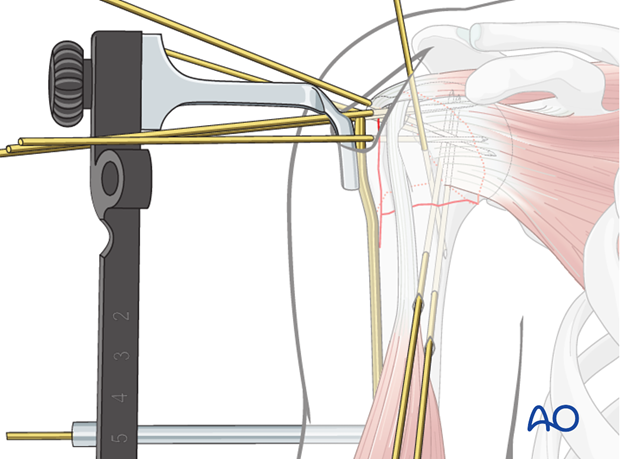
Use an appropriate sleeve to drill holes for the humeral head screws. Do not drill through the subchondral bone and into the shoulder joint.
It may be necessary to remove one or more of the K-wires to make room for screws. Place first screws that are unobstructed and help stabilize the fracture.
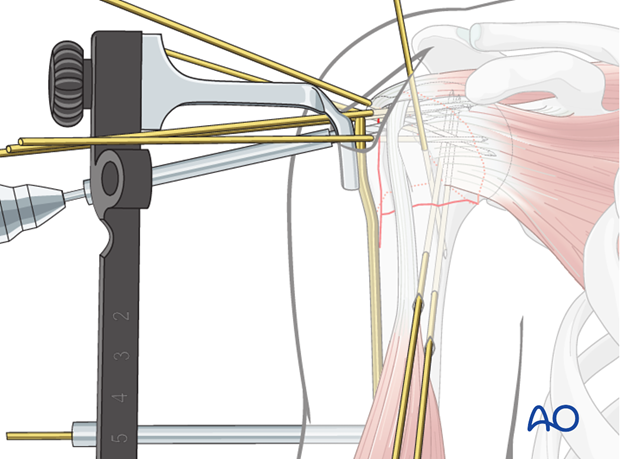
Use percutaneous drilling and screw insertion sleeves to fix the plate to the humerus.
Avoiding intraarticular screw placement
Screws that penetrate the humeral head may significantly damage the glenoid cartilage. Primary penetration occurs when the screws are initially placed. Secondary penetration is the result of subsequent fracture collapse. Drilling into the joint increases the risk of screws becoming intraarticular.
Two drilling techniques help to avoid drilling into the joint.
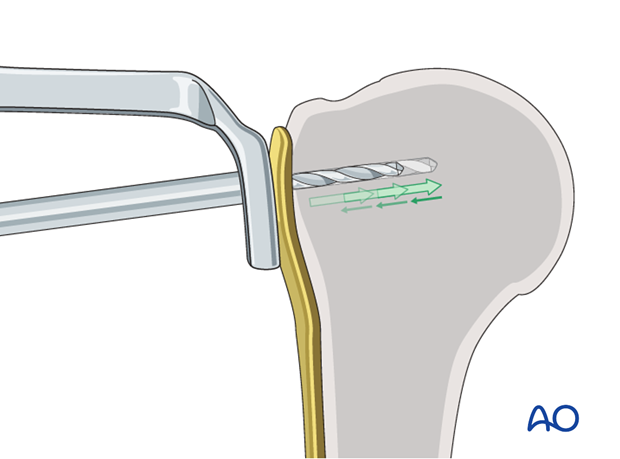
Pearl 1: “Woodpecker”-drilling technique (as illustrated)
In the woodpecker-drilling technique, advance the drill bit only for a short distance, then pull the drill back before advancing again. Keep repeating this procedure until subchondral bone contact can be felt. Take great care to avoid penetration of the humeral head.
Pearl 2: Drilling near cortex only
Particular in osteoporotic bone, one can drill only through the near cortex. Push the depth gauge through the remaining bone until subchondral resistance is felt.
Determine screw length
The intact subchondral bone should be felt with a depth gauge or blunt pin to ensure that the screw stays within the humeral head. The integrity of the subchondral bone can be confirmed by palpation or the sound of the instrument tapping against it. Typically, choose a screw slightly shorter than the measured length.
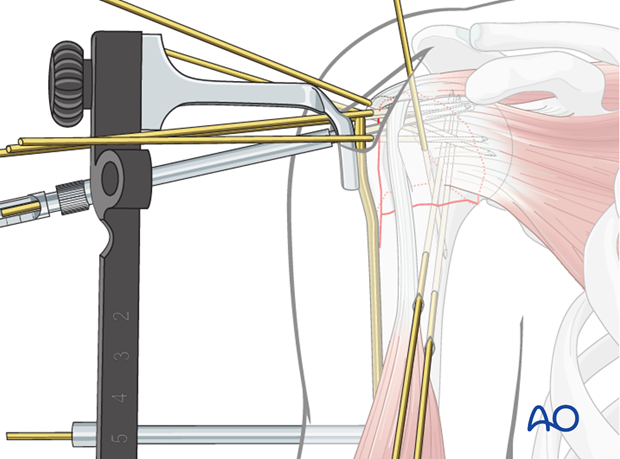
Insert screw
Insert a locking-head screw through the screw sleeve into the humeral head. The sleeve aims the screw correctly. Particularly in osteoporotic bone, a screw may not follow the hole that has been drilled.
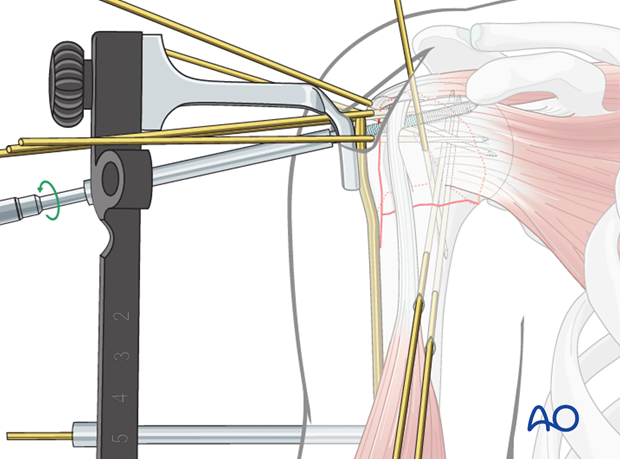
Number of screws and location
Place a sufficient number of screws (often 5) into the humeral head. The optimal number and location of screws has not been determined. Bone quality and fracture morphology should be considered. In osteoporotic bone a higher number of screws may be required.
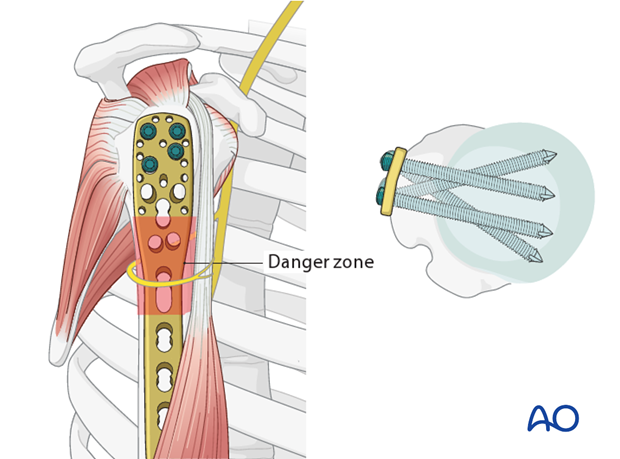
Remember the plate lies deep to the axillary nerve. Screws should not be place through the danger zone where the nerve may be injured.
Lesser tuberosity fixation
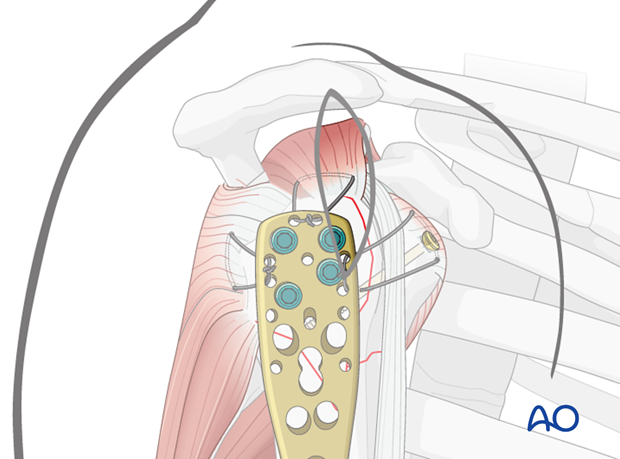
If the lesser tuberosity is involved, lag screw fixation might be considered. Alternatively, neutralizing sutures may be placed through the rotator cuff insertions.
Check the stability of the lesser tuberosity fixation by rotating the arm. If there is any micro movement visible or palpable consider additional fixation, which is typically placed after the rest of the fixation.
Insert screws into humeral shaft
Insert two to three screws into the humeral shaft, below the danger zone, with aiming device and appropriate, percutaneously placed screw insertion sleeves.
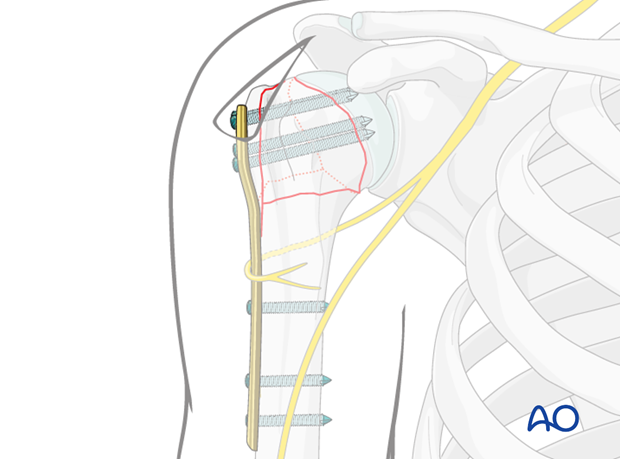
Neutralizing sutures in addition to plate and screws
Supplementary rotator cuff tendon sutures provide additional stability. Varying the arm position helps to place them through such a small incision. The sutures should be inserted close to the bony insertion sites of subscapularis, supraspinatus, and infraspinatus tendons. They are tied to the plate to resist muscle forces and improve plate anchorage.
6. Final check of osteosynthesis
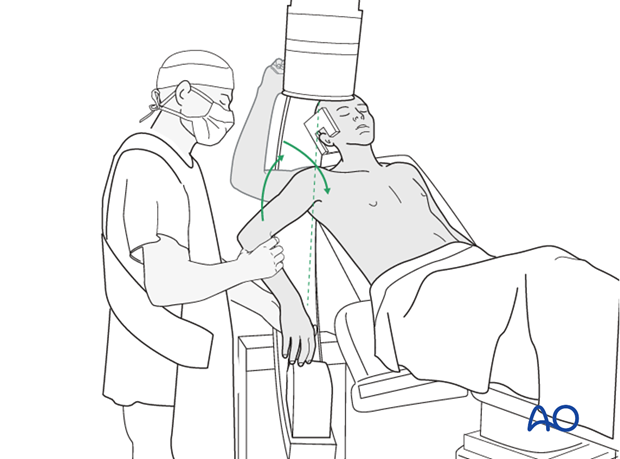
Using image intensification, carefully check for correct reduction and fixation (including proper implant position and length) at various arm positions. Ensure that screw tips are not intraarticular.
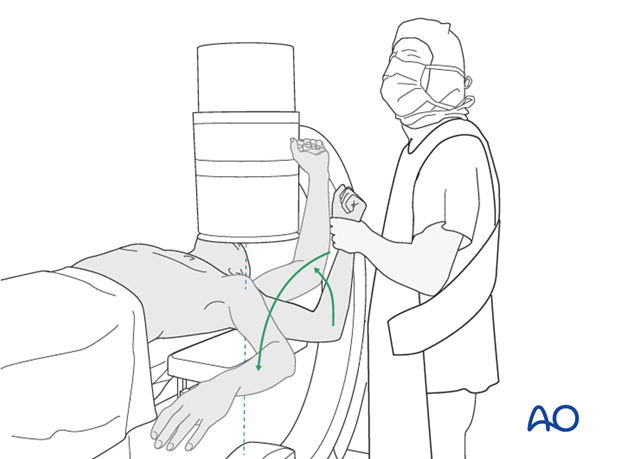
Also obtain an axial view.
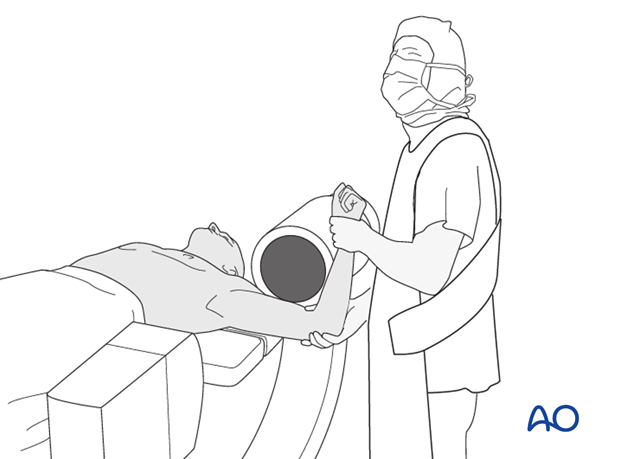
In the beach chair position, the C-arm must be directed appropriately for orthogonal views. Position arm as necessary to confirm that reduction is satisfactory, fixation is stable, and no screw is in the joint.
7. Overview of rehabilitation
The shoulder is perhaps the most challenging joint to rehabilitate both postoperatively and after conservative treatment. Early passive motion according to pain tolerance can usually be started after the first postoperative day - even following major reconstruction or prosthetic replacement. The program of rehabilitation has to be adjusted to the ability and expectations of the patient and the quality and stability of the repair. Poor purchase of screws in osteoporotic bone, concern about soft-tissue healing (eg tendons or ligaments) or other special conditions (eg percutaneous cannulated screw fixation without tension-absorbing sutures) may enforce delay in beginning passive motion, often performed by a physiotherapist.
The full exercise program progresses to protected active and then self-assisted exercises. The stretching and strengthening phases follow. The ultimate goal is to regain strength and full function.
Postoperative physiotherapy must be carefully supervised. Some surgeons choose to manage their patient’s rehabilitation without a separate therapist, but still recognize the importance of carefully instructing and monitoring their patient’s recovery.
Activities of daily living can generally be resumed while avoiding certain stresses on the shoulder. Mild pain and some restriction of movement should not interfere with this. The more severe the initial displacement of a fracture, and the older the patient, the greater will be the likelihood of some residual loss of motion.
Progress of physiotherapy and callus formation should be monitored regularly. If weakness is greater than expected or fails to improve, the possibility of a nerve injury or a rotator cuff tear must be considered.
With regard to loss of motion, closed manipulation of the joint under anesthesia, may be indicated, once healing is sufficiently advanced. However, the danger of fixation loosening, or of a new fracture, especially in elderly patients, should be kept in mind. Arthroscopic lysis of adhesions or even open release and manipulation may be considered under certain circumstances, especially in younger individuals.
Progressive exercises
Mechanical support should be provided until the patient is sufficiently comfortable to begin shoulder use, and/or the fracture is sufficiently consolidated that displacement is unlikely.
Once these goals have been achieved, rehabilitative exercises can begin to restore range of motion, strength, and function.
The three phases of nonoperative treatment are thus:
- Immobilization
- Passive/assisted range of motion
- Progressive resistance exercises
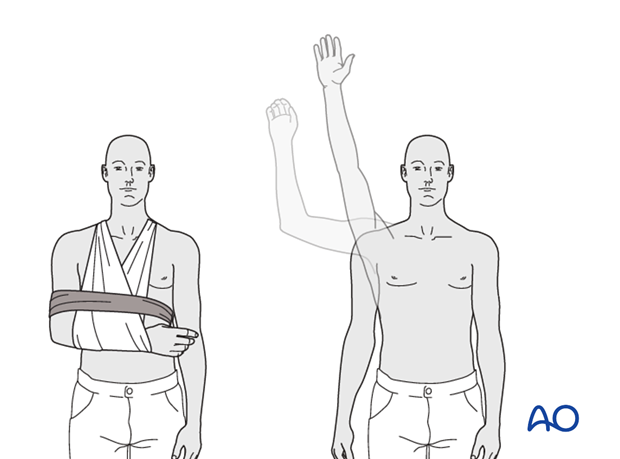
Immobilization should be maintained as short as possible and as long as necessary. Usually, immobilization is recommended for 2-3 weeks, followed by gentle range of motion exercises. Resistance exercises can generally be started at 6 weeks. Isometric exercises may begin earlier, depending upon the injury and its repair. If greater or lesser tuberosity fractures have been repaired, it is important not to stress the rotator cuff muscles until the tendon insertions are securely healed.
Special considerations
Glenohumeral dislocation: Use of a sling or sling-and-swath device, at least intermittently, is more comfortable for patients who have had an associated glenohumeral dislocation. Particularly during sleep, this may help avoid a redislocation.
Weight bearing: Neither weight bearing nor heavy lifting are recommended for the injured limb until healing is secure.
Implant removal: Implant removal is generally not necessary unless loosening or impingement occurs. Implant removal can be combined with a shoulder arthrolysis, if necessary.
Shoulder rehabilitation protocol
Generally, shoulder rehabilitation protocols can be divided into three phases. Gentle range of motion can often begin early without stressing fixation or soft-tissue repair. Gentle assisted motion can frequently begin within a few weeks, the exact time and restriction depends on the injury and the patient. Resistance exercises to build strength and endurance should be delayed until bone and soft-tissue healing is secure. The schedule may need to be adjusted for each patient.
Phase 1 (approximately first 3 weeks)
- Immobilization and/or support for 2-3 weeks
- Pendulum exercises
- Gently assisted motion
- Avoid external rotation for first 6 weeks
Phase 2 (approximately weeks 3-9)
If there is clinical evidence of healing and fragments move as a unit, and no displacement is visible on the x-ray, then:
- Active-assisted forward flexion and abduction
- Gentle functional use week 3-6 (no abduction against resistance)
- Gradually reduce assistance during motion from week 6 on
Phase 3 (approximately after week 9)
- Add isotonic, concentric, and eccentric strengthening exercises
- If there is bone healing but joint stiffness, then add passive stretching by physiotherapist
