Cerclage compression wiring
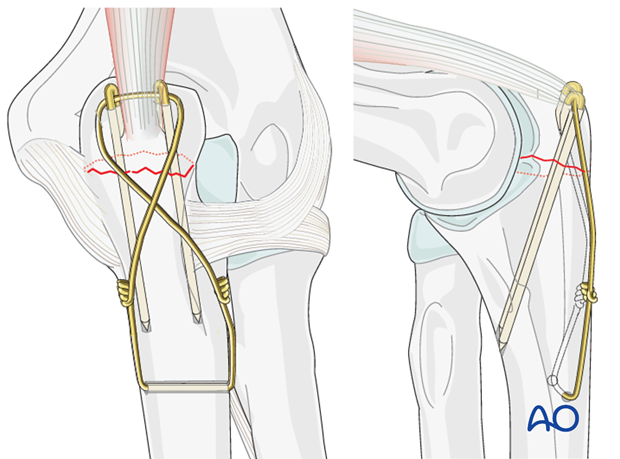
The philosophy behind cerclage compression wiring for the olecranon is that it converts tensile forces on the posterior side of the olecranon into compression forces at the joint line during flexion. The fixation is simple and inexpensive and works well if executed properly.
Choose a wire of sufficient strength to withstand the tensile forces generated in the figure-of-eight loop (1.2 mm/18 gauge). Positioning the K-wires as close to the joint while also penetrating the volar cortex is paramount.
Note: “Cerclage compression wiring” was referred to as “Tension band wiring”. We now prefer the term “Cerclage compression wiring” because the tension band mechanism cannot be applied consistently to each component of the fracture fixation. An explanation of the limits of the Tension band mechanism/principle can be found here.
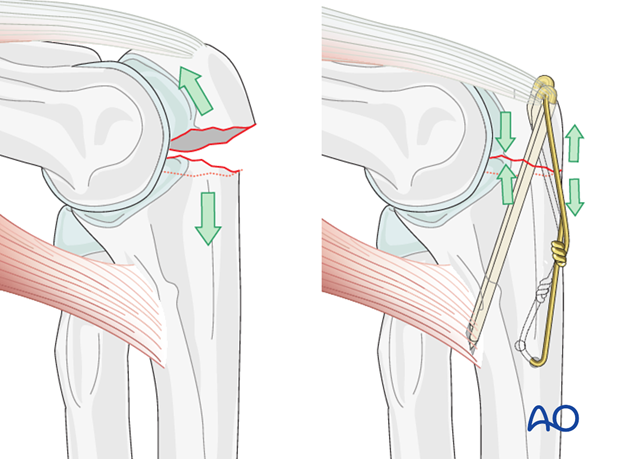
Salvage procedure for very small and comminuted fragments
Depending on the size of the proximal bone fragment and bone quality, it can either be excised and the tendon reinserted (if bone quality is poor and the patient is low-demand), or it can be reinserted and stabilized with an additional interfragmentary screw or cerclage compression wiring.
Teaching video
AO teaching video: Ulna, Olecranon—Transverse Fracture (2U1B1) Cerclage compression wiring
1. Positioning and approach
Positioning
This procedure is normally performed with the patient either in a lateral position or in a supine position for posterior access.
Approach
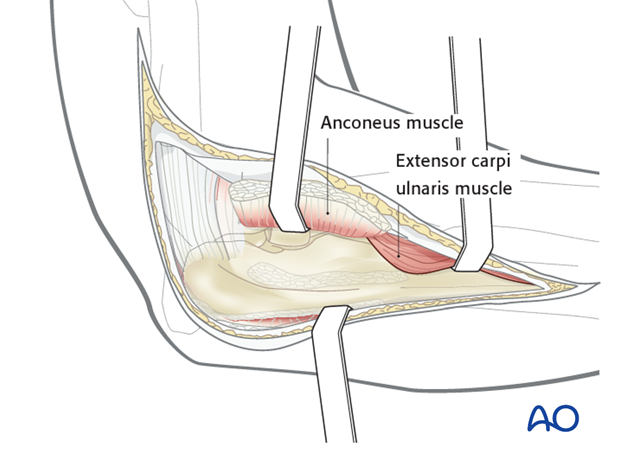
For this procedure a posterolateral approach is normally used.
2. Reduction
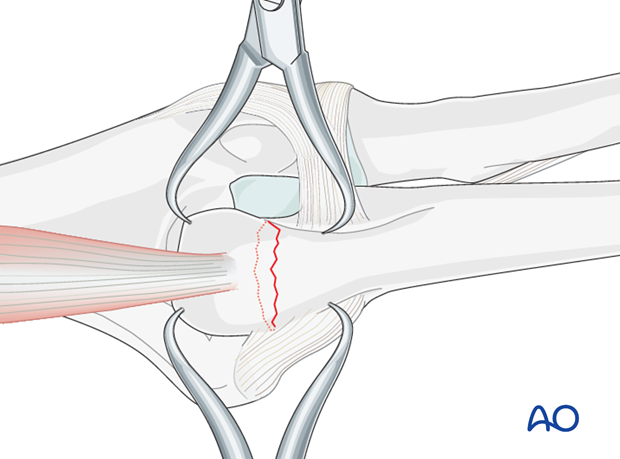
There is almost always a small spike on one of the fragment sides that exactly fits into a gap on the opposite fragment.
Reduce and hold the reduction of the transverse olecranon fracture with one or two small pointed reduction forceps.
Pearl: To prevent the reduction clamp from slipping on the distal fragment, a small drill hole can be drilled in the distal fragment before applying the clamp.
3. Prepare wire insertion
Drilling
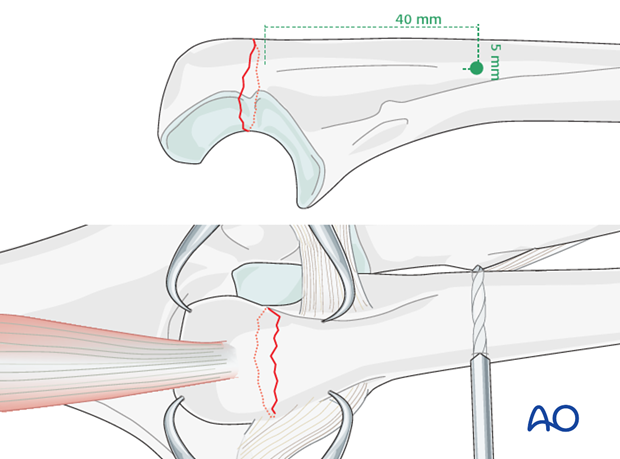
Approximately 40 mm distal to the fracture line and 5 mm from the posterior cortex, drill a hole through the ulna with a 2.0 mm drill, using a sharp drill guide as the drill tends to slide dorsally.
Wire preparation and insertion
Prepare a 1.2 mm/18 gauge wire by making a loop approximately one third along its length.
Insert the shorter segment of the wire through the drilled hole from medial to lateral. As the ulnar nerve is medial it is safer to introduce the wire from this side.
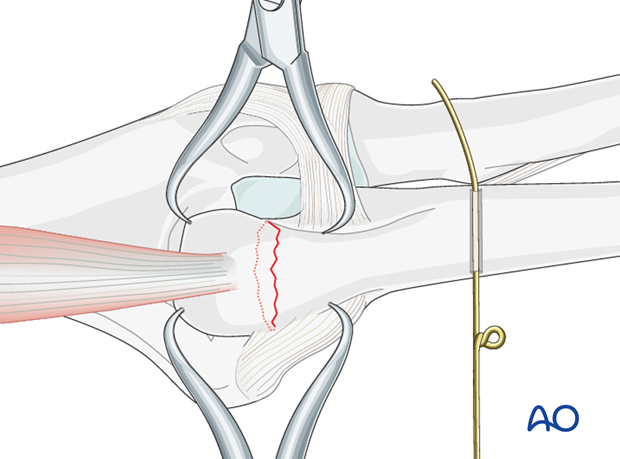
4. Insertion of the K-wires
First K-wire
Using the drill guide, introduce the first 1.6 mm K-wire medially through the proximal end of the olecranon. Aim the drill towards the anterior cortex, passing as close as possible to the joint. Leave enough space on the lateral side for the second K-wire.
Drill the K-wire through both cortices.
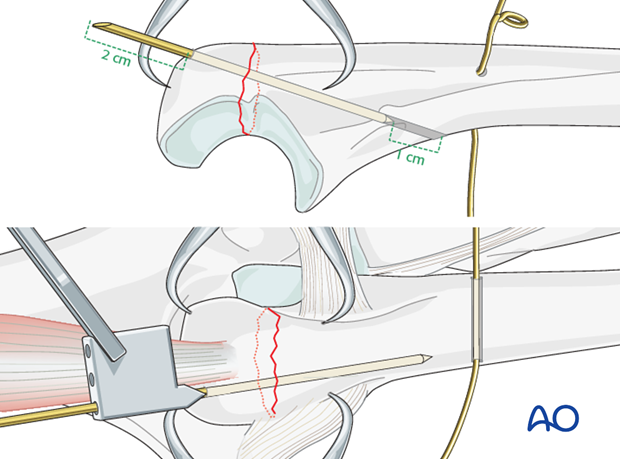
Second K-wire
Insert the drill guide over the first K-wire, and insert the second 1.6 mm K-wire parallel to the first one.
Check the position of both K-wires on the C-arm. If the position of wires and fracture reduction is good, pull both K-wires back approximately 1 cm.
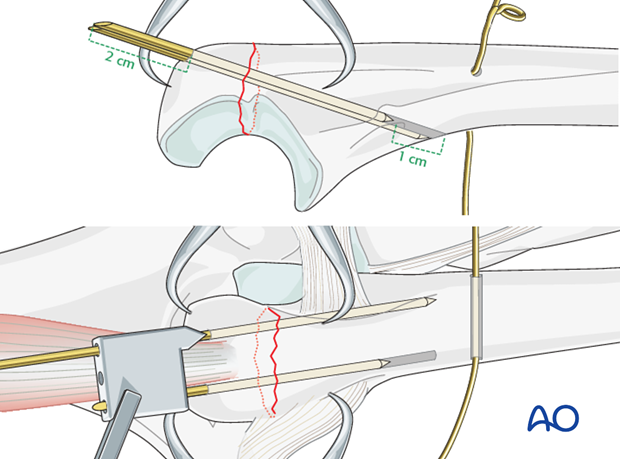
5. Wire fixation
Figure-of-eight configuration
The small pointed reduction forceps can now be removed.
Pass the long segment of the wire (bearing the loop) in a figure-of-eight configuration beneath the triceps tendon around the protruding ends of the K-wires.
Unite the two wires with a little twist.
Note: Make sure that loop and wire twist do not lie too close to the wire hole to avoid unnecessary tension at the wire hole.
Placing the loops more proximal will allow a smaller incision when removing them after healing.
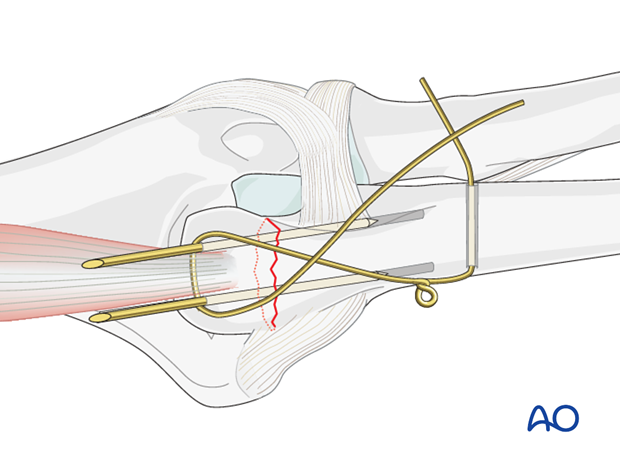
Tightening the wire
Loosely prepare the wire twist ensuring that each end of the wire spirals equally - the twist should not comprise one spiral around a straight wire.
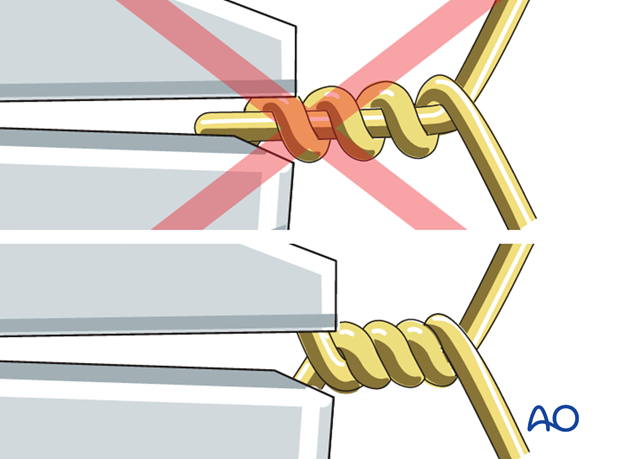
Cut the wire ends short.
The slack is then taken up by further twisting. Repeat this until the desired tension is achieved. Both loops must be tightened at the same time and in the same direction, to achieve equal tension on both arms of the wire.
By tightening the twist and the loop with two pliers simultaneously, the two fragments are drawn together such that the fracture is placed under compression.
Note: Avoid excessive tensioning, especially in osteoporotic bone.
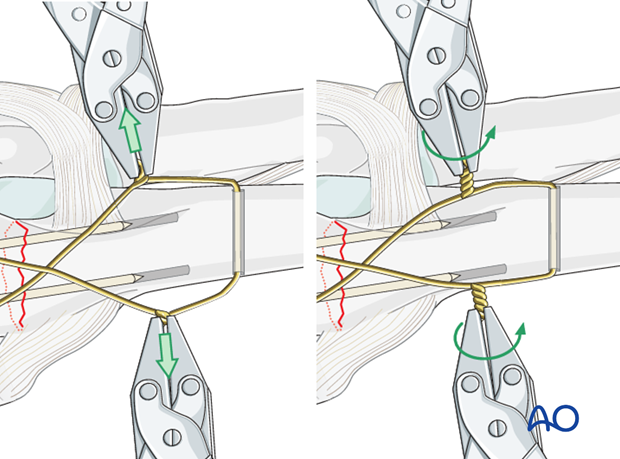
Prevent later soft-tissue irritation
Trim the twisted wire and turn both ends towards the ulna/olecranon in order not to irritate the soft-tissues later.
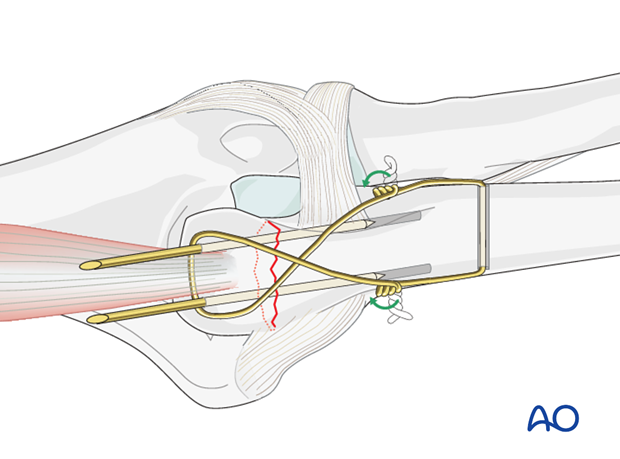
Sinking the K-wires
With the help of pliers, bending iron and forceps, bend the proximal end of the K-wires 180 degrees.
Cut the K-wires leaving a bend of about 5-6 mm. Make a small cut in the triceps to allow burial of the K-wires. The K-wires are then driven home, sinking their curved ends into the bone in order to prevent backing out and skin irritation. Closing the small cut in the triceps over the K-wires will help prevent backing out of the wires.
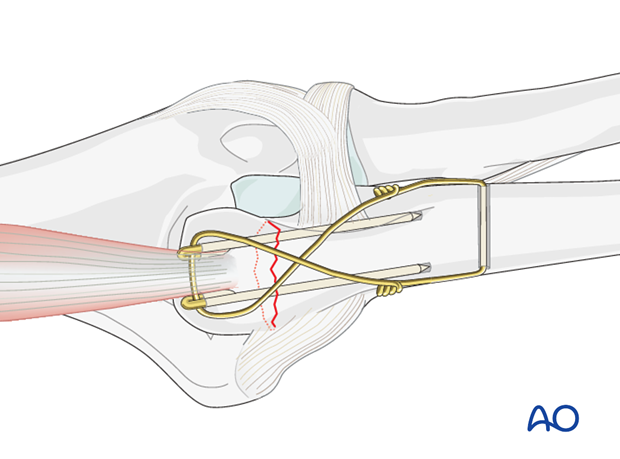
Check results
Confirm fracture stability and range of motion, including supination-pronation. Exclude K-wire impingement of the radial ulnar joint. Final x-rays or image intensifier views should demonstrate good reduction and proper hardware position.
Pearl: Intramedullary screw
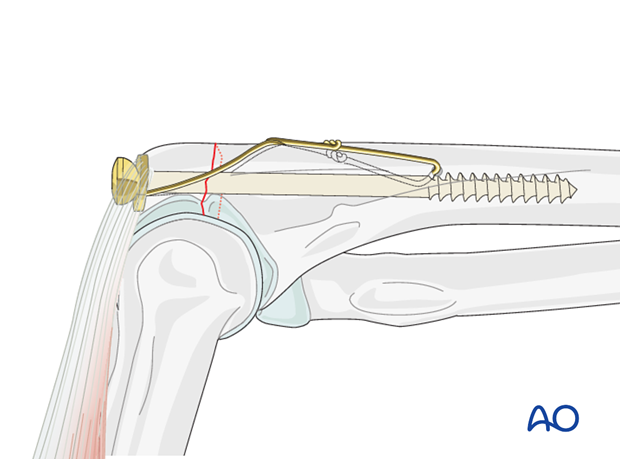
As an alternative, one intramedullary screw or two intramedullary K-wires may be used instead of the two K-wires penetrating the anterior cortex.
Introduce a 6.5 mm cancellous screw with a 32 mm thread and a washer inside the canal. The screw should cross the fracture site at least 7 cm.
Choose the screw long enough to purchase in the inner cortex of the diaphyseal area. Usually, a screw of 10-12 cm length is appropriate.
Make a stab incision through the triceps tendon insertion to place drill and screw. When tightening the screw make sure not to over compress the fracture.
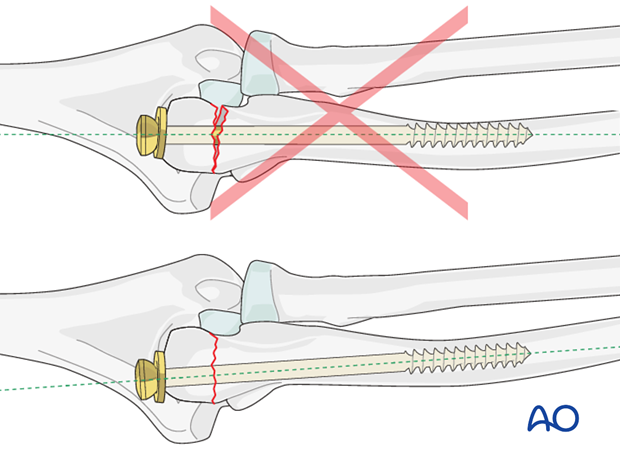
As the ulna has a slight bend distal to the metaphysis the long intramedullary screw can cause displacement when engaging the isthmus of the intramedullary canal distally.
6. Case
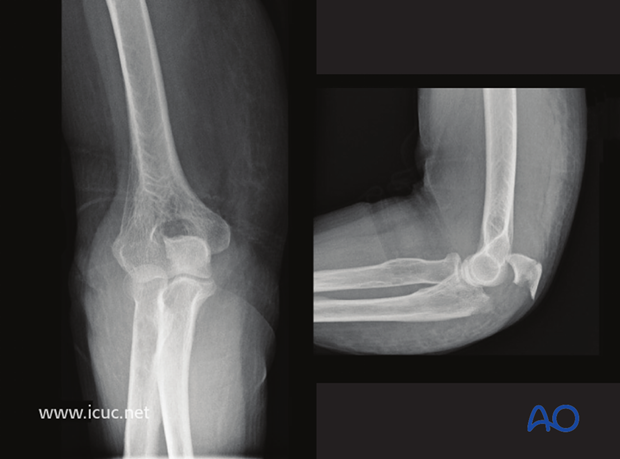
AP and lateral X-rays of a displaced olecranon fracture in a 75 year old female.
Positioning of patient supine with elbow pointing upward with a fracture marked on the skin.

Dorsal incision
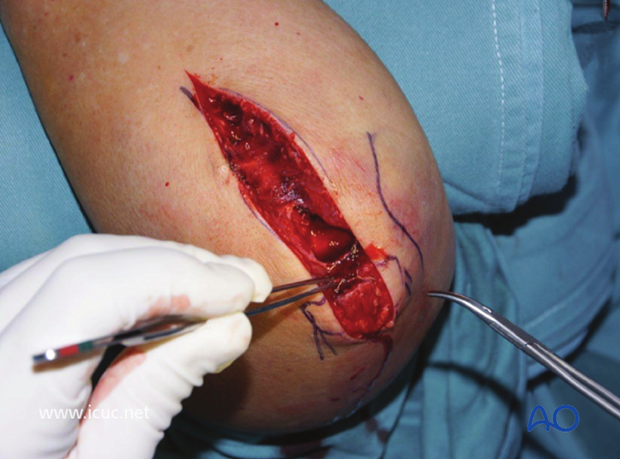
A drill hole has been made in the more distal ulna for passing of heavy gauge wire for the construction of a figure of eight made from cerclage wire.
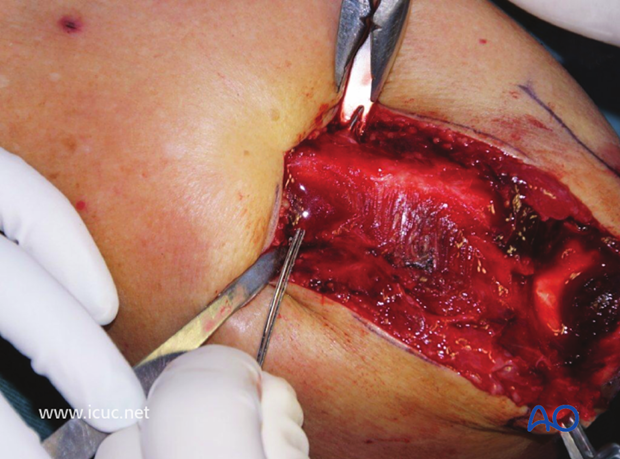
The fracture site is cleaned and osteochondral damages to the two surfaces of the joint is assessed.
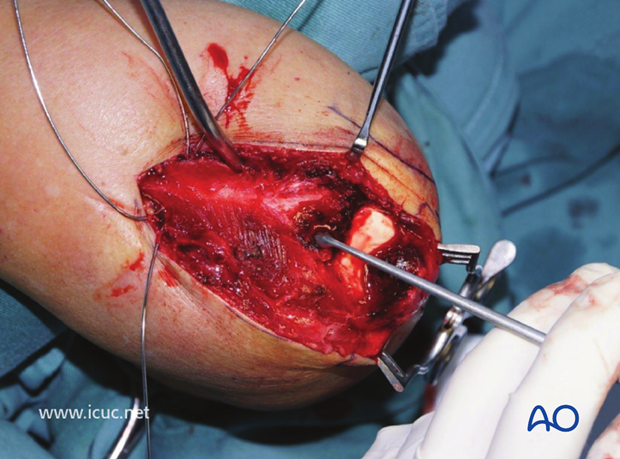
The fracture is reduced and held with two longitudinal K-wires up the shaft of the more distal ulna. The two K-wires on either side of the olecranon are temporarily inserted to prevent comminution on either side of the osteoporotic olecranon.
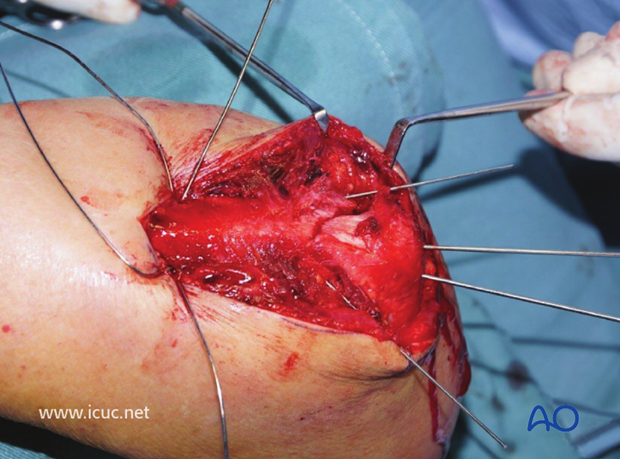
A large bore needle (14 gauge) is used to pass the heavy gauge wire deep to the triceps tendon to create a figure of eight.
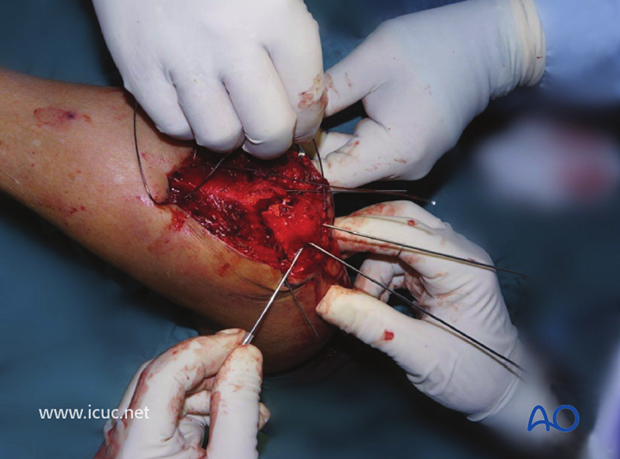
The fracture is seen with the ends of the wire ready to be joined.
In this case, a second wire was passed through the drill hole in the ulna, so that a second figure of eight could be created.
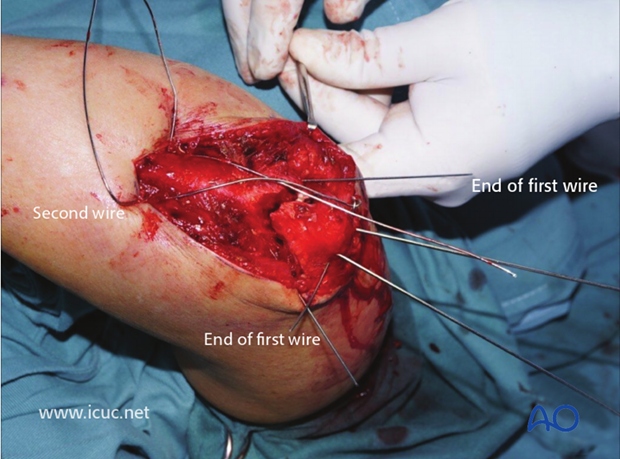
The ends of the first wire are twisted together, but not yet tightened.
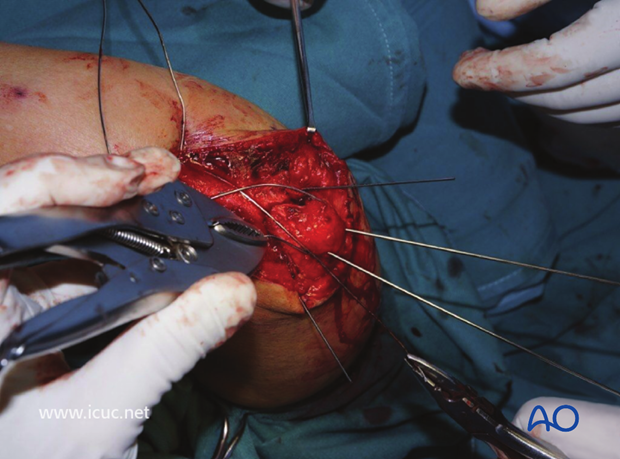
A second pair of pliers (in this case a vise grip) is used to create a twist on the opposite side.
The figure of eight wire is tightened by twisting on both sides simultaneously.
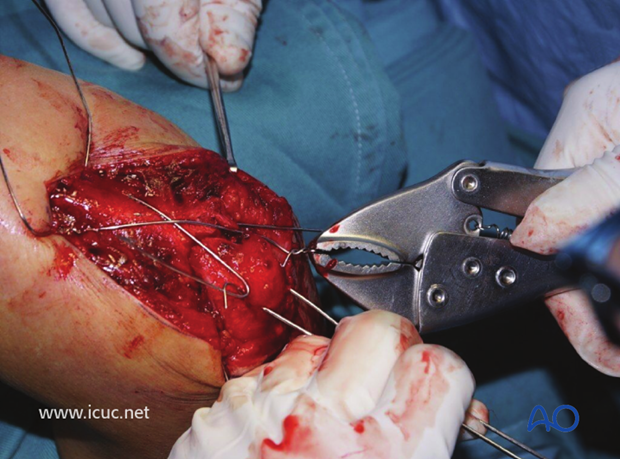
The second wire has been used a second figure of eight which has also been tightened with a twist on both sides.
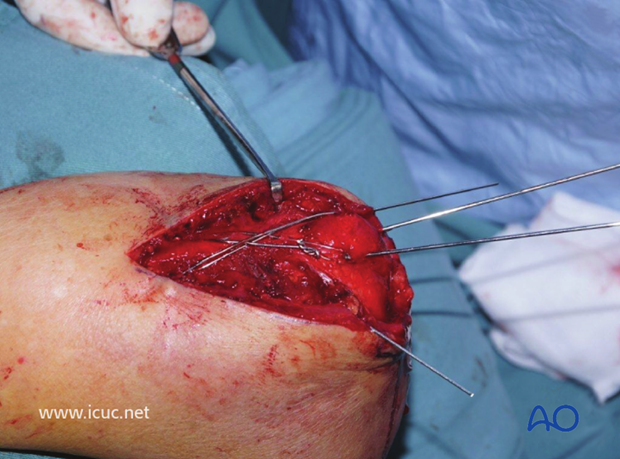
The longitudinal K-wires are bent past 90° and then cut.
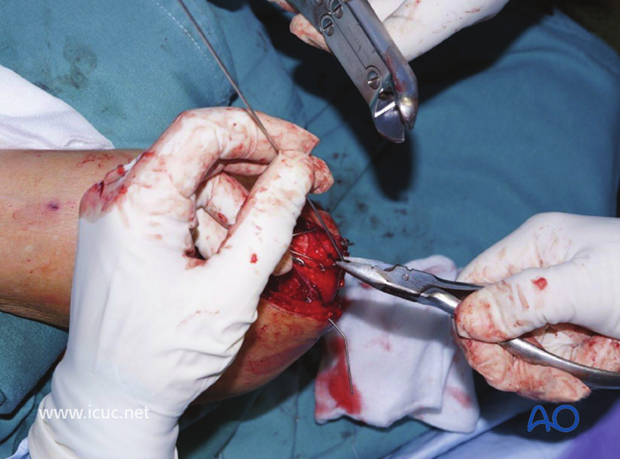
With the two wires cut, they are ready to be turned 180° and then impacted into the olecranon.
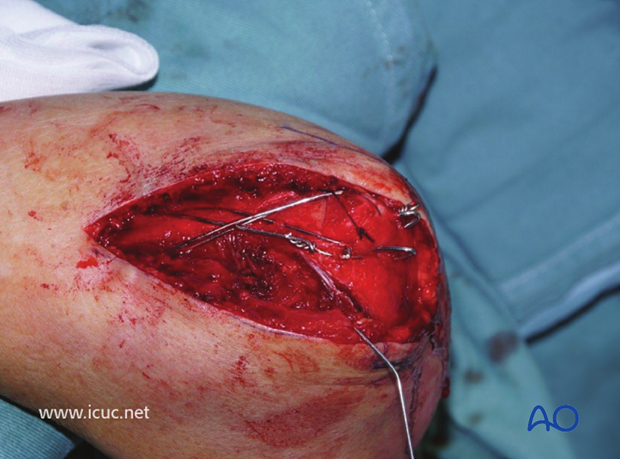
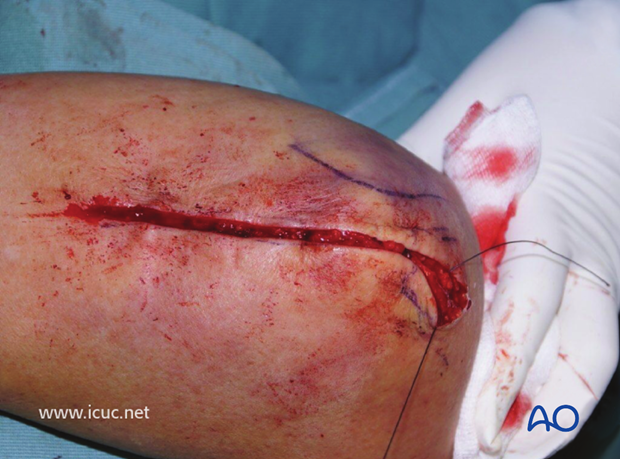
Final clinical intraoperative picture.
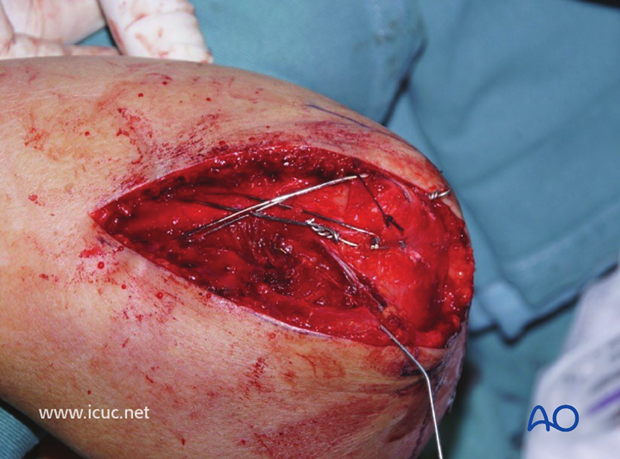
Lateral intraoperative image

Wound closure
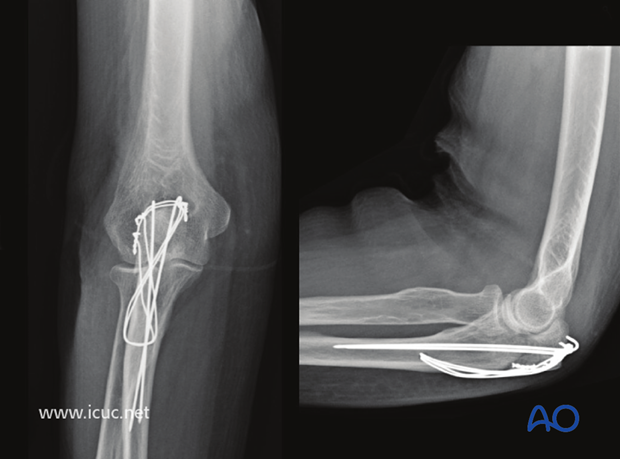
3 weeks X-ray images.
The ends of the K-wires have not been fully impacted into the olecranon.
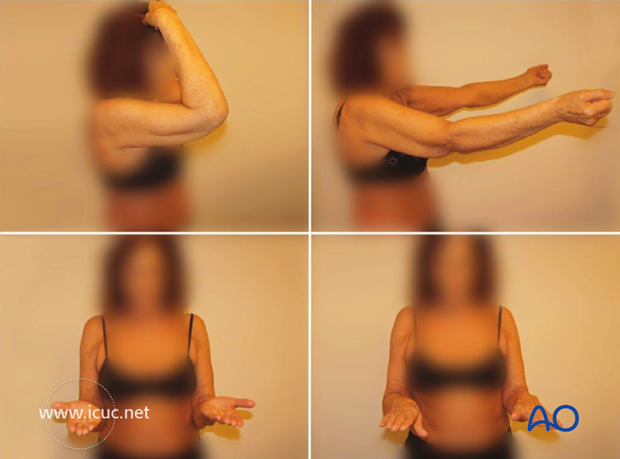
3 weeks clinical photographs
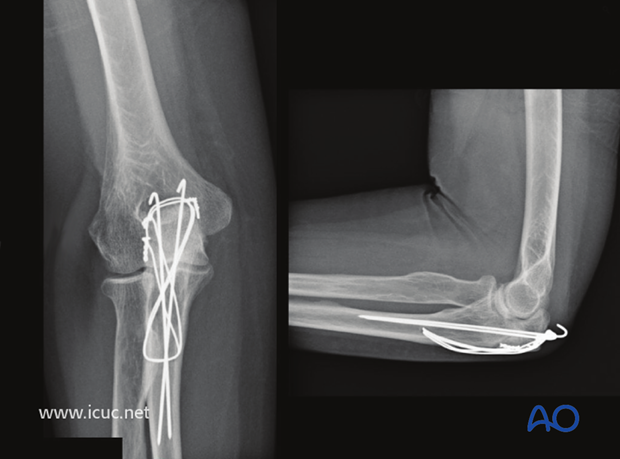
12 weeks X-ray images with fractures healed. Note that one of the K-wires has backed out a little.
12 week clinical photographs.

7. Postoperative treatment following ORIF
Postoperatively, the elbow may be placed for a few days in a posterior splint for pain relief and to allow early soft tissue healing, but this is not essential. To help avoid a flexion contracture, some surgeons prefer to splint the elbow in extension.
If drains are used, they are removed after 12–24 hours.
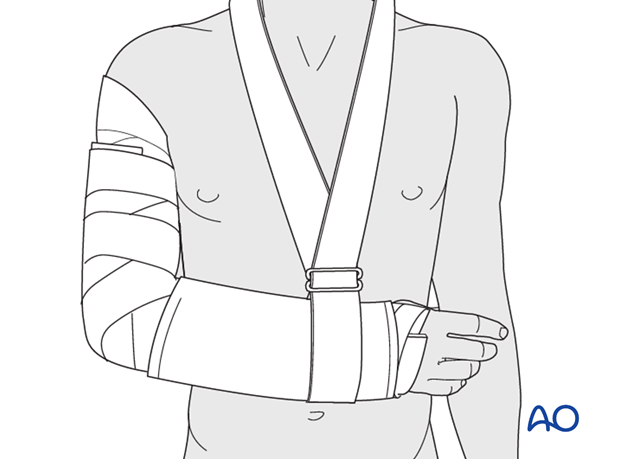
Mobilization
Active assisted motion is encouraged within the first few days including gravity-assisted elbow flexion and extension. Encourage the patient to move the elbow actively in flexion, extension, pronation and supination as soon as possible. Delay exercises against resistance until healing is secure.
Use of the elbow for low intensity activities is encouraged, but should not be painful.
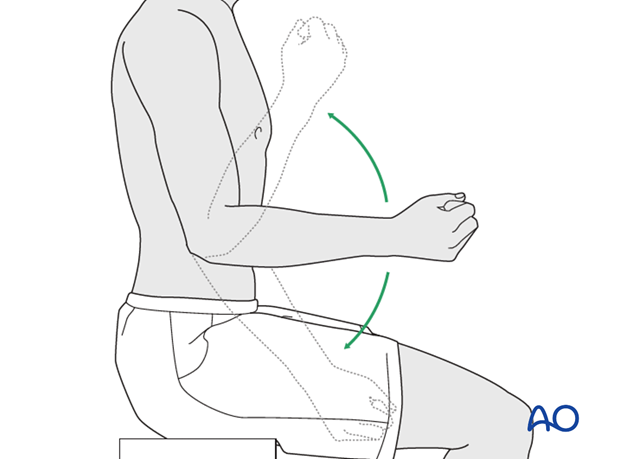
Range of motion must be monitored to prevent soft tissue contracture.
Prevent loading of the elbow for 6–8 weeks.
Monitor the patient to assess and encourage range of motion, and return of strength, endurance, and function, once healing is secure.
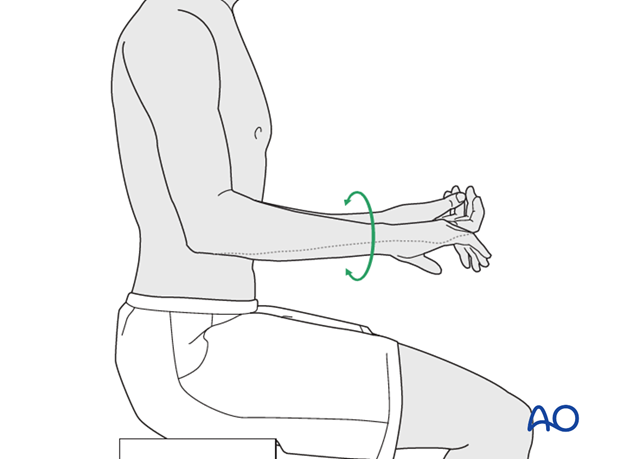
Follow up
The patient is seen at regular intervals (every 10–20 days at first) until the fracture has healed and rehabilitation is complete.
Implant removal
As the proximal ulna is subcutaneous, bulky plates and other hardware may cause discomfort and irritation. If so, they may be removed once the bone is well healed, 12–18 months after surgery, but this is not essential.


