Malleoli fracture management with minimal resources
1. General considerations
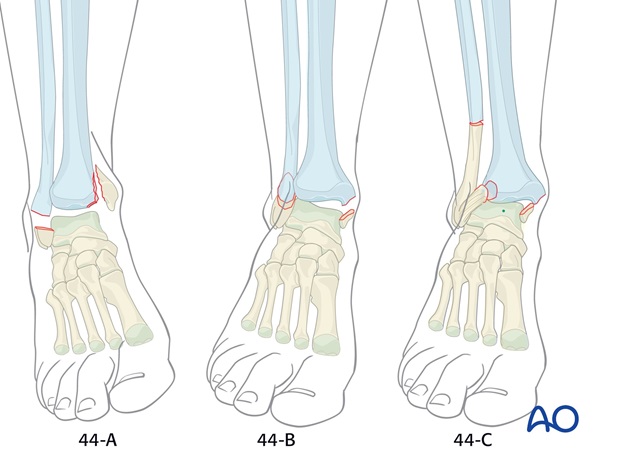
This description of nonoperative treatment considers all malleolar injuries.
Preliminary remarks
Nonoperative treatment of ankle fractures is usually only indicated for undisplaced, stable fractures. However, if the facilities and the skill for safe operative treatment are not available, nonoperative treatment is safer, and if performed correctly and skillfully, it can lead to acceptable results.
In any situation, a displaced ankle fracture should be reduced as soon as possible, even if surgery is planned for the near future.
If severe swelling is present, the provisionally reduced ankle fracture should be immobilized temporarily with a plaster of Paris (POP) back-slab, and elevated on several pillows.
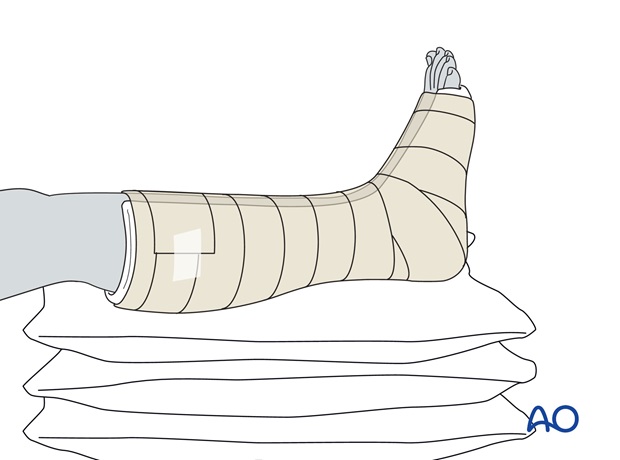
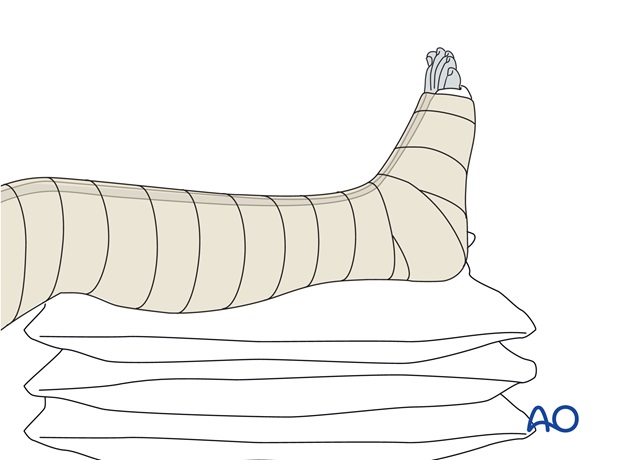
If the injury is of the rotational type, and unstable, an above-knee back-slab will be more comfortable.
Anesthesia
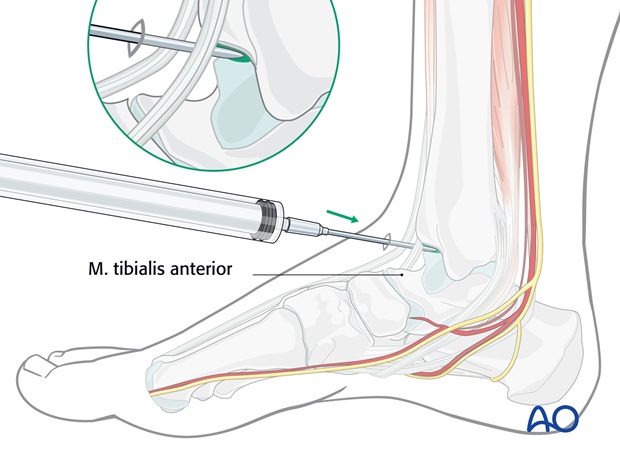
In the absence of the facility for general anesthesia, reduction can be achieved under sedation (e.g., Pethidine plus Diazepam), and/or intraarticular local anaesthesia (Lignocaine 2% 15ml).
If severe swelling is present, the reduced ankle fracture should be immobilized temporarily with a plaster of Paris (POP) back-slab, and elevated on several pillows.
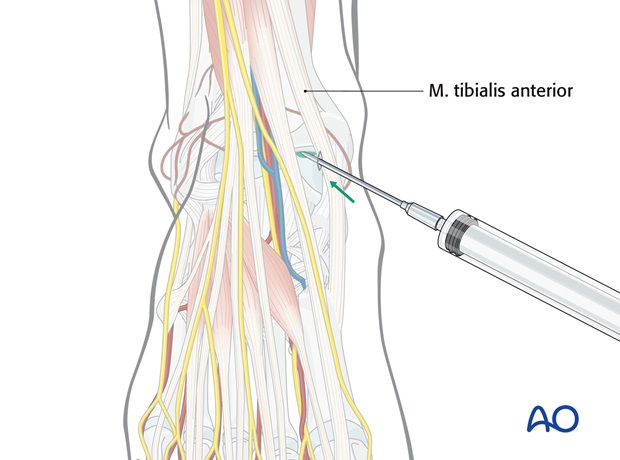
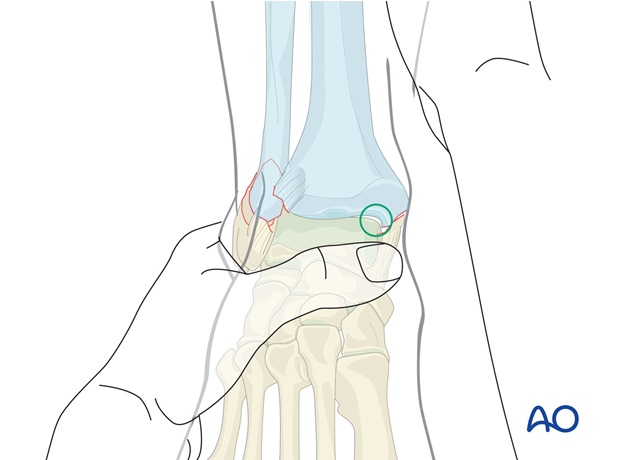
The intraarticular injection of local anesthetic is introduced anteromedially, between the tendons of tibialis anterior and extensor hallucis longus, medial to the anterior tibial neurovascular bundle.
Typical displacement in ankle fractures
The stated mechanism of injury, the history and the clinical appearance of the foot and ankle offer hints to the clinical diagnosis.
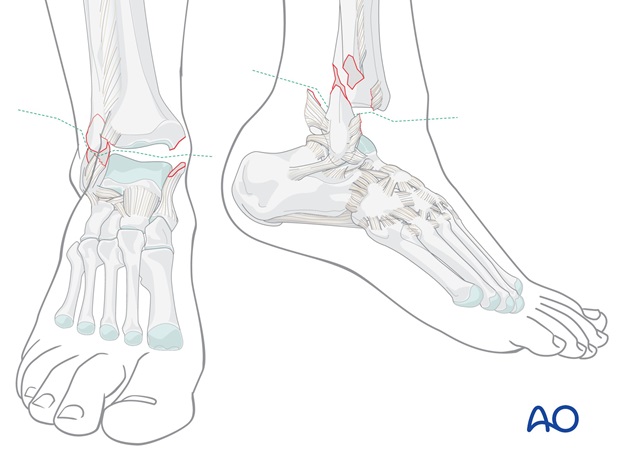
The typical displacement in most ankle fractures is posterior and lateral, usually with the foot externally rotated (transsyndesmotic and suprasyndesmotic injuries). In the infrasyndesmotic fractures, the displacement is medial.
Careful review of the x-ray images is essential for a full understanding of the mechanism of injury.
Regard the injury as a two-part fracture between the lower leg (tibia and fibula) proximally, and the foot distally. The task will be to place the foot in correct alignment with the leg.
If x-rays are not available, it is safer to correct the deformity clinically, rather than to leave it unreduced.

2. Reduction of displaced ankle fractures
Treatment of patients presenting early
The aim of any reduction (early or late) is to correct the displacements.
Treat the patient as soon as possible, when the deformity is typical, late swelling has not yet appeared and adequate anesthesia can be administered.
Use gravity to help to reduce the fracture.
The patient lies supine on the table, with the lower leg hanging over the end of the table.
For laterally displaced and externally rotated injuries (trans- and suprasyndesmotic injuries), hold the heel of the injured foot as shown and lift the externally rotated leg. In this procedure the weight of the leg will, in most cases, reduce the posterior and the lateral displacement automatically. Further pressure against medial or lateral malleoli is usually unnecessary.
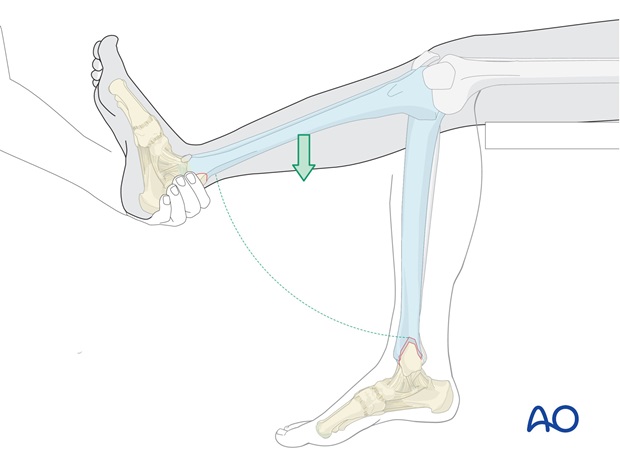
For medially displaced injuries (infrasyndesmotic), the reduction procedure involves holding the heel of the foot with the leg internally rotated, so that gravity tends to relocate the foot in a lateral direction.
Detailed reduction will be considered later.
Treatment of patients presenting late
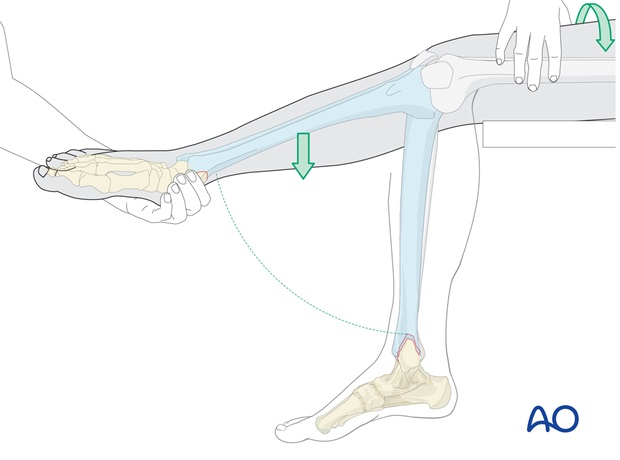
If the patient presents late and you have no possibility to administer general anesthesia, so that the patient is not fully relaxed, but merely sedated, or has only local intraarticular anesthesia, reduction will not be achieved by gravity alone.
Manual reduction is performed on the hanging leg, with the knee flexed to reduce the pull of the Achilles tendon.

Correct alignment
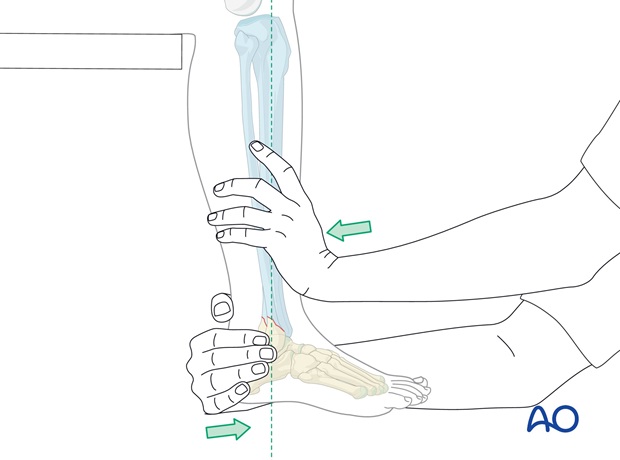
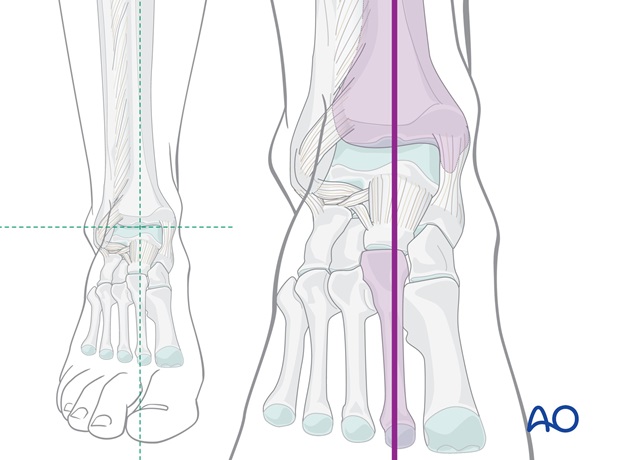
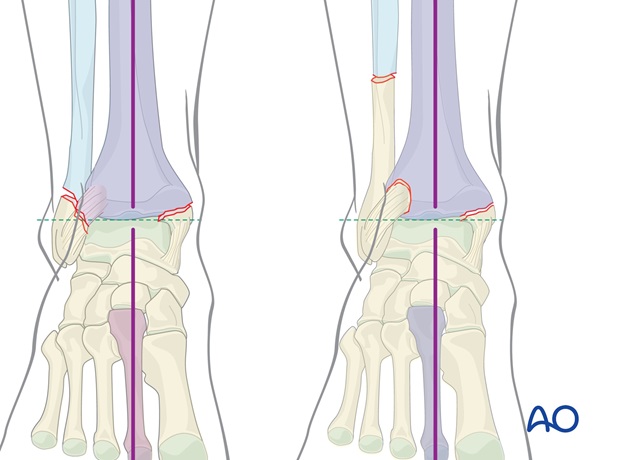
The aim is to bring the foot into correct alignment with the lower leg, as shown.
If x-rays are not available, this is the only alignment reference available.
X-rays
For the choice of the correct reduction technique, it is useful to differentiate three patterns of fracture morphology.
This differentiation can only be made if x-rays are available.
Three radiographic views are taken:
- Anterior-posterior (AP) view
- AP in 20 degrees of internal rotation (mortise view)
- Lateral view
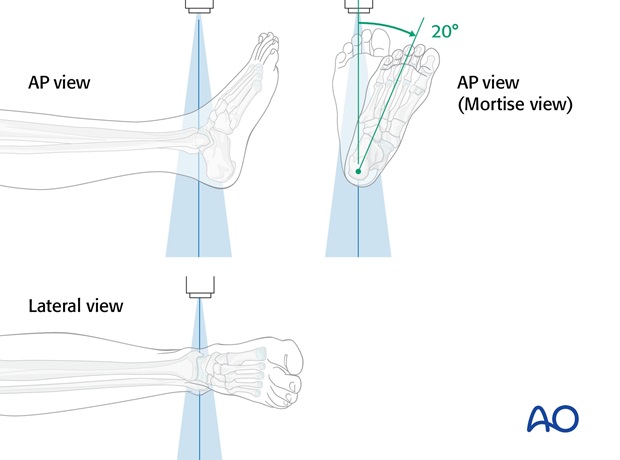
Patterns of fracture morphology
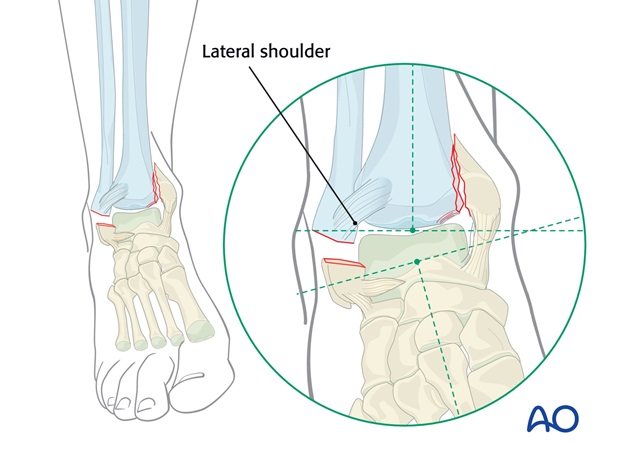
Pattern 1) Lateral fibular buttress (infrasyndesmotic, adduction mechanism of injury)
The medial malleolus has been pushed off by the adducting talus. The traction fracture of the lateral malleolus, or the osseo-ligamentous injury, has left a lateral fibular buttress.
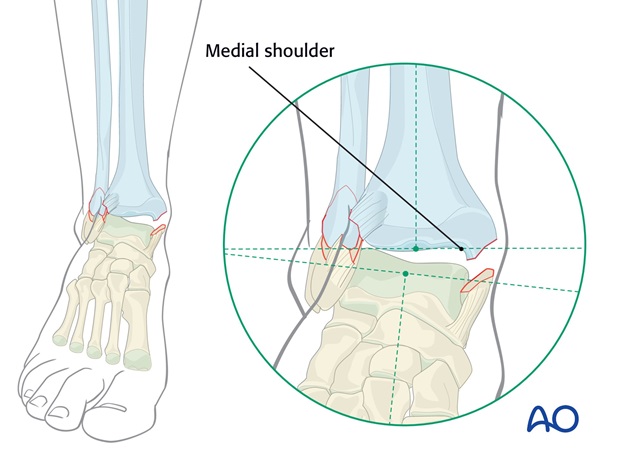
Pattern 2) Those with a medial shoulder (some trans- and suprasyndesmotic injuries, external rotation mechanisms of injury)
The fracture of the medial malleolus has left a shoulder (or beak) on the tibia.
Many displaced ankle injuries fall into this pattern.
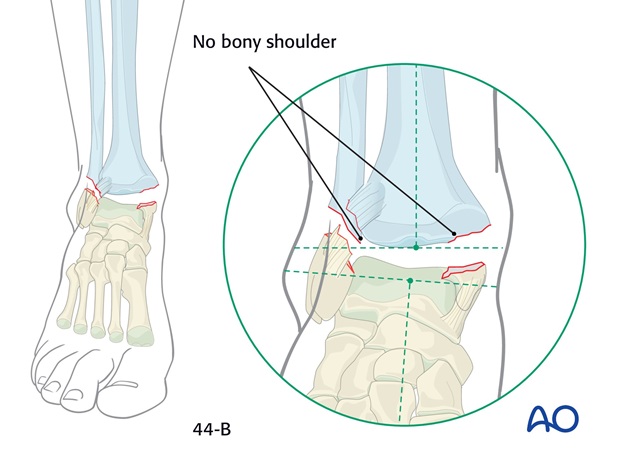
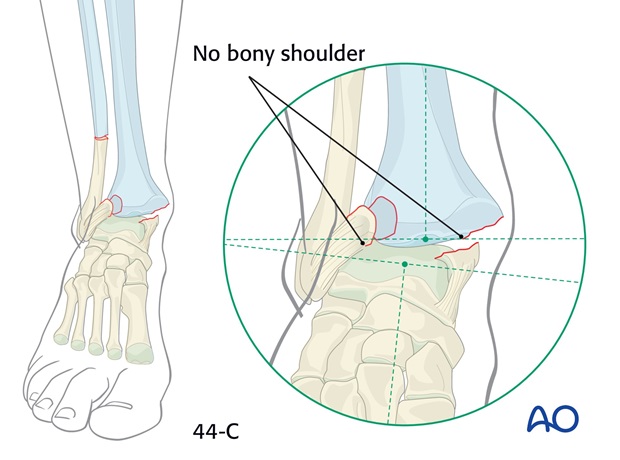
Pattern 3) Combined fractures of the lateral and medial malleoli without medial or lateral shoulder (some trans- and suprasyndesmotic injuries, external rotation mechanisms of injury).
Both medial and lateral fractures are flush with, or above, the joint level, not leaving any medial or lateral bony shoulder against which to reduce the talus.
Reduction of pattern 1: Fracture with a lateral fibular buttress
First, any AP displacement is corrected.
Hold the hindfoot firmly and gently pull both distally and forwards to correct any posterior displacement.
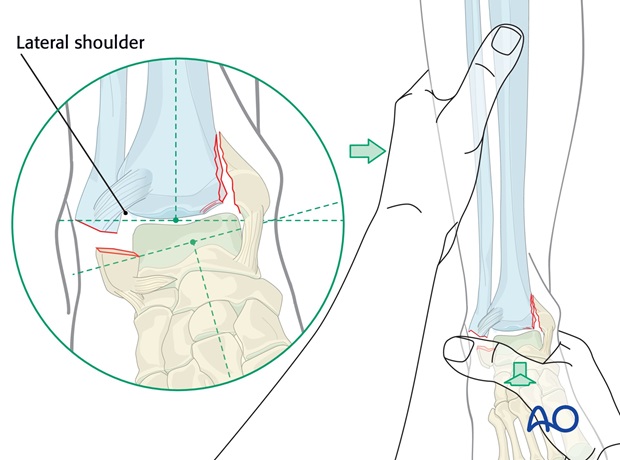
The heel then needs to be pressed upwards and laterally, buttressing the talus against the shoulder of the lateral malleolus.
Reduction of pattern 2: Fracture with medial shoulder present
First, any AP displacement is corrected. Hold the hindfoot firmly and pull both distally and forwards to correct any posterior displacement.
At the same time, any external rotation displacement is reduced.
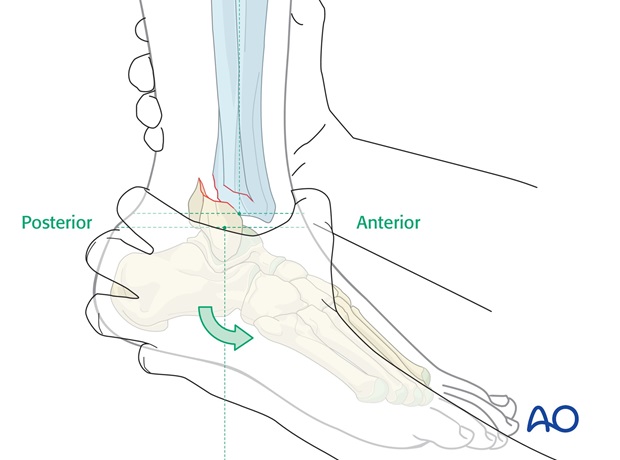
Avoid pushing the forefoot into dorsiflexion, as this tends to displace the talus posteriorly in the mortise. This is especially important when the fracture complex includes a posterior tibial marginal fracture (Volkmann’s fragment).
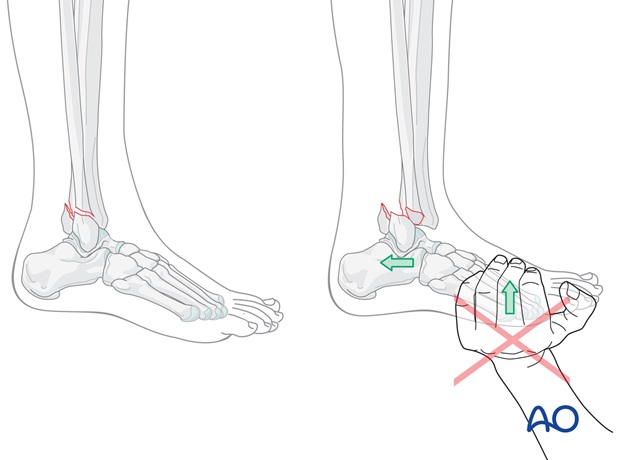
A plantigrade position of the foot is important, but needs to be achieved by manipulation of the hindfoot downwards and forwards, rather than pushing upwards on the forefoot.
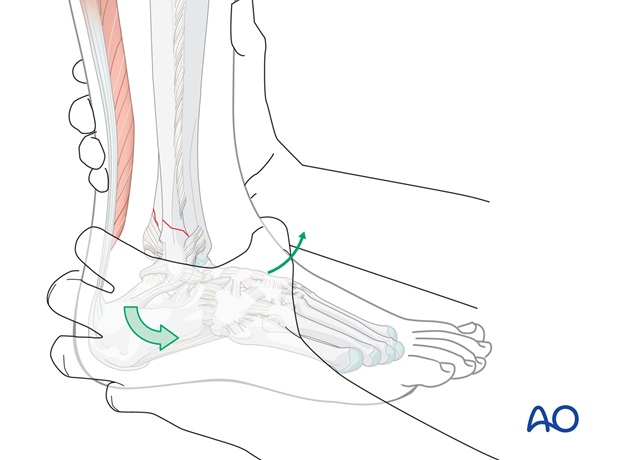
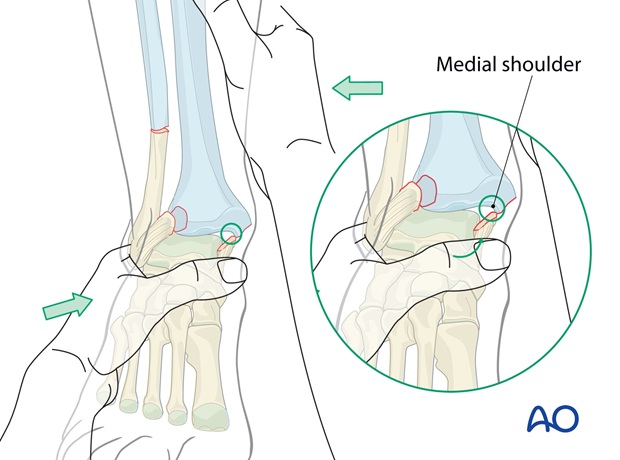
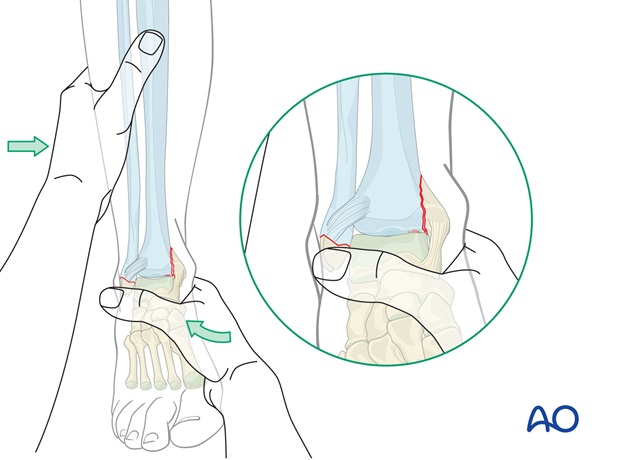
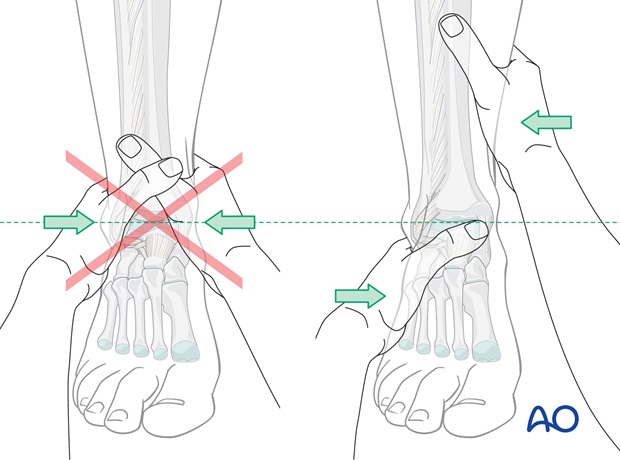
The lateral displacement is then corrected by pushing the mid - and hindfoot (heel) from lateral to medial against the counter pressure of the other hand on the lower end of the tibia as shown. This presses the talus against the medial shoulder. At the same time any external rotation deformity is corrected.
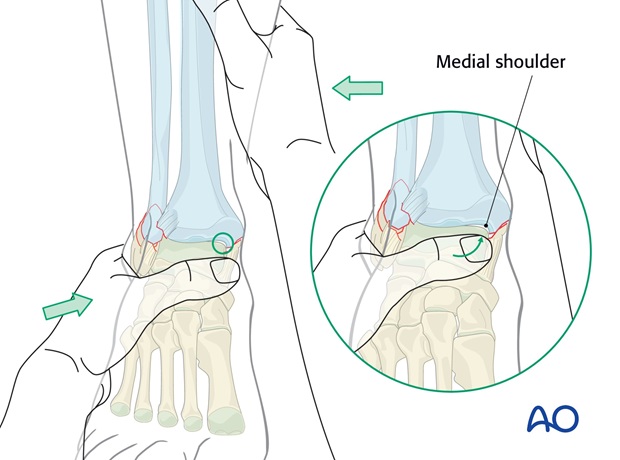
By exploiting the resistance of the medial shoulder, over-reduction is avoided.
Reduction of pattern 3: Reduction of combined fractures of the lateral and medial malleoli without medial or lateral shoulder
Reduction pressure needs to be applied above (lower leg) and below (heel and midfoot) the malleoli, not directly over the malleoli.
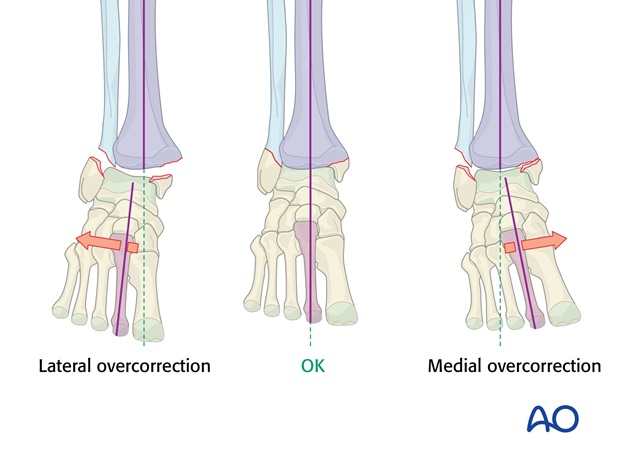
Here, the danger is of overcorrection of the ankle medially, or laterally. In such cases, the AP displacement is corrected, and the foot orientated in alignment with the lower leg, avoiding any undue medial or lateral pressure, and correcting any malrotation. It is only the soft tissues and surgical acumen that help to prevent overcorrection.
3. Holding the reduced position
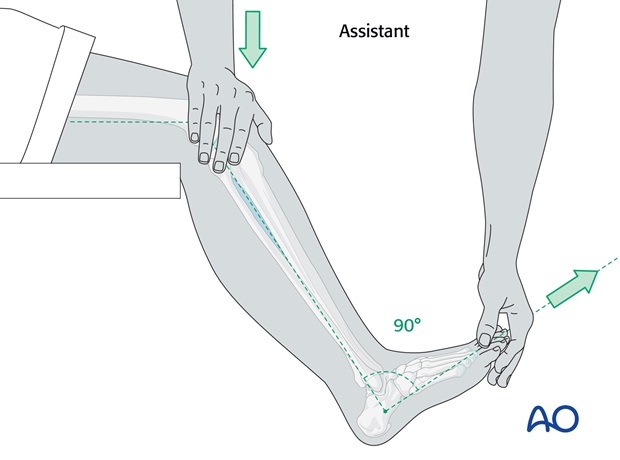
With an assistant:
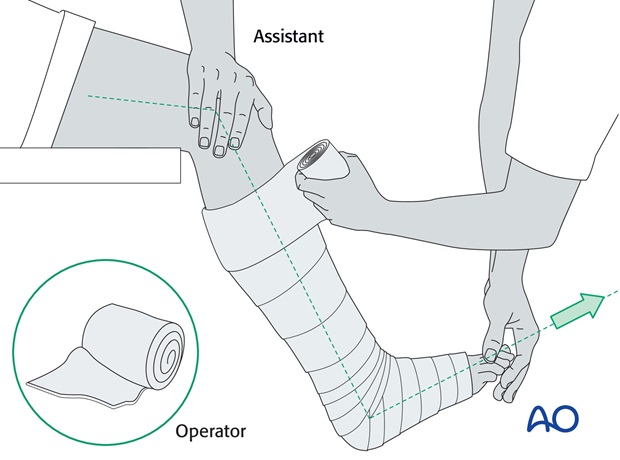
The assistant stands on the medial side of the injured leg and maintains some flexion of the knee and the right angle position of the ankle, pressing gently on the knee and holding the big toe forwards in line with the patella.
This usually holds the reduction that has been achieved and allows the operator to apply the padding and the plaster cast.
Tip
Avoid strong dorsiflexion of the foot as this can cause posterior displacement of the talus, as previously discussed under reduction of displaced ankle fractures.
Without an assistant:
Apply the plaster padding.
Then, apply one roll of POP (dipped in cold water to give more time until hardening) around the ankle, reduce the fracture and maintain it reduced until the POP skim is hard enough to hold the reduction.
Then complete the below-knee portion of the cast.
4. Preparation for cast application
Two-person team
- Operator and assistant
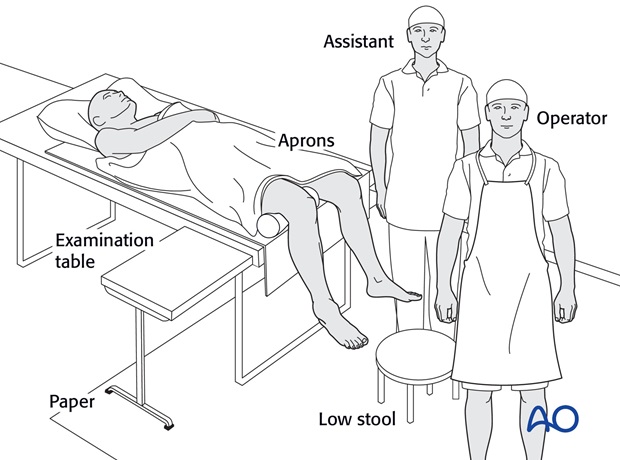
Materials (prepared before the procedure)
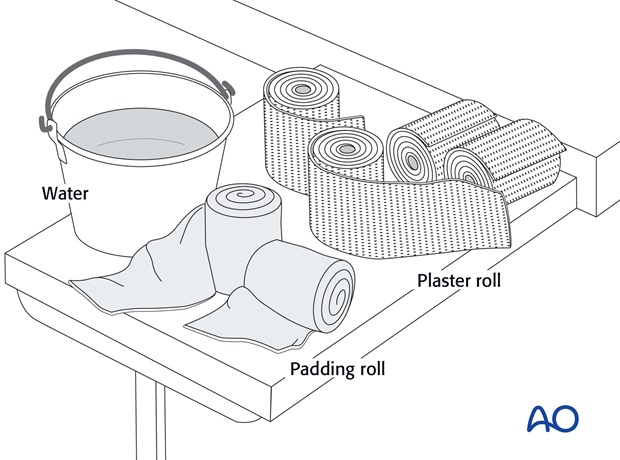
- 2 rolls 100 mm padding (3 – 4 for an above-knee cast – patterns 2 and 3)
- 4 plaster of Paris rolls, 100 mm wide (8 – 9 for an above-knee cast – patterns 2 and 3)
- Bucket with cold, or lukewarm, water
- Low stool
- Examination couch, or table
- Aprons to protect team members and patient
- Paper to cover the floor
5. Application of the below-knee cast
Positioning in undisplaced fractures
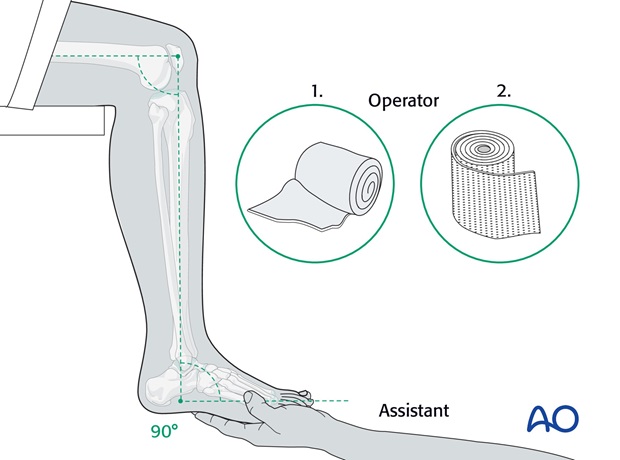
In undisplaced fractures, reduction is not necessary. The plaster cast will be applied on the hanging leg (knee flexed to 90 degrees and ankle held at 90 degrees).
Application of the padding
First, apply the padding. This needs to be thicker over the malleoli and around the fibular head.
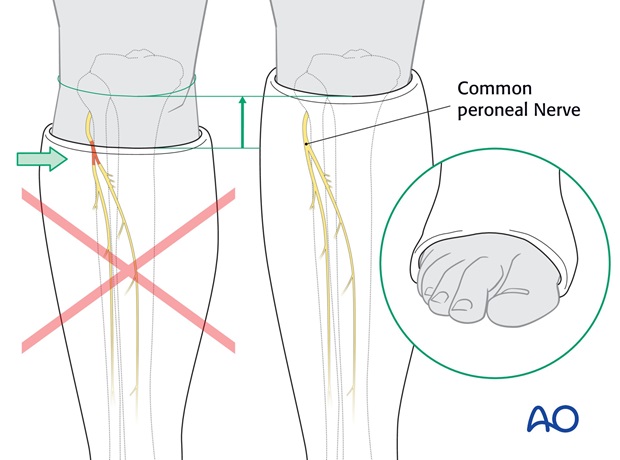
The cast should reach from the MTP joints of the toes to just below the knee joint, avoiding the upper end of the plaster’s being at the level of the neck of the fibula, where the common peroneal nerve crosses.
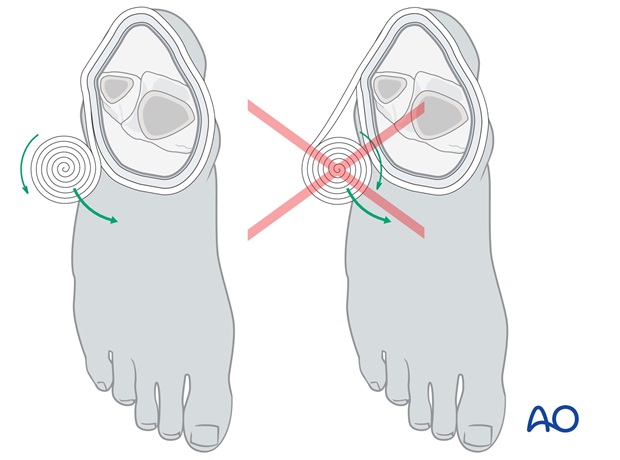
Handling of plaster bandages
It is important to hold the plaster rolls correctly during application, so that they can be rolled on, rather than pulled on.
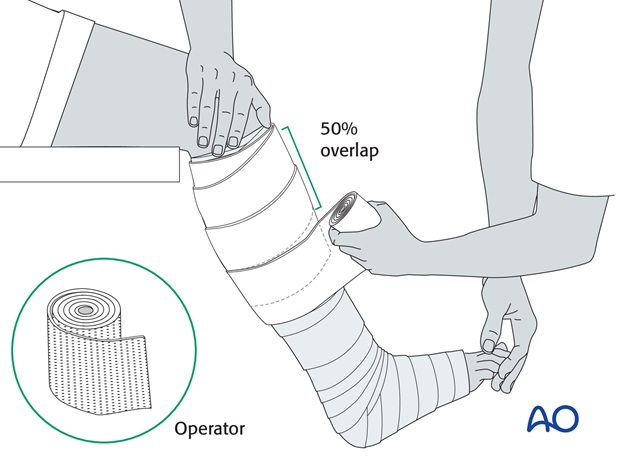
Application of plaster bandages
It is easier to start proximally, overlapping by half the width of the roll and moving down the lower leg to around the ankle and foot.
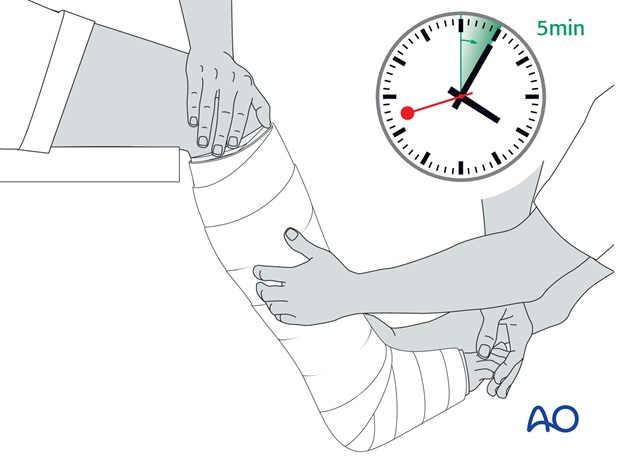
After the application of the second roll, whilst the plaster is still soft, final manipulation is done and the reduction held, with appropriate molding, until the plaster hardens. This may take 4 to 5 minutes, depending on the temperature of the water – colder water gives you more time.
The final two rolls are then applied, and further molding is performed to achieve the desired 3-point fixation.
Molding of the cast: 3-point cast fixation
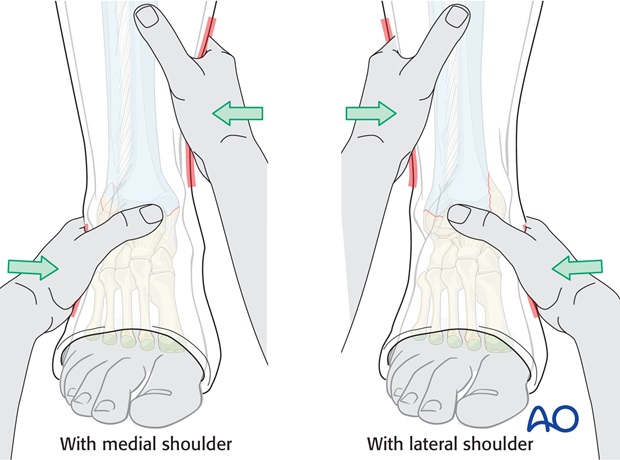
When molding the cast, the same action as for reduction is repeated and held until the plaster is firm.
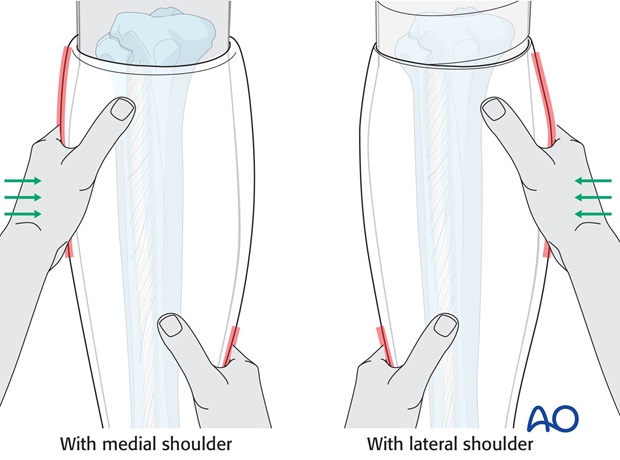
The principle of 3-point fixation within the cast needs to be applied. The two main molding points are created by gentle pressure below the buttressing malleolus and above over the opposite supramalleolar part of the lower leg.
The third point is created by molding the upper end of the cast firmly around the leg, on the aspect of the leg opposite to the supramalleolar molding.
Suprasyndesmotic fracture
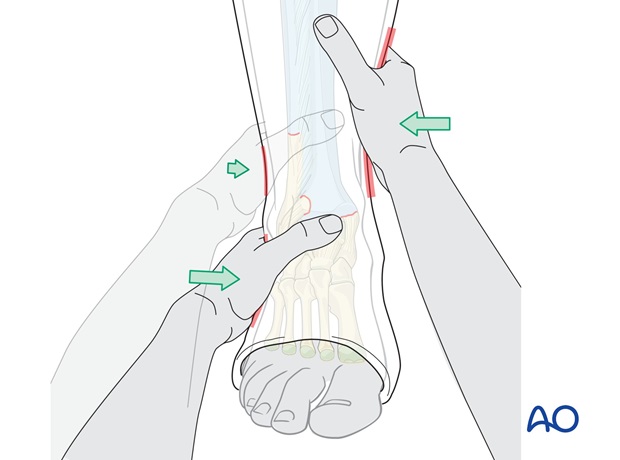
In suprasyndesmotic fractures, with disruption of the syndesmosis, firm molding around and even over the lateral malleolus helps to close the diastasis and allows the syndesmosis to heal.
These fractures will require extension to an above-knee cast as discussed shortly.
6. Application of above-knee cast
In those fractures with an external rotation component, the reduction will be held better with an above-knee cast for the first 4-6 weeks (patterns 2 and 3).
Thereafter, a below-knee cast can be applied for the remaining period of casting, as determined by the surgical decision-maker.
7. Evaporation period
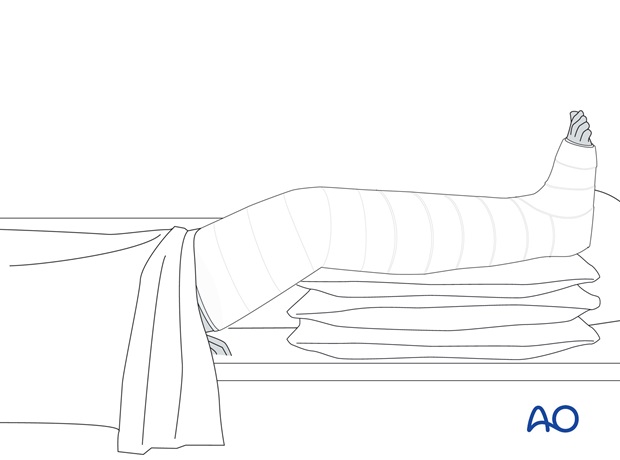
The patient should be warned that the leg in the plaster will feel cool and moist. This is due to the evaporation of water from the plaster. Once the cast is dry, the moist, cold feeling will disappear.
During the evaporation period, the casted limb should remain exposed and not fully covered by blankets.
Tip
Remember that the plaster requires over 24 hours to reach full strength.
Compartment syndrome
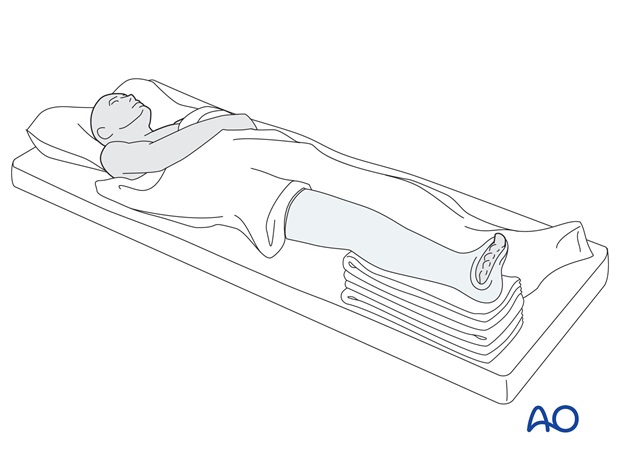
Any plaster, especially one without adequate padding, carries a risk of causing obstruction of circulation and compartment syndrome.
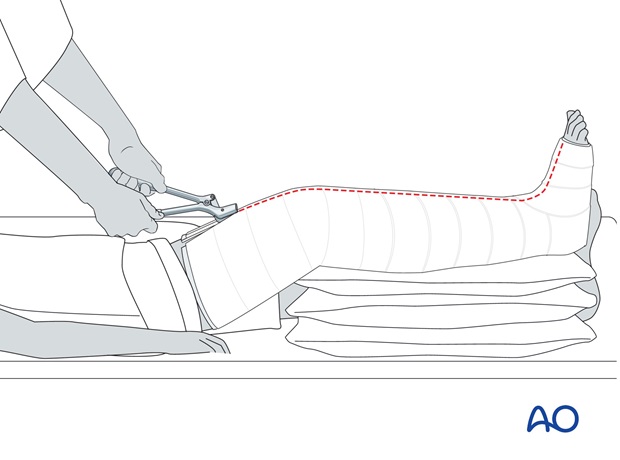
In case of inappropriate pain, especially on passive dorsiflexion or plantarflexion of the toes, the plaster and padding should be split immediately down to skin, over its whole length, and the leg watched carefully for rapid recovery. It is better to lose the reduction than to risk muscle necrosis.
If the slightest suspicion of compartment syndrome remains, the plaster needs to be removed and urgent dermatofasciotomy considered.
8. Aftercare
General guidelines
Elevate the lower leg on 2-3 pillows for 3-5 days.
X-ray control after reduction confirms the position, but must be repeated after 3-5 days. Redisplacement usually occurs during the early days, as the swelling subsides, and if diagnosed early enough, can often still be corrected non-operatively.
Analgesics and anti-inflammatory drugs should be prescribed, as necessary, during the first few weeks. If analgesia consumption is unexpectedly high, suspect redisplacement, or cast pressure on the skin.
If a cast becomes loose, it should be removed and replaced with a new one. If possible, wait until the fracture has become sticky (+/- 4 weeks) so that the reduction is not lost during the replacement procedure, but check regularly for redisplacement.
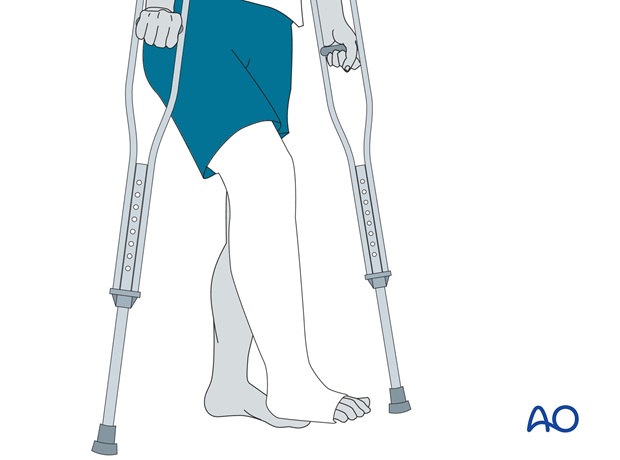
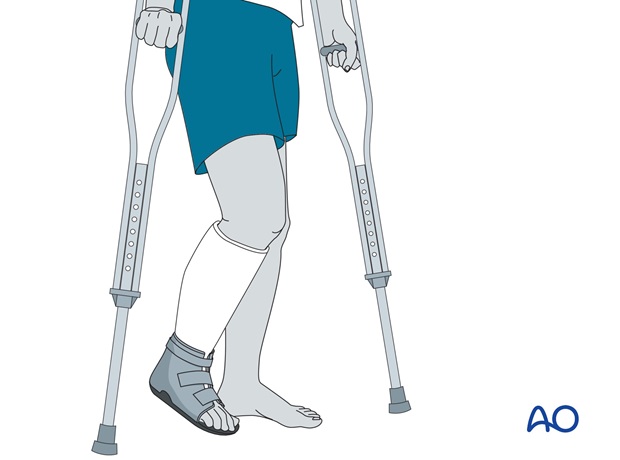
Non weight bearing should be maintained for 4-6 weeks, depending on the fracture pattern. Thereafter, weight bearing can be started, reaching full weight bearing by 8-9 weeks.
In fractures that required reduction, the plaster cast should not be removed before 9-12 weeks, or before the patient manages to walk pain-free with the cast. In fractures that did not require reduction, the period in the cast can be reduced at the discretion of the surgical decision-maker.
After removal of the cast, rehabilitation should involve dedicated joint mobilization for a prolonged period. At this stage, it is also advisable to give a non-steroidal anti-inflammatory preparation for several weeks.
