Full ring external fixation (Ilizarov)
1. Note on illustrations
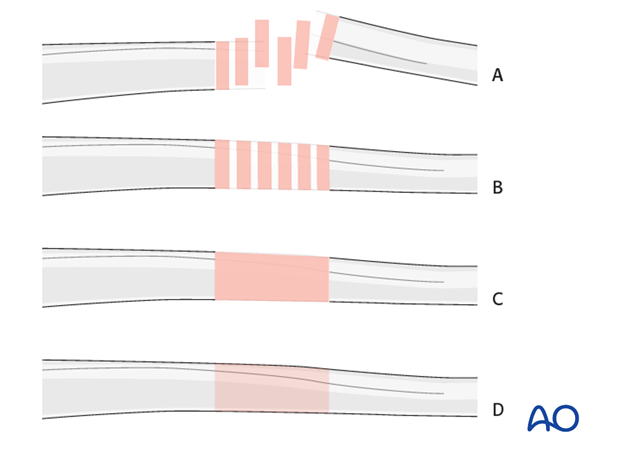
Throughout this treatment option illustrations of generic fracture patterns are shown, as four different types:
A) Unreduced fracture
B) Reduced fracture
C) Fracture reduced and fixed provisionally
D) Fracture fixed definitively
2. General considerations
Introduction
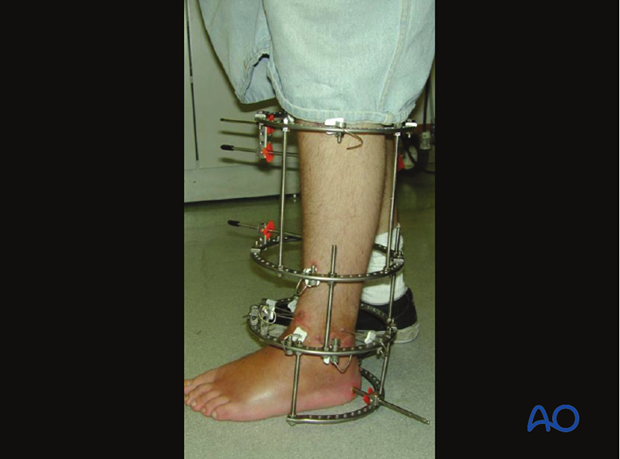
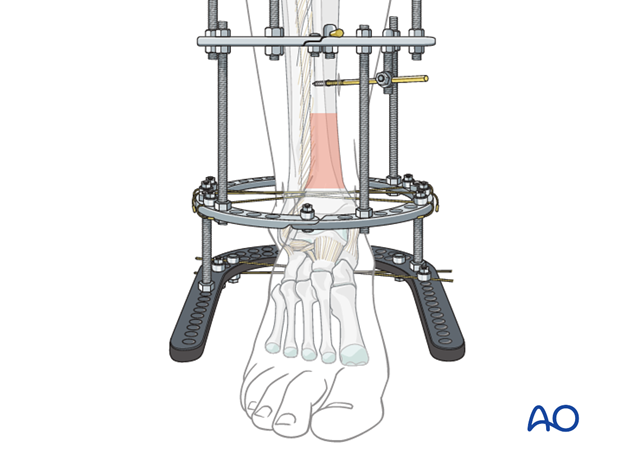
The most stable external fixation for distal tibial fractures is usually composed by:
- One fully circular ring with tensioned wires attached to the distal tibial articular segment
- Two proximal fully circular rings to provide stable anchorage for the distal ring
- An extension for the foot and ankle, at least initially, and particularly for type C (intraarticular) fractures
- 3-4 connecting rods between each ring
The proximal rings can be anchored with Schanz screws or tensioned wires. Wires are usually used in cancellous bone. Wires attached to a circular ring are typically tensioned at 100 to 130 kg-force. Schanz screws may be easier than wires in diaphyseal bone. (Remember to predrill cortical bone before inserting them.) Ring fixator systems are highly adaptable and can be combined with internal fixation of the articular surface.
Considerations on full ring fixator
Many variations in technique and frame design are possible. Frames like the one described in the following steps can provide excellent stability. When applied and adjusted with care, they should restore satisfactory alignment (axes, rotation, and length). The good results with extraarticular distal tibial fractures confirm their efficacy.
However, ring fixators offer limited potential for reduction and stabilization of articular surface fractures. But they are not as effective as ORIF for more complex articular fractures, particularly when fragments are impacted or rotated. Thus, a most important consideration is whether or not open articular surface reduction (delayed until soft tissues are suitable) should be a part of ring fixator treatment.
3. Principles for frame construction
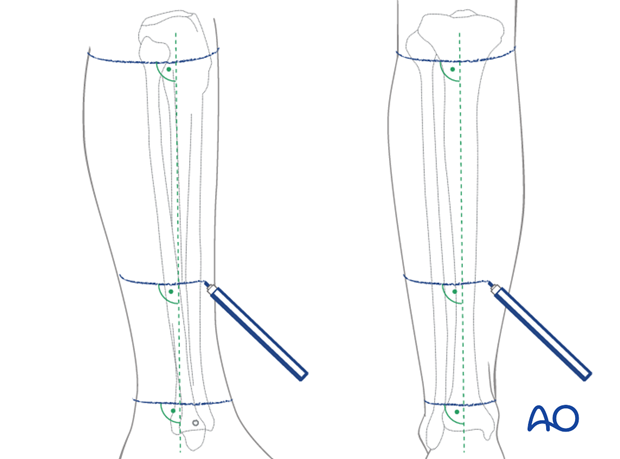
Mark ring locations on the skin
It helps to first select ring locations and mark the skin. Place the rings so it is easy to insert wires and pins into preplanned locations, based upon review of the patient’s x-rays. For advice about ring placement, see the following steps.
Frame construction options
The surgeon must decide whether the frame should extend to the foot (ankle-joint-bridging). This protects the articular surface and may decrease problems of loosening and infection involving the distal tibial pins. It may also increase the safety of earlier weight bearing.
Ring selection
Appropriately sized half-rings to create the three full rings are chosen with the following criteria:
- At least 2 cm clearance between leg and each ring is necessary to accommodate swelling
- Same size rings should be used, if possible, to facilitate the interconnection (Special fittings are available for attaching threaded connecting rods to different size rings)
Select an appropriately sized foot ring and half-ring for its anterior end.
4. Patient preparation
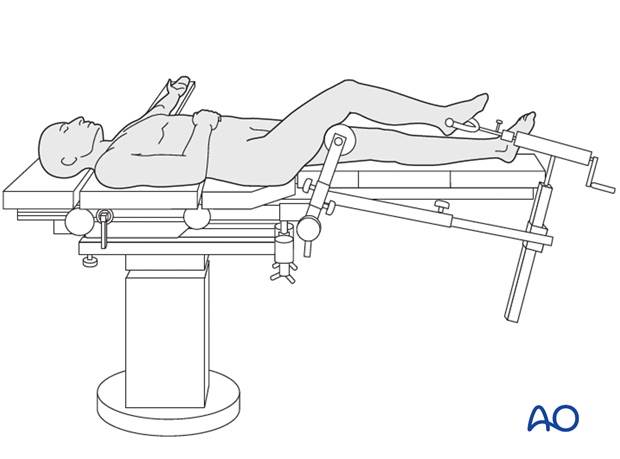
This procedure is normally performed with the patient in a supine position on a fracture table.
5. Safe zones for wire and pin placement
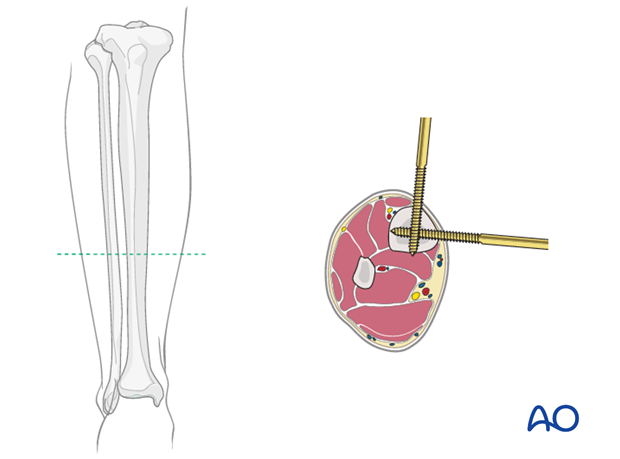
Knowledge of safe zones and anatomy of the lower leg and the foot is essential for safe wire and pin placement.
6. Reduction
It is important that fracture reduction be achieved before the frame is attached, and that it is monitored and maintained during fixator application. This is because full ring external fixator are not adjustable without significant modifications.
Traction should be applied preliminarily to facilitate reduction, and temporary limb supports should be employed to prevent angulation due to gravity.
Traction can be provided with:
- Fracture table
- Separate bridging external fixator or distractor
- Ring fixator itself, if it is applied initially in ankle bridging mode. Note that the distal tibial ring and connecting frame may interfere with surgical access to the distal tibial fracture site.
7. Proximal frame
A stable base should be created proximally with two parallel rings, centered appropriately about leg and connected with three rods. Full rings are assembled from two half rings. Their size must be adequate for soft-tissue clearance, including swelling that may develop after fixator application. Allow at least 2 cm everywhere between ring and skin.
Preparation
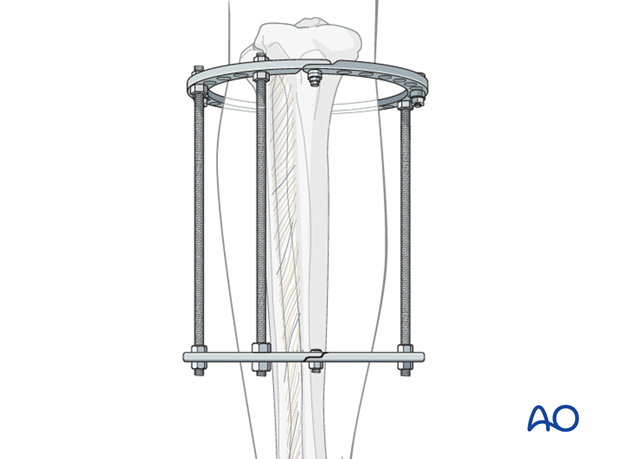
Connect the two proximal rings with three threaded rods. Final tightening of their connections should await confirmation of satisfactory alignment. Bolts connecting half-rings should be placed where wires or pins are not desired.
The length of these rods should be chosen so the lower ring is anchored to intact diaphysis above the fracture zone, yet proximal enough not to interfere with attaching wires and pins to the distal tibial ring (approximately 10 cm above the fracture).
Attach most proximal ring to tibia
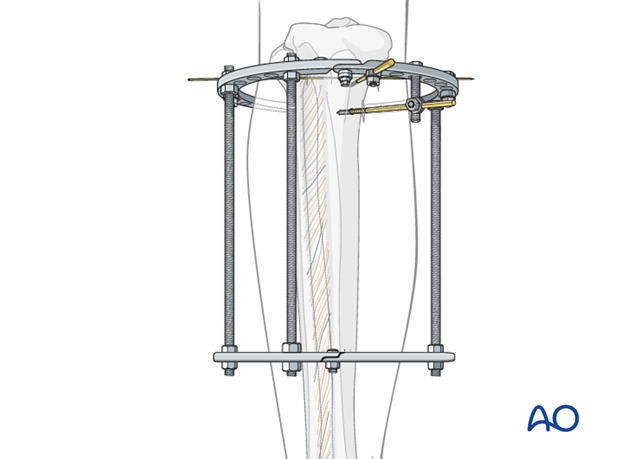
The most proximal ring should lie 2 or more centimeters below the proximal tibial articular surface. Place a transverse 2 mm wire through the tibia at this location. Attach the proximal ring to this with appropriate connectors. Tighten the wire. Make sure to allow at least 2 cm at all points between the leg and the ring.
With the ring perpendicular to the tibia, insert an anteromedial Schanz screw into the subcutaneous surface proximal to the anterior compartment muscles (Gerdy’s tubercle). Attach this to the ring.
Insert a second Schanz screw “dropped” (with a short connecting rod or post) somewhat more distally into the anteromedial subcutaneous tibial surface as illustrated.
Pearl - positioning aids
Folded towels placed between rings and leg can help to hold the ring assembly in position. Alternative positioning aids include suction tubing and special limb supports.
Fixation of the middle ring
Ensure that this ring lies distally over intact tibial diaphysis. It must be perpendicular to the tibia, with at least 2 cm clearance circumferentially. Stabilize it temporarily with folded towels or other technique as mentioned above. Place an anteromedial Schanz screw on the proximal surface of this ring. Next, place another Schanz screw below the ring on an appropriate connector. Place it through the safe zone, at a different angle from the first pin.
Reconfirm ring assembly position and tighten all connections.
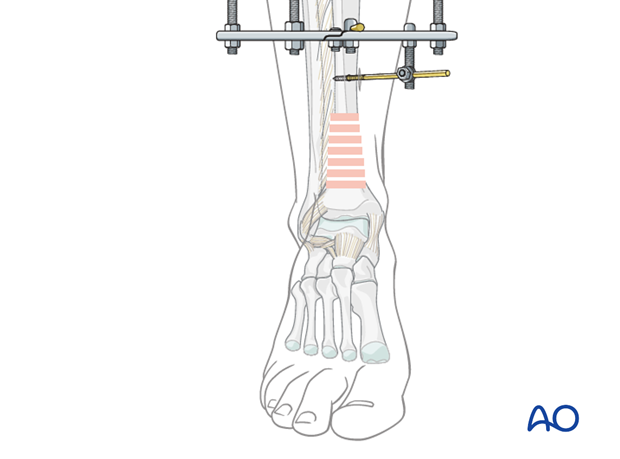
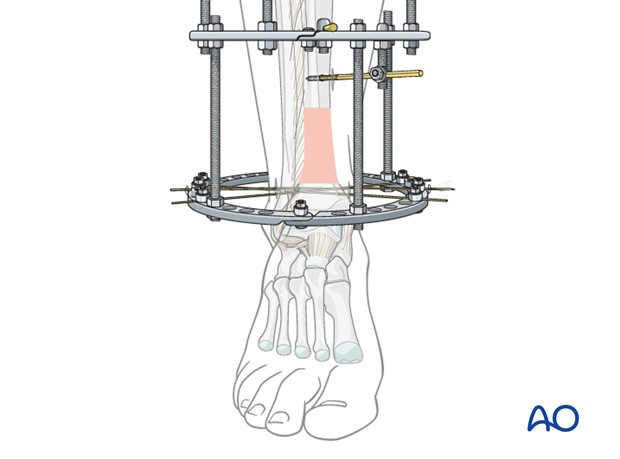
8. Attachment of distal ring
Distal tibial ring
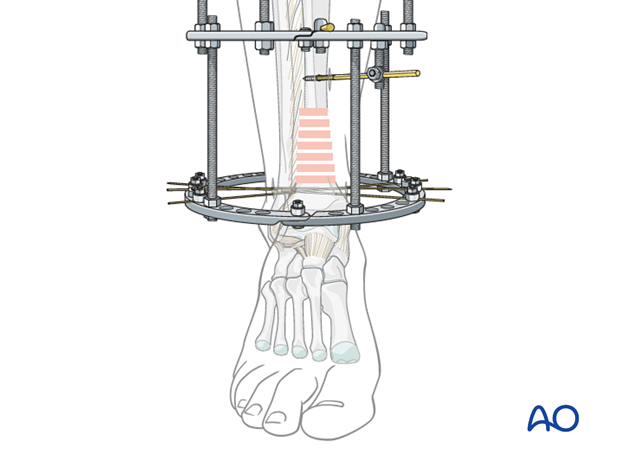
A full ring is placed just above the level of the ankle joint for distal tibial fixation. Using tensioned wires, sometimes supplemented with a Schanz screw, it is attached to the reconstructed tibiofibular articular block.

Reduction and wire placement according to preoperative plan
This illustration presumes an extraarticular fracture, without displacement of the tibiofibular syndesmosis. The distal tibial fracture should be reduced before inserting wires or pins. Adjustment of reduction later is possible but difficult and may compromise stability. Preliminary fibular fixation or the use of a temporary external bridging frame aids reduction.
The location of distal tibial wires and pins should be planned preoperatively. A CT scan is very helpful. For some complete articular fractures, reduction wires (with olives) may be considered for interfragmentary compression and reduction, if desired (see step 8).
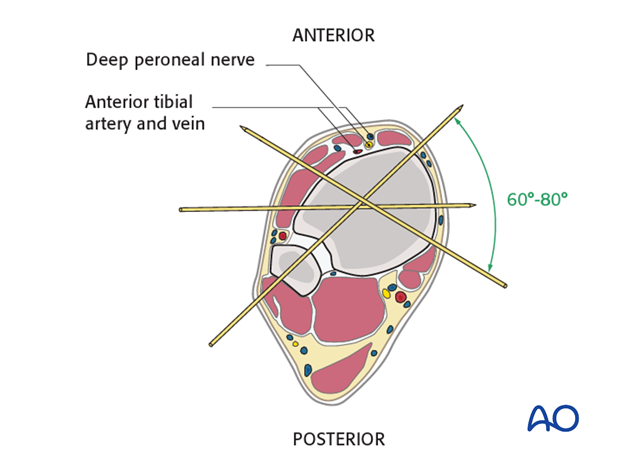
Insertion of first distal tibial wire
This illustration shows the placement of the distal tibial ring and its anchorage into a reduced extraarticular distal tibial fracture. A typical first wire is placed from the fibula posterolaterally through the anteromedial tibia. If the fracture location permits, this should be at least 2 cm above the ankle joint.
Place this first wire perpendicularly to the tibial axis, with sufficient length on each side of the ankle to allow ring mounting. Assemble the selected ring and confirm that its diameter is sufficient. Mount the ring on this first distal wire, with sufficient soft tissue clearance, and located to permit fracture reduction. Tension the wire for stability.
An analogous distal wire might be placed through the calcaneus, for stabilizing a pre-assembled frame with foot ring.
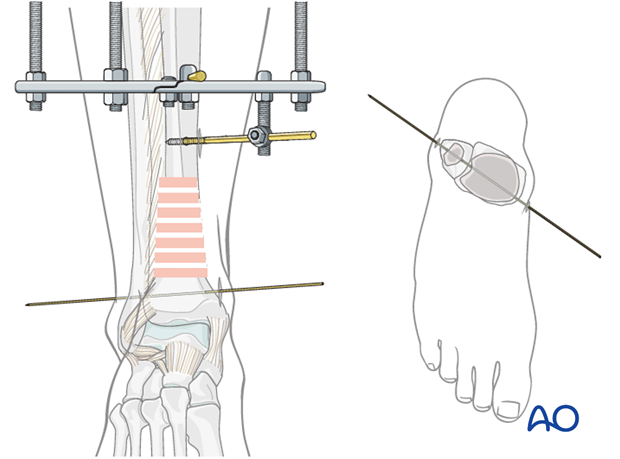
Insertion of second distal wire
Using the ring and an appropriately positioned wire bolt as guide, insert a second wire in its preplanned location. Advance it through the bone and soft tissue with attention to neurovascular structures.
Attach it to both sides of the ring. Tension this wire. Simultaneous wire tensioning may help maintain fracture reduction.
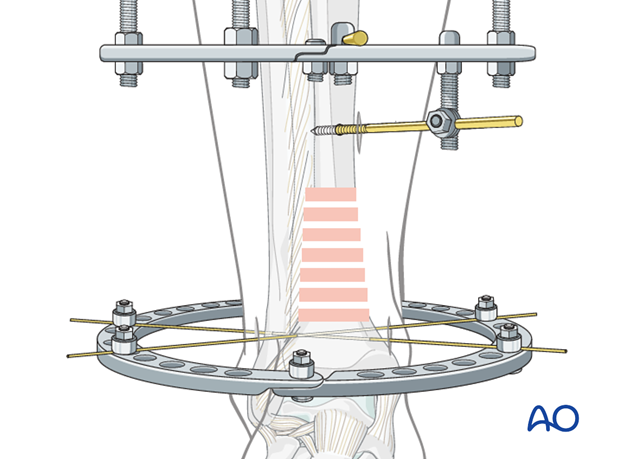
9. Connect distal ring to proximal ring assembly
Maintaining axial alignment and rotation, and adjusting length correctly, attach the distal ring with three threaded rods to the lower ring of the proximal ring assembly. Tighten the nuts to stabilize this relationship.
10. Option: reduction wires
Wire selection
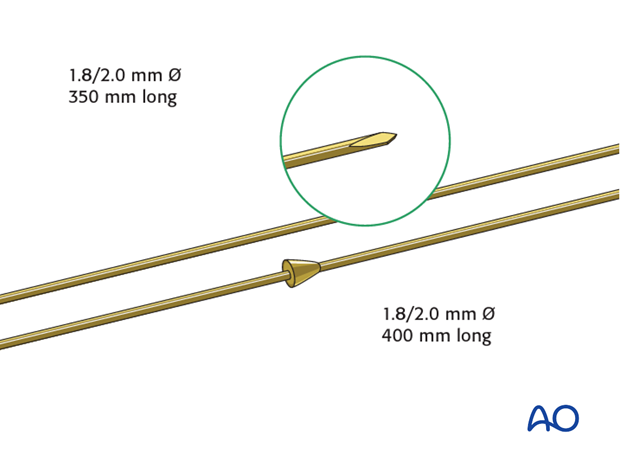
2 mm diameter wires are recommended. Some wires have small beads called “olives”. Wire tension can pull the olive against a bone fragment, and thus these wires inserted and tensioned in opposite directions can produce interfragmentary compression. Such wires must be inserted on the side where the olive is desired.
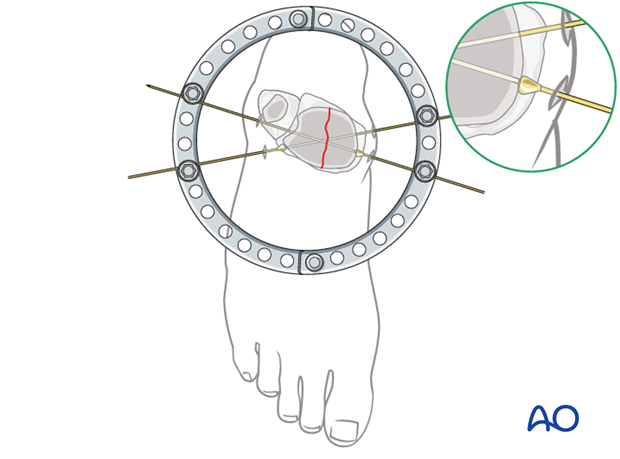
Articular fracture compression
In this illustration, two reduction (olive) wires are used to compress the medial and lateral articular fragments of a suitably oriented simple complete articular distal tibial fracture.
The reduction wires have been inserted according to preoperative plan, perpendicularly to the fracture plane and centrally in each fragment after preliminary reduction. One olive is on each side of the fracture. When tensioned appropriately, these wires will compress the fracture.
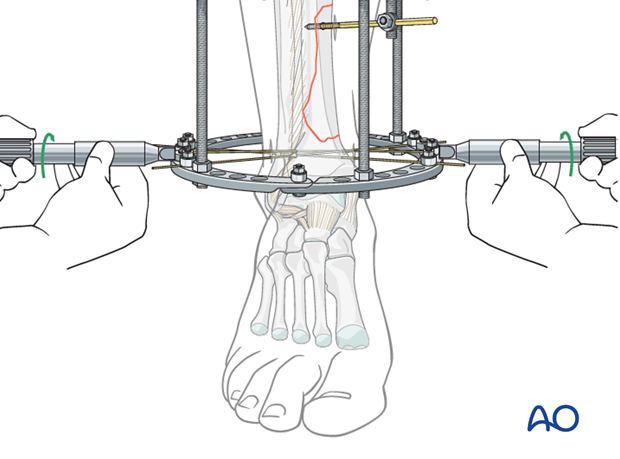
Simultaneous tensioning of reduction wires
Tensioning the two reduction wires simultaneously (or in alternating fashion) helps avoid displacement of the distal fragments during this process.
Reconfirm appropriate alignment. Add an additional wire or Schanz screw to increase stability of the distal fragment. Confirm that all connections are securely tightened, all wires are appropriately tensioned, and fracture alignment remains satisfactory.
Bend the wires around the clamps so they are not prominent and apply end caps.
11. Foot and ankle fixation
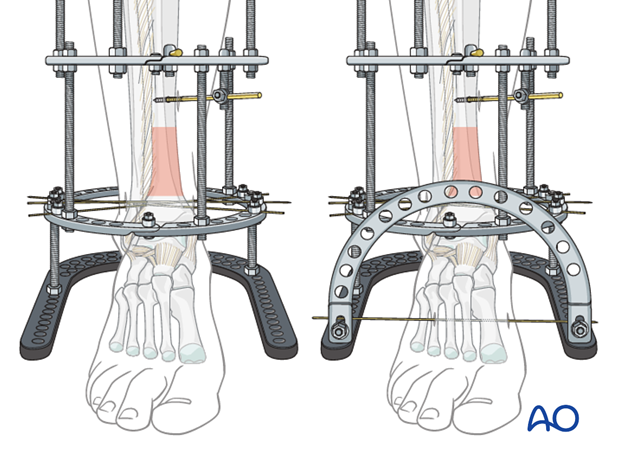
Foot ring
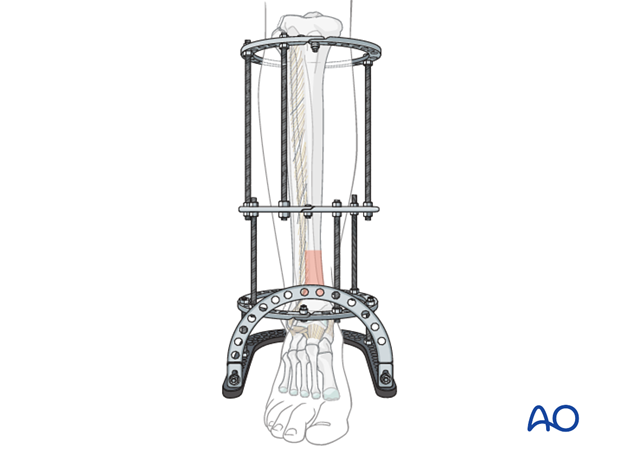
A “U”-shaped foot ring completes the frame. Its anterior open end is closed with a half ring, as shown in the illustration. The ring fixator frame can be preplanned and pre-assembled, for easier application in the OR, or it can be built piece by piece on the leg.

To protect the distal tibial fracture, and avoid equinovarus contractures, the frame can be extended to support calcaneus and forefoot. This may permit early weight bearing.
Two (or more) wires or pins can be placed in the calcaneus, oblique wires in the midfoot, and a wire in the 1st, 2nd, and 3rd metatarsals distally (as shown in the illustration).
A variety of options are available. For example, short extensions permit placement of small Schanz screws into first and fifth metatarsals.
12. Option: preassembling of the frame
The frame may be assembled before it is applied to the injured leg. This option is usually faster but may require more experience. The preassembled frame is attached to the leg with a transverse proximal tibial wire, and then a transverse calcaneal wire distally.
After achieving desired length with axial distraction, additional wires pins are used to complete attachment of the frame to the leg.
During this process, the leg position can be supported with suction tubing slings attached to rings as needed, folded towels placed between leg and rings, or other techniques.
13. Aftercare following application of ring fixator
Ankle joint
External fixation of distal tibial fractures is often extended to include the foot, to avoid an equino-varus deformity. Otherwise consider a splint to support the foot and ankle.
Note: Remember the risk of ankle joint infection with intraarticular wires or pins.
Pin-site care
Proper pin/wire insertion
To prevent postoperative complications, pin/wire-insertion technique is more important than any pin/wire-care protocol:
- Correct placement of pins/wires (see safe zones) avoiding ligaments and tendons, e.g. tibia anterior
- Correct insertion of pins/wires (e.g. trajectory, depth) avoiding heat necrosis
- Extending skin incisions to release soft-tissue tension around the pin/wire insertion (see inspection and treatment of skin incisions)
Pin-site care
Various aftercare protocols to prevent pin tract infection have been established by experts worldwide. Therefore, no standard protocol for pin-site care can be stated here. Nevertheless, the following points are recommended:
- The aftercare should follow the same protocol until removal of the external fixator.
- The pin/wire-insertion sites should be kept clean. Any crusts or exudates should be removed. The pins/wires may be cleaned with saline and/or disinfectant solution/alcohol. The frequency of cleaning depends on the circumstances and varies from daily to weekly but should be done in moderation.
- No ointments or antibiotic solutions are recommended for routine pin-site care.
- Dressings are not usually necessary once wound drainage has ceased.
- Pin/wire-insertion sites need not be protected for showering or bathing with clean water.
- The patient or the carer should learn and apply the cleaning routine.
Pin/wire loosening or pin tract infection
In case of pin/wire loosening or pin tract infection, the following steps need to be taken:
- Remove all involved pins/wires and place new pins/wires in a healthy location.
- Debride the pin sites in the operating theater, using curettage and irrigation.
- Take specimens for a microbiological study to guide appropriate antibiotic treatment if necessary.
Before changing to a definitive internal fixation an infected pin tract needs to heal. Otherwise infection will result.
Weight bearing
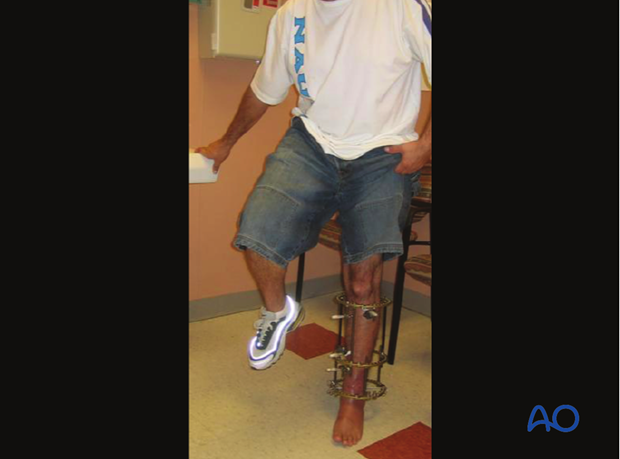
A stable ring fixator may permit weight bearing, even fairly soon after injury. The foot must be included in the frame to avoid loading the fracture site through the talus. Once fracture healing has progressed, the foot extension can be removed to allow motion as well as weight bearing. The fixator is left on the tibia until mature fracture healing is evident radiographically.
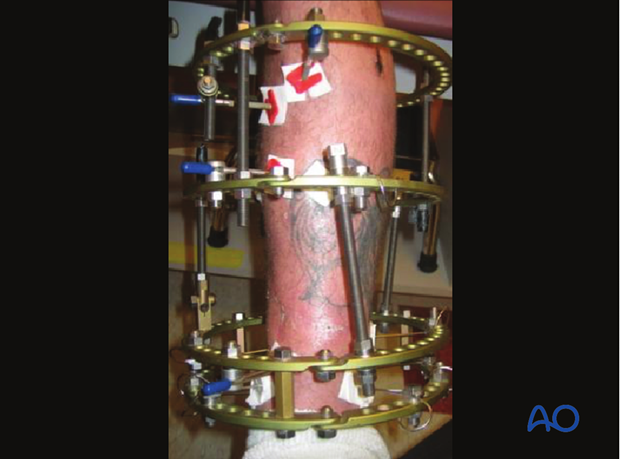
Follow up
See patient 7-10 days after surgery for a wound check. X-rays are taken to check the reduction.
