Extended iliofemoral approach to the acetabulum
1. Introduction
The extended iliofemoral approach exposes the entire lateral innominate bone, by posterior reflection of the abductors, and reflection of short external rotators. It can be extended anteriorly into the first (iliac) window of the ilioinguinal incision.
When necessary, this approach may be used to achieve reductions which are otherwise impossible.
The extended iliofemoral approach is performed in the lateral position, either on a flat radiolucent table or a fracture table.
AO teaching video
Pelvic and acetabular surgical exposure – The extended iliofemoral approach
Exposure
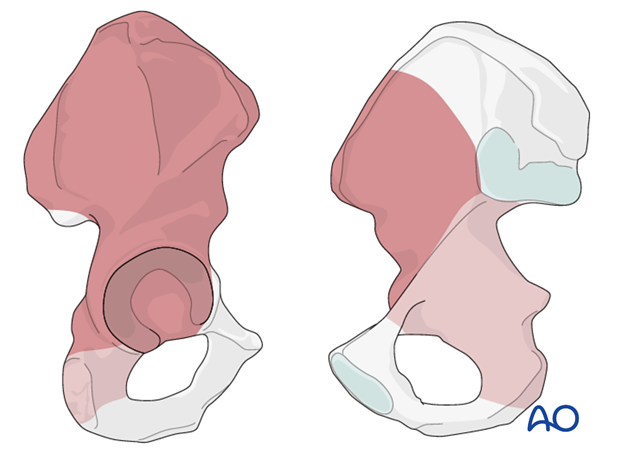
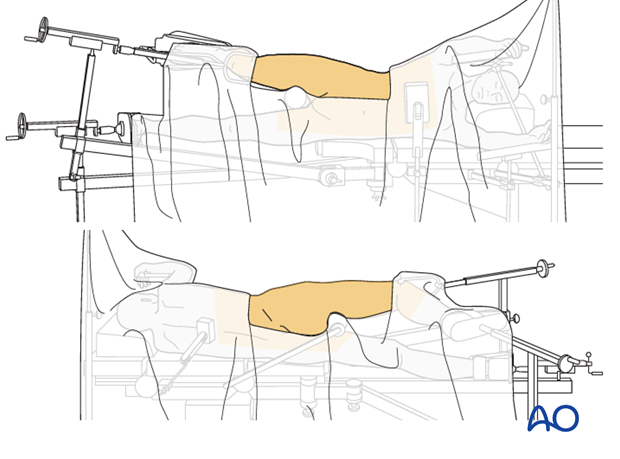
This approach allows direct access to the area indicated in dark brown. The area in light brown can be accessed by palpation and allows clamp placement.
Dangers of the extended iliofemoral approach
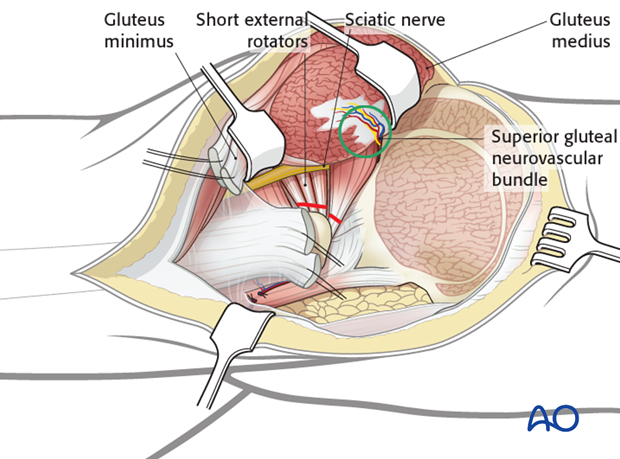
This approach risks injury to the vessels and nerves that exit through the greater sciatic notch. The superior gluteal artery and its accompanying veins lie on the deep surface of the gluteal muscles. During elevation and posterior reflection of the glutei, the vessels may be torn, typically where they lie against the ilium at the top of the notch. If torn, they may retract into the pelvis. Bleeding from the superior gluteal vessels may be difficult to control. The surgeon should remember that packing the notch may help, followed by angiographic embolization, or, alternatively, the use of an anterior vascular approach.
During flap retraction, the vessels may lose flow and become thrombosed, leading to necrosis of the gluteal flap. This must be avoided by continued assessment of the vessels during the surgery and care must be taken to avoid aggressive retraction of the glutei during exposure, reduction and fixation.
Additionally, the superior gluteal nerve runs with the superior gluteal vessels, and is itself at risk of injury during exposure, retraction, and during efforts to control bleeding. The sciatic nerve, which usually exits the notch distal to the piriformis muscle, is also at risk of injury, typically from retractors or prolonged stretching.
The risk of neurovascular injury is increased during exposure of older fractures, and when fracture lines run parallel to the course of vessels and nerves.
Draping
Anteriorly, the torso is draped to the umbilicus, and includes the anterior thigh, while excluding the groin.
Posteriorly, the drapes extend beyond the posterior superior iliac spine towards the midline. The entire buttock must be draped into the surgical field. Care is taken to exclude the anus.
2. Skin incision
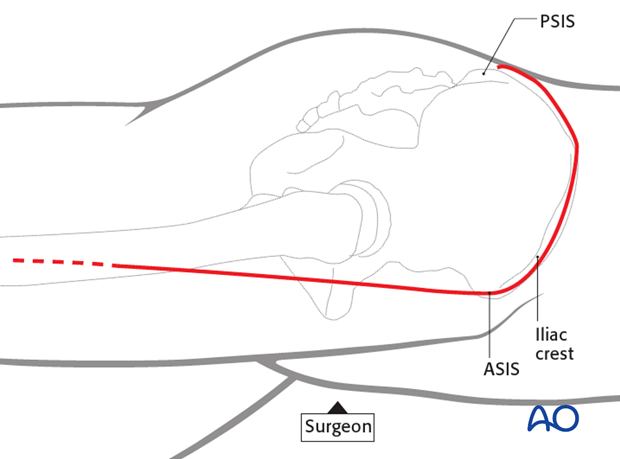
The following landmarks are used for orientation:
- Posterior superior iliac spine (PSIS)
- Iliac crest
- Anterior superior iliac spine (ASIS)
- Lateral margin of the knee
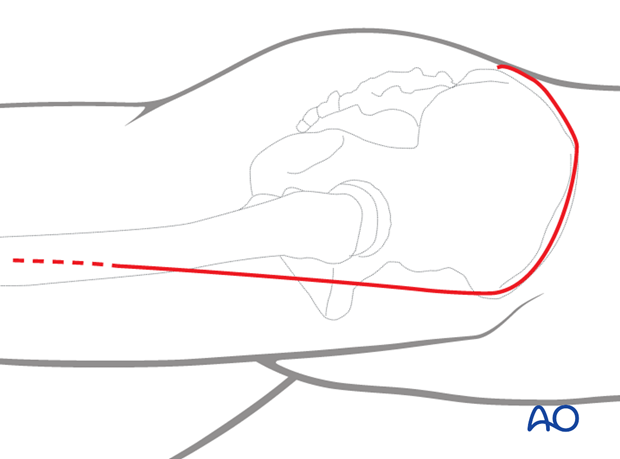
Incise the skin in the form of an inverted “J”. Begin at the PSIS and follow the iliac crest to the ASIS.
Upon reaching the ASIS, continue along the anterolateral surface of the thigh for a length of 20-30 cm and halfway down the thigh. Proceed distally, and then aim posteriorly. This will allow easier posterior retraction of the musculocutaneous flap.
3. Superficial dissection
Expose the iliac crest from the ASIS towards the PSIS using a standard scalpel.
Develop the interval between the abdominal and the gluteal muscles. They have separate innervation and blood supply. The gluteal muscles will be mobilized, and the abdominal muscles left attached to the iliac crest.
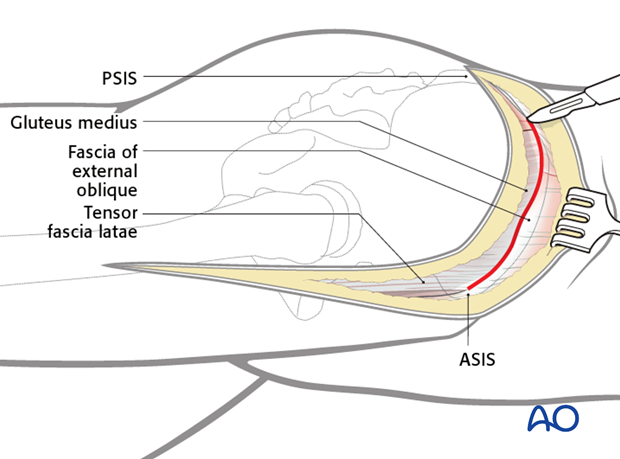
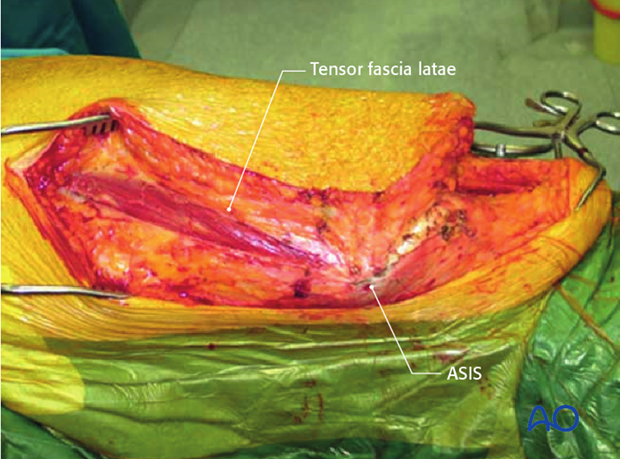
Anteriorly, the interval between the sartorius and the tensor fascia latae is developed from proximal to distal.
First, incise the fascia over the muscle, and define its anterior edge. Retract the tensor laterally. Continue dissection distally through the full thickness of the fascia lata, approximately 10 cm beyond the distal end of the tensor fascia latae muscle. The lateral branches of the lateral femoral cutaneous nerve are severed.
Detach subperiosteally the tensor fascia latae muscle from the ASIS, elevating towards the hip joint. Retract the muscle laterally.
4. Deep dissection
Exposure of the iliac wing
Complete the dissection of gluteal muscles from the top of the iliac crest. Dissect subperiosteally along the external surface of the iliac wing, from anterior to posterior and from proximal to distal.
Proceed further from the lateral aspect of the crest down to the superior border of the greater sciatic notch and posteriorly until the posterior inferior iliac spine are exposed. This last step is better accomplished when the distal part of the incision is completed.
Take care to protect the superior gluteal vessels which emerge from the greater sciatic notch and lie on the deep surface of the muscles. A sterile Doppler can be used to identify the vascular pedicle prior to encountering the vessels at their exit point from the sciatic notch.
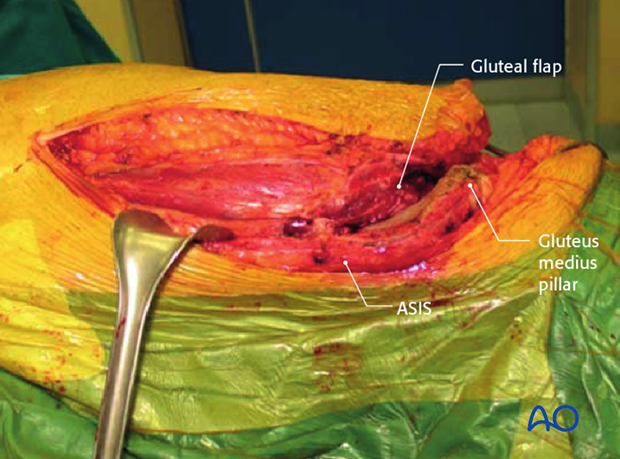
Detaching of the fascia latae muscle
Detach subperiosteally the tensor fascia latae muscle from the ASIS, develop the interval between sartorius and tensor, and retract the tensor laterally.
The lateral branches of the lateral cutaneous nerve are severed.
The deep layer of the fascia lata is below. This incision is shown in the illustration.
Do not make a transverse cut in the distal fascia lata. It will complicate the reconstruction.
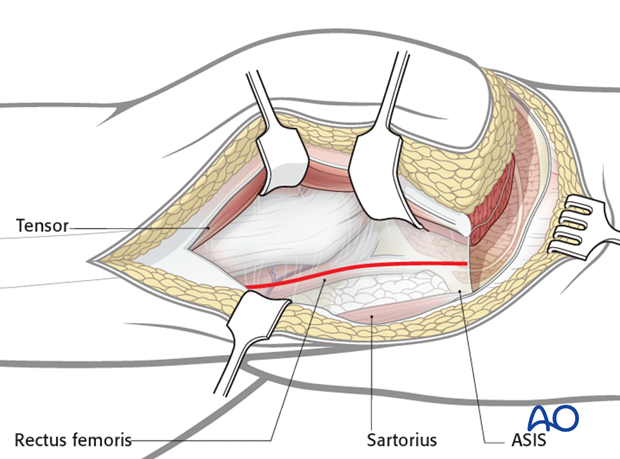
Splitting of the fascia lata
The tensor fascia latae must be retracted and protected. The dissection is along its anterior edge and medial surface.
Once the interval between the tensor fascia latae and the sartorius muscle is developed, a fatty underlying tissue covered by a thin fascial layer is revealed.
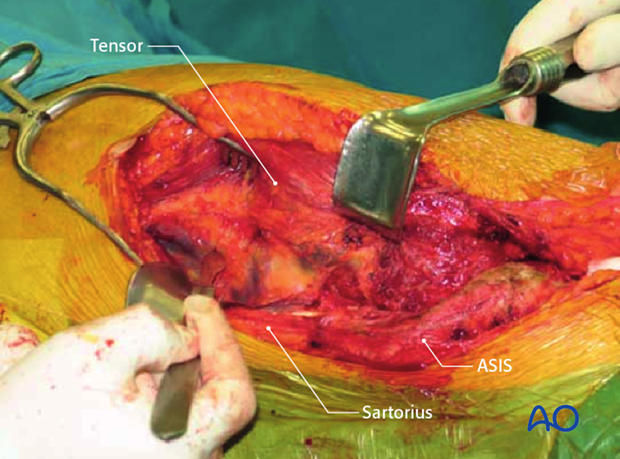
Division of circumflex vessels
Once this fascia is incised, the underlying branches of the lateral femoral circumflex vessels appear.
These vessels must be ligated and divided.
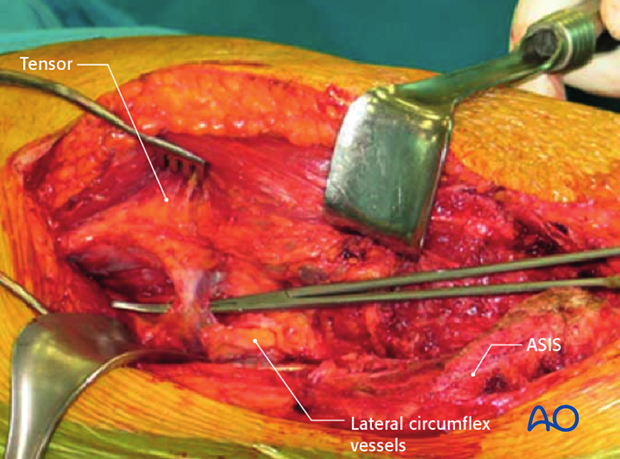
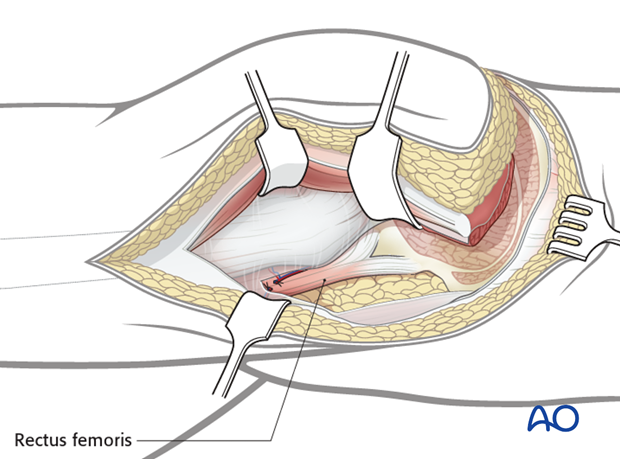
This allows for the retraction of the flap, and provides access to the fascia propria of the rectus femoris muscle. Removing this will expose the direct and reflected origins of the rectus.
5. Access to the hip joint
Visualization of the joint capsule
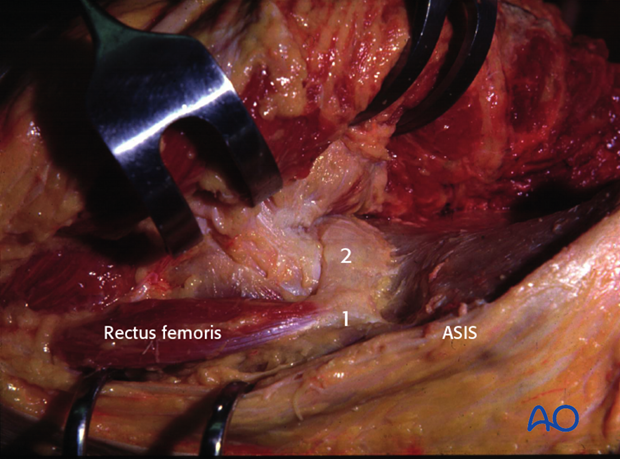
Define the direct head of the rectus femoris (1) as it inserts on anterior inferior iliac spine. Identify the reflected head of the rectus femoris (2) which leads to the hip capsule.
Release the insertion of gluteus minimus muscle
Next, elevate the gluteus minimus muscle from the femoral neck.
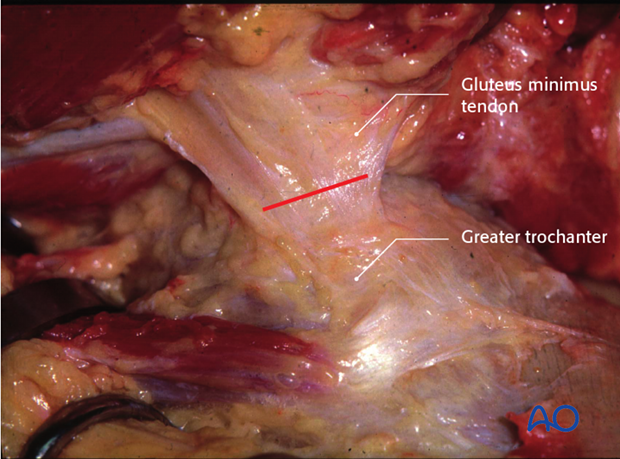
Following the vastus lateralis towards the greater trochanter, the surgeon will see the insertion of the gluteus minimus on the anterior aspect of the greater trochanter.
This tendon has a triangular shape, and a typical mother-of-pearl color. The insertion typically involves both a superficial and a deep layer.
The minimus tendon must be divided, leaving a stump attached to the trochanter for its repair. Tag the tendon ends with sutures for easy identification.
Note
Femoral head protrusion into the pelvis may make tendon recognition difficult.
Release the gluteus medius
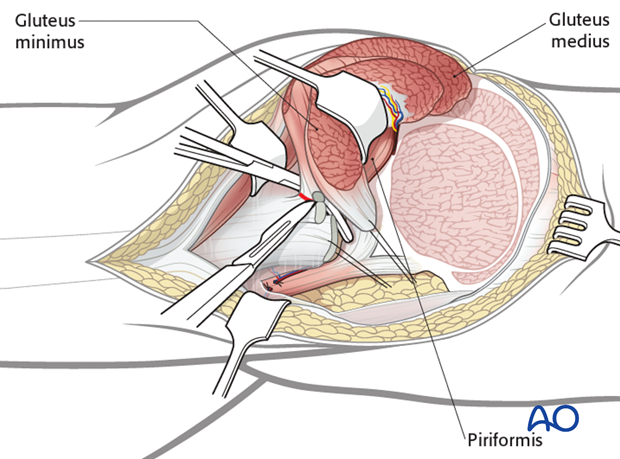
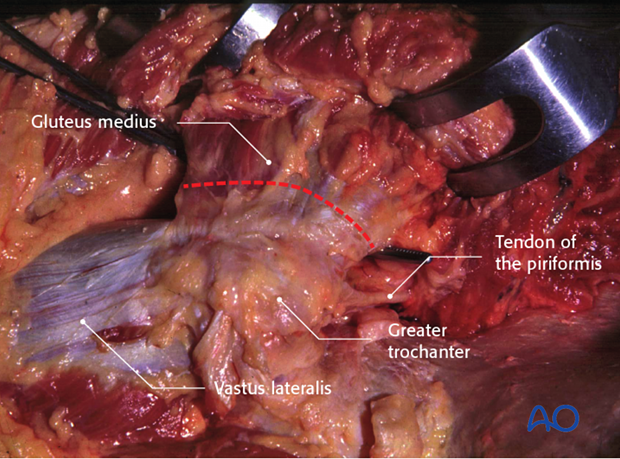
After retraction of the gluteus minimus muscle, the trochanteric insertion and the distal part of the gluteus medius muscle become visible.
Following the horizontal fibers of the vastus lateralis in cranial direction helps to identify the most distal portion of the gluteus medius tendon.
A curved forceps, placed underneath the gluteus medius tendon, will help to define its insertion.
Note
The tendon of the piriformis muscle will be found just proximal and anterior to the medial border of medius gluteus tendon.
Severing the gluteus medius tendon
Once the gluteus medius tendon is prepared, transversally divide the gluteus medius tendon and leave an adequate stump for reattachment on the trochanter.
Option: trochanteric osteotomy
As with the trochanteric osteotomy (see trochanter osteotomy), the gluteus minimus and medius tendon insertions to the greater trochanter can be preserved and an osteotomy, rather than tenotomies, performed.
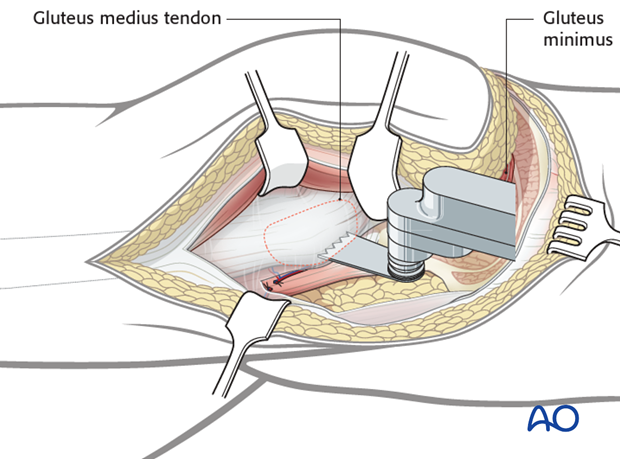
The potential advantage of the osteotomy is the more predictable healing of bone compared to tendon healing required for tenotomy.
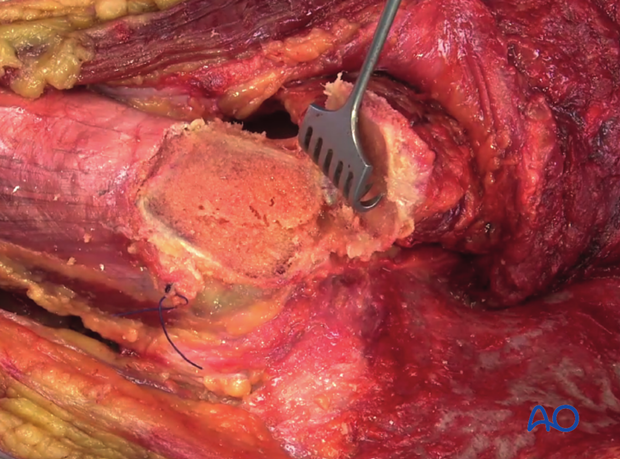
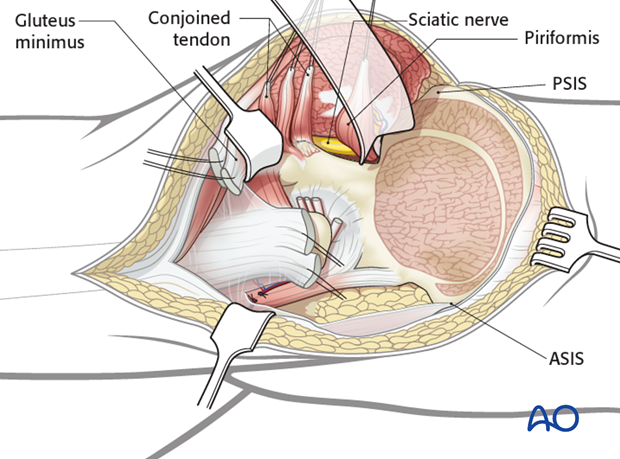
Release the external rotators
With posterior retraction of the gluteus medius, the external rotator muscles will appear.
Continue with careful protection of the superior gluteal neurovascular bundle.
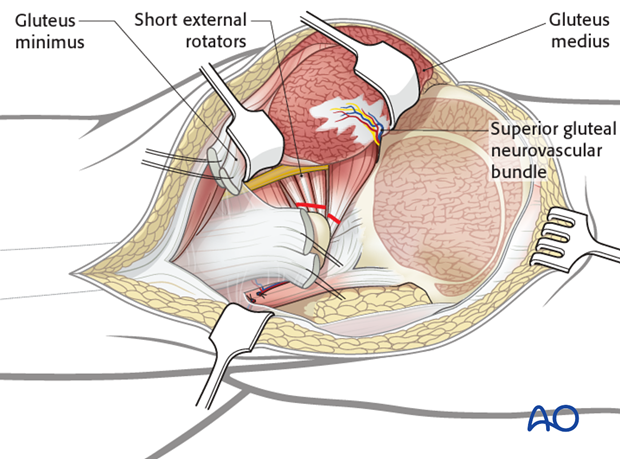
Cutting of the external rotators
Detach the piriformis and obturator internus, and gemelli muscles from the greater trochanter. Tag them with sutures. Posterior column exposure is improved with a retractor placed in the lesser sciatic notch. Protect the sciatic nerve with care, and avoid prolonged retraction of the nerve.
It is important to preserve blood supply to the femoral head by leaving the obturator externus tendon and underlying medial femoral circumflex artery. Dividing the short external rotators 1 cm posterior to the greater trochanter helps avoid injury to the artery.
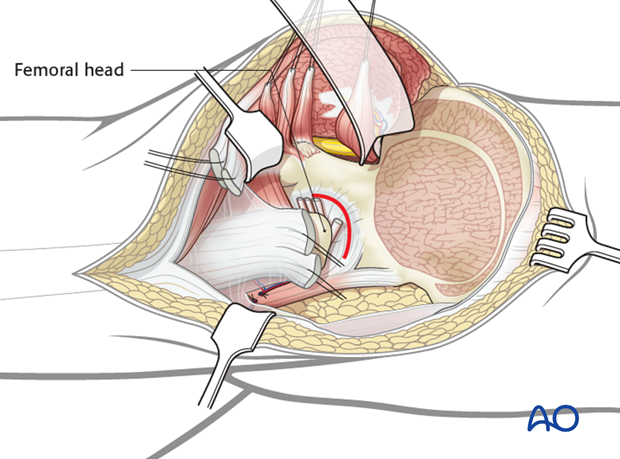
6. Opening of the joint capsule
Open the joint capsule, if necessary, with a curved incision just distal to the acetabular labrum, which should be protected. If the labrum was torn by the injury, it should be repaired during closure.
Take care not to devascularize the posterior wall fragments. These should be left attached to the joint capsule.
Distraction of the femoral head with aid of the fracture table, femoral distractor, or manually, allows cleaning of the joint, and assessment of the articular fracture lines for later reduction.
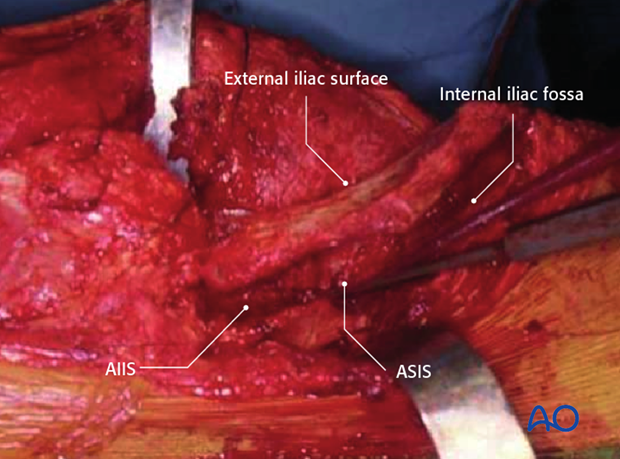
7. Exposure of the internal iliac fossa
Release the abdominal wall muscles and sartorius from the iliac crest. This increases exposure of the internal iliac fossa, and permits introduction of instruments beneath the iliopsoas. The sartorius may be released by an osteotomy that leaves a small fragment of ASIS attached to the muscle. Predrilling for screw fixation can provide for good repair.
Note
The complete exposure of the internal iliac fossa may greatly aid reduction, and can be performed safely in cases of transverse and T-shaped fractures in which no fracture lines traverse the iliac fossa. However, in the case of the both column fracture, the anterior column is separated from the innominate bone blood supply and is susceptible to complete devascularization, if one exposes both sides of the iliac wing. In order to avoid this, one should leave attached the direct head of the rectus femoris and the anterior hip capsule if internal iliac exposure is required.
8. Wound closure and drains
Start wound closure with reattachment of the hip capsule.
The external rotators are then reattached to the greater trochanter.
Reattach the medius gluteus to the greater trochanter with strong sutures, starting medially, close to the piriformis, with the thickest part of the tendon. The repair must be anatomical and mechanically secure. Next, repair the gluteus minimus tendon, recreating the original trochanteric insertion.
Reattach the rectus femoris origin with transosseous sutures. Knee extension will facilitate this.
Now reattach the proximal origin of the glutei to the iliac crest with the hip abducted. Repair the sartorius and abdominal muscles if they were released. Close the fascia, subcutaneous tissue, and skin in layers.
Typically, drains are placed before closure, one along the posterior column, another in the distal portion of the incision, and a third in the internal iliac fossa, if it was exposed.
